Graphic designer and artist Joanna Bean Martin shared with us the technique of how to marbleize the bottom of glassware with nail polish. Without delay, we decided to bring this idea to life. Who knew there was such an easy way to add color to your next meal or party?
Remember, the brighter and bolder the colors you use, the more pleasing the result will be.
Have fun!
To create a marble effect when decorating glassware you will need:
- Flat bottom glassware
- Nail polish of different colors
- Clear nail polish
- Disposable plastic containers
- Nail polish remover
- Masking tape
- Toothpicks
Let's start creating marble overflows.
1)
Wrap the glass with masking tape, leaving only the bottom exposed.
2)
Pour water into a disposable plastic container.
Open all the nail polish bottles and start dripping the polish into the water. Drip the colors one by one until they form layers one on top of the other. 3)
Take a toothpick and move it from the center to the edge, making streaks.
Work quickly so that the varnish does not have time to harden and form lumps. 4)
Immerse the bottom of the glass in the varnish.
Wait until the varnish collects around the sides of the glass and carefully pull it out. Small air bubbles may form, but this is to be expected! 5)
To decorate the next glass, you need to take a new toothpick and clean water.
Allow the glasses to dry completely before applying a coat of clear varnish. 6)
Once everything is dry, remove the masking tape and adjust the design using nail polish remover and a cotton swab. Your bright glasses are ready. All that remains is to wash the dishes and hands. Drink up! Author of the master classErica
Crafts from cups are a great way to spend your time. Their advantages are the simplicity and availability of the source material. This is also a good way to decorate a room for a special event. In addition, according to pediatricians, such homemade products, made by a child, develop fine motor skills of the hands and develop perseverance.
Materials
1) tea or coffee pair (cup and saucer)
2) glue
to connect the “spouting” structure with a bowl and saucer. It is better to use the universal Moment gel adhesive for ceramics, plastic or glass. An alternative can be any other adhesive designed to work with smooth surfaces. A glue gun is also used, but it is intended mainly for working with rough surfaces. There is a possibility that the cup will come off in the near future after gluing.
3) thick
wire
or triple wires. You can use other flexible items, such as old aluminum forks or spoons, or a metal hanger.
superplastic
) is a self-hardening thermoplastic. When heated, it becomes plastic and convenient for giving it the desired shape. When cooled, it becomes hard, elastic and durable.
5) masking tape
– they can replace superplastic
6), can also replace polymorphus. It resembles plasticine, but unlike it, it hardens well in air. Contains natural ingredients (dough made from cereal flour), so it is absolutely safe for children.
7) decoration items
cups: coins, flowers, cones, feathers, candies, beads, buttons, ribbons and much, much more.
Cup assembly process
The process of creating a floating mug is not at all complicated, but there are several important nuances that need to be taken into account when creating it.
The main secret in creating a flying bowl is to choose the right tea pair. The cup and saucer should not be too heavy. If you take this condition into account, it will be easier to create a flying bowl!
We construct the base of the floating cup; this is the element that connects the saucer to the cup. To do this, take a wire of the required length. It is important to note that the distance between the bowl and saucer should be approximately two cups. With these parameters, the flying cup will look most balanced.
Inside the bowl we form a loop from the wire, the diameter of which should be 2-4 cm. This will help to achieve better fixation of the wire in the cup. We twist the second end of the wire into a flat spiral in two or three turns. This way we will get a kind of stand, which we will fix in the saucer.
The tilt radius of the resulting structure should not exceed 45 degrees, otherwise the structure will be unstable!
Polymorphus is the best material when making a flying cup.
Take a piece of polymorphus and immerse it in hot water for 20 seconds. During this time, the material is converted into soft plastic.
We stick the resulting plastic, like plasticine, around the base, giving it the desired shape. If the plastic hardens before you finish the job, simply dip it back into hot water. The prepared base will completely harden within 15 minutes.
If you don’t have this material on hand, you can use modeling compound. An alternative to these two materials is masking tape, which is simply wrapped around the wire base. Or you can wrap the wire with felt or other fabric, after coating it with glue.
An important aspect is to constantly try on the base on a saucer with a cup in order to spot any flaws in time!
You should pay special attention to the edge of your cup in the place where the structure will be attached!
In this place it is necessary to make a kind of step in the form of a support. This way the structure will hold much more securely.
When the base is ready, you can begin fixing it on the cup. Lubricate with glue all surfaces of the base in contact with the saucer and cup. Press firmly and hold for 3-5 minutes. Don't forget to glue a step to support the cup!
We fix the flying cup on soft objects in the desired direction and leave it in this position for 5 hours. During this time, the glue will dry well and securely fix the resulting floating bowl.
When the floating cup is well glued, you need to check how stable it is.
If the saucer is not able to hold the cup, then it is necessary to reduce the radius of the structure until it becomes stable.
The last stage of making a flying bowl is the most interesting and creative. Decorating a spill cup! Apply adhesive gel to the decorative elements and glue them.
It is better to glue the large elements first, and glue the smaller ones last. This will hide small visible defects and gaps between elements.
After all the decorations are glued, you need to let the cup stand for 5 hours so that the glue dries.
The process of assembling a flying bowl is discussed in detail in the Hand-made master class from the Masterclassy website:
Flying mug of fruits and berries
With the help of plastic fruits, berries, and mushrooms, you can create such an abundance of fruits and berries pouring out of a cup. will perfectly complement your fruit and berry
A floating cup can be decorated with bright gifts of autumn. Dried leaves and flowers can also be used. The mug can be replaced with a wooden barrel made from simple ice cream sticks.
Flowers and fruits are harmoniously combined in a floating stream. Butterflies, dragonflies, and ladybugs will be a wonderful “live” addition.
Floating money mug
The floating mug looks very stylish. The design technique of using an unfastening zipper will also add originality to your mug. Keys, bells, old small toys - everything can be used as decorative elements for your mug.
With coins you can also use imitation bills, in which.
The secrets of creating a money mug can be found in the Sveta DIY video tutorial:
The money tap is created using the same principle as the flying mug. Instead of a mug, we accordingly use a plastic tap, and a saucer can replace a small chest or. Coins will look more impressive if they are coated with gold spray paint or varnish.
Master - Anastasia Spitsyna
Cash flows can be depicted using paper bills.
Master - Oksana Ankudinova
You can see how to create a money tap in the DIY Gifts master class:
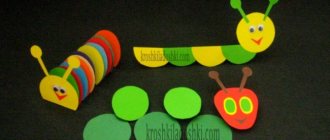
Instructions for making a snowman
At the very beginning you need to build the first level; plastic cups are used for this purpose. You decide for yourself how many of them you will need, since much will depend on the goal you are pursuing, that is, on the desired size of the craft. The glasses can be fastened together using a stapler.
Now start building the next system, keep in mind that this is done strictly in a checkerboard pattern, after the glasses are correctly placed, they are fastened with a stapler.
This is how you need to build levels, doing so until a closed ball is formed; the second ball differs in size, which is known even to children. Don't forget, the largest ball acts as the body, the smaller ball is the head, so you can easily calculate the number of cups intended for the middle basic level.
Now you can move on to decorating, adding your taste to this process.
Thus, after spending a little time, you can always make a beautiful, original and attractive snowman with your own hands using plastic glasses, everything is extremely easy and simple.
If the desire arises, then know that you can make a unique, bright and attractive Christmas tree, again, using plastic cups for these purposes. As for the work in general, it follows the same principle as actually creating a snowman; no problems will arise.
All this leads to the fact that if you add a little patience and imagination to this process, you can always create real masterpieces that will impress everyone around you.
Know that bright and unique ideas and instructions on how to make crafts from cups will help you realize any ideas that interest you.
Now everything depends only on you, do not forget to involve your children in this process so that it becomes even more interesting, there is a great opportunity to get closer to children, and in general there is nothing more beautiful when you create something with your own hands.
Flying mug with birds
The bird is a symbol of lightness and freedom; it is very often found in interior solutions in various styles and variations. This motif is also reflected in the decoration of the floating mug.
A floating mug can become a wonderful house for a nest of birds. The nest resembles a home and an idyll in it.
A cup with daisies and a bird with a nest looks like a real symbol of family, love and fidelity.
A bird with delicate roses, fluttering butterflies and other decorative elements will help create a summer soaring composition.
You can decorate the flying cup with simple pasta. It’s better to take bow-shaped pasta, paint it with acrylic paint, and decorate the middle with pearls. We decorate the mug with them and the waterfall of bows is ready!
This mug looks elegant both in pastel colors and in classic colors - black and white.
Flying mug made of beads
Pearls are the most noble decorative element that will add festiveness and pomp to any craft! A simple white tea pair can be transformed into such a pearl miracle!
A very delicate floating bowl will be made from soft pink and matching pearls. A white dove will perfectly complement the composition).
Beads of different colors will also help create a unique spill cup. Flowers and ribbons of the same shade as the mug will perfectly decorate and complete the image of your cup.
Will make yours more magnificent and elegant:
Handicraft masterpieces cover in their master class how to make an Easter floating bowl:
DelkiRu talks about another type of Easter composition in his master class:
Unusual flying cups
Instead of a flying cup, you can make a flying teapot. This composition will look very original on your kitchen table. When performing such a craft, it is better to choose a teapot of small size and weight so as not to overload the structure. It is better to make a “stream” from a teapot from thin, strong wire (for example, knitting needles) and superplastic.
Hanging flying cups with flowers can become an original decoration! The main thing is to securely fasten them.
Categories,
Decorating glasses can be not only a fun activity, but also a great small business. Homemade glasses for weddings or other large celebrations are always in great demand. And mastering this art is not so difficult. The main thing here is the willingness to work painstakingly with small details, and the rest will follow.
Decorating glasses with your own hands can be different, but it is best for a novice craftsman not to take on complex textured painting (you will also have to specially look for paint that is far from budget) or decorating with silk, but to decorate with ordinary twine. The result is amazing - these glasses look very cute and elegant, and the cost of resources and time is very small.
What do we need?
- glass (don't use crystal, let's start with plain glass)
- twine hammer
- decorative elements (lace, burlap, cardboard, beads, satin ribbons, etc.)
How to decorate glasses with your own hands?
If you are making such a decoration for the first time, we advise you to practice not on champagne glasses, but on regular highball glasses - they are easiest to use.
It is better to do the winding from top to bottom. Determine the height of the decorative element (say 4 cm). At this distance, using a glue gun (or transparent glass glue), fix the end of the twine and begin to wind it in a circle. Carefully coat the side of the twine (and if the glue is transparent, then just cover the entire glass with it). When we reach the bottom, we trim the tip of the twine, carefully pass it over the decorative element and tuck it into the upper part of the winding.
In such glasses, for example, candles look very beautiful.
If you have mastered this, then you will definitely master the decor of champagne glasses without difficulty. We just need to coat the entire part to be decorated with transparent glue, and then carefully wrap the twine around it. The winding should be very tight + no gaps: thread to thread.
We glue a lace braid to the top of the glass (directly on the twine), and you can grab the stem with a ribbon, tie it in a bow, and decorate it with an ornamental flower on top.
If you have a glue gun, use it to attach beautiful pearl beads and rhinestones directly to the twine.
The wrapping looks impressive in any case: both when only the stem of the glass and a small part of the bottom are “hidden”, and when it is half covered. As a rule, white decorative elements are best combined with twine - this makes the product very delicate.
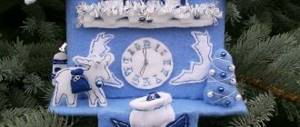
Candlesticks and candles today are, first of all, an element of modern decor that helps bring a festive, calm or romantic atmosphere to the interior of your home. Individuality is especially valued in this matter. You can make candlesticks with your own hands from any available materials: plastic, glass bottles and jars, wood and thick branches, plaster or crystal glasses. Our detailed master classes, which come with step-by-step instructions, high-quality photos and video materials, will help you make unique and beautiful products.
Photos of crafts made from cups
If you want to paint wine glasses for yourself or as a gift, for a wedding or a theme party, rest assured that you will get great pleasure from creativity - because it is done easily, quickly and inexpensively.
Before you begin the step-by-step master class on painting glasses with your own hands, you need to decide on the future design of your wine glasses, so we invite you to get inspired and get original ideas for “glass” decor in the next chapter.
Painting glasses and wine glasses can vary in drawing technique, degree of complexity, use of materials and, of course, subject matter.
DIY candlesticks made from glasses
Today, there are many techniques that allow you to turn an ordinary glass (not necessarily crystal) glass into a luxurious candlestick. The main thing is the desire to create and some free time. The easiest option is to place a candle on the flat base of its stem or pour mother-of-pearl beads into a bowl and place a long candle. With a little imagination, you can make a more mobile candlestick, decorated with various details: beads, seed beads, ikebana, balls, pine cones, small Christmas tree decorations or spruce branches, as in the photo.
Very elegant interior accessories emerge from inverted glasses, where the bowl contains the main decorative elements of the composition.
To create a New Year's themed candlestick from an inverted glass, you will need the following materials:
- glass goblet;
- decor (beads, pine cone, cotton wool, sparkles, any New Year's toy characters);
- glue;
- a piece of foam rubber;
- cardboard;
- candles.
- Using cardboard scissors, cut a circle whose diameter is equal to the circumference of the glass bowl.
- Using foam rubber, apply glue to the edges and glue to it a small piece of cotton wool, beads, glitter and other things that you have prepared for work.
- “Place” the pine cone on the glue in the center of the cut out circle.
- Glue a small layer of cotton wool and toy characters on the sides. Apply glue to the edges.
- Place the bowl of the glass on the composition. Place a candle at the base of the leg.
Such a candlestick can be made not only with a New Year theme. To decorate a marine-style interior, New Year's accessories are replaced with a variety of shells or small pebbles. For the Provence style, a candlestick decorated with dry herbs and ribbon is suitable.
A candlestick made from a glass, shaped like a lamp, the lampshade of which is decorated with perforations, rhinestones, braid, appliqués or flowers, will help to add a touch of romance to an ordinary dinner. Nicely tie a ribbon on the leg.
Making a lampshade is quite easy: make a cone out of paper, fasten the edges with glue and cut off the top. After completing all the decorative work, place the lampshade on a glass, inside of which there is a small candle-tablet, and place it on the table.
Attention! Don't forget about your own safety. Paper is a highly flammable material.
Original do-it-yourself candlesticks: photo
Surely many people at home have several (or even many) unused crystal glasses, wine glasses and cups
.
This article will tell you what original crafts
You can do it
yourself
using these seemingly
unnecessary things
.
The stem of your glass
, but do you feel sorry for giving a lot of money to glassblowers so that they can return the leg to its place?
On the other hand, would it be a pity to throw away such a beautiful glass?
Even a glass without a stem
can be used in some products that this article will talk about.
Do you want creations
Everyone could admire your hands, but you don’t want your
handmade decorations and flowers
to get dusty?
Give yourself a real personal exhibition
!
Place your items on pads
(you can easily make them with your own hands using a circle
of fabric
,
stuffing
material thread and needle
, a circle
of cardboard
the size of a rag,
glue
) and cover the top
with vases, wine glasses and glasses
! If your crystal glasses or wine glasses don’t have a stem, it doesn’t matter, because you won’t need one at all!
You have several completely different vases, cups and wine glasses
, which you would like to put on the table at the same time? Nothing could be easier!
In the photo you see one of the ways to combine vases of different styles
.
For this you will need wire
, silver
beads
, silver
paper
or plain paper and silver paint,
paper
glue knitting needle
.
The paper needs to be cut into tapering strips, wound onto a knitting needle or rod (starting from the wider part of the paper strip), gluing the ends. As a result, you will get oblong paper beads
, which need to be strung on a wire interspersed with round silver beads.
Wire with beads
need to be fixed on vases, glasses and wine glasses.
By replacing regular beads with heart beads, you will get an original decor for Valentine's Day
!
Do you dream of an original crystal chandelier
? Make it yourself from crystal goblets and glasses!
To fix the crystal on the chandelier
, it is better to choose glasses with stems. They need to be passed between two rings made of metal (plastic, very thick cardboard). If you use cardboard, you can staple the rings together in the spaces between the glasses. In other cases, only glue will help.
You can make a chandelier
in several tiers (it all depends on the number of unnecessary crystal glasses you have), make
crystal pendants
from beads.
Well, and the chandelier
need to be hung from the ceiling using strong wire.
By the way, if you wrap the glasses with a light Christmas tree garland
, the chandelier will also shine!
Such an original little lamp
.
The idea
was found on the Internet, presumably on the Osinka forum.
So that from an ordinary wine glass
to make an unusual
candlestick
that looks like
a table lamp with a lampshade
, take an ordinary crystal or glass
goblet
, a warming
candle
(in a metal sleeve),
paper
.
a lampshade
from paper and
decorate
it as your imagination tells you.
stem of a glass
You can also decorate, so you can take a glass with a broken stem, glue it with universal glue suitable for glass and crystal, and decorate the top with beads, seed beads, pasted rhinestones, feathers, threads wound in a circle (including metallized ones)…
Shade
We put it on the glass so that there is always a large hole at the top for air circulation. Place a candle inside the wine glass and light it.
Even old crystal glasses
can help
make your home more comfortable, stylish and original
. You just need to use your imagination! You will definitely succeed!
I wish you creative success!
A single wine glass and trophies brought from vacations from the shores of the seas and oceans can easily be turned into an original candlestick for home decor or as a gift.
In this master class you will see how to make a candlestick from a glass with your own hands, using sea sand, shells and other natural materials for decoration. This accessory will decorate the bathroom, living room or bedroom. Don't forget to put a candle on the table for the New Year and warm the atmosphere on a romantic evening.
Available materials and simple tools
To make a decorative candle holder, find a glass wine glass. Any glass will do except champagne and fortified wine glasses. Their bowls are too narrow to create a marine-themed composition.
Glasses for red wine or cocktails are ideal because their rim diameter is larger than the diameter of the entire bowl. Look in the closet, ask your friends, there are often single glasses left without a pair that can no longer be placed on the table.
Also prepare:
- candle;
- CD;
- sea or river sand;
- sea salt;
- shells of different types;
- a simple pencil;
- transparent universal glue “Dragon”;
- tweezers.
Step-by-step transformation of a glass into a candlestick
Place sea salt in a bowl. Shake it a little so that small debris and small salt crystals fall to the bottom. Generously coat the stem of the glass with clear all-purpose adhesive. Deepen the base into the bowl of salt until the salt covers the entire surface.
Remove the wine glass, turn it upside down and set it aside until the glue dries completely. This will be the working part of the candlestick.
Take a damaged CD from your supplies. It would be better if it was a transparent round plate, which is used to cover the discs in a large package. Cover the central hole with any flat shell. The circle will make the candlestick stable, and the mirror surface will enhance the effect by reflecting the lights of the candle flame.
Place the glass on the disk in the center with the bowl facing down, and use a simple pencil to trace the outline of the edge. This way you will designate the area of the future composition of sand and seashells.
Apply a thin layer of transparent glue to the central platform and cover it generously with sand. Gently press down on the sand and then shake off the excess.
Glue the stones and discarded shells inside the drawn circle in the shape of a cone. At the same time, do not skimp on glue.
Apply glue selectively to the surface of the cone and add sand again. Shake off excess sand.
Select the most beautiful shells and colored pieces of glass and glue them onto the cone-shaped composition and on the inside.
Apply glue to the edge of the wine glass and glue it to the disc.
After complete drying, place a candle on a hand-made candlestick made from a glass and light it.
In a modern home, a candlestick plays not so much a functional role as a decorative element in the design of a room. Thanks to candlesticks, you can create the right mood and give the atmosphere a romantic and festive feeling.
Candles in original candlesticks are appropriate not only for a holiday or a romantic evening, they will perfectly complement any dinner and add a touch of enthusiasm. Unusual and at the same time very beautiful candlesticks from different glasses can be made quite easily with your own hands. Such candlesticks will only emphasize the shape of the candle and create an exciting and mysterious atmosphere at any time.
We offer you a fairly easy master class with a photo of a candlestick made from a glass, which you can make with your own hands. To make it you need the following materials:
- Small thuja branches.
- A piece of paper or newspaper.
- Large tall glass.
- Scissors.
- Spray or regular glue.
Let's start the work by cutting the thuja branches to the required size and laying them out on paper. Then we will apply glue to them; if you do not have it in the form of a spray, you will need to use a brush to apply it.
We paste thuja branches around the glass in a circle; this must be done quickly so that the glue does not have time to dry.
After the glue has completely dried, you need to carefully trim off all excess with scissors. At this stage, all the big work is finished, all that remains is to choose a suitable candle and place it in the glass. As a result, we got a very original and beautiful candlestick that will become a worthy interior decoration.
- read in this article!
DIY wooden candlesticks
Wood is a noble material. Thanks to this, all products made from it, including candlesticks, look aesthetically pleasing in any interior and beyond, for example, in the garden. In addition, it is not necessary to “spoil” some expensive wood. In your work you can use saw cuts, logs, various branches or snags. The more crooked and knotty the wooden blank is, the more interesting the result will be.
Even a person far from wood carving can make a candlestick. For a product made from branches you will need:
- a drill with a furniture pen attachment (the diameter of the attachment should be at least 5 mm wider than the candle);
- dry branches are slightly wider in diameter than a candle;
- glue;
- decor at your discretion (for a product in a natural style, purely natural decor is suitable: pine cones, brown ribbon, ikebana, etc.)
- Cut dry branches into pieces of the required length (usually 10-15 cm).
- Use a drill and a pen to make a notch.
- Squeeze a little glue into the center and place the candle on it.
- Attach the decor prepared for work to the branch using glue.
- Place it on a table, windowsill or shelf and light a candle.
In the same way, you can cut several small indentations in a piece of driftwood or sawn wood, and place a tablet candle in the center.
For a bachelorette party or a wedding ceremony in nature, a white birch candlestick is suitable. An excellent decorative element for such a wooden candlestick can be “windows” in the shape of hearts.
stone Flower
I once saw the book “37 Plants That Will Survive Even Yours” - but I remembered it a few days ago, when we decided to leave the window open at night - and 2 plants in pots froze ((.
In my opinion, this idea is from an Italian magazine for equally hopeless gardeners: painting unusually shaped stones in the form of lush bouquets of flowers and plants. Next, these stones are “planted” in pots and pallets and decorate the winter landscape on the street or on an uninsulated balcony.
Candlesticks and candles today are, first of all, an element of modern decor that helps bring a festive, calm or romantic atmosphere to the interior of your home. Individuality is especially valued in this matter. You can make candlesticks with your own hands from any available materials: plastic, glass bottles and jars, wood and thick branches, plaster or crystal glasses. Our detailed master classes, which come with step-by-step instructions, high-quality photos and video materials, will help you make unique and beautiful products.
Candlesticks made from glass jars
It's very easy to make a candle holder from jars. Decor is placed inside the glass container and a candle is installed. Baby food jars, mayonnaise and half-liter jars are perfect for this product. And if the container is also decorated with some kind of perforation, then all that remains is to complement it with a harmonious decoration and the candlestick is ready to fulfill its purpose.
As decorative finishing you can use: lace, ribbons, ropes, all kinds of beads. Decoupage or enamel coating in the form of a fancy pattern applied to the inner surface of the jar looks beautiful. They can be placed on a shelf, table or hung on a wire from a tree in the garden.
To make a romantic-style candlestick with a heart-shaped window, you will need the following materials:
- any small jars (up to one and a half liters);
- masking adhesive tape;
- ribbons for decoration;
- sharp knife;
- matte paint in light or red tones;
- corrector pencil;
- small candle.
- Apply mounting tape to the jar. Draw a heart on it and cut it out with a knife. Remove excess pieces of tape from the surface of the jar so that the heart remains in place.
- Paint the outside surface. Let dry.
- Peel off the heart. Using a corrector, draw strokes or a beautiful pattern on the surface of the paint. Tie a ribbon around the neck.
- Place a candle inside the jar and light it.
Attention! Painting the inside will look completely different.
The original effect of the candlestick is given by ordinary coarse table salt. To make the product you will need:
- glass jars;
- varnish in the form of a spray in a can;
- silicate glue (transparent);
- sea (bath) or table salt;
- brush;
- alcohol;
- candle tablet.
- The first thing to do is degrease the jar. Apply alcohol to a cloth and wipe the glass surface.
- Using a brush, cover the outside, bottom and edges of the neck of the jar with a thick layer of glue.
- Sprinkle or roll in salt and let dry for at least 3 hours. To give the candlestick some shade, mix salt with suitable food coloring.
- Cover everything with a layer of varnish and dry at room temperature for 2-3 hours. After this time, apply a second layer and dry again, but for 2-3 days. If desired, a third layer can be applied.
- Drop a little wax into the center of the jar and glue the candle.
An unusual “snowy” effect can be achieved by sprinkling the workpiece with salt.
Candlesticks made of plaster or polymer clay
You can sculpt the shape of candlesticks from plaster or polymer clay yourself. Made in an abstract manner, this decor will fit perfectly into an interior designed in high-tech, art deco or minimalist style.
For work, take the following materials:
- gypsum (mix it with water in advance in the required proportion);
- sandpaper;
- candles.
- Roll the prepared plaster into a ball.
- Use a candle to make a hole in it (should be slightly wider than the candle itself).
- Use a knife to shape the candlestick into the desired shape.
- Wet your hands with water and smooth the surface of the product.
- Let it dry for a day. If you use polymer clay, dry it in the oven.
- Sand the surface of the finished candlestick with sandpaper. If desired, paint the product in the color you like.
Photos of crafts made from cups
Note!
Note!
Original and attractive crafts made from cups are always a great way to have fun while decorating your room. If you use your imagination, it is quite possible to create a bright craft whose appearance will be incomparable.
Photos of crafts made from cups on the Internet will allow you to understand that if you wish, you can create something interesting and unusual, exclusive.
Also, parents should learn a simple thing, many psychologists say that by creating such crafts, doing work together with children, you can not only get closer to them, showing your love, but this is also a great way to develop fine motor skills and perseverance.
Candlesticks made from bottles
With a little imagination and effort, simple wine or beer bottles will turn into original home decor. Before you start decorating the bottle, you need to carefully cut off or knock off its neck.
Attention! If a bottle is accidentally chipped, treat it with sandpaper or fill it with silicone to avoid injuries and cuts during work.
A candlestick made from a bottle, decorated with mosaics, looks original. To do this, cover the inner surface with glue and place small pieces of glass, for example, from another bottle, in random order. The easiest way is to use special tools to cut off the bottom of the bottle and cover the candle with the top.
A candlestick made from a plastic bottle looks simple, but at the same time original and beautiful. To work you should prepare:
- plastic bottle 1.5-2 l;
- scissors;
- glue moment.
- Cut off the neck and bottom of the bottle.
- Using a hot knife, make a hole the size of the neck in the bottom.
- Apply glue to the neck and connect the two parts. Let it dry.
- Paint the surface of the finished candlestick, place it on top and light the candle.
Whatever technique you choose to make a candlestick, homemade decor always looks new, original, and individual.
Benefits of making crafts from cups
Making easy crafts from cups for children has many advantages. Children, engaged in this type of creativity, become more:
- attentive;
- independent;
- diligent;
- neat;
- patient.
By collecting such trinkets, they acquire skills in working with glue and scissors, which will undoubtedly be useful for them in kindergarten or school. The completed crafts will remain a pleasant reminder of childhood.
We should also not forget that children who engage in handicrafts develop their brains much better than their peers who are not engaged in such work.
As a result, if your little one has difficulty communicating with peers or has poorly developed logical thinking, then without a doubt you need to start creating original crafts from cups with him.
Here are other advantages of such homemade products:
- low cost;
- ease of manufacture;
- beautiful appearance;
- no need for special knowledge and complex tools.