Matches, if you look closely, look more like miniature logs, and the first thing that comes to mind when thinking about crafts is how to make a house out of matches with your own hands. You can build from them either with or without glue. This article will describe both options.
For beginners, it is recommended to assemble a simple house based on the principle of a well. It is assembled from 7 boxes of matches on some kind of stand. Detailed video at the end of the article.
The basic design for more complex crafts is a cube. Having learned how to assemble it, it is much easier to master the construction of fortresses and multi-story buildings.
Cube assembly steps:
The simplest crafts:
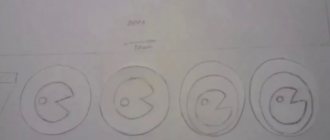
Match wheels:
Small well of matches:
Mill from cubes:
The benefits of crafts made from matches
“What is the benefit?” - you ask.
Crafts made from matches can truly be a work of art. And each art, in turn, develops in a person a sense of beauty, perseverance, hard work, discipline, creative and spatial thinking.
Take a match in your hands. It is small, wooden, and has four sides. Hold it in your hands a little longer. Now you have your own feelings about this subject.
Small materials develop fine motor skills, and long-term work with them calms the nerves.
Construction
Interesting products are created using the design method. To do this, you need a fixed frame: holes are made in the stand up to 5 mm thick. Matches are stuck vertically into them. The rest are fixed between supports at different angles. This method is used to construct wheels for water mills, original boxes, and three-dimensional figures.
Using the construction method, original three-dimensional panels are created. Matches go well with fabric and colored cardboard. The following masterpieces are complemented:
- large coffee or corn beans;
- pumpkin seeds;
- beads;
- braid;
- pieces of satin ribbon:
- other decor.
What you will need for work:
- tweezers;
- flat container for glue;
- cotton buds;
- knife, enough stationery;
- scissors.
Who can practice match art?
The art of matches, like love, is suitable for all ages. For children, crafts from matches that they make themselves are a way to acquire new skills and knowledge, and for an adult, it is an opportunity to try something new and spend time productively.
A person is constantly looking for a way to self-realize, and after trying yourself in this creativity, perhaps you will realize that this is exactly the way you were looking for.
Match house with glue
Consider the option of creating a house of matches using glue. This house is easy to assemble and is suitable if you or your child are taking on a craft of this kind for the first time. Use the instructions so you don't miss a single moment:
- Decide what the match house will look like. If you are planning a cute rustic option, leave the sulfur heads: they will give a fairy-tale look and are easier to play with. If you are planning a house in a modern style, it is better to cut off the heads. In addition, do not forget that for small parts you can shorten the matches to length using a utility knife.
- Prepare the glue: the ideal option would be to pour a portion of the adhesive onto a saucer. This way the glue will be available at any moment, and it will be easier to regulate the amount of gluing substance. Glue the parts together with a toothpick.
- Prepare matches: select smooth specimens, without nicks or irregularities.
Now that everything is ready, start creating the house. The next steps will be briefly described below.
Foundation and walls
Given that you are working with glue, it is not necessary to build a house using the same principle as a matchstick house. The simplest option for creating a foundation and walls would be to alternately glue matches to each other. The height of the elements is determined by you yourself. Make four walls and glue them together.
Window
The easiest option is to cut out windows on finished walls with a utility knife. Firmly strengthen the dried wall on a hard surface and use slow, pressing movements to cut out a rectangle or square. Glue the edges of the windows to secure the cuts.
Roof
The roof of the house can be made from cardboard or glued together using matches. An excellent option would be to alternately fasten short and long logs. The attached photos of matchstick houses will help you better see how to properly fasten the mini-logs together.
Workplace
The place where you will create should be well lit and spacious. To do this, you can sit near a window or use a good lamp.
It is best to work on a table so that you can move your hands freely and additionally place all the necessary materials nearby.
We work with children
It has been proven that working with matches strengthens the nervous system. Children are interested in creating panels on colored cardboard. Before work, pour the matches out of the box and put them aside:
The sulfur heads are dipped in office glue and dried. Now matches can be used by children. It's easy to make a beautiful applique out of them. First, the outline of the figure is drawn on the cardboard. The matches are carefully glued along the contour. Then, using the mosaic method, sectors parallel to each other, the pattern is completely filled with matches. If necessary, they are cut to the required size at a certain angle or straight. From a distance, the rows of matches resemble shading. For the template, any contour drawings of animals and toys can be used. If desired, the pictures are complemented with decor.
Materials and tools required
First of all, these are, of course, matches. Chances are you have a couple of boxes lying around in your kitchen cabinet. And if not, then it won’t be difficult to purchase them at your nearest grocery or hardware store.
We recommend that you buy more, so that later you will not be distracted from the process, and if something remains, it will always come in handy on the farm.
Scissors or a utility knife, but wire cutters or nail clippers are best. They make it much easier to separate the ignition head from the handle.
Glue "Moment". It sets quickly and prevents the structure from spreading, but PVA will also work. If your child is doing the work, then it is better to fasten the matches together with small pieces of plasticine.
Thick cardboard for attaching crafts or drawings to. Pencil and ruler for sketching the outline of the drawing.
Choosing glue
It is no secret that the matches will have to be glued together with an adhesive solution. Therefore, you need to select the appropriate glue in advance.
"Moment Joiner"
A common glue used when working with wood. When creating the mixture, plasticizers and other components are added that make the solution more viscous and reliable.
PVA
To secure wooden materials together, you can use regular PVA glue. Its advantages include:
- low cost;
- moisture resistance;
- frost resistance;
- reliability;
- no shrinkage.
"Moment Montage"
Among the reliable adhesives for wood, Moment Montazh stands out. This product does not deteriorate when exposed to low temperatures and dampness. The characteristics of the glue include transparency and speed of gluing.
Let's get started
Now you are 100% ready to start your creativity.
Our small master classes are in order: from the easiest to the most difficult. As with any other activity, we recommend that you start with the basics and gradually move towards the top, making the task more difficult step by step.
Construction of a house
Now let's start construction. First, let's form the foundation of the match house. Place two matches in parallel at a distance from each other, and eight more in a row on top so that they are perpendicular to the bottom ones. They must be laid very carefully and in the process make sure that the outermost matches form a quadrangle with our stand. Now let's lay out a new row - and again perpendicular to the previous one. The number of matches should not change.
To give the house beauty and aesthetics, you need to make sure that the match heads are arranged in a circle.
At this stage, you can stop and enjoy the resulting well, or you can continue construction and make a house with your own hands. If you decide to continue, make another layer of eight matches, and then place six perpendicularly. Place a button or coin on top. Take your “well” and place one match at each corner so that they pierce the top layer and go into the base. Now that the house is secure and not moving apart, begin installing new elements along the walls. After that, press the parts that were inserted with the button into the house, squeezing the product on each side. As you can see, the foundation of the “well” served as the foundation for the roof. Now add two match rows to each of the walls. One of them should be vertical, the other horizontal. Once the work is completed, the house will need to be compressed again.
Match cube
We move from two-dimensional space to three-dimensional space. Large complex match structures are based on simple geometric shapes, the execution of which you need to master. And we'll start with the cube.
Stock up on enough matches and a ton of patience. If you don't succeed the first time, don't give up and try again.
So let's get started!
- Two matches are laid out on the work surface, parallel to each other, at a distance of approximately 3 cm.
- Perpendicular to these two matches, 8 more are laid out, in the second tier.
- With the third tier we again lay out eight matches, parallel to the first tier and perpendicular to the second.
- We have received the basis for our future cube.
- The next tier will be laid out perpendicular to the previous tier. In the fourth tier, 2 matches are placed parallel to each other, as on the first tier.
- The fifth tier is again 2 matches parallel to each other, but perpendicular to the previous tier.
- Repeat steps 5 and 6 five more times.
- After these steps, all that remains is to complete the frame by placing 8 matches in parallel, and then 6 matches, perpendicular to the previously laid eight.
- To prevent the structure from collapsing, place a coin on top.
- Stick 4 matches in the corners of the cube, and then repeat the same around the entire perimeter. The heads should point up.
- You will get a square of match heads, place a coin in its center and press down the sides so that they fit snugly against each other.
- When the heads are clearly marked, you need to insert 6 matches between them, and another 6 matches perpendicular to the previous ones.
- To complete the craft, you need to insert matches into all the remaining holes.
And this is just the beginning. Practice and develop your skill. Study yourself and help your child create beautiful things.
And who said that matches are not a toy for children?
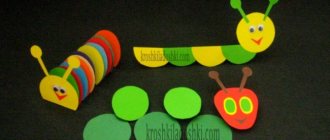
Sun for children's crafts
The materials for work are similar to the previous method, but for the frame of a three-dimensional craft you will need any small plastic ring.
The sun for a children's product can be created on a cardboard base, or you can make it a light and mobile option. To make a three-dimensional model, you will need to prepare two circles of slightly larger diameter from yellow cardboard.
Matches are glued to the back of the plastic base to form a sun. Next, cardboard parts are glued on top of the plastic circle so that they hide the junction of the matches and the plastic.
You can decorate the sun by adding a funny face to it.