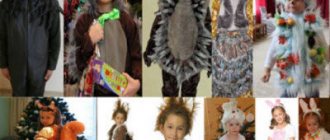
Theatrical performances for children are always accompanied by colorful carnival costumes. Among their diversity, it’s easy to recognize popular fairy-tale characters, cute animals, or children’s favorite vegetables and fruits.
One of the popular options for this outfit is the lemon costume. It is suitable for a costume performance based on the fairy tale about Cipollino or a specialized performance. This outfit is easy to make yourself.
An outfit for the holiday can be done in different ways.
From foam rubber
This option is one of the most common. This outfit will be a complete imitation of a real fruit.
Materials:
- foam rubber - 1 sheet;
- glue;
- scissors;
- yellow fabric (for example, satin);
- pencil;
- rubber;
- threads;
- needle;
- sewing machine.
Completing of the work
- Draw a rectangle on a sheet of foam rubber. It must correspond to the required length of the product and completely envelop the child
. We divide it into several more identical rectangles. Slightly round the top and bottom edges and cut off excess material. - Using glue, we connect the elements at the top and bottom, fastening the halves. Then we connect the main sides of the canvas. Use a pencil to mark the holes for the arms. Carefully cut out the sleeves. The base for the costume is ready.
- Next, you can move on to decorating the fruit itself. To do this you will need fabric of a rich yellow shade. You can use a material with a slight metallic sheen - lurex. We cut out a cover from fabric that will match the size of the base. It is recommended to make it a looser cut, leaving a few extra centimeters.
Advice
: When cutting out parts, do not forget about seam allowances.
- On the wrong side, carefully bend the seam allowances and pass a zigzag stitch on a sewing machine
. In the absence of a household appliance, stitches can be applied manually. We perform similar actions on the upper and lower half of the cape. - An elastic band should be inserted
into the bottom and top seams . It should be narrower at the top, but not squeeze the child’s neck. At the bottom you can leave a size that corresponds to the parameters of the base. - Finally, we put the finished cape on the foam base and make slits for the arms.
The suit is ready. The addition will be yellow trousers and a white turtleneck
.
Advice
: This style can be used as a basis when creating an orange costume. In this case, the cape is replaced by a product in orange tones.
Ready-to-wear base
You can also assemble a suit from ready-made products that are available in the child’s wardrobe. The main thing in selection is to pay special attention to the color palette.
You should select products without bright prints, ornaments and designs, and exclusively with a monochromatic texture.
- A T-shirt or shirt in a rich yellow shade
is suitable as a top A vest or jacket can serve as an addition. - The bottom is selected according to a similar rule. These could be shorts, sports tights, trousers or jeans
. A great advantage would be products decorated with a shade of green in the neckline, waistband or bottom seam. The green stripes will imitate the leaves of a real fruit.
Advice:
a winning option would be a full-fledged suit consisting of a shirt, jacket and trousers in yellow shades.
Making an Ant Suit
Determine what elements the costume will consist of and what will make it look like the desired insect. The key points are the voluminous protruding parts of the body and the antennae on the headdress. Their creation and decoration should be given special attention.
Version 1
Let's make an ant costume with our own hands, a photo of which you will see below.
You will need:
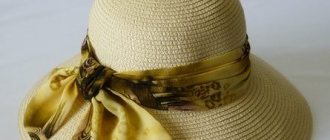
- a cap;
- wire;
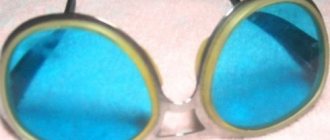
- dark and white material for the eyes (felt is better), or round plastic eyes;
- glue;
- base: sleeveless vest or turtleneck;
- fabric, padding polyester for filling.
Glue eyes to the front of the hat. They should be large and clearly visible. Thread the wire through the top so that you get tendrils, wrap it in fabric and sew along the edges.
Next, you need to sew a pillow-tail, which will serve as part of the ant’s body. For stuffing, use padding polyester or other filler.
The color of the base, cap and fabric should be the same, use black, brown or red.
Version 2
Another version of the suit comes with a sleeveless vest and shorts.
It is recommended to use brown velor, velvet or satin as fabric; these fabrics will look most advantageous at a performance. At a craft store, find a heat-based ant applique to glue to your costume later.
As a result, you should end up with a DIY ant costume for a boy, as in the photo below:
In this model, the sleeveless vest comes with a peplum. Cut out the details according to the pattern and sew:
Sew a zipper at the back. Alternatively, you can do it with buttons. The length of the peplum is given as average, if necessary, increase or decrease it.
After the sleeveless vest is ready, start sewing the shorts. The pattern for children's shorts with elastic is very simple:
Leave seam allowances of 1 cm on the sides and 2 cm on the bottom. The allowance on the belt should be at least 2.5 cm in order to make it more convenient to sew on an elastic band.
Cut out the fabric. Fold the blanks right side inward. Sew the side seams and crotch seams. After this, fold the blanks along the seam of the seat and sew the parts.
Finish the bottom edges.
Then start sewing in the elastic. Measure the desired length, fold the edge of the fabric and stitch. It is better not to grab the elastic band with the needle, let it be free inside.
All you have to do is turn the shorts inside out and you're done!
Version 3
An easy and effective DIY ant costume for a girl is a brown tu-tu skirt with a mask or hat. As a backup option, a skirt is suitable, short in the front and long in the back.
Let's make this skirt. Materials:
- tulle
- rubber
- satin ribbon
Determine the length of the skirt. Hint: for a girl under 7 years old, 30 cm in length is enough. Cut the tulle into ribbons, each strip should be 2 times longer than the skirt, plus 3-5 cm for an allowance. The width is sufficient 10-15 cm.
Measure the child's waist circumference and cut the elastic according to these measurements, sew it into a circle. You will need a base to work with, such as the back of a chair. Put a rubber band on it and get to work.
Fold each ribbon in half under the elastic, you will get a loop on one side and the ends on the other. Thread them through the loop over the elastic and tighten. Don't make the knot too tight.
Then lay the skirt out on a flat surface and check the length. Trim the strips if necessary. Decorate the waistband of the skirt with a satin ribbon.
You can replace brown tulle with organza or similar material. Use fabric scraps to decorate a hat or mask.
Models and styles: gathered, curvy
You can come up with another way: a fluffy, several-tiered skirt, gathered at the waist (like a ballerina’s tutu). Fitted bodice and puffed sleeves with frills. On the sleeves, embroider with confetti sparkles - flowers. Cover the bodice with artificial small flowers of different shades. Place pieces of green rain between them. Then work on the skirt. Decorate it in the same way, trying to make the outfit, as a whole, look harmonious and not tacky. Although, if you are making a spring costume with your own hands (photos are attached), for example, for a kindergarten, then brightness will not hurt! Choose from chiffon, lace, guipure, silk or satin materials.
We complement the suit with accessories
In order for an ant to become an ant and no one confuses it with another insect at the holiday, you need to make a little cap with eyes and antennae.
The headdress can be fabric or cardboard. In the second case, the task is simplified.
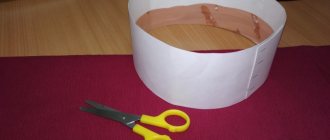
We'll tell you how to make an ant costume with your own hands from paper. The simplest type of mask is a paper strip 3-4 cm wide around the head, to which an insect's muzzle is attached to the front. Carefully cut it out and paint it with gouache or acrylic.
The second option is a more complex design. Make three paper rings. The central one will be put on the head, and two smaller ones at the edges, decorative. Glue the eyes and legs of the ant (6 pieces). You can choose the color yourself.
Spring in a sundress
Spring is often compared to a young girl. According to ancient Russian traditions, she wanders through the fields and forests in her elegant sundress, and in each trail a blade of grass or a flower grows. So you are invited to make this version of the costume. You need a white shirt or blouse with long puffy sleeves, at the cuffs. Choose the cut of the sundress according to your taste: straight, flared, with a yoke. Satin is a very good material; satin and silk are suitable, but preferably one-color. Cover with elegant ribbons or “rain”. Place a wreath with ribbons on your head. You will be able to make an excellent “Spring” carnival costume with your own hands. Or replace the wreath with a silk scarf. Such an accessory will also be quite appropriate and will fit into the folk color of the outfit. Moreover, sewn flowers will not allow the image of spring to be confused with any other carnival image.
We complete the image of the ant - apply makeup
To complement the image, draw a beautiful picture on the child’s face. Remember that face painting is not recommended for children under 3 years of age. If there are scratches or irritations on the skin, also do without makeup.
To apply face painting, you will need:
- special paints for painting on the face (gouache, acrylic, watercolor and others are absolutely not suitable because they can cause allergies);
- brushes (at least one thin and one thicker);
- sponge;
- wet wipes to adjust the drawing.
Choose a suitable image. Print it or open it on your screen.
Start with the background. To ensure an even base, use a sponge and apply the paint in a circular motion. There is an option to do without a background and depict only an ant.
Use a wide brush to paint large details, starting with light shades and moving on to dark ones. Draw small details with a thin brush. At the end, leave the drawing to dry and apply white elements on top (for example, highlights in the eyes).
The festive image of the little ant is ready!
View all ant costumes
Fairy spring
A spring suit consisting of a white chintz blouse will also help create a feeling of freshness and lightness, touching and tenderness. The skirt and cape should be made of velor the color of a young apple. Embroider them with flowers - it will remind you of a colorful spring meadow. Make a red wreath on your head. The greenery of the suit will remind you of the first grass and sticky fragrant leaves that have just blossomed from the buds. And the color red is associated with the popular saying that spring is red, that is, beautiful. The costume will be spectacular, colorful, simply chic!
Interesting ideas and wonderful implementations for you!
How to make your own ant costume at home
The hard-working ant has neither a hat nor a coat. In the summer I will build a house and then winter in it.
CARNIVAL COSTUME “ANT”
consists of elements:
1. Vest 2. Pullover 3. Trousers 4. Headdress
Recommendations for choosing fabrics and accessories For the costume you will need: dense dark brown fabric that holds its shape (taffeta, raincoat), light brown fabric, bugles, wire, elastic, zipper.
Description of work Vest. Using any suitable pattern, sew a long straight vest. Stand collar, zipper on the back. Provide a drawstring at the waist and bottom of the product. Insert two rubber bands. Sew triangular mini-sleeves to the armhole. On the chest, make an “ant and anthill” applique from light brown fabric. Embroider the “ant” motif with bugles along the contour, and embroider the “anthill” motif not only along the contour, but also inside. Make stitching on the shoulders (see sketch). From the same fabric, cut out two oval pieces and stitch. Place several decorative horizontal stitches. Fill loosely with padding polyester. Sew the resulting “butt” to the vest.
Pullover. Sew a long sleeve pullover using any suitable pattern. Sew wide cuffs of dark brown fabric along the bottom of the sleeves. Make stitching on the elbows (see sketch).
Trousers. From light brown fabric, sew straight, slightly flared trousers with an elastic band according to any convenient pattern. Place a decorative stitch on the knees (see sketch), and stitch a wide strip along the bottom of the trousers - trim made of dark brown fabric.
Headdress. You can sew a hat with a mustache (description and pattern here). You can make a headband from the main (or knitted) fabric. Bend the antennae from the wire and attach it to the headdress.
Application. Motifs for embroidery and appliqués.
Description, sketch, diagrams: Lyudmila Orlova, coordination and layout: Tatyana Evtyukova
The material was prepared specifically for the children's portal "Sun" and published on December 5, 2008.
For personal use only! Republication in other publications is prohibited!
source
Children's matinees are often not particularly original. Parents don’t want to spend their already small amount of free time sewing a custom suit.
However, what to do if a child, instead of standard bunnies or snowflakes, wants the image of an ant? Or if this outfit is required for some matinee?
A parent will need a little strength, patience and unlimited imagination to sew a cute costume for a children's party with their own hands.
We will help you do this work, show you a photo and tell you how to sew such an outfit with your own hands.
Required tools and materials
Before starting work, the parent must have a sufficient number of necessary materials and tools in stock. To work you will need the following.
- Thick fabric in brown or black.
- Wire. Its thickness does not matter; it can be either thick or thin.
- Foam rubber.
- Scissors.
- Sewing machine, if available. Otherwise, you must have a needle and thread in black or brown.
- Long sleeve blouse and black tights.
IMPORTANT! In order to sew an ant costume, there is no need to purchase new fabric. An old jacket, pants or robe may also be suitable for work.
However, if you have the opportunity to purchase bright, unusual fabric from a specialty store, this can make your costume the best and most unusual at the party.
Sew an ant costume
First of all, it is necessary to build on the basis used in the work. This is precisely the role assigned to a long-sleeved blouse, regardless of the gender of the child. If you don’t have the necessary thing, you can easily replace it with an old children’s sweatshirt or golf shirt.
It should be remembered that dark shades predominate in the body of an ant - black or brown.
IMPORTANT! You should not focus your attention on materials that are exclusively black. Otherwise, the finished child’s costume will be too gloomy and nondescript.
The insect's body consists of 2 large parts - the tummy and a slightly protruding butt. To give additional volume in the area of the child’s abdomen, it is necessary to fill the space under the blouse with foam rubber. For simplicity and in order to prevent the foam rubber from accidentally falling out of the suit at the most inopportune moment, you can sew it on the wrong side of the base of the ant suit.
If you don’t want to spoil your clothes in this way, you can use an ordinary elastic band. To do this, an elastic band is sewn along the bottom edge of the sweater so that it fits tightly around the child's belly.
An ant's butt can be made from two sleeves, also filled with foam rubber or rags.
Paws
A real ant has legs on its sides. In order to make them, you need to cut two long strips of fabric and sew them in the shape of tubes. The finished tubes need to be filled with foam rubber. It is not at all necessary to insert wire inside them; this is done at the discretion of the craftswoman.
ADVICE! You can sew bright bells onto the tips of the paws to make them look interesting and fun.
The finished look is completed with black tights. For a little variety, you can use bright shoes or socks, a tie, a colored bow tie or a mask.
Headdress
An ant costume must have a hat. It can be successfully replaced by the hood of a sweatshirt or an old children's hat in a dark shade. You can also paint a rubber pool cap black or brown.
In order for the costume to have the greatest resemblance to the original, the cap must have a mustache.
- To make them, you need to take the wire and cut two pieces of equal size from it.
- Then give them a slightly curved shape.
- After this, you need to cut long thin strips from old clothes or a piece of fabric and wind them evenly around the wire to give them a more beautiful shape.
- You can simply sew the strips into a tube and insert prepared pieces of wire into them.
- To give the antennae extra volume, you can insert foam rubber inside the tube.
- After all the steps taken, the antennae need to be secured to the child’s hat.
There are two ways to attach antennae to a child’s head.
- Using a hoop. In this case, the wire used to make the antennae must be wound around an old hoop. This is a fairly simple option and more convenient for a child. The hoop with antennae will additionally support the cap on the child’s head, preventing it from accidentally falling.
- Attach to the cap. In this case, the finished antennae are simply sewn onto the cap. However, it should be remembered that if the cap does not fit the child’s head tightly enough or the antennae are heavy enough, they may constantly slide off the head. Children at the matinee are active and do not stand still; the cap and attached mustache can sometimes fall, blocking the child’s view.
In order for the child to feel comfortable at the holiday, such factors should be foreseen in advance and corrected in time.
ADVICE! To make the finished mustache brighter and attract additional attention, you can decorate it with bright bells. For example, red.
Ant costume option for girls
The ant costume for girls and boys is not much different. However, if your little fashionista likes to stand out in the crowd, you can use bright elements in the costume that decorate the child.
So, for a girl, a large bright bow on her head or bright hair clips in her hair would be suitable. You can sew a small bright skirt yourself from leftover tulle. A small handbag with a colored ribbon will be an unusual accessory for a little lady.
Let's talk about hairstyle
Naturally, such an outfit requires a special hairstyle. If the girl's hair is long, braid one braid and tie the strands with silk ribbons. You don’t have to do the usual “three-strand” hairstyle—both a Greek braid and a spikelet will look great. You can do it differently: leave your hair loose, freely scattering down your back. Lightly curl the strands with a curling iron, giving them a pleasant waviness. Or even make curls, but not elastic and dense, but soft. If you have short hair, you can simply comb it carefully and fluff it a little to make it look voluminous. The main thing is that the wreath is in place and lies beautifully.