Girls, I would never have completed such a project without you!!! I read the forum up and down, and thanks to you, I finally decided to sew a suit. And having seen enough of such beauty as you post, I didn’t want the most banal suit, I wanted one that would make sense to sew it and not buy it. These suits are the first thing I sewed from clothes, so to speak. Until now I have only sewn all sorts of decorative things for the home. Therefore, everything related to patterns and fit on the human body is new to me))) While I was sewing, due to the rush (I had 10 days to make 2 suits), exhausted, I cursed the day when I decided to sew the suits myself, and didn’t buy them, but then... after the matinees, listening to the teachers’ compliments about the costumes, I was rewarded for all the torment and lack of sleep. It took me 9 days for Santa Claus, and a full day for Snow Maiden without breaks for sleep. I finished it, dressed it and went to the matinee - that’s how it was for me. But in the end I’m happy, I’d like to sell these already and next year, having more experience, make a more beautiful suit (I feel like I’ll curse this decision again next December, but I’m glad). Well, here they are:
For Santa Claus it took me 5 meters of velvet and about 2 meters of fur. , I would have liked more expensive fur, but it was either that expensive or too expensive, and I didn’t have time to look. I started sewing Santa Claus using this pattern https://www.solnet.ee/gallery/knk2.html. But either I don’t understand something, or she’s no good at all. When the lining was added, everything bulged under the armpits, a lot of excess fabric. So I cut off the sleeves and then sewed in new ones, cut at random. I had a great time with them. I also made the collar at random, altering it several times, directly on the fabric, without a pattern. But with Snegurochka I was already smarter. I really liked the pattern I sewed from. Highly recommend. I really initially wanted to make it long and flared to the floor, but I didn’t have time or fabric, since my Snow Maiden is sewn from a beautiful expensive fabric made of sequins that shimmer in the light, but I bought it not in a fabric store, but in a second-hand store Hyundai It was a dress of no clear purpose at all, similar to a nightie. I used everything from it. Already from the smallest scraps I made a kokoshnik. So to speak, waste-free production. The suit should have been lined with fur on the bottom, but I didn’t have enough, and considering that there was already beaded lace sewn along the bottom, it would be a pity to flog it. Yes, the pattern is here Basic dress design First option. I just added a few centimeters to my volume so that it would be like a coat and not like a dress. But you don’t need to print anything, you can create the pattern directly on the lining and right for you. I recommend. I also didn’t have enough fabric for the sleeves, so I have Snegurochka with 3/4. Hat - based on this MK https://fiseje.ru/%D0%BC%D0%B0%D1%81%D1%82%D0%B5%D1%80-%D0%BA%D0%BB%D0% B0%D1%81%D1%81-%D1%88%D0%B0%D0%BF%D0%BA%D0%B0-%D0%BC%D1%83%D1%80%D0%BC%D0% BE%D0%BB%D0%BA%D0%B0-%D0%B4%D0%B5%D0%B4-%D0%BC%D0%BE%D1%80%D0%BE%D0%B7.html
Children treat the New Year holidays with special trepidation. After all, they believe in miracles and the kind Grandfather Frost, who brings gifts under the Christmas tree to everyone on New Year’s Eve. And the appearance of Santa Claus in the house on the eve of the celebration can charge the kids with positive energy for a long time. To do this, adults dress up in the costume of a fairy-tale character and come to the house to congratulate the children on the holiday. However, it is not always possible to buy or rent a Santa Claus costume; there are many people who want to please their children. Let's look at how to make such an outfit with your own hands.
Fur coat for the main character
Usually this role is entrusted to men, but women often have to dress up as a grandfather. The fur coat is worn over clothes, so the size will be approximately 50, 52, 54. And a grandfather of size 46 will seem funny, but he should be omnipotent. This means you will need a lot of fabric. First, you need to take measurements with a measuring tape from the person for whom you want to sew a Santa Claus costume. Then you need to carefully study the selected pattern and make sure that it fits in size.
- a piece of chalk or a piece of dry soap;
- rulers and measuring tape;
- finished, cut out pattern.
Then you should cut the fabric, leaving seam allowances of about two centimeters.
The fur coat is sewn from five parts
: two front shelves (right and left), back, collar and belt.
After the parts are cut and cut, you can begin to connect the parts. First you need to stitch along the shoulders the two front shelves with the back, then sew the side seams along the wrong side. All seams must be machined using a zigzag, overlocker or special scissors so that later the edges of the material do not fray or diverge.
Separately, you need to sew the sleeves and process the seams. Then the sleeves need to be sewn into the armholes of the fur coat. The main thing is to do it correctly so that the sleeves fit correctly.
When the main part of the fur coat is ready, all that remains is to sew on the collar
, cut from white fur or any other fabric. You can also cut and sew a collar from the same fabric as the fur coat, and then sew fur on it.
The last detail of the dress is the belt (sash), it should be wide and long so that it can be circled twice around the waist and tied in front. To cut such a belt, you don’t need a special pattern; you can cut the part to size, twenty centimeters wide, taking into account seam allowances, and three meters long. If you only have short pieces of material and there is no piece of suitable length left, make a sash piece from several pieces and sew them together.
Then the resulting sash blank needs to be folded exactly in half lengthwise, carefully fold the edges inward and sew the entire part on a sewing machine. Your belt is ready, its ends on both edges can be decorated with white faux fur, fringe or fabric.
How to sew a Santa Claus outfit
Now we will tell you how to make a Santa Claus costume in the form of a wraparound robe. This outfit will be identical for children and adults: the main thing is to choose all the parameters correctly. The sewing procedure itself will consist of several steps:
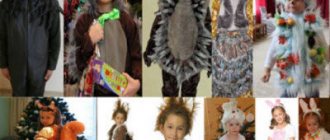
Look at the photo options for a quick and beautiful Santa Claus costume. You can make your own adjustments to the described master class.
A costume for a baby, mainly intended for photo shoots and not for active pastime, can be made in the form of overalls.
Use your child's finished item as a basis, or take measurements of the legs, sleeves, height and width of all elements to sketch out a pattern for a one-piece outfit.
Cut out the front and back parts and sew them together, having previously decided on the method of connecting the elements (zipper, buttons, etc.) and their location.
Find out how to sew a Santa Claus costume using patterns in the video:
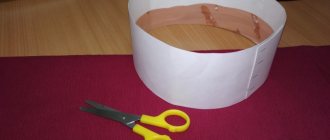
Christmas hat for Santa Claus
After the fur coat is ready, you can start sewing a hat for Santa Claus.
.
For this you will need a pattern. Using a measuring tape, take measurements of the person for whom the item is intended. If you are sewing for a child, all measurements must be taken from the baby, for an adult outfit - from an adult.
When the size of the selected pattern is ideal, it can be transferred to the fabric. It must be transferred to the fabric with the required dimensions.
The hat consists of three parts:
- top part;
- band.
After the finished pattern is transferred to the fabric from the wrong side, you need to cut out all the details, not forgetting the seam allowances. Then you need to sew the top of the hat with the bottom. In order for the hat to keep its shape, you should sew a band made of starched cotton fabric or cardboard or thick paper. To complete the work, the hat, like the collar of the fur coat, must be decorated with white fur or fabric.
If you are preparing Morozko's magical decoration for a class or kindergarten, an indispensable attribute of this should be a magic stick-staff. You also need a bag with gifts. Let's look at how to sew it.
How to sew a Santa Claus costume - coat
For such a robe you will need to prepare:
- Red or blue fabric, threads.
- Fabric in white color or with a golden, silvery sheen for finishing.
- Faux fur for covering the product.
Instructions for sewing a coat:
- Start with a pattern. For this outfit, you will use a regular dressing gown pattern. By the way, if you have one, then you won’t have to sew anything; it will be enough to decorate it with various patterns or snowflakes made of fabric or other materials, for example, foil.
- After constructing the robe pattern, transfer it to the fabric, and do not forget to leave 1-2 cm for seam allowances.
- Cut out the details of the robe. Sew the front parts of the product and the back.
- Then sew on the sleeves.
- Finish the seams with a zigzag stitch on your sewing machine.
- Next, sew the belt. And trim the edges of the coat with faux fur. Form a collar from the same fur.
- In the end, all that remains is to show your imagination and decorate Santa Claus's coat with intricate patterns.
Frost Bag
Sew a bag for gifts from Frost
quite simple. To do this you will need a piece of fabric you like, a sewing machine, a tailor's measuring tape and fifteen minutes of free time. Ideally, the bag for gifts from Santa Claus should be sewn from the same fabric as the entire suit. But if there is no similar material left, the bag can be sewn from any material, the main thing is that it matches the color or is of universal colors:
- Red and blue;
- silver and gold;
- white and oily.
So, you need to cut out two identical rectangular parts 1 meter long and 80 centimeters wide. Sew both parts using a sewing machine on three sides from the wrong side, finishing the edges of the seams with a zigzag or overlock.
Fold the top of the bag inward five centimeters and stitch it on a machine. You need to insert a braid or ribbon into the resulting lapel, with the help of which the bag will be tightened. Instead, you can cut out a strip of fabric seventy centimeters long and ten centimeters wide, tuck it in and sew the edges. Then sew it in the center to one side seam on the front side, so that the bag can be tied with this ribbon.
To make all the details of Santa Claus’s New Year’s decoration look magical and truly fabulous, you need to add additional decor
. The easiest way to decorate an outfit is with shiny tinsel that can be sewn on:
- along the edges of the fur coat;
- on the cuffs;
- on the collar;
- as the edge of a hat.
You can embroider snowflakes by hand or on a sewing machine with silver, gold or white thread; sew shimmering sequins, rhinestones, beads and other decorative elements onto the suit. You can knit openwork snowflakes and sew them onto a fur coat and Santa Claus’s hat.
Making a staff
The image of Morozko will be incomplete if he does not have a magical, fairy-tale staff
. It's not at all difficult to make. You need to take a long club, wooden or plastic, wrap it and cover it with foil. You can also paint it with white, silver or gold spray paint.
The top of the magic staff is crowned with a large star. Cut out a large five-pointed star from thick cardboard and cover it with foil or paint it. The edges of the star and the staff can be decorated with shiny tinsel, large beads, rhinestones, snowflakes and any New Year’s decor made by yourself or bought in a store can be glued onto them.
You can complement the magic star with a pair of small bells, which will create an original, fabulous effect from the appearance of Grandfather Frost at the holiday.
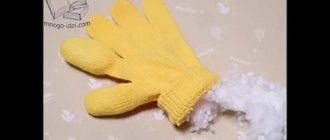
Mittens for Santa Claus
Hands are precisely the element by which children recognize their daddy, teacher or physical teacher in Grandfather Frost, so mittens should be a mandatory component
carnival costume.
To sew mittens, you need to choose the same fabric as for sewing a fur coat, hat or bag. If you are sewing mittens for a baby, then the pattern should be reduced.
It is necessary to transfer the pattern onto the fabric. Each mitten consists of three parts: one back and two inner (top and bottom). To cut a mitten for the second hand, transfer the pattern to the material in a mirror image.
Then you need to cut the material taking into account the seam allowance
(one centimeter) and sew. First, the inner parts of the mitten, then connect them with the back side. All seams are stitched from the wrong side and must be processed with a zigzag or overlock.
Mittens, like other parts of the costume, can be decorated with tinsel, snowflakes, beads, rhinestones or other New Year's decor.
New Year Card Ideas
Finally, let's look at ideas for postcards with our character. It can be flat, three-dimensional, monochrome or colorful. Small or big. It depends on you! The main thing is the mood in which you created it!
Use different techniques and unusual shapes.
Combine different materials: pompoms, buttons, paper and cardboard, wood and wire.
And also several drawings to create a postcard. you can simply print them out and give them as a gift, signing your wishes on the back. They can also be used as window decorations.
Here is the simplest card idea that you can create together with your child.
For inspiration, you can look at crafts and just take their outline.
The postcard itself can be of different shapes; it can unfold, shrink, or simply open.
Or it may be in the form of an envelope.
As you can see, there are no restrictions anywhere, it’s just important to think through the composition, prepare the materials and start creating! I wish you health and every success.
Tweet
Tell VK
Hello, my dear sewing lovers! How great it is to support a fairy tale in life, especially for our children - daughters, sons, godsons and goddaughters! And how great it is to organize a holiday for your beloved children, because they are so looking forward to the arrival of Santa Claus for the New Year! And for the arrival of Santa Claus, I propose to prepare, or rather prepare Santa Claus himself))).
Today my post will be about how to sew mittens (or mittens) for a Santa Claus costume
. After all, in order for the child to definitely not recognize his father, grandfather or godfather in the disguised Santa Claus, he needs to be hidden well, and uncovered hands can give away the one who is hiding under the suit.
Today we will sew these mittens:
How to make a beard
An important detail in Frost’s costume is the beard, white, fluffy, magical
. If you were unable to purchase a ready-made beard, you can make it yourself. Can be made from the following materials:
- from padding polyester;
- synthetic wool;
- faux fur;
- white yarn;
- paper or fabric.
Let's look at an example of creating a machine-knitted wool sweater from an old, forgotten white or beige wool sweater.
Need to take
old sweater, PVA glue, scissors, a small piece of white.
First, sketch out a beard of the desired size on a white cotton cloth and cut it along the contour with scissors. Don't forget to make a hole for the mouth and ties to hold the beard on your head.
Then you need to carefully unravel the sweater into individual threads, starting from the bottom edge of the beard, thread by thread, maybe in small bunches. It is necessary to glue the beard onto the fabric base in even rows of threads, filling the entire free area and creating a real beard for Santa Claus. Thanks to machine knitting, the threads will turn out strongly twisted and curly. Using this principle, you can make a beard from strips of white tape, which florists use, and first curl them using a scissor blade or from strips of ordinary white paper.
Faux fur beard
It’s also quick to make and looks great. It can be made round or triangular in shape. It is attached, like a beard from a sweater, using elastic bands or ribbons.
A beard for a child and a man can be made from household materials. Take a clothesline and cut it into equal lengths. Using a gun and hot glue, gradually glue the pieces of rope onto the beard fabric, row by row.
If you have leftover wool for felting, you can make a mustache and beard for a fairy-tale hero from it. Prepare a base from the fabric, glue strands of wool, starting from the bottom.
To make the image of the main character of the New Year complete, be sure to give your grandfather a specific make-up using makeup or women's cosmetics
. Paint Morozko's red nose and rosy cheeks, fill in the eyebrows with white shadows so that they match the white beard.
If you know how to knit or crochet, then the outfit can not only be sewn, but also knitted.
Now you can easily create a costume and a unique image of your favorite New Year's character.
Attention, TODAY only!
This is the first time in my life that I am creating a master class. I haven’t done sewing for 15 years. I met Burda magazine back in 1987. I wanted to dress beautifully, but there wasn’t much in the stores, and there wasn’t any money either, so I sewed for myself and for my little daughter myself. Then the need for sewing disappeared, and I stopped sewing. And it so happened that my grandson wanted to be Santa Claus, but they couldn’t find a suitable costume in the store. I went to the magazine’s website, ordered patterns and saw that the magazine had announced a competition for a master class. I understand that it is impossible for me to compete with sewing masters, but I really wanted to participate. Here I present my work to your judgment. For the basis of Santa's jacket, I took the pattern of model No. 133 from the magazine 04/2017, and for the basis of the trousers, model No. 147 from the magazine 01/2010. For the costume you will need 1 meter of red fleece and 20 cm of white fleece. 1. Cut out the pieces, leaving seam allowances. (Photo 1, 2, 3, 4) 2. Cut out the hat. Cap width = Head circumference: 2, cap height 30 cm. (Photo 5) 3. Pin together the parts of the cap with right sides, sweep, stitch, cut off seam allowances close to the corner, turn the cap inside out. (Photo 6,7,8) 4. Cut out made of white fleece, a facing length = head circumference + 2 cm, height 11 cm. Check that the facing part fits the size of the hat. Pin the sections and stitch (photos 9,10, 11,12) 5. Align the front side of the facing with the wrong side of the cap, and place the facing seam in the middle of the back side of the cap. (photo 13) 6. Baste seam allowances, stitch (Photo 14,15) 7. Turn the facing inside out, fold it in half, pin, baste and stitch on the front side (photo 16,17,18,19) 8. Cut out a strip of white fabric with a height along the length of the shelf, 5 cm wide. (Photo 20) 9. Sew to the shelf (Photo 21,22) 10. Baste the back halves to sew in a hidden zipper. (photo 23) 11. Sew a hidden zipper (photo 24) I will not describe in detail how to sew a hidden zipper, since such a master class is on this site, and I myself took advantage of this master class.) 12. Sew the shoulder and side seams. (photo 25,26) I didn’t take a photo of the side seams. 13. Sew the seams on the sleeves (photo 27) 14. Sew the seams on the trousers (photos 28,29) 15. Sew the bottom of the jacket, using the same pattern as the piping of the cap. Steps 3 to 7. (Photo 30,31,32) 16. Cut out a trouser facing from white fleece measuring = trouser circumference + 2 cm seam allowances, 6 cm high. Align the cuts, stitch (photo 33) 17. Place the facing with the right side to the wrong side of the leg, baste, stitch (Photo 34, 35) 18. Turn out the facing, baste close to the edge of the trousers and on the front side, stitch (Photo 36,37,38,39, 40, 41) 19. Perform sleeve facings according to the same pattern from step 16 to 18 (photo 42) 20. Cut out the neck facing, length = neck length + 2 cm, shape as in photo 43 21. Pin, baste, stitch the facing facing to the front side of the jacket. (photo 44,45) 22. Fold back the seam allowances, secure with pins (photo 46,47,48) I am left-handed, so the photo shows how this is done with the left hand. Right-handed people do as you please. 23. Sew as close to the neck line as possible. (photo 49,50) It turned out a little crooked, don’t judge strictly, I haven’t picked up a thread and a needle for many years. 24. I had some unstitched areas, so I sewed the facing by hand. (photos 51,52, 53,54) 25. Sew in the sleeves (photos 55,56,57) 26. When trying on the trousers, it turned out that the height of the trousers was not enough to bend, sew and insert the elastic. so I sewed the elastic right along the edge of the top of the trousers. (photo 58,59) 27. My 12-year-old son helped me make a pom-pom for the hat; he cut out a circle like this and made a pom-pom out of it (photo 60) 27. In the end we got a costume like this (photo 61, 62, 63) Thank you for reading my master class to the end. You might also want to sew the same suit.
How to sew a Santa Claus costume with your own hands: pattern of the outfit, ways to design a hat, staff, gloves and beard
how to sew a Santa Claus costume with your own hands - pattern Preparing for the New Year is rarely complete without looking for a Santa Claus costume, especially if you have children whom you want to please with the arrival of such a guest or dress up for photo shoots and matinees.
Instead of going to tailors or stores where theme costumes are not of the best quality and usually cost a lot of money, try sewing the outfit yourself.
We suggest you figure out how to sew a Santa Claus costume with your own hands using a pattern.
Preparation process
Start preparing to create your own Santa Claus costume for a boy or an adult by planning its components.
A traditional suit consists of a long fur coat or robe, so you can wear anything underneath it.
Don’t forget about small details: the image must be completed with mittens, a hat, a staff, a bag and a beard.
The greatest difficulty is creating a fur coat. If you have never done sewing before or have no idea how to make such an outfit, we recommend sewing a Santa Claus costume with your own hands using a pattern for beginners.
In addition, you can make a paper pattern yourself if you use a robe that fits as a basis. After creating a pattern for a Santa Claus costume with your own hands, start selecting materials.
If you have suitable fabric at home, make sure that its size will be sufficient.
Making a DIY Santa Claus costume for a child will require very little fabric, but when sewing an outfit for an adult, you will most likely have to spend money on consumables.
Advice:
For a suit, velor, corduroy, flannel, satin or velvet fabric in blue, red, gray or light blue are suitable.
Immediately plan how you will decorate the costume. At a minimum, stock up on faux fur or white fabric: this material will be used for the lower frill, sleeves and collar.
To decorate a fur coat and other elements of the costume, you may need beads, bright buttons, beads, ribbons, snowflakes made of thick fabric (for example, felt), rain or ribbons.
And now all the materials are ready, which means we can start. Take measurements from the person for whom the outfit is being sewn - and make sure you make a pattern that fits his parameters. If necessary, adjust the paper sketch.
If everything is in order with the pattern, turn on the video on how to sew a Santa Claus and Snow Maiden costume with your own hands, or follow our tips for creating an image.