We bring to your attention a master class on creating such a groom from a bottle of champagne.
We hope this tutorial will be useful for you and will inspire you to create such a cute gentleman in a hat. So, what we will need for our work: - a bottle of any champagne - black bias tape (6 meters) - white bias tape (20 cm will be enough) - scissors - glue - narrow contrasting ribbon (mine is dark red) - rose made of ribbons of the same color - mother-of-pearl half-pearls - a narrow plastic cap with a diameter equal to the diameter of the neck of the bottle - there is also tape in the photo (I planned to use it to attach the cylinder to the brim of the hat, but it was not needed) - cardboard
All materials are prepared, so let's get started. Let's start with the fact that we need to remove the label from the bottle. To do this, leave the bottle in cold water overnight. The next morning you will remove the label in one motion and you will have a clean bottle. Let's now dress our groom. Let's start with an imitation shirt. Take white bias tape, cut off a length sufficient to fit around the neck of the bottle and glue it on. I use Moment glue.
We repeat the procedure and glue the second layer of white bias tape, slightly overlapping the first. It turned out to be a white shirt.
Now we do the same thing only with black bias tape, creating an imitation of a black suit.
We gradually go lower until the bottle is level.
When the bottle is already flat, there is no need to cut the bias tape; we wrap the bottle with bias tape and secure it with glue on the back side.
Our groom is dressed. Photo from the back.
Let's start with the hat. Cut out a circle from cardboard. The internal diameter is equal to the diameter of the bottle neck minus 2 mm. I plan to increase the height of our groom at the expense of the hat, so I will not put it on the groom, but glue it on top (therefore I make the diameter smaller so that the hat does not fall through, but remains on top of the neck). If you want to literally put a hat on the neck of a bottle, then add a few millimeters to the diameter of the bottle neck and get the size of the inner circle. Because the cylinder has narrow margins, then the outer diameter of our cardboard circle is 2 cm larger than the inner one. Don’t be alarmed if the edges are not very even. This will not be visible. We wrap the brim of our cylinder with black bias tape, leaving a small section free. Don't forget to glue everything down well. As I already said, I will not put the cylinder on the bottle, because... I want to make the groom taller. Therefore, I put the margins on top of the neck of the bottle and fix them with glue. For additional fixation, I glue on top of the neck the free edge of the bias tape that we prudently left. There's just a little bit left to do. Make a cylinder. To do this, I found a plastic cap from one of the cosmetics. The diameter of the cap matches the diameter of the bottle neck. I wrap it with bias tape. And I glue it to the brim of the hat. To decorate the hat, I glue a contrasting narrow ribbon at the base of the hat. I create imitation buttons using white semi-pearls. I securely fix them with glue on the groom's suit.
Where would we be without a boutonniere? I take a rose from ribbons of the same color that I used to decorate the hat and glue it onto the groom’s chest. It seems like something else is missing... Butterflies! I take black bias tape and fold it in two layers. I wrap it in the middle with black thread. I glue it to the groom's shirt. I decorate the butterfly with a white half-pearl. Our groom is ready! Back view.
During the long New Year holidays, visiting is usually planned, that is, visiting, when you want to visit all your relatives or close friends.
It's nice that there is time for this at the very beginning of the year. People don’t come to visit empty-handed, and we traditionally celebrate the New Year twice, according to the new and old style. Therefore, a bottle of champagne is more appropriate than ever. And to make the New Year's mood brighter, champagne should be decorated in New Year's style.
For work you will need: A bottle of champagne; Yarn of juicy green, bright blue and light gray colors, only 60 g; Hook N6; Satin ribbon; Pine cone; Nail polish with glitter or mother-of-pearl that is no longer used for its intended purpose; Fragment of a green plastic bottle.
We will work with yarn. For our champagne decor, we chose the image of a winter Christmas tree dusted with snow. To do this, we select yarn of juicy green, bright blue and light gray colors, respectively. The thickness of the thread when triple folded should give a tight knit. To select a hook, knit a sample; when selecting stitches, the knitting should not be visible. I liked the large knitting option, so a combination was chosen: green thread in three folds, gray thread in five folds, blue thread in two folds.
We start knitting with 5 air loops closed in a chain. Then we knit in a circle, evenly adding loops and we get a circle that completely covers the bottom of the bottle. After this, we stop adding loops and knit in a circle upward until we reach the required height. The height should correspond to the height of the champagne bottle, where the walls are smooth without narrowing towards the neck.
When the desired height of the knitted glass is reached, we put it on the bottle and carry out further knitting directly on it. Gradually reduce the loops, tightening the knitting on the glass surface, narrowing it in accordance with the neck. This is quite a labor intensive process as the knitting needs to be kept tight and the bottle needs to stay inside the knitting.
We knit to the narrow part of the bottle neck. We finish knitting, pull out the end of the thread, make a knot and hide it inside. The required part will remain on the bottle; it is not removable. The top of the bottle must be left free so that the champagne can be opened and poured into glasses. But the New Year's image has not yet been achieved. From the same set of yarn we knit a removable cap for the top of the bottle. During the knitting process, we try on the cap; it should fit snugly on the cork crown.
One subtlety: it is difficult to knit the top of the bottle from such a thick thread, in the fold that was used for the lower part. Therefore, it is better to reduce the thickness and change the hook to a thinner one.
When the cap is ready, we begin decorating with ribbons.
First, let's prepare the spruce branches. If you have several artificial spruce branches, you can use them; if not, fluffy branches can be easily obtained from a plastic bottle. You need a fragment of thin-walled green PET. It is best if the plastic is smooth, without relief. We cut off four identical sectors, 2.5 - 3 cm wide and about 10 cm long. We fold each fragment in half, crease this line, and use scissors to apply frequent parallel cuts that do not reach the fold line. Then fluff up the resulting needles.
At the end, in each branch we make a hole with a hot needle into which the satin ribbon prepared in advance should pass.
We will also use a pine cone to decorate the bottle. The cone was harvested in the fall, completely cleared of seeds and dried. That’s why it turned out so beautiful, with open scales. We cover the bump with acrylic varnish or nail polish that you use for decorative purposes. Acrylic silver or gold paint will also look beautiful.
Let the pine cone dry. Meanwhile, we thread a wide scarlet ribbon at the top of the knitted cover on the champagne bottle. This requires some effort, because... the knitting tightly grips the smooth glass. Let's help ourselves with crochet. When the ribbon is threaded, we pass it through the holes of the plastic spruce branches and make a strong knot.
We pass a thin thread through the scales of the cone, fasten it and tie it to the knot of the ribbon. We form a bow from a satin ribbon.
There is very little left until the New Year, but those who know how to crochet will still have time to knit a beautiful champagne case with the help of Olga’s master class. He could be great.
Decorating the house for the New Year! Christmas tree, garlands, toys and, of course,! In this master class, I propose to dress a bottle of sparkling drink in an elegant fur coat. So, we knit a champagne cover.
New Year's clothes for a bottle - how to knit
1st row - we knit with white yarn: from 53 air loops, we close it in a ring, i.e. We knit a connecting stitch into the first loop of the chain.
Option #1
Option No. 2 4th row - knit with half-columns 5th row - with a hinged loop 6th row - with half-columns 7th row - with a hinged loop 8th row - with half-columns Next, change the color to red (Santa Claus) or blue (Snow Maiden) and knit from 9th to 28th row with regular ones in columns. Row 29 - decrease 3 loops in a row and also three more rows i.e. Rows 30,31,32. There should be 41 loops left in the 33rd row Change to white and knit the 33rd row with half-columns 34th row - with a hinged loop 35th row - with half-columns in this row, decrease 3 loops 36th row - with a hinged loop 37th row - with half-columns, decrease 2 more loops 38th row - with a hinged loop 39 row - half columns 40 row - knit with another thread (red or blue).
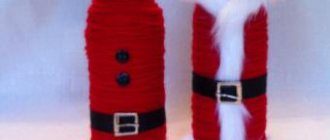
I knitted the white strip for the fur coats separately on 7 loops using the same principle as the fur for the collar and hem. The body is ready!
cap
For the hat we cast on 23 air loops from white yarn, close them into a ring 1 row - half-columns 2nd row - with a hinged loop 3rd row - half-columns 4th row - with a hinged loop Next, change the color (to blue or red) and knit another 5.6 row 7, 8 rows decrease loops every other i.e. close the cap.. During the knitting process, we try the cap on the bottle because the knitting is different for everyone. If desired, the finished fur coat can be decorated with sequins or beads. For the Snow Maiden, weave braids separately from white yarn and sew them to the hat, and for Santa Claus, you can tie a beard...
Well, of course, he wasn’t the only one with this set of New Year’s clothes for bottles; there was another one who wanted to buy such fur coats.
And another set of New Year's coats for bottles was created!!!
And since the New Year is coming soon, I think this set of New Year's clothes for champagne will not be the last this year!
I hope you like my description too!!!
I wish you creative success!
Nadezhda Maksimova"
PS In addition to thanking Nadezhda for participating in the competition, I want to say thank you for reminding me of such a wonderful crochet technique as elongated loops (Nadezhda in her description calls them hinged). Unfortunately, this technique has not yet been discussed on the blog (minus for me))) there is something to work on... But there is an article “”, look, perhaps your New Year's clothes for the bottle will be knitted by you (not everyone likes to crochet)) )
And don't forget to leave your comment. Your opinion is important to me!
If you liked the article, then share this information with your friends by clicking the social network buttons! Just a huge request! — do not copy the entire material, please use social buttons! Do not be shy! I will help as much as I can :) If you have an idea, please share! If you find any errors, write to us and we will fix them! I have a desire to help the blog in some way - I will be only too glad! Hosting costs money, and materials are not cheap these days... So, if possible, then help financially)))
There are a lot of ideas for creating knitted bottle covers. For the most part, it all depends on the knitting method you choose (knitting or crocheting), the type of yarn and, of course, the idea that you want to embody in this bottle knitted garment.
In addition, you can make knitted bottles themselves - a great way to combat drunkenness.
If you have chosen our original way of fighting alcoholism, namely creating a knitted bottle of beer or champagne, then in this case you will need to knit a case in the shape of the bottle and fill it with cotton wool or padding polyester. In this case, a glass bottle is not needed.
A knitted decoration for a bottle can serve as a kind of holiday gift. Giving, for example, a bottle of champagne for New Year is a banality, but giving the same champagne, but decorating the bottle in an original way, is already a sign of attention, respect, reverence, because such a gift option claims to be at least a work of art and more at least like a masterpiece.
In addition to the “decorative” function, tied bottles can also serve a completely utilitarian purpose. For example, a knitted cover for a beer bottle is a way to warm your hands while drinking this drink. Men whose hobby is football will appreciate such a gift.
You can also crochet a bottle to create an original vase. Such a stylish handmade bottle vase can become not only an interior decoration, but also a wonderful gift for a friend for a birthday or other memorable date.
Elegant wedding bottle. We design with our own hands quickly, easily, originally
Wedding and champagne are very compatible concepts. It's hard to imagine this holiday without this noble drink. It has already become a tradition to place beautifully decorated wedding-style glasses and a bottle of champagne on the table in front of the newlyweds. Every bride-to-be can make festive decorations for them. And don't be alarmed if you've never done anything like this. In our article we will tell you how to make your wedding bottle, decorated with your own hands, look original, elegant and impressive. Choose the idea you like and feel free to start creating.
Cool labels
Decoration of wedding bottles can be done in the form of funny labels with portraits of the newlyweds. If you draw well, then creating such masterpieces will not be so difficult. For those who are not comfortable with pencils and brushes, we suggest using the services of Photoshop. You insert portraits of the newlyweds into a special program, print them out and stick the label on the champagne. The general background of the bottle can be painted with acrylic paints or pasted over with decorative paper.
DIY wedding bottle decoration made using the kanzashi technique
Satin ribbons have long been an invariable attribute of weddings. For the original design of champagne bottles, you can also use them as a basis. A container with a sparkling drink, decorated with ribbon flowers and beads, looks very delicate. To complete the composition, let’s take two identical bottles. Prime their entire surface with white acrylic paint. Make any flowers from narrow white ribbons (you can buy them ready-made). On each of the bottles, make an applique of flowers and beads in the shape of a half-heart, and in a mirror image. Use a glue gun to attach. Try to keep the compositions on both containers the same in shape and size. When you place them side by side, you should be able to see the composition of one big heart. That's all, the wedding bottle, decorated with your own hands in traditional colors, is ready.
Suit-dressed wedding bottle. We sew an outfit for champagne with our own hands
Dressing containers with sparkling drink in wedding costumes is very popular and very fashionable today. As a rule, to create a complete composition, a bottle is prepared in the groom’s attire and the same container in the bride’s attire. It is advisable to sew suits from beautiful fabrics: satin, silk, chiffon. For decoration you can use lace, braid, ribbons, artificial flowers. You can make a veil and a top hat for the plugs, and a bow tie and beads for the necks. A simplified version of this method can be to design champagne outfits from colored paper using the appliqué type.
Using our tips, you can easily create an attribute such as a wedding bottle with your own hands for the happiest holiday in your life. And if you don’t drink it on your wedding day, perhaps its beautiful decoration will delight you for many years and give you pleasant memories of this event. Good luck in your creativity and happy family life!
How to make a hat - a bowler hat, a bottle - a groom
First we make the bottom of the pot. I calculate the diameter of a circle like this: I measure the circumference of the neck (circumference), for me it is 10.7 cm. And then, using a formula from geometry, I find the diameter:
d = L: π (diameter = circumference: 3.14). That is, 10.7 divided by 3.14 equals 3.4 cm.
Of course, it’s easier to draw a circle with a compass, but I don’t have one, so I draw with a ruler.
And so, I drew a circle with a diameter of 3.4 cm and cut out this circle moving away from the edge about 1 cm. Next, I cut out small triangles. as if making darts.
Cutting out the bottom of the pot
Now I cut out the crown of the bowler. I cut a strip 3 cm high and 13 cm long, coated one side and one end of the strip with glue. She applied it to the triangles - the grooves and began to press them. When the ends of the strips met, I glued them together overlapping.
Making the crown of a pot
Now I'm making the brim of the pot. Again I drew a circle with a diameter of 3.4 cm. I stepped back 1.5 cm and drew the outer circle. In the inner circle I again cut out triangles - darts.
I placed the crown on top and pressed the darts.
Glued the brim to the crown
The paper bowler is ready, all that remains is to glue the fabric. I cut a circle out of a square of black satin ribbon. I smeared glue on the top of the bowler and a little on the top of the crown. I applied a circle of satin and pressed it, leveling the fabric. Then, I made small cuts along the edges of the satin and glued them to the crown.
Glued the fabric to the bottom of the pot
Made of black satin ribbon, wide. 1.3 cm cut into strips. I ended up needing 16 strips. I coated each one with glue and covered the margins. I won’t repeat myself about what kind of glue I use; I wrote about this in the DIY Wedding Champagne master class.
I cover the fields with ribbons
And all that remains is to decorate the crown. I smeared the ribbon with glue and glued it, making several turns around the crown. Inside the pot, I glued a circle of satin ribbon along the diameter of the bottom (3.4 cm).
I glued a circle of black satin ribbon into the bottom of the pot.
This is how you can make a hat - a bowler hat. Later I glued a rosette to the bowler.
Ribbon hat decoration
To decorate the hat, I made a veil from tulle. I glued lace on top, the same as on the skirt of the bottle itself.
We take the remaining roses with petals, glue them to the hat, and decorate them with stamens.
This is the hat I made from ribbons.
And I needed the hat itself for this “Lady in Red.”
DIY gift for a friend
Friends, if you found my master class useful, share it with your friends!
Click on the social media buttons!
Wedding champagne design
Often, at weddings bottles are decorated in the shape of the bride and groom. Champagne in the style of “bride and groom” can not only decorate the festive table, but also become a nice souvenir gift for guests.
You can make such a present with your own hands. There are a huge number of options, today we will look at one of the most beautiful and easy to implement.
Remember! The color scheme of the gifts should be in harmony with the overall color scheme of the wedding.
What you will need:
- Bottles of champagne (a pair for each guest, one pair is enough for a married couple);
- Trim (thin ribbons, the color depends on the color scheme of the celebration, in our case we use classic white and black);
- Beads (white);
- Glue stick “Moment”;
- Scissors;
- Tulle (white).
Manufacturing:
- First you need to remove the labels. Leave only the foil on the necks.
- Next, let's move on to the bride's dress. Lubricate the top of the bottle (the place where the “dress” will begin) with glue and begin to attach the white trim. You need to glue it as follows: wrap half the bottle (in a circle), and fasten it crosswise at the front, and so on, turn by turn, to the very bottom.
- From tulle, we make a small skirt and glue it on top of the dress. The skirt should be attached not in the middle, but slightly below, imitating a dress with a “mermaid” silhouette. To emphasize the silhouette, we tie the top of the skirt with a ribbon.
- Now we attach the beads (from the top to the skirt).
- All that remains is to make a veil and our lady is ready. We make a small veil from tulle and decorate it with a bead.
- It was the groom's turn. We glue the binding according to the same principle as on the previous champagne, the difference is in color, the top should be white (the first 4-5 turns), and then black.
- Now we make a small black butterfly and attach it to the light top.
- Below the butterfly we glue several (preferably the same number as the bride) beads.
- That's all, the newlyweds are ready. You can also make a hat for the groom, but this is optional.
Such memorable gifts are appropriate only if there will be a small number of guests at the celebration, otherwise it will cost a tidy sum and you will waste a lot of time.
