Brags
A large box for storing money is ready. This is a great handmade gift, both for yourself and for friends or relatives.
I wish you a decoupage extravaganza and even more beautiful works. Thanks for stopping by. I would appreciate your comments.
The master class was conducted by Elena Norshakevich.
Memories of summer... They probably come to every person in winter. We invite you to plunge into summer by creating this unusual gift bottle.
Materials.
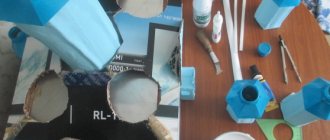
Bottle for decoration; Adhesive primer (for smooth surfaces - glass, plastic, metal); Artistic primer; Acrylic paints; Acrylic varnish; White acrylic putty; PVA glue; "Liquid Nails"; Nail polish remover, dishwashing liquid, glass cleaner, alcohol, vodka (something of your choice for degreasing glass); Elements for decoration, for example: shells, chain, buckwheat groats (or beads of different shapes and sizes), twine (sesame thread); A napkin with a three-layer pattern; Printing a picture on a laser printer; Brushes, toothpick, zero-grit sandpaper (the finest), scissors, narrow and wide tape; Polyurethane pressure roller with a handle (usually used when gluing wallpaper); Dishwashing sponge (new); Empty plastic bottles with a spout (for hair dye, glue or other materials), washed clean.
Progress.
Soak the bottle in water at room temperature to remove the labels. We remove the labels and wipe the bottle dry. Apply any degreasing agent to the bottle, wipe thoroughly, and dry.
In this case, it is important that it is clear what kind of drink is in the bottle. Therefore, the cover with the inscriptions will not be touched. To avoid staining the lid with primer, stick narrow stationery tape along the bottom edge of the lid. Cut off about 1/4 of the dishwashing sponge and, using a tamponing motion, apply an even layer of primer to the bottle using the sponge, without painting the neck and bottom. Leave to dry. When the bottle is completely dry, prime the bottom and dry again. Remove the tape (Fig. 1).
Cut out the picture. We thin it out using wide tape. To do this, glue tape to the back of the picture (in overlapping strips), smooth it out and press it firmly. Then we remove the tape very carefully - a thin layer of white paper will also be removed along with it.
Apply PVA glue to the desired area of the bottle and to the picture on the back side, glue the picture and roll it with a roller. This way the glue will be evenly distributed and no air bubbles will form between the picture and the bottle. Leave until completely dry (Fig. 2).
2
As planned, there will be a three-dimensional anchor on the back of the bottle. First you need to mark the drawing with a pencil. Then we dilute the putty a little with water to such a state that it is squeezed out of the bottles, but does not spread. We fill the bottles (one has a thicker spout, the other has a narrower one). To determine the desired consistency of the putty, you can apply a design to the paper and wait for it to dry (Fig. 3).
Apply the anchor pattern using putty. The entire anchor is from a bottle with a thicker nose, and the point at the ends is thin. When the anchor is completely dry, adjust its shape and smoothness using a toothpick. Holding it at a slight angle to the drawing, carefully remove any unevenness. You can polish the anchor with light pressure using “zero” sandpaper (Fig. 4).
4
Using a gun with “liquid nails” we glue decorative elements - a chain, shells, cereals or beads. We cover the chain with the same primer that was used for the bottle (Fig. 5, 6). Leave until completely dry.
5
6
We make the main background with putty. To do this, use a small hard brush to pick up the putty and apply it to the bottle with strokes in different directions. You can add the desired texture using the same toothpick. Leave until completely dry. If necessary, carefully sand with zero-grade sandpaper (Fig. 7).
7
We apply artistic primer to the bottle, painting all the recesses and details.
Mix paint for the main background. Thoroughly paint the entire bottle except the neck. After drying, check that there are no unpainted areas left (Fig. 8).
8
Add white paint to the paint mixed for the main background. Using the resulting tone, we highlight the convex elements of the bottle. It is better to do this with a dry brush, picking up a little paint (Fig. 9).
9
If a little paint gets on the neck while working, remove it with a damp cotton swab. Coat the dried bottle with one layer of varnish. This will make it clearer whether the parts have enough volume.
For the best effect, add shades to the recesses on the shells and on the main background - green or blue paint, diluted with water almost to the point of watercolor. The main thing is moderation. We cover the dried bottle with varnish in several layers with complete intermediate drying. You can apply more layers of varnish to the picture than to the entire bottle for more shine and gloss.
The final stage of work is decorating the neck. To do this, you will need a napkin of a suitable color and sesame thread. Cut out a circle of the required size from a napkin and remove the two bottom white layers. We place the napkin on top of the lid and, making neat folds, press it to the neck of the bottle and tie it with thread. The bottle is ready!
For work we will need the following materials:
- bottle
- acrylic paints (colors burnt umber, ivory, gold. Or any others at your request))
- fine-grained texture paste or putty
- crystal paste
- shells, beads, coins and other “treasures”
First, the bottle needs to be cleaned of labels and degreased so that the black and white paint will adhere better. This can be done with alcohol or any other product (I use nail polish remover). Next, we prime our bottle (I have cognac) with burnt umber acrylic paint using a sponge, carefully sanding the entire surface:
We wait for the paint to dry; if the paint layer is thin, then you can cover the bottle one more time. The paint should lie tightly.
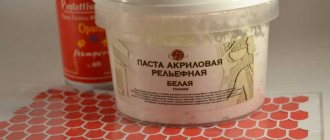
The next step is to apply texture paste; if there is none, then regular construction putty will do.
First, we apply the putty at random... we just spread it where we want, so that later we get a relief (like silt and all that).
I don’t like all kinds of designs on bottles, and therefore I cover them with putty:
We try on our “treasures” to the resulting relief.
These can be various shells, pebbles, coins, beads, etc. and leave the putty to dry.
The next step is to apply crystal paste to the already dried putty (or texture paste with glass balls, I think with sand or just coarse-grained paste will also work), onto which we glue all our “treasures of the bottom of the sea”, pressing them into the paste.
In some places we apply the paste over the “treasures”, as if they have grown into the silt and limescale growths on the bottle:
Again, we wait for the crystal paste to dry completely and begin to paint the resulting relief with the same burnt umber:
I didn't try to paint the entire relief thoroughly, because... this even creates additional volume and in any case will be covered with tinting.
Well, now we’re actually starting to tint. Using a sponge and ivory paint we tint our bottle.
To do this, put a small amount of paint on a sponge, dry the sponge on a piece of paper, and use an almost dry sponge to touch our relief:
The result was such a silted bottle, overgrown with limescale.
In principle, we could have stopped there, but I decided to decorate our old copy a little and literally gilded my bottle a little.
I colored the stars, the coin, and very lightly walked over the relief:
By the way... don't forget to prime and tint the bottom of the bottle.
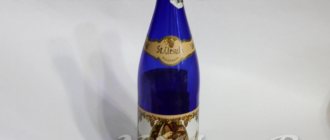
Well, that's all! We cover the whole thing with varnish, preferably matte, because... a bottle made from sea waters will hardly shine, but I didn’t have a matte one, so I had to coat it with a glossy aerosol varnish... aaaand... Here is the result.
Our beautiful bottle is ready! Straight from the bottom of the sea and onto our holiday table!
Bottle decor in a marine style.
Master class with step-by-step photos. Razumova Valentina Nikolaevna, teacher of the Municipal Preschool Educational Institution “Shukhobod Kindergarten”, village of Shukhobod.
Description: in this master class I offer options for decorating a bottle in a marine style. The material can be useful to creative people who are interested in making crafts for the home with their own hands. Purpose: the use of such exclusive bottles can be different: a gift, interior decoration in a marine style, a flower vase. Goal: making a vase from a glass bottle in a marine style. Objectives: * develop creativity and imagination; * find use for waste, natural, and any available materials; * introduce the technology of making a vase (decoupage with fabric, applique from natural and improvised materials); * develop the ability to work with various materials and tools. Option No. 1
Materials for production:
* glass bottle of original shape; * gold acrylic-based spray paint; * glue “Moment-Montazh”; * materials for decoration: shells, beads, coins, pebbles, beads, buttons, etc. * stained glass shine; * any transparent glue: “Moment”, Super-glue * acetone for cleaning the bottle. Our bottle must first be cleaned of stickers and traces of glue. To do this, soak the bottle in water and wipe off the stickers. You can use a steel wool. Traces of glue can be easily cleaned with acetone or solvent. Apply acetone to a cloth and wipe off. Be careful when using chemicals. This is the result: a clean bottle. Having finished with the dirty work, we begin to create. We take the beads, apply Moment-Montage glue to the neck of the bottle in a fairly thick layer and wrap a string of beads around the neck. The glue that I use is very convenient: it fixes various materials well, you can work on glass and slippery surfaces, it does not smell, it does not dry immediately, it is possible to correct errors. We place the string of beads on the flat surface of the bottle, fixing it with glue. Then we cut off the excess (when the glue dries a little so that the beads do not roll off the thread). Next, we begin to fantasize: we apply “Moment-Montage” in a thick layer and arrange shells, coins and any other materials that we have at hand so that it is beautiful and aesthetically pleasing. We devote ourselves completely to creativity. We fill the entire surface of the face in this way: I leave room for a heart pebble, which I will glue later. We wait for the glue to dry. The hardest part is waiting, so I usually make several crafts at the same time. We take gold spray paint on an acrylic base. Absolutely wonderful thing. Easy to apply and spray, dries quickly. But it has an unpleasant odor, so it is better not to use it around children. We cover our bottle with gold paint on all sides. We get amazing results. At least I really like it. Other angles: I glue a beautiful pebble and beads to the left places. I use whatever glue I have at my disposal. The main thing is that it sets quickly and is transparent (“Moment”, “Super glue”). You can also, if you wish, walk through some of the details of our vase with stained glass glitter. Our marine style vase is ready. You can create a themed corner in the interior: You can put flowers in a vase.
Option No. 2.
Materials:
* glass bottle; * chintz fabric; * PVA glue; * white acrylic paint; * blue color; * transparent glue: “Moment”, “Super glue”, universal polymer; * brushes, sponge for painting; * stained glass paints with glitter; * materials for decoration: shells, coins, buttons, fish, beads, etc.; * scissors; *silver marker. Let's start making the second vase. First degrease the bottle: wipe it with alcohol or acetone. In this case, it is not necessary to remove the stickers. To begin with, we will perform decoupage with fabric. Almost everyone is familiar with napkin decoupage. But this technique (decoupage) is quite diverse and rich in options. So, cut the fabric into strips wide enough. It is better to use thin natural fabric. I have chintz, not new, quite worn (old pillowcase). Soak the strips of fabric in PVA glue (not thick, quite liquid, dilute with water if necessary). Lightly wring out the fabric and begin gluing it to the bottle, forming beautiful folds. Let's imagine, create! I got the following result: On the other hand: We are waiting for our vase to dry. The process is quite long. You can use a hairdryer to dry the product. Having waited, we begin to glue shells, coins and everything else you want into the folds of our sea that you associate with the sea. Let's start coloring our sea. Using white acrylic paint and a blue tint, we create the two shades we need for our work: a darker one and a lighter one. First, paint our vase with a darker blue color with a brush, painting all the folds well. After drying, paint with a lighter blue color, not so carefully, over the folds. The colors will combine and transform into one another. For painting we use brushes or a sponge. On closer inspection it looks like this: Drying our vase. Let's start painting with stained glass glitter. Apply it with a brush randomly over the entire surface. We use blue glitter. Again we wait impatiently for our beauty to dry and begin to create further. Armed with a variety of beads and beautiful things, we stick them onto our sea the way we like. We create interesting compositions. Draw on the fish with a silver marker.
If you went on vacation to the sea, you probably couldn’t resist and brought some of it with you - shells, pebbles, pieces of coral.
Use all this wealth to decorate a bottle in a marine style, described in our master class. The cost of the craft is pennies, but the pleasure is a lot! The souvenir will remain decorative for a long time, decorating the house, pleasing the eye and reminding of a wonderful vacation. Make this beauty in the coming days or save the link for the future if you don’t have the opportunity to do handicrafts yet.
Preparing for needlework
To decorate a bottle in a marine style with your own hands, prepare the following materials and tools:
- shells, sea stones, corals (all this can be bought in craft stores);
- glass bottle;
- sand;
- halves of pearl beads;
- metal pendants with a marine theme;
- two or three champagne corks;
- jute twine of different thicknesses;
- natural or synthetic mesh, white;
- stationery knife;
- scissors;
- nail polish remover;
- cotton wool or rags;
- transparent universal glue “Dragon”;
- glue gun with a transparent rod;
- tassels.
Not only the cheapest, but also environmentally friendly! You can do them with your children. We recommend that you immediately design using photographs.
Imitation of an “antique” map
Almost everything is ready, all that remains is to add a small element. Let's work a little with self-hardening clay. This material provides many opportunities for our creativity, and in this master class I will show how we made a roll of an ancient map from it.
Roll out the sheet to about 3 mm thick.
We cut off the required size and wrap the edges inward, as shown in the photo.
The finished card blank must be thoroughly dried. As it dries, it takes on a lighter shade. If the card remains dark after drying (depending on the quality and type of clay), then cover it with white acrylic primer. In this case, we simply applied acrylic varnish.
Glue a napkin with a card design and after drying, coat it with varnish again.
The finished work must be shaded along the edges with bitumen varnish or wax. We glue it to the inside of the lid, install the lock and voila.
Brushed with firing.
Wow! When it gets hot, we are already firing the pine wood with a gas burner. We open the windows wider so as not to breathe in smoke, but it is better to burn the box outside in the fresh air.
We do not leave a single light area; the box should be completely covered in black. We leave only space for the picture and on the inside for a decorative element made of clay.
Ready? Now we clean off all the fumes in the direction of the wood grain with an iron brush. Periodically wipe the box with a damp cloth to prevent dust from scattering too much.
Patination and primer
Now you can start patination of the surface.
Patina gives the decorated surface an antique look. With its help, the effect of contrast of individual elements is achieved, which makes the surface more expressive. We used a white water-based patina from Sayerlack. It's okay if you don't have one. You can use white construction paint slightly diluted with water.
Apply it in a thin layer to the brushed surface. It dries within a few minutes, after which it is partially removed with a damp cloth or Scotch Brite.
Apply acrylic primer to the surface on which we will glue the decoupage napkin.
Working with paints.
Selecting the appropriate colors, we will paint the picture. Here it is convenient to use an oval brush, or otherwise called a “cat’s eye”. This brush creates smooth transitions from one color to another. Just what we need.
We apply contrasting colors that are present in the picture to the sides of the box, then lightly wash it with a damp cloth. The color will only remain in the recesses. If you have sharp color transitions, add white paint to the borders of the transition. This will make the colors more shaded.
We covered the inside of the box with brown acrylic paint diluted with water.
And if you want the inside to feel more comfortable, cover this part with velvet fabric. You will learn how to decorate with velvet in the following articles. We cover the finished work with acrylic varnish, then, after complete drying, we stain the ends with bitumen wax or bitumen varnish.