Coffee tree - bead craft
To make a coffee tree with your own hands we will need:
- coffee colored beads No. 10 (for Czech beads)
- beads beige or light brown
- copper wire with a diameter of 0.4 mm
- wire with a diameter of 1.0 mm and 3 mm
- iris thread or coffee floss
- plaster or alabaster
- foam ball with a diameter of 4-5 mm
- coffee beans
- brown acrylic paint
- hot glue gun
- hot melt glue – 1-2 sticks
- PVA glue
- container for planting
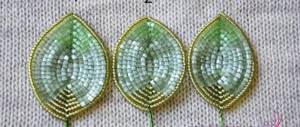
Making leaves.
Place 70-80 cm of beads onto the end of the wire from the spool.
Separate one bead from the bottom. Leave a tail of the wire about 10 cm long, and twist the leg under a bead about 1.5 cm long. String 6 beads onto the free end of the wire (tail). At the working end of the wire, separate the same number of beads.
Twist both ends in two turns.
Wrap the working end of the wire with beads once around the leg of a single bead - you will get the first arc.
Make a second arc by twisting the ends of the wire at the base of the leaf two times.
Make 4 more rows of arcs. Twist the ends of the wires. The result is a leaf.
Make 25 of these leaves.
Twist 5 leaves each to form a branch. Set aside the branches for now.
Making sepals.
Cut 5 pieces of wire 90 cm long.
Make a small loop at one end of a piece of wire and twist the wire under the loop several times. String 6 beads onto the other (working) end of the wire. Bend the wire at a distance of 10-11 cm from the end with a loop and collected beads, place 3-4 fingers of your left hand in the resulting bend of the wire and with your right hand twist the wire 1 cm close to your fingers.
String the required number of beads onto the working end of the wire. Place the second row of beads close to the first so that its end is located at a 45 degree angle to the first row.
Wrap the working end of the wire around the first row once, maintaining a 45 degree angle between the wires.
For the third row, collect the required number of beads and place them close to the first row on the other side. Twist the working end of the wire under the first row of beads, maintaining a 45 degree angle.
Work 8 more rows in the same way (11 rows in total).
Make the 12th and 13th rows from light-colored beads.
Twist the wires under the leaf.
Unwind the loop at the top of the leaf and string 9-10 light beads onto it. Twist the end of the wire and hide it by pulling it through the beads of the last row.
Make 5 of these sepals.
Making a coffee ball.
Paint the foam ball with brown acrylic paint.
Let dry.
Sort the coffee beans by size and remove any damaged ones.
Cover the ball with grains, placing them as close to each other as possible, in even rows (this is why sorting is needed). Glue the grains on any side you like: outer, inner or alternating. Under no circumstances use Moment type glue for a foam ball! PVA does not stick well (surfaces are uneven) and takes a long time to dry. It's better to use a heat gun.
If you like the result, you can leave one layer of grains. It turned out ugly with large gaps between the grains.
So I glued the second row of grains with hot glue.
Assembly.
Cut 5 pieces of wire with a diameter of 1 mm of a suitable length (focus on the height of the future tree + a margin of 5 cm for planting and bending). Wrap the wire around the stem of the twig with thread.
Cut a piece of wire for the trunk with a diameter of 4 mm and a length corresponding to the height of the tree, with allowance for fit and bending. Sharpen one end of the wire.
Wrap the sepals with a thread, departing 3 cm from the top of the wire.
Continue wrapping the thread around the tree trunk, attaching twigs at equal distances in a spiral.
Secure the thread at the bottom with masking tape or a drop of glue.
Fold the remaining ends and cut off the excess.
Take a container for planting. Dilute plaster or alabaster with water to the consistency of thick sour cream. Pour into a container and “plant” the tree in the solution. Hold until the solution hardens and the tree stands stable. Leave overnight to dry. Bend the trunk and branches as desired. Dilute about a teaspoon of plaster or alabaster with PVA glue in a 1:1 ratio.
While the solution is liquid, quickly coat the branches, being careful not to smear the leaves (you can wrap them in film or foil). As the solution thickens, coat the trunk from top to bottom. When the solution thickens or runs out, dilute a new one. Use small portions of the solution, because... it hardens very quickly. Take a brush with stiff bristles to give relief to the trunk, imitating the bark of a tree.
Let the wood dry
Paint the trunk and branches brown. After drying, you can lightly brush it with bronze or gold paint, giving the trunk a shine.
Apply some hot glue to the pointed top of the tree and place a coffee ball on it.
Decorate the soil under the tree with ground coffee. Just grease the surface with PVA glue or Moment Crystal and sprinkle with coffee. You can decorate with flowers made from coffee beans and beads.
All! The fragrant coffee tree is ready!
Enjoy the aroma of coffee or give a coffee tree to connoisseurs of this drink - they will definitely be happy!
saychata.ru
Do-it-yourself coffee tree: how to make it yourself?
Do-it-yourself coffee tree is an original craft: at first glance it seems complex and intricate, but if you try to make it yourself, following our advice, you will quickly master all the techniques used. In this case, we will not limit ourselves to the simplest ball; we will complement the tree with beaded branches, thanks to which your craft will definitely be unique.
DIY coffee tree
In the first master class on how to make a coffee tree with your own hands, we will combine two popular techniques for creating decorative decorations for the interior: the technique of creating topiaries and bonsai from beads. This is exactly what our tree will be, where aromatic natural coffee beans will be combined with beautiful golden beads.
A tree made from coffee beans with your own hands will decorate any interior; it will fit into both the interior of the living room and the interior of the kitchen. Such a gift will make any housewife happy, so if you are at a loss as to what to give your friend for her birthday or March 8th, then crafts made from coffee beans will be the ideal solution. And for a couple on their wedding anniversary, you can make a heart decorated with coffee.
Our tree will be about 40 cm in height, but you can make it taller or smaller and more decorative. For the craft, you need to prepare a set of materials and tools, because you need to make not only the coffee component, but also beaded leaves, and also prepare the materials to fix the finished tree in a decorative pot.
Of course, you can choose any beads, but it is best to choose those colors that would combine with the natural color of the coffee beans and highlight them, so we settled on two shades - brown and amber. Such beads will look very beautiful, especially if you choose transparent ones with a golden core. We will also need gold beading wire, which we always use when creating bonsai. For a strong frame, we will need another wire, about 4 mm thick, we will twist it in several layers, so a piece of about one meter may be required. The wire will also be used to create a frame for the branches; its thickness can be about 2 mm; about 5 meters will be needed.
Now let's move on to the materials that will be used directly to create the topiary: about 100 grams of grains and a floral ball, which can be replaced with a plastic Christmas tree ball; you can definitely find one in every home. We will attach the finished topiary to a coffee cup, and additionally decorate the saucer. We will also need paints - white and brown, Moment glue and PVA glue, aerosol varnish, plaster to secure the tree trunk.
How to make a coffee tree with your own hands
Now you can move on to the main stage, how to create a coffee tree with your own hands. The master class with photos will tell you not only how to attach the beans to the base, because even a child can handle this process, but also how to properly make leaves from beads on a wire base.
First you need to sort out the coffee beans: select only whole beans, preferably the same size. A plastic Christmas ball must first be coated with brown paint or decorated with a jute cord, which can be glued to the ball using glue or double-sided tape. The paint must be applied in several layers so that the surface is evenly painted.
We begin to make a coffee tree with our own hands step by step: the beans must be glued to the base at the “Moment”, because PVA will not ensure reliable fixation of the elements. Sometimes the grains are glued in two layers.
If you make the “Heart” topiary with your own hands, then using beads you can make a few more decorative hearts for decoration. But for the tree we definitely need to make leaves; for this we will use the French bead weaving technique. The same technique is used to make leaves when weaving flowers.
Beads need to be collected onto the wire, and then you can make the first turn: you need to step back about 10 cm from the edge, for the first turn you will need 15 beads. Each turn is secured by twisting on the wire. The loop will be three increasing turns, then you need to indent a few centimeters and repeat the same steps. Using this weaving technique, you need to make more than five leaves, step back another 10 cm from the edge of the last leaf and cut the wire. Large outer loops need to be sharpened; such leaves will turn out nice and very natural.
DIY coffee bean tree
When you have made several leaf blanks, you can start assembling - you need to twist the wire from the central one, so you will form a twig. At the end, the wire also needs to be twisted another 3-4 cm, and the leaves on the branch should be straightened in a chaotic manner. As a result, you should end up with 15 branches - this is a task for several evenings, so you need to start completing this gift in advance in order to be sure to meet the deadline.
Next, we have to make the sepals for our coffee tree; we will use the French axial weaving technique, in other words, arching. The technique is very simple, and even if you have not done beadwork before, you can master it quickly enough. First you need to leave an axis - 10 cm of wire with 15 beads. Using a string of brown beads, you need to weave arcs around the axis. The axis is braided at the top, then we return down. In each arc it is necessary to increase the number of beads. There should be five arcs in total on the leaflet. The workpiece should have an end of 30 cm of wire. You need to string amber beads onto this segment and form a sixth arc.
We continue to make a coffee tree with our own hands; the photo master class will tell you how to form a trunk from individual pieces. We need to attach the blanks to a wire with a diameter of about one and a half centimeters. To do this, you will need a 20 cm piece of wire. You can use nylon thread for fastening. Three finished pieces must be folded into a large branch.
The barrel frame can be made of aluminum wire, because it bends easily, but it is quite difficult to break it. Since on one side we will fasten the trunk in a pot, in this case in a bowl, then on one side we should make a loop.
You can add decorative coins to this craft, and as a result you will get an original money tree with your own hands.
DIY coffee tree: master class
Now we will assemble a coffee tree with our own hands, the master class will show step by step where to start: from the top you need to step back 5 cm from the edge and attach the first sepals. The remaining leaves must be attached to the base using a nylon thread, moving in a spiral.
Next, you need to decorate the finished tree: first, glue the bowl to the saucer, you can use PVA for this. Leave them motionless until completely dry. In a bowl or disposable glass, dilute the plaster so that its consistency resembles sour cream. Then you need to place the barrel in the center of the bowl and fill it with plaster; a little plaster should also be “spilled” onto the bowl and saucer, creating the impression that coffee has been spilled. This coffee cup will decorate your home interior and fill the room with a unique aroma.
The branches of the tree should also be plastered; for this you need to prepare a light solution: dilute the plaster with water and add PVA glue. The consistency of the solution in this case should resemble liquid sour cream.
When the crown is ready, you can attach the coffee ball. Then proceed to additional decoration to make our coffee tree look very beautiful with your own hands, the photo will tell you step by step how to paint the trunk with brown paint. We used ordinary paint - gouache, which must first be diluted with water and stirred thoroughly. When the paint is completely dry, you can begin shading the relief; for this you will need a dry, hard brush and white gouache. The brush should be made horizontal movements along the trunk.
The saucer and bowl can also be decorated using beans and ground coffee. And finally, coat the finished product with aerosol car varnish so that all elements are securely fixed and not subject to the influence of external factors.
A craftsman can make a coffee tree with his own hands by combining a variety of techniques and materials, for example, you can use the technique of creating bonsai and make a tree from coffee beans, natural stones and decorative coins. A money tree with coins is designed to bring wealth and good luck, so you simply cannot find a better gift for a friend.
DIY coffee tree: step by step
You can be sure that a coffee tree with your own hands will perfectly complement the interior; you can find photos of a variety of options for making such topiary on our website. Almost all trees with coffee beans have a spherical base, covered with beans, with an attached wooden trunk, which is finally fixed in a decorative pot with a plaster mixture.
Each topiary has distinctive features that lie in the elements of additional decor.
You are probably wondering how to make a spherical base, because not all stores can buy a foam ball, so needlewomen prefer to make it from scrap materials. For example, there is the simplest option - roll up a ball from newspaper sheets or foil, and at the end wrap it with twine or rope. For an “airy” topiary, you can make a hollow base using a balloon, thread and PVA glue. Using the same technique, you can make various children's crafts and Christmas tree decorations: first you need to inflate the balloon to the required size, carefully soak the selected threads with PVA glue and wrap them in a chaotic manner around the ball. Leave it until completely dry, and then carefully pierce the ball. When it deflates, you can take it out from the inside, and use the finished ball to decorate with coffee beans.
The most common combination is coffee beans with jute rope; it can be used to decorate the trunk of a tree and a pot; its natural texture will emphasize the “coffee” mood.
myhandmade7.com
Coffee heart
Another popular option is a heart topiary made from coffee beans, the creation of which we will tell you step by step.
- You need to make the blank for the heart-shaped crown yourself. To do this, cut out two hearts of the required size from cardboard.
- To one heart we glue a wire wound into a bundle - the trunk of our craft.
- We glue cotton pads onto the same surface to create the volume of the heart. Next, glue the two cardboard halves together.
- The outer part of the heart also needs to be covered with cotton pads. Then we wrap the resulting workpiece with thread, thus forming the desired shape. Paint it brown.
- Glue the coffee beans after the paint has dried. You can lay them out traditionally in two layers or get creative: along the contour of a figure, in a spiral, in honeycombs, etc.
- Next, we insert the workpiece into the bowl according to the same principle as in the previous master class.
Important: the cup can be placed on a saucer and glued, then the craft will be more stable.
- We decorate with flowers, figures, ribbons, rhinestones, etc.
Such a handmade item in the shape of a heart will not leave your soulmate indifferent and will give warm emotions to both.
DIY coffee tree. Photo master class – Masters Fair
Working time on the collage is 4 hours. Painting and drying of the ball - 1 day. Processing the trunk - 1 hour (if you do not use paint), planting the tree and hardening - 2 hours. Decoration of the pot - 24 hours (taking into account the glue drying).
Total time - 2 days.
Difficulty - 3.
Now it has become fashionable to decorate the interior with artificial decorative trees. The European florist tree comes in different shapes, sizes, and colors. The coffee tree is often round, of course, the color of coffee beans and small in size. It not only brings joy to the eyes, but also the aroma of freshly ground coffee. I decided to make one of my trees under the watchful eye of a photographic lens.
. I will show you what I came up with during this master class. So…
The basis for the crown is ordinary children's plastic balls.
I paint them with spray paint to match the color of the grains.
After painting, I dry it for at least a day. And at this time you can start preparing the grains. I sort them by size, so it will be easier and faster to select the grain you need in a particular fragment. And I remove ugly or broken grains.
Now you can work with such a ball. I use hot glue, it's quick, easy and holds tightly. Apply a drop of glue to the grain and quickly glue it to the desired location. I look for this most necessary place in advance, try on the grain to see if it will fit, and only then use glue.
I glue the grains on both the smooth side and the one with the groove, depending on how the grain fits better (more densely). But I prefer more grooves on top, since the texture of the surface is more embossed, I like it better. The grains can be glued in one layer, or you can make two, so the tree turns out to be more voluminous; it was photographed with just two layers.
To secure the barrel, you need to make a hole using a sharp knife like this.
Continue gluing, the second layer is visible here.
The crown is ready.
Insert the barrel into the hole, insert it all the way until it hits the “ceiling” of the ball, this will hold it tighter.
Seal it completely with grains so that the glue touches the trunk, surround it closely with grains for greater strength.
I would like to draw your attention to the barrel, or rather to the options for it.
A good branch of the so-called goat willow (green and red in the photo)
And this is an option for its use, if the trunk is colored, it would be nice to play up the color in the entire composition.
This is a roll of fax paper, you can use any straight stick or, for example, an ordinary pencil, it needs to be wrapped with twine or other coarse thread, it is also suitable for a country interior or for a country-style kitchen.
You can also wrap it with tape or
satin ribbon, a good gift option. Here you can use beads to match the ribbon (as in the photo).
You can also wrap rattan, dried in the form of a spiral, around the trunk.
Here the barrel is pre-painted copper color with acrylic paint.
Well, the easiest way is to take a shaped twig and process it with regular sandpaper. In the tree described, this is exactly what I took.
I still prefer ready-made ceramic pots. I'll choose a cup and then explain why.
To plant it in a ceramic vessel, we need polystyrene foam or other lightweight porous material. When cement dries, it can cause cracks to appear on the ceramic surface.
Drill a hole in the bottom of the barrel
and secure the wire in it in this way.
Thanks to this procedure, the tree will remain “dead” in the solution.
Cover with foam plastic
Pour water into the cement
mix well until smooth,
cut off a corner of a bag or file and pour the solution into it
and squeeze it into a pot with a tree, level the surface. After complete hardening, pour a 2 mm layer of PVA glue and pour in coarsely ground coffee.
Let the glue dry for a day, blow off any unadhered particles, and decorate with coffee beans to your taste.
Here I used dried horse sorrel. Other options for decorating the surface of the pot can be seen in the photographs of trees I took, for example sisal, and on the right you can see natural dried moss.
This is a tree with sisal.
And that's why I planted the tree in a cup.
www.livemaster.ru
What is this
Initially, the creation of topiary related to the art of artistic pruning of trees and shrubs, which dates back to ancient Rome. The gardens of wealthy nobles were decorated with trees with a round crown or in the form of various objects and animals.
Today, topiary is a decorative decoration, most often made from coffee beans and other improvised materials and decorations. This decor comes in different types and shapes; it fits well into any interior, both home and office. In addition, it emits a subtle coffee aroma that persists even after processing the beans.
There is a belief that such crafts can attract good luck, financial independence, happiness in love and family relationships. Therefore, the coffee tree is often given as a holiday gift to both men and women.
Coffee topiary “Lucky fortune telling” / Trees, bonsai / Biserok.org
Height 40 cm
Coffee is the drink of the gods! Who can argue with this statement? Coffee invigorates the body and spirit, saves from illness and bad mood. Coffee is a great topic of conversation when meeting for the first time and a faithful companion in any life situation.
For work we will need:
- brown beads with a golden center -70-80 g - amber or gold beads (transparent) -30-40 g - gold-colored bead wire -1 spool - wire for the frame of a barrel with a diameter of 3-4 mm - up to 1 m - wire with a diameter of 1 .5 - 2mm for the frame of branches - 4-5 m - brown nylon (silk) threads - coffee cup with saucer (ceramics or clay) - coffee beans about 100 g - Christmas ball (6-7 cm in diameter) or floral ball - acrylic paints or gouache (white and brown) - material for decoration (coffee beans and ground) - gypsum - PVA glue and Moment - car varnish transparent aerosol
Materials provided by handmademart.net store
Preparatory stages - prepare a coffee ball: Stage 1 - we sort the coffee beans (we select only whole beans, approximately the same in size and color) Stage 2 - we cover the Christmas tree decoration with brown acrylic paint in several layers Stage 3 - with “Moment” glue, carefully glue the coffee beans onto ball, if the result does not satisfy you, you can glue two layers of coffee beans.
Step 1. We weave branch blanks. The weaving technique is French without axial. Before starting weaving, you need to prepare a beaded base, stepping back 10-15 cm from the edge, make the first turn of 15 beads and immediately the next two free ones. We fix the turns with twisting on the wire. Thus, we have a loop of three increasing turns. Make an indent of 2 - 3 cm and repeat the weaving. In this way we weave 5 or more leaves. We retreat 10-15 cm from the last leaf and cut off the wire. We make the outer large loops pointed (see photo).
When the workpiece is ready, we begin assembly - starting from the central leaf, we twist the wire, forming a twig. After the last pair of loops, we twist the wire at a distance of 3-4 cm. We straighten the leaves in a chaotic manner.
In this way we weave 15 branches of branches.
Step 2. Weave the sepals of the coffee flower. The weaving technique is French axial. Let us recall the basic principles of the French weaving technique (threading with arcs). We prepare an axis (about 10 cm) with 13-15 beads and a small amount of brown beads. The low part and the axle are twisted (Fig. 1-3). Then we weave arcs from the prepared base with beads. The first arc braids the axis at the top once, after which it returns down and braids the axis at the bottom. In this case, the angle between the axis and the low one should be 45 degrees.
The remaining arcs are woven in a similar way, the number of beads in them gradually increasing. Number of arcs – 5 pcs. Then we move the beads and leave about 30 cm of wire free and cut it low. We string amber beads onto the free end of the wire and form a sixth arc. You can form a loop of 10 amber beads on the axis, tucking the free edge of the wire from the wrong side.
Step 3. We form branches and a trunk. We attach each branch blank to a wire with a diameter of 1-1.5 mm and a length of 15-20 cm with nylon thread (photo 1). Then we form a larger branch from three such prepared blanks (photo).
For the barrel frame, knitting or aluminum wire is used, which is easy to bend, but cannot be broken (it is better to trim the braid only at the edges). You will need to make a small loop at the end of the wire to attach it to the cup. We begin assembling the tree according to the following principle: we place the leaves of the sepals on the top of the head, 4-5 cm away from the edge, then we wind the branches in a spiral with a thread of the appropriate color according to the rule of the golden ratio (in a spiral).
Step 4. Assembling, planting and decorating the tree. We attach the inverted cup to the saucer with PVA glue and wait for it to dry completely. Now we can start planting and decorating the tree. We attach the prepared trunk to the gypsum solution to the cup, as if pouring a small amount inside the cup and out onto the saucer (as if our coffee had spilled). We plaster the trunk and branches with a light gypsum solution. Prepare the gypsum solution in the following way: gypsum, water, PVA glue
To attach the base in a cup - the consistency is like thick sour cream. To process the trunk and branches - like very thin sour cream. We attach a coffee ball to the prepared crown.
We select gouache (I used regular children's gouache) in two colors: brown and white. Dilute well with water and paint the trunk. After the paint has completely dried, you can begin shading the relief. Using a dry, hard brush, paint the trunk with white gouache, making horizontal movements.
Next, decorate as you wish. I used ground coffee and whole coffee beans - to plant the selected decorative element, you can use plaster or PVA glue. The final stage is to coat the entire product with colorless aerosol varnish.
Author: Gladysheva Oksana
866
biserok.org
What is needed to create
The set of materials for creating a coffee tree may vary depending on the type of topiary, its decorations and your imagination. Let us determine step by step the basic set required for such a hand-made project.
- Tree crown:
- foam ball (sold in craft stores);
- coffee beans – 200-300 g;
- brown paint or fabric;
- decorative elements (flowers, ribbons, buttons, beads, beads, cinnamon sticks, dried citrus fruits, etc.).
- Trunk:
- dry branch, stick, pencil, tube, wire;
- paint or wrapping material (twine, tape, fabric, etc.).
- Base:
- cup, pot or any other suitable vessel;
- alabaster for pouring (you can also use cement or gypsum, but alabaster is easier to work with and dries quickly);
- decorative filling (pebbles, remaining coffee beans, dry grass, moss).
- Additionally:
- scissors,
- brush,
- scotch,
- hot glue and a special gun for it.
How to make a coffee tree at home with your own hands + photo
Decorating your home with homemade items has recently become increasingly popular and widespread. There are a great variety of options for how to decorate the interior of your home, as well as a sufficient number of workshops on making items for an unusual and original design. Therefore, every needlewoman, regardless of her skill level, will be able to choose the appropriate option for herself.
A DIY coffee tree is an excellent addition to the interior of a cozy room and can easily be created independently at home. You can put it in your home or give it to someone as a gift made with your own hands from the heart. Such gifts are of particular value, because when making them, a person leaves a piece of his soul in the product. In order to make a coffee tree, you just need to watch several master classes, prepare the necessary tools and materials, and choose the time for the process.
For beginning needlewomen, making a coffee tree with your own hands may seem like a complex and labor-intensive process, but after just a few minutes of exciting activity, everything will turn out easily and correctly. Such a product, made at home, can be of different sizes and have individual features added at the request of the craftswoman.
Feng Shui meaning of the coffee tree
According to the rules and principles of Feng Shui, the coffee tree has unique properties and characteristics. First of all, its presence in the house helps to increase the well-being and well-being of the family. The coffee tree is considered a type of money tree, so its location in the apartment will favor an increase in cash receipts and an improvement in the financial situation.
Coffee is a famous and powerful talisman because the beans contain new life. Therefore, the product promises success in all matters, strengthening friendly ties and harmonizing love relationships. If you place a coffee tree in the bedroom, it will promote strong and mutual love.
The influence of wood made from coffee beans, which is made by hand, is especially important. In the process of making such a talisman, it is important to be in a good mood, think positively about something pleasant and good, and attract positive energy into the house. Then it will become not just a beautiful piece of furniture, but also a keeper of the warm and cozy atmosphere in it.
Manufacturing Features
Although there are many varieties and variations of coffee bean trees, they all consist of three main parts. The main part is the top of the tree, its crown itself, which is made from the base and covered with coffee beans. It can be based on any solid figure, but most often a ball is used. Although, at the request of the needlewoman, it can be an oval or even a heart. In order to make a spherical coffee tree, you can take any plastic or foam ball, which will subsequently be covered with beans.
The second part is the tree trunk. For beginning craftswomen, it is better to take a straight stick or tube, which can be decorated at your own discretion, for example, wrapped in flying paper or strips of colored paper. More experienced needlewomen can use other uneven structures that will serve as a trunk. It can be dense wire, decorated with thick threads or ribbons. But the simplest option is an ordinary tree branch, which can also be used for needlework.
The third essential part of a coffee tree is a pot or small vase in which it will stand. To do this, you can use any glass or even a small pot purchased at a flower shop. Its decoration depends entirely on the imagination and wishes of the craftswoman. A fixing mixture must be placed inside the pot. For this you can use sand or gypsum. The main condition for filler in pots is reliable fixation of the trunk and the tree itself from coffee beans, made with your own hands. Since most often this design is quite heavy, you need to think about which material will hold the weight better than others.
Varieties
All coffee bean trees can be divided into several main varieties.
Straight tree
It includes one common part of the crown, most often round in shape. The trunk on which it is mounted is most often straight and not very high.
Forked tree
It may have several (even three, four or more) branches extending from the main trunk, on which balls with coffee beans are attached. However, they can be different sizes, or they can look exactly the same.
Heart tree
Most often it is mounted on a straight trunk, and its crown is shaped like a heart covered with coffee beans. A variation of this option could be a heart tree, hollow inside. This not only looks original, but also makes the design easier.
It is up to the needlewoman to decide which shape of the product to choose in order to make it with her own hands. Any variety will look unusual and delight the eyes of everyone who can admire the coffee masterpiece.
Master class: Simple coffee tree
Making a coffee tree with your own hands is not difficult. First of all, you need to select the materials and tools that will be needed for the work. Experienced craftswomen use:
- coffee beans;
- a twig or stick that will serve as a tree trunk;
- children's plastic ball for the base of the tree crown;
- a vase or glass in which the tree will stand;
- glue, scissors;
- ribbons and decorations to taste.
First of all, it is necessary to prepare the crown of the future product. To do this, a plastic ball is wrapped with threads, onto which coffee beans will then be glued. It is important to leave a hole on one side of the ball into which the barrel will be inserted.
When wrapping the ball, you need to ensure that the threads cover the entire surface of the plastic, otherwise it will be difficult to stick the coffee to its surface.
The next step is to glue coffee beans onto the surface of the ball. PVA glue is used for this, although it is much easier and more convenient to use a glue gun. This will allow you to quickly apply glue to the surface of the threads, so that you can then cover it with coffee beans.
Coffee beans are carefully laid out on the glue layer. You should try to place them as close to each other as possible so that the ball is not visible.
After the first layer of coffee beans, you will most likely need to apply another one to fill the voids. This is necessary so that the crown looks solid and neat.
The next step is to secure the barrel in the ball hole. It can also be glued for reliability and structural strength.
The trunk of the coffee tree is wrapped with tape. Its color should correspond to the general style and be subdued tones.
Lastly, the trunk is secured in a pot or cup. To secure its location, you can pour sand into the container or secure the trunk with plaster. And on top, for decoration, put beads, nuts, the same grains, or even colored paper cut into thin strips to imitate grass.
Thus, making a coffee tree with your own hands is not at all difficult. And the fascinating and interesting manufacturing process is so addictive that after the first product you will definitely want to try another, more complex and interesting option. The main thing is to enjoy both the process of creating a coffee masterpiece and the result.
zhenomaniya.ru
Beading: making bonsai trees | Home magazine
Beading trees for beginners
It cannot be said that weaving trees is much more difficult than flowers or bracelets. The point here is different - creating them requires more time, as well as perseverance. Each bush consists of branches, which will require quite a lot of weaving. This is a meditative activity that will help you relax and deal with stress, and you will end up with a very cute product!
On the Internet you can find many different videos on beading trees that will give you interesting techniques and ideas. You can weave sakura, apple tree, rowan tree and even a New Year tree! Generally, all beaded trees look like bonsai, which means dwarf plant in Japanese. This bonsai will perfectly complement the interior of your home, and will also be a wonderful gift made with soul. So, stock up on beads, wire and patience - it's time to get started!
Other Topiary Ideas
Let's present a selection of different popular designs for all occasions:
- Flower tree. Its crown is decorated with flowers made of ribbons, felt, polymer clay, rhinestones, this is a nice gift for a girl or woman for any occasion.
- Fruity hello. The main decor here was elements made from real or artificial fruits. Most often these are dried citruses with cinnamon, cardamom and cloves. An original decoration for the kitchen interior.
- Christmas tree. Will help create a festive mood in the house. The base can be easily made from thick cardboard or you can buy a blank.
- Money Tree. A symbolic gift that is decorated with coins on the crown and in the pot. Step-by-step instructions can be found on the Internet.
- Flying cup. A very unusual topiary, it looks like something supernatural, although it is very simple to make. To create a suspended effect, you only need wire and foam (see detailed step-by-step guide).
- Lady and gentleman. Usually used as wedding paraphernalia, example in the photo.
Important: sometimes the beans are coated with varnish for shine and ease of care, but in this case you need to take into account that the characteristic coffee aroma disappears.
Detailed step-by-step instructions will help you create a small masterpiece even for those who are little familiar with such activities. What you make with your own hands will always have much more value than what you buy in a store. Especially if you did it as a gift for a loved one.