We invite you to consider and study interesting ideas for winter-themed cotton wool applications.
Christmas tree made of cotton pads
Performed by preschoolers during handicraft classes in kindergarten.
For this you will need:
paper or cardboard for the background (or color the paper with paint);- cotton wool discs;
- colored safety pins and glitter for decoration;
- scissors;
- glue and brush;
- pen and pencil.
First roll each part (a disk painted with green gouache) into a little bag. Secure the figure with glue and shape it along the contour of the spruce diagram. Then all the elements are glued step by step onto the background of the application. The finishing touch is to decorate with multi-colored safety pins, which will add a festive mood to the picture. It is easier for children to make decorations with their own hands by gluing regular beads. Draw a snowman's smile with a felt-tip pen.
How to make a pig from DVDs and felt - Second option
We have already said that you can make any animals from disks. Especially if these animals resemble a circle in shape. And what animals are round, pot-bellied and have no waist? Yes, of course they are pigs and hippos! I suggest that today, together with us, we will make a funny pig, a symbol of 2020, from DVDs and felt.
For this craft we will prepare the following materials and tools:
- Disk
- Felt pink and red
- Paper and pencils
- Ribbons
- Glue and scissors.
First we need to close the hole in the disk. To do this, cut out a large circle from the pink wind: it will close the hole and at the same time become a muzzle for the piggy. We will also cut out two identical circles for the ears and a small oval patch, outline it with a pencil or felt-tip pen and decorate it with sequins.
We also need legs with hooves - these are rectangles with a sector cut out and the edge tinted. We sequentially attach all this to the disk using ordinary pencil glue. Moreover, we give the ears a shape like this: we combine the two edges and glue them to the head from the inside out.
We will make the eyes for the piggy out of paper. Just cut out two small circles, outline them with a black pencil and draw the pupils. Glue it over the patch. Let's also cut out a mouth from a small piece of red felt. We attach it to the side.
To make the piggy look elegant, we will make two bright bows for it. From grosgrain (any) ribbon, tie two bows.
You need to fasten a loop on the back side, then the pig can be hung on a wall or on a Christmas tree. Secure with tape.
Glue the finished bows near the ears. You can use hot glue, or instant glue, or you can use pencil glue again, just press it harder.
Such a mischievous pig, the symbol of the year 2020 made of disks and felt, is in a hurry for the holiday!
What kind of pig will you get?
The author of the works is Anastasia Obolentseva , correctional teacher, Novosibirsk.
Polar bear made of cotton wool
We recommend this craft for beginners.
Step-by-step instruction:
- the idea you like for a picture and mark it with a pencil on colored (blue or dark blue) cardboard;
- prepare a corresponding stencil of a polar bear by cutting it out of paper;
- cover the template with cotton wool;
- make a snow covering from a textured material:
- stick the bear, add a nose and eyes;
- Decorate your work with sparkles.
Winter houses made of cotton wool
We recommend doing a bear den in the younger group.
What you will need:
- colored paper;
- green paper Christmas tree templates;
- templates of a bear with a muzzle and paws drawn in with a marker;
- cotton wool;
- glue and brush.
Step by step execution:
- First, the paper bear and Christmas tree are glued onto the background.
- Then decorate the applique with cotton wool: larger fluffy pieces are used to decorate the den around the bear cub, and small cotton balls are glued on like snow flakes (they harmoniously fill the background and decorate the Christmas tree with several elements).
Another interesting version of a children’s applique for the younger group on the theme “bear cub’s winter house.”
What materials you will need:
- background (paper or cardboard);
- paper stencils: bear face made of brown, month and stars made of yellow;
- half a large white circle made of cardboard (blank den);
- fluffy large pieces of cotton wool;
- The marker is darker than the main background of the application.
Process description:
- first, draw silhouettes of winter trees without foliage with a marker, 2 pcs.;
- glue the den template between them;
- attach a bear's face on top (draw the eyes and nose or attach beads);
- stick stars at the top of the background and a month;
- decorate the applique with cotton wool, stick on identical, rather large lumps (then you will get the effect of a den of large white ice stones);
- the space of the lower edge of the application to the left and right of the bear's den is also covered with cotton wool.
In the middle group of the kindergarten, complete the “magic winter house” appliqué.
List of materials:
- colored blue cardboard (an interesting effect can be achieved if the background is unevenly covered with thin translucent paper in color);
- cotton wool;
- wooden ice cream sticks (in sufficient quantity);
- yellow paint or gouache;
- glue and brush.
Instructions for implementation:
- A house with a window and a roof is first assembled from sticks, and then they are glued to the background in the same order.
- Above the house, the outline of the sun and rays is drawn with a pencil.
- Cotton flagella are glued in the shape of the sun and painted yellow.
- Start decorating your winter fairytale house with cotton wool: from its fluffy shreds, attach snow to the roof and snowdrifts.
- In the window of such a wonderful house, place a character made using any handicraft technique.
In the older group of kindergarten, when children draw more confidently, give them classes on how to design the pictures they have made. Thus, with the help of snow-white shreds of fluffy cotton wool, an ordinary house will come out dusted with snow. For classes in younger groups, print out stencils with drawings of finished houses to make it more interesting for children to decorate with cotton wool:
Finish the winter house with cotton wool and complex appliques, which are performed with children in the preparatory group. Such work involves the use of a variety of textures (pasta or cereals, fine glass chips):
Not only are ordinary or plot appliques made from cotton wool, but they are also used to create a real white painting, suggesting the presence of a complex spatial composition.
Drawing with cotton wool
Winter landscape
In winter, you can admire not only the lace decorating the windows of apartments and houses, but also the houses covered with snow. Small village houses covered with a blanket of snow look incredibly beautiful. It will be difficult for kids to make such a craft on their own, but children in the older group are quite capable of this task.
- Using wax crayons, draw the outlines of houses and trees on whatman paper.
- Using a dishwashing sponge, cover the paper with gouache diluted in water. The background for the picture can be anything, but white wool is best set off by dark colors.
- Now proceed to step-by-step application of glue to the pattern and gluing the cotton wool.
- Contour lines must be clear, so you need to use cotton wool to form them!
- And to fill the remaining parts and voids, you can use small pieces of cotton wool.
Video: Painting from cotton wool “Winter”
A winter application of cotton wool is formed quite quickly. To see this for yourself, you can watch a short video.
Winter city made of cotton pads
Materials and recommendations for implementation:
- background made of colored blue cardboard;
- cotton pads in the required quantity (depending on the scale of the planned work);
- halves of disks (they are useful for decorating roofs covered with snow);
- rectangular templates made of colored paper, identical (city buildings);
- small rectangles for gluing windows;
- marker for drawing window frames;
- rounded rectangles for making entrance doors;
- glue and brush;
- black marker and brown paint to draw the outlines of the trees;
- small snowflakes or stars for gluing scattered across the background.
Winter landscape made of cotton pads
To make an applique with a bunny and a Christmas tree, you will need:
- trim the required number of ends of cotton swabs;
- two cotton pads completely;
- translucent paper (thin);
- parts cut from disks (ears, paws, tail);
- pieces of colored red and black paper for the nose and eyes of the hare;
- glue and brush.
Winter forest trees drawn in gouache on colored paper are complemented with bunnies made of cotton pads:
Or they add variety to the texture of a watercolor illustration by making snow drifts from disks:
Graceful patterned winter lace is perfectly conveyed by cotton appliqué. By drawing a diagram of your favorite or invented illustration on a sheet of blue or blue cardboard, you can use cotton feathers and flagella to convey the beauty of the idea. All that remains as a finishing touch is to complement the work with the contours of the depicted trees and animals (they can be cut out of dark colored paper or drawn tightly by hand with a marker):
Pig symbol of 2020 from DVDs, master class step by step with photos
Today we propose to make a symbol of 2020 from a disk - a pig in a Santa Claus hat. Believe me, in 20-30 minutes you and your child will make a wonderful Frosty pig!
Materials needed for the craft:
- Disk
- Felt pink and orange
- Scissors
- Glue
- Buttons for eyes
- Narrow ribbon for eyelet
1. Let's start with the pig. We trace the disk with a pencil on a piece of felt and immediately draw protruding ears. Cut out the part.
2. Prepare the remaining details. Cut out one oval from pink felt (piglet) and two orange circles (cheeks). The inner elements of the ears and a small mouth are also needed. We also cut out rectangular legs.
3. We begin to design the face of the symbol of 2020 - a pig. Glue the pink circle. Next we glue orange cheeks, a mouth and a snout onto it. We attach the paws from the inside out.
4. Instead of eyes, I chose buttons with a shiny blue finish. And our nostrils will be replaced by black sequins. Don't forget about the bright earpieces.
5. We make a loop from a narrow ribbon and fasten it on the wrong side.
6. Select a Santa Claus cap from the holiday set. Also, it can be quickly made from red and white paper (cardboard) or felt. To do this, just cut out the red cap and the white fur edge. Glue the cap onto the piglet's head.
7. What a positive pig Santa Claus turned out to be!
8. It can also be used as a Christmas tree decoration, secured to the tree using a loop.
9. The cap can be rotated: for a mischievous one, move it to one side, for a serious one, place it straight.
Now each of you knows how to make the symbol of 2019 - a pig - out of DVDs, with your own hands. This craft is very simple, it will take a little time, and even a child can handle it.
Winter fun from cotton pads
Winter holidays are a time for fun and a variety of activities. This topic serves as a source for various ideas and applications - postcards made from cotton pads:
To make an original picture with cute snowmen you don’t need detailed instructions. Just stock up on: two discs, glue with a brush, gel pen and large glitter:
Create a cheerful mood by collecting snowmen - applications with children's photographs. Taking disks and photos as a basis, add other elements made from colored paper: handles - twigs, sports caps and buttons, noses - carrots.
Winter applications from cotton swabs
Having assembled and glued the house into a lattice onto colored (blue or light blue) cardboard, all that remains is to add snow-white snowdrifts made of fluffy cotton wool to it. The falling snow in this master class is made from cotton balls. At the final stage, the applique is complemented with sparkling, shiny elements from scrap materials:
Cotton snowflake
The main assistant in creating winter-themed applications is, of course, cotton wool! After all, it is this material that most closely resembles the light and airy snow that delights us every winter.
Using ordinary white cotton wool, you can create amazing lace, magical patterns that cover the windows of our houses with the onset of winter.
Winter lace consists not only of frosty patterns, but also of beautiful snowflakes. Each snowflake is an amazing, one-of-a-kind decoration created by nature itself!
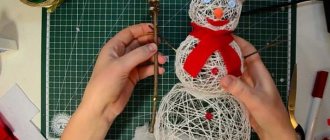
And now we will tell you how to make wonderful snowflakes from cotton flakes, which will be a wonderful addition to winter lace.
To make the application you will need:
- white cotton wool;
- PVA;
- cardboard for the base;
- ready-made snowflake template.
Technique:
- First, glue a white blank to black or dark blue cardboard.
- Then carefully glue small pieces of cotton wool on top of the snowflake so that it covers the entire surface.
- You can draw cotton lace around the finished snowflake. To do this, you need to make a frosty pattern with glue, and attach pieces of cotton wool on top of it.