Home / Eco-friendly house
Back
Published: 07/11/2020
Reading time: 4 min
0
3
- 1 Preserve the herbs in olive oil so they don't go to waste.
- 2 Mini chocolate cheesecakes for one bite.
- 3 Video material
- 4 Home methods
- 5 Perfect Ice
- 6 How to make ice without special ice molds?
- 7 Method two
- 8 Share on social media networks:
- 9 Types of ice for alcoholic drinks
- 10 Increase the freezing period
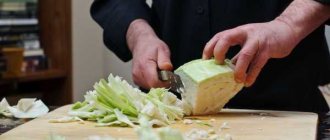
Preserve the herbs in olive oil so they don't go to waste.
Hard herbs that require cooking are best for freezing in oil: oregano, rosemary, thyme and sage. This method will help preserve all the aromas of the herbs; the shape of the ice cube allows you to use the product in portions.
Herbs frozen in oil are well suited for preparing stews, stir-fries, soups, and potato dishes. These dishes typically use oil at the beginning of cooking. And so you can take a cube of frozen herbed butter and use it as the base of your dish. When frozen in oil, herbs not only do not lose their taste and smell, but also saturate the oil with it.
8 Steps to Freeze Herbs in Oil:
- Choose fresh herbs. Herbs from your garden or market are best.
- You can chop them if you like, or you can leave the twigs and leaves whole. A combination of chopped and whole herbs such as rosemary, fennel stalks, sage and oregano works well in many dishes.
- You can mix bouquets of herbs. For example, mix sage, thyme, rosemary; in winter they can be added to roast chicken and potatoes.
- Fill ice cube trays two-thirds full with herbs.
- Pour unsalted ghee or olive oil over the herbs.
- Cover with film and freeze overnight.
- Remove the cubes from the molds and store in the freezer in containers or bags.
- Don't forget to label the containers and bags: where, what herbs and what oil were used.
One-bite mini chocolate cheesecakes.
There are two options for preparing this dish: vegetarian and non-vegetarian. These recipes are perfect for those who are on a diet, since the products are selected so that your favorite dessert becomes low-calorie. And it doesn't need to be baked!
Ingredients for non-vegetarian cheesecake:
- ¼ cup low-fat yogurt;
- ¼ cup light cream cheese;
- 2-3 tbsp. l. honey;
- ½ teaspoon vanilla extract (can be replaced with dry vanillin).
Ingredients for vegetarian cheesecake:
- 1 cup pre-soaked cashews (you can use other nuts, which also need to be soaked overnight);
- 2 tbsp. coconut oil;
- 2 tbsp. honey;
- ½ teaspoon vanilla;
- ½ teaspoon lemon juice.
- Ingredients for chocolate icing:
- 1 cup coconut oil;
- ½ cup cocoa;
- ¼ cup honey.
Preparation:
1. Combine all cheesecake ingredients in a food processor or blender until smooth.
We invite you to familiarize yourself with 15 ways to quickly get rid of unpleasant shoe odor
2. In a separate bowl, mix all the ingredients for the chocolate glaze until smooth.
3. Grease all ice cube trays with oil.
4. Using a spoon, pour chocolate glaze into each mold.
5. Spread the glaze along the sides and bottom of the mold.
6. Make sure the entire surface of the ramekins is covered. To do this, you can tilt the mold in all directions so that the glaze spreads over the entire surface.
7. Fill each ramekin with cheesecake filling.
8. Cover the top with a layer of chocolate glaze.
9. Place in the freezer for 2-3 hours.
10. Remove from the freezer and freeze for 1-2 minutes.
11. Remove the mini cheesecakes as you would normally remove ice cubes.
How to make ice without special ice molds?
The lack of molds is not a problem if you have imagination. You can make them yourself or even use improvised means. The approach option and the specifics of its implementation depend on the type of drink consumed and what is on hand:
- If you plan to serve not cocktails, but simply pour one-ingredient drinks, you should take care of the dishes in advance. To do this, take the selected glasses (preferably thick glass, it will not crack from exposure to cold air), pour about 1 cm of boiled drinking water into them, wipe them thoroughly so that no moisture remains on the surface. Next, carefully place the containers in the freezer (temperature is -1ºC), trying not to spill anything on the walls. The finished ice will not only be beautiful and perform the specified functions, but will also give the spilled drinks an original look.
- It's very easy to make your own ice using plastic or metal lids. For the first ones, it is better to trim them inside in advance so that the thread does not interfere with the extraction of the product. The main secret of the process is to pour the liquid to the maximum and reach the very edge. In this case, it will expand, protrude above the surface and the pieces will be easier to get out. You just need to keep them at room temperature for a few minutes until they melt.
- One of the easiest options for making ice is to use plastic cups. Pour pre-prepared water onto the bottom, determine the thickness yourself, but remember that the mass will still expand. Freeze the product and carefully remove it. You don’t have to settle on round “cubes”; if you insert homemade plastic dividers inside the cup, the shape can be adjusted.
- It’s worth looking around the kitchen and rooms; in most cases, something can be adapted for making ice. These include parts from children's construction sets, candy inserts, and silicone baking molds. Only available products must be thoroughly disinfected before use.
If you are short on time, and you can’t prepare something worthwhile with your own hands, you need to limit yourself to the simplest option. We take plastic bags, cut them into shreds, fill the blanks with a small amount of water and tie them in a knot. We will get small, neat balls that will look very original in a glass.
Secrets of clear ice for drinks
Those who want to learn how to make real ice for drinks with their own hands, and not just cloudy pieces of frozen water, should adopt the following approaches:
- Use of pre-treated water. Pour the liquid into an enamel or steel bowl, bring to a boil and let it simmer for a few minutes. After this, cover with a lid and leave to cool naturally. We repeat the manipulation and cool the composition again. Then we fill the ice molds and freeze the pieces. With this approach, the cocktail filler becomes transparent due to the removal of air bubbles.
- Slow freezing. You can displace bubbles that make the product cloudy if you freeze the product not quickly, but very slowly. The final version will not only be transparent, but also very smooth. True, the time for preparing ice in this case is at least a day. To carry out manipulations in the freezer, you need to set the temperature no higher and no lower than -1ºС.
- Freezing in salt water. This method also allows you to make clear and beautiful ice without cracks. Ideally, you should use sea salt, but if you don’t have it, you can make the mixture yourself. To do this, fill a deep bowl with water, add fine table salt and stir well (unfortunately, the concentration of the composition will have to be determined experimentally). We place the container in the freezer, the temperature in it should not be lower than -2ºС. As soon as the liquid has cooled down greatly, lower the filled ice trays into it and put them back in the freezer until cubes form. If the liquid in the bowl begins to freeze, this indicates an insufficient amount of salt, and the solution will have to be redone.
Method two
In order to make clear ice at home without boiling, you will need:
- clean water (it is better to filter it several times or buy it);
- large capacity for freezing;
- ice molds.
We invite you to familiarize yourself with the Barcode corrector: how to remove it, methods and means for removing stains
What to do with all this:
- About two liters of clean water are frozen in a large container, after which the frozen block is removed (the easiest way is to dip the bowl in warm water and turn it over onto a lint-free towel).
- Then you can chip off the ice from the edges with something sharp, gradually getting to the cloudy middle, which is not needed. There is also an option when the middle with air is washed out with water. Next, the extracted chopped pieces are again laid out in molds, waited until it melts, and again sent to freeze until ready.
But situations are different, and the state of affairs can affect everyone, and if suddenly the question becomes one way and no other way, then we will answer this question.
How to make fruit ice at home without molds with your own hands.
You can use regular glasses and cups. Tall glasses are better, but not with thin glass; it can burst in the freezer when fruit ice is frozen in the refrigerator freezer. It is better not to freeze anything at all, especially at very low temperatures, in glass, even if the glass is thick. Take and use iron or plastic ones, which are even better.
Plastic can be frozen as long as you like. Glass can burst, iron can freeze too much, but plastic is perfect. How exactly is it necessary and possible to cool fruit ice without molds at home? After you prepare and make fruit ice according to the recipe, the resulting mass should be divided into molds and placed in the refrigerator for 5-10 hours.
How exactly can this be done, in what ways? 1. Simply pour the prepared popsicles into a glass and put them in the refrigerator. 2. If you want to make several layers and not just one, then you should do it as follows. 3. First, fill the glass with one type of prepared fruit puree and syrup. Just not to the brim, but 30% of the glass. 4. Leave to cool for half an hour. 5. After about 30 minutes, take the dessert out of the refrigerator and into a glass, on top of the first layer of fruit ice, which is already frozen enough so that you can pour the second layer on top. Pour the second type of dish up to 60% of the glass. Place the second layer of dessert in the refrigerator again to cool.
In the same way, half an hour after the 2nd layer of fruit ice cream freezes, pour a 3rd layer of another type of fruit ice on top of it. As a result, you should get a glass with a dessert made of 3 different layers, balls of ice cream.
How to make popsicles at home without molds.
Also, about the popsicle sticks. You need to insert them into glasses with dessert not when it is completely frozen, but during cooling, while it is still at least slightly liquid or thick, but not when the mixture has already hardened. Ice cream sticks can also be bought online, as well as the molds themselves for cooling food in them. There are also special plastic containers for storing already prepared products. In such special plastic containers for storing homemade ice cream or sorbet, fruit ice, the product can be stored in them for up to 2 weeks.
At the same time, your dessert in the refrigerator will not pick up the smells and tastes of everything else that is there. So, under no circumstances should you refrigerate or store ice cream or fruit ice, sorbet, in the refrigerator in an open container. Only with a tightly closed lid. Otherwise, your delicacy will simply pick up the smells and tastes of everything that can be absorbed from the products stored in your refrigerator along with the open dessert.
Recipe, tips on how to make, prepare fruit ice, ice cream, sorbet at home yourself.
Also, do not forget about the quality of the products and ingredients used in the recipe for making fruit ice at home with your own hands. All the products from the store will not be the same as from the grandmother’s market, so to speak. Nothing beats natural homemade eggs and cream with milk and berries and fruits. Make a dish from such products, natural and homemade, and not from the store and with all sorts of chemicals, and the delicacy will turn out a hundred times tastier and healthier. This will be especially appreciated by children who love sweet and tasty desserts like ice cream and popsicles.
In general, of course, it’s better to think about buying an ice cream maker, ice cream molds, fruit ice, and sorbet. With an ice cream maker, you can prepare a delicious milkshake for yourself and your children, and all of the above dishes at any time. Almost all devices, in addition to the main unit, also come with molds and storage containers. It’s better to spend money once and enjoy it almost every day, especially on children’s holidays, birthdays and others, when children ask to cook something special.
Types of ice for alcoholic drinks
To prepare ice for a drink, you can use ordinary molds, which are placed in a regular refrigerator, and to make ice in large quantities, use a special unit called an ice maker. Although few people know this, ice can be made in several categories and varieties:
- Food. This type of ice appears in the form of individual pieces of ice, shaped like small cylinders or cubes. Most often made using an ice maker from filtered drinking water. This type of ice is used as a cooler for alcoholic and non-alcoholic drinks or cocktails.
- Lump. It is prepared in the form of pieces of different shapes and is added both to cool the liquid and for beauty in alcoholic cocktails. In this category, ice can also be divided into cups, cubes and nuggets.
- Chipped. This type of ice is usually used at presentations and exhibitions to keep drinks and food cool. This ice has the form of crushed pieces that have an irregular shape. This type of ice is also used in bars and restaurants for preparing cocktails in a shaker. You can prepare crushed ice at home, by breaking chunks of ice with a kitchen hammer and using a cloth so that the fragments do not fly away. Because crushed ice melts much faster than other varieties, it is prepared right before use.
- Ice Frappe. This name is given to finely crushed or shaved ice, which is used to make cocktails with the addition of fruit, cruchons, Mojitos, and other drinks that are usually drunk through a straw.
- Granulated. This type of ice has the shape of small hailstones, approximately 1 cm in diameter. This ice is easy to store, it does not freeze and mixes quickly with the product and never damages its soft tissues. Most often, such ice is used to serve wine, champagne and some types of dishes on an ice bed.
- Ice cubes Fancy. This sonorous name was given to ice cubes in which a variety of candied fruits are frozen. Such cubes can also be made from coffee or tea, and if preparing a cocktail involves using juice, berries or mint leaves, then all this can be frozen in Fancy ice cubes.
- Color. This ice is used not only to cool drinks, but also to create their original design, or decorate the glass. Juices, lemonades and cocktails are usually served with this ice, although it can be used for any other purpose at the user’s request. To obtain colored ice, fruit and berry juices are used, which have different colors, and in addition, such ice cubes have a pleasant original taste. In order to give the ice greater originality, layer-by-layer freezing is sometimes used, then each ice cube has an impressive and beautiful appearance.
- Fried. Despite the unusual and controversial name, this ice is quite simple to prepare. To do this, small pieces of fruit are frozen in the freezer, then the egg white is beaten and a meringue is made, the diameter of a tennis ball. A piece of ice is pressed into it, after which it is doused with cognac and set on fire. has time to burn before the ice melts, and the meringue turns out toasted, maintaining a cool and refreshing effect, with ice inside.
We suggest you read: Removing chewing gum: ways to remove chewing gum from jeans
Today, in order to make any type of ice, you can use an ice maker or a wide variety of freezing molds, which are usually made of plastic or food-grade silicone.
How to use ice cube trays
Ice molds are an indispensable kitchen assistant that should be in every housewife's arsenal!
This device will be especially useful in the summer, when it’s hot outside and you want to drink or eat something cool. We have prepared for you 19 unusual ways to use ice cube trays that will definitely come in handy. So quickly bookmark this article!
- You can pour coffee into molds, freeze it and add it to milk when it’s hot. Makes an excellent summer drink.
2. Leftover red or white wine can be frozen and these cubes can be used to make various sauces.
3. You can also freeze yogurt, especially if it has a short shelf life. This is a great summer treat that some people enjoy even more than ice cream!
4. Freeze fruit puree. This is not only delicious and healthy, but also a very refreshing dessert!
5. You can also freeze watermelon and enjoy your favorite dessert even in winter!
6. While freezing the water, place the flowers in it. This ice can be used as decoration!
7. Ice cube trays can be used to make chocolate desserts, such as chocolate-covered strawberries!
8. Freeze grenadine and add this ice to alcoholic drinks or cocktails. This way they will be chilled and you will not have to dilute them with regular ice.
9. Freeze citrus juices and add the cubes to plain water. You won't find a better soft drink!
10. Edible glitter made from gum arabic is an excellent decoration for various dishes and cocktails. And if you also freeze them...
11. Sushi can be preserved by freezing it.
12. Freeze aloe juice and wipe your skin with it. This is an excellent tonic!
13. Freeze fruit and berry smoothies. First aid when you're hot and hungry!
14. Flowers that can be eaten are frozen flowers.
15. Frozen chocolate can also be added to cocktails.
16. If you freeze mint and lime along with regular water, you can at least make mojitos every day!
17. Multi-colored cubed ice cream is a great addition to a regular milkshake.
18. Fruit ice, which consists of several layers, is something!
19. Freeze parsley and dill in olive oil so you always have fresh herbs on hand.
Shall we turn on some music to set the mood?
Open Kluber FM website | iOS app | Android app