This handy scoop is very easy to make. It can come in handy in a variety of situations; for example, it is very convenient to pick up bulk materials. It is used in the kitchen or in stores for “bulk”: sugar, buckwheat, rice, flour and so on. It is also very convenient to collect bulk construction materials, such as sand or dry construction mixtures.
Materials and preparation
A scoop made from plastic bottles, as mentioned above, is really easy to make. All you need is one plastic bottle. The capacity of the plastic bottle for the scoop is selected depending on what tasks it will solve.
The larger the bottle, the larger the scoop will be and the faster you can use it to transfer bulk materials from one container to another. Accordingly, the smaller the plastic bottle, the smaller the scoop, which can be more convenient in some cases.
If you intend to use a scoop made from plastic bottles for food products, the bottle must first be thoroughly washed using detergents under running water. You also need to remove stickers and labels. Then the plastic scoop bottle is thoroughly dried.
How to make a scoop from plastic bottles
Once the bottle is properly prepared, it can be made into an owl. This is done very simply, literally in a few seconds. The main thing is that the knife is sharp enough, large and thin. It is much more difficult to wield a knife with a thick blade, and even a dull one.
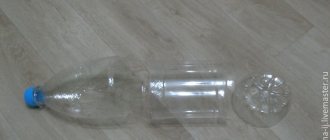
So, to make a scoop from plastic bottles, you just need to cut off the excess bottom part of the plastic bottle. It must be cut at an angle, that is, diagonally, as shown in the photographs. In this case, the scoop will be very convenient to work with.
In principle, you can first cut off the bottom of a plastic bottle, and only after that cut a scoop of the required shape from the remaining part of the bottle. That’s it – a scoop made from a plastic bottle with a comfortable handle is ready!
Once the scoop is cut, you can take scissors (large and sharp ones are best) and trim the cut line. If you want to bring the scoop of plastic bottles to perfection, this very cut line can be melted a little with the help of a candle. You just need to work carefully, because plastic bottles are made of thin plastic, and a scoop made from such plastic bottles can melt very easily.
We managed to make two useful things from one plastic bottle. See for yourself.
1. Plastic bottle scoop 2. Cell phone holder
Once again I was at the market and saw an interesting thing. You also noticed it a hundred times yourself. Everything is very simple and banal, but when you need to, you won’t remember and won’t do it. A scoop cut from a plastic bottle for scooping up small amounts of bulk materials! As soon as I got home I got down to business. Take a plastic bottle, scissors and a marker. With a marker we mark the boundaries along which we need to cut, as shown in the photo, and go ahead.
We do not throw away the cap from the plastic bottle, but close the “neck” so that the collected bulk material does not spill out.
This is how we made a scoop for scooping sugar, cereals, etc.
That's not all.
Cell phone holder.
See for yourself. The remaining part of the plastic bottle also found its use.
Carefully correct the cut edges so that there are no unevenness and it looks beautiful. Cut a round hole. So we got a holder for the cell phone. We hang the holder on the charger and plug it into an outlet, and put the phone inside. Very comfortably. I recommend to all. If the holder is large, you can cut it smaller - at your discretion, I left it this way.
This is how I made two useful items from one plastic bottle.
A cell phone holder can be made in a similar way from the top of a plastic bottle with a neck.
See for yourself.
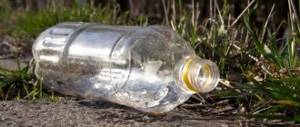
Homemade scoop from a plastic canister with your own hands. Let's make a necessary item from scrap materials - a scoop. The trade offers a wide selection of plastic scoops. However, as you can probably confirm, scoops are becoming less and less durable and reliable. An accidental fall or blow and the scoop is split or a crack appears along it. Manufacturers of scoops are not interested in the long life of their products, but most likely want us to be able to buy a new scoop for our home more often. But in everyday life, we often throw away canisters of detergents, products or technical fluids. Surely, with the onset of winter, we saw empty glass washer cans in parking lots. And this canister will make a good scoop for cleaning up garbage, collecting spilled small objects from the floor, or a measuring scoop for preparing mortars from bulk materials during repairs. The method for making a scoop is like a life hack - it’s simple and fast.
BEST IDEAS. What can be made from plastic bottles.
The capacity of the plastic bottle for the scoop is selected depending on what tasks it will solve.
The larger the bottle, the larger the scoop will be and the faster you can use it to transfer bulk materials from one container to another. Accordingly, the smaller the plastic bottle, the smaller the scoop, which can be more convenient in some cases.
If you intend to use a scoop made from plastic bottles for food products, the bottle must first be thoroughly washed using detergents under running water. You also need to remove stickers and labels. Then the plastic scoop bottle is thoroughly dried.
How to make a scoop from plastic bottles
Once the bottle is properly prepared, it can be made into an owl. This is done very simply, literally in a few seconds. The main thing is that the knife is sharp enough, large and thin. It is much more difficult to wield a knife with a thick blade, and even a dull one.
So, to make a scoop from plastic bottles, you just need to cut off the excess bottom part of the plastic bottle. It must be cut at an angle, that is, diagonally, as shown in the photographs. In this case, the scoop will be very convenient to work with.
In principle, you can first cut off the bottom of a plastic bottle, and only after that cut a scoop of the required shape from the remaining part of the bottle.
That’s it – a scoop made from a plastic bottle with a comfortable handle is ready!
Once the scoop is cut, you can take scissors (large and sharp ones are best) and trim the cut line. If you want to bring the scoop of plastic bottles to perfection, this very cut line can be melted a little with the help of a candle. You just need to work carefully, because plastic bottles are made of thin plastic, and a scoop made from such plastic bottles can melt very easily.
By the way, if you make several of these scoops from plastic bottles of different sizes, you can use them to approximately measure the amount of bulk materials. To do this, take bottles ranging from half a liter to two liters. Sometimes this is very convenient.
Bucket and scoop
Preparation method:
Both the bucket and the scoop are made from the same bottle.
- First, cut off the bottom of the bottle. Using a knitting needle or scissors heated over a fire, we make holes on both sides for the wire handle. Insert and secure the handle. We paste stickers or transfers. If the edge of the bucket is sharp, you can wrap it with regular electrical tape.
- The scoop or spatula is made from the remaining part of the bottle. The top part of the bottle with the cork will be the handle, and cut out the middle part of the bottle smoothly to fit the scoop. You can also cover it with stickers, just try to stick it closer to the handle, otherwise they will quickly peel off on the working part of the scoop.
It is advisable to choose even bottles for these sand accessories. In our version, the bottle was embossed only at the bottom and near the cork, and the middle, from which the blade was cut, was smooth.
Hello, dear gardeners! The topic of today's material is interesting to everyone and is always relevant. It’s probably familiar to many, but I still hope to surprise you.
Today, everything is sold in plastic bottles: water, lemonade, milk... Of all the garbage that we accumulate, bottles are the most voluminous: you put one in the trash can and that’s it: consider half the bucket occupied. And what is it like at the dacha! In many holiday villages there are simply no garbage containers. There is only one way out: either take all this “good” to the city, to the nearest container, or somehow use what cannot be recycled in the countryside.
A logical question: how can plastic bottles be used in the household?
so that it is useful, convenient, and beautiful? That's what we'll talk about.
By the way, informational note
: plastic decomposes in water
from 100 to 500 years
(according to various sources and depending on the type of plastic).
We have few factories that process waste, so people themselves find interesting uses for simple and seemingly completely unnecessary things.
Crafts from plastic bottles
15 ideas for a garden: a vertical garden made from plastic bottles
As soon as you get tired of looking at a boring fence or a blank wall of a house at your dacha, ideas for a vertical garden made from unnecessary plastic bottles will come to your aid. Who said that in order to add bright colors and unexpected solutions to your dacha you will need serious efforts and considerable funds?
You can successfully apply these simple ideas for using plastic bottles both for the garden and for the veranda or your balcony.
You must have collected a considerable amount of plastic bottles in order to make a similar design for several sections of a country fence. But in the summer heat, collecting a couple of dozen bottles of lemonade or mineral water will not be difficult.
You can secure plastic bottles horizontally and, by cutting out part of the bottle, place the seedling inside. Or use the bottom of the bottle as a flower pot.
The main task of a vertical garden made of plastic bottles is to ensure regular watering of such a structure and to avoid stagnation of water in the lower part of the container.
To do this, the bottles are connected to each other, and a thin hose with holes for watering is laid inside.
You can make a kitchen garden in your dacha in this way for growing greens: lettuce leaves, for example, will always be clean.
Therefore, even if you have a lot of land, it is worth experimenting with this design. You can use plastic bottles at the dacha “for beauty”. We wrap a lump of earth with seedlings in burlap, and place plastic bottles in a circle.
Cute pig
In order to make a cute pig, you will need to prepare:
- Five liter plastic bottles;
- Acrylic paint;
- Varnish;
- Scissors;
- Dish sponge;
- Marker.
First, we take the bottle and remove all unnecessary parts from it, such as rims and handles.
Now we mark with a marker and cut out an oblong hole almost from the bottom to the throat, and above it on the back side, we make another wider hole. From scraps we make ears and a tail for a piglet.
Now you need to paint our animal in any color you like. We paint in two or three layers, and when the paint dries, it is necessary to varnish the product. Such a pig can be very useful in the garden and can be used as a flowerbed for growing flowers.
20+ original options for using plastic bottles in the country
The result is not for everyone, but you can play around with such ideas. If the appearance of black soil in the bottle bothers you when planting like this, you can always paint it with leftover paint or use all your handicraft talents and wrap it in something bright.
Depending on the shape of the plastic bottle, there are different designs for its use in the garden.
Perhaps you will come up with your own version of a vertical garden - even more successful.
For exotic lovers, you can make an imitation of a hanging tropical garden. It is better to plant indoor flowers of the bromeliad family in such structures, which can simply grow in the air.
Succulents, fat plants, and bright purslane are also well suited for such gardens.
A vertical garden made from plastic bottles does not require much space or much expense. The whole family can participate in its creation: dad makes the structure, mom plants the seedlings and the children decorate the bottles. This way you can make a design out of bottles that is best suited for your dacha.
WHAT IS YOUR OPINION?
If we talk about the obvious, but about what we sometimes don’t even think about, it turns out that the average lifespan of a plastic bottle is only 10-15 minutes. However, the period of its complete decay in nature is about 300 years. Comparing such dates is difficult, but necessary. It is necessary to realize how long after we have taken advantage of the “momentary weakness”, nature will restore its natural balance. Although, in order to somehow “brighten up” such a significant difference in the period of use and disposal, you can give a “second life” to already used plastic bottles. In this article we will talk about what can be made from empty, used plastic bottles.
How to make a greenhouse out of plastic bottles
You can make a greenhouse out of plastic bottles by placing the bottles in rows on wire and placing these rows one next to the other. Don’t forget about the well-known method, when even small “shreds” of plastic are cut out of bottles and then sewn into a large canvas. It is from this “canvas” that the walls and roof of the greenhouse are made.
How to make a pencil holder from a plastic bottle
The simplest thing you can make from a bottle is an ordinary pencil holder. Simply cut the bottle to the desired height and melt the edges, for example, on the surface of an iron.
How to make a drawing stamp from a plastic bottle
It is important to have some imagination here. If you have one, then your plastic bottle can become a useful drawing tool.
How to make a toy from a plastic bottle
You can shorten the bottle by cutting out a piece of plastic from the middle, and then fasten the top and bottom, decorating the resulting toy.
How to make a spoon from a plastic bottle
This option for using a plastic bottle will come in handy on a hike or on a picnic when you don’t have a spoon but have an extra plastic bottle.
How to make a case from a plastic bottle
It is very practical to use a plastic bottle when transforming it into a case where you can store various useful little things.
The lock can be glued in or sewn in, depending on what seems more secure and simpler to you.
How to make colorant from a plastic bottle
How to do without plastic bottles at the dacha. Here they are a container for seedlings and material for greenhouses, and even a sprinkler for planting. It is enough to supply water through the neck of the bottle, after making many holes in its walls.
How to make a feeder-dispenser from a plastic bottle
From two plastic bottles you can make a feeder and dispenser for pets.
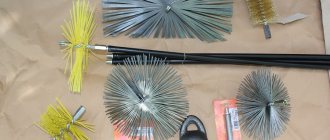
How to make a broom from plastic bottles
You can even make a broom out of plastic bottles. To do this, we place the already loose bottle bodies one on top of the other, like leaves in cabbage, and then secure them using the same elements from plastic bottles. Don't forget about the handle and the broom is ready.
How to make a closure from a plastic bottle onto a plastic bag
The neck and cap of a plastic bottle can be used as a dispenser-lock, together with a plastic bag. We thread the edges of the bag into the neck and screw on the lid. If necessary, unscrew and dose bulk products through the neck of the former bottle.
How to make a scoop from a plastic bottle
If you have used bottles made of thick plastic, then with a little imagination and skill you can make a good scoop.
How to make a phone holder from a plastic bottle
A practical pocket - the holder can be made from a plastic bottle if it is cut according to the photo below.
How to make a lamp from a plastic bottle and plastic disposable spoons
An unusual lamp can be made from a plastic bottle and disposable tableware (spoons).
How to make a vase from plastic bottles
If you have patience, time and desire, then plastic bottles make good vases.
How to make slippers from plastic bottles
If you came to someone's bathhouse and forgot your slippers at home, then plastic bottles can make good disposable slippers.
How to make a washbasin from a plastic bottle
Well, everyone knows about the washbasin made from plastic bottles.
Of course, in fact, we have only given special cases, since there are many more real examples of the use of used plastic bottles. That is why we once again encourage you to try to use what many consider garbage. Such decisions will help us save time, money, develop our imagination and logic, become a hobby for some, and, most importantly, slightly support the ecology of our planet.
Plastic bottles
In everyone's life, they have firmly taken a place as disposable containers and their use is only in the form of containers, but we can get much more benefits without throwing them away.
For most people, a bottle is a useless thing, but with some ingenuity you can find many ways to make your life easier and save money using bottles. can be made from a plastic bottle
; you just need the bottles themselves and a little imagination.
LiveInternetLiveInternet
Quote from Tatyana_Kuranova's message
Read in full In your quotation book or community!
"Magic" bottle!
Greenhouse made from plastic bottles
This greenhouse is made from 1500 liter plastic bottles with the tops and bottoms cut off. The greenhouse has vertical posts cemented into the ground, these serve as a foundation to strengthen the structure. A plastic covering made from bottles is strung on a wooden frame, which is attached to a cement base. This reuse of bottles will make our planet a little cleaner from polluting plastic.
Made from bottles and tetrapacks Bottle fence
Border
From empty bottles you can make a beautiful and durable border for flower beds or paths in the garden or at the dacha.
To do this, you need to take empty bottles, paint of different colors, a cord at least 0.5 meters long and ... your desire. First, you need to paint the bottles, one color, or you can use different ones. Then dig a shallow groove along the path. Pull the cord and strictly stick the empty bottles with their necks down, half their height. Stick the bottles close to each other in a chain. The result will be a very beautiful and durable side. By the way, in addition to the path, bottles can be used to border both flower beds and garden beds. *
** It is advisable to insert bottles without stoppers.
As the temperature drops, the air will compress inside the bottle and the pressure will drop accordingly. This may cause the bottle to become wrinkled. And without a cork, the bottle will not be so hermetically sealed...U plastic. The bottom and neck of the bottle must be cut off, then the resulting pipe must be cut lengthwise, and then bent in half (also lengthwise) in the direction opposite to that in which the bottle itself tends to bend. Bend like a sheet of paper that needs to be torn evenly, i.e. press, bend and hold with something (the blunt side of a knife, for example). Then bend the resulting “seagull” in two more places to form a “slate” of 4 waves. And then bury this “slate” with a slight overlap. It turns out so great! Just like a store-bought border, only it shines! Clamps made from plastic bottles.
You need scissors. Cut off the bottom and neck of the bottle, cut along the seam. We get the canvas. This canvas can be cut in half or into three parts, depending on the length of the clamp. Average size 10-12cm. Then I cut it into strips. I cut by eye. Then I measured the width. It turned out to be 2 cm. I bend 2 cm on one side and cut out a strip 7 mm wide and more than 1 cm long. All sizes are approximate. No one stands with a tape measure and measures. There are two points that must be met and that’s it... After bending, you get a cutout longer than 2cm. On the other side, I cut out the hat on the neck with two slightly rounded triangles. The length of the cutout should be slightly longer than the width of the strip. And the width of the neckline should be slightly wider than the neck of the hat. Then it will be easy to fasten and unfasten everything. For what? I fastened roses to a support, tomatoes and cucumbers to a net. I think it will be convenient to fasten a woody vine to the first wire in the spring. I made a couple of pieces universal with two rows of cutouts, for a smaller and larger diameter. Did not like. The speed of fastening and unfastening is lost. I decided that it would be better to make a smaller size (length) from beer bottles, dark ones. And if you need long ones, I’ll cut them from transparent ones. While I was chatting with my friend, I cut about 30 pieces. When the strips were prepared, it took 1 minute - 1 clamp. There is no need to straighten, it’s even convenient that they are already twisted. Curtains and partitions
Building a house
from plastic bottles
Palma
back massager
Bag
Designer chair
Raft
I'll continue tomorrow. This is an amazing thing. It’s a pity it’s night, otherwise I would have rushed to bring it to life...
Sprinkler for the garden.
One of the simplest ways to use a bottle in a vegetable garden or garden
— make
a garden sprinkler
, it couldn’t be easier to make. We attach a plastic container to the garden hose and make several small holes, then tightly seal the hose with the neck. This is how we made a garden watering system.
Advice.
For convenience, use a square container or secure a round one with a weighty object.
It is not uncommon for the charger wire to be missing from the socket to the location.
where you can put your mobile phone, everything can be fixed by making a clumsy
phone holder
. It is necessary to cut the bottle diagonally, take the bottom and cut a round hole in the upper part for the socket. Now the phone will lie in the bottom using a socket.
Advice.
It is better to cut the bottle as close to the top as possible, this will allow you to hold the phone more securely.
your stationery every time?
, you have to look for them, you need to make an easy to make
stand
. In addition to the bottle, you will need a bolt and nut. You need to cut off the top and bottom, then drill a hole in the plug and bottom and connect it with a bolt and nut. It will be convenient to use this since it turns out to be 2 sections. The upper compartment will accommodate pens and pencils, and the lower compartment will hold paper clips, buttons, graters, and you won’t have to take out your pens for small things.
Advice.
Tighten the bolt and nut loosely, then the top will be able to rotate.
Empty canister
with a manual one you don’t have to throw it away; it can be useful if you don’t need it or have become unusable; it will turn into
a scoop
. It is necessary to mark the canister with a marker as in the photo and cut it.
Advice.
For convenience, make the nose of the scoop square.
Create an elephant
To make a wonderful baby elephant, you will need the following materials and tools:
- Six liter bottles - two pieces;
- Two liter bottles - six pieces;
- Corrugated tube of small diameter, half a meter long;
- Thick wire 55 centimeters long;
- Sand;
- Glue;
- Scissors.
First, take four two-liter bottles and cut them in half crosswise. The underside will become the legs of the future baby elephant. Now we take a six-liter bottle and make ears out of it, after which we take a second six-liter bottle and make holes in it to fix the ears. After this, we take the wire and bend it, giving it the shape of an elephant’s trunk, and put a corrugated tube on top of it.
The time has come to paint all the blanks; you can use natural gray, or any other color you wish. When the paint dries, you can assemble the baby elephant.
We take the parts of the legs and fill them with sand, after which we glue them to the body of the animal. The trunk must be fixed to the neck of a six-liter bottle used as a body. Now we insert and fix the elephant ears in specially made holes. All that remains is to take paints and draw the elephant’s eyes and mouth.
Now the cute and funny baby elephant is finished.
Laminating a glass jar.
We use glass jars
for different purposes and you have to mark them in all ways, but the inscription on the glass does not stick well, and the glued pieces of paper quickly become unusable, and
to laminate them
. With an industrial hair dryer, this problem will be solved forever, and the strength of the cookware will increase. If you break it, you won't have to pick up the pieces and cut your hands. Using your imagination, you can decorate the jar well. It’s easy to do, you just need one bottle of suitable size and color and a piece of paper with an inscription or design that we want to attach. However, there is a way to do without an industrial hair dryer.
Method one.
Cut off the top of the bottle and place it on the bottom with the cork facing up, then place the jar with the inscription on the cork, put on gloves and start heating the industrial hairdryer. When the hairdryer is hot, you can begin to gently heat the jar in a circle, without stopping in one place. You need to take a reserve, the plastic will settle both in width and height. When the jar is tightly sealed with plastic, cut off the excess and heat the angular parts again, if all parts have become even, the jar is ready.
Advice.
Start heating the plastic from the bottom, gradually rising.
Method two.
Cut off the top of the bottle and place a jar with an inscription glued to the bottom. To heat the plastic in this case, we need a tall pan of water and a stove. The pan should not be full, otherwise water will splash onto the stove. When everything is ready and the water is boiling, we lower the bottle into boiling water and begin to turn it slowly, holding the neck of the glass jar with tongs.
Advice.
By holding the jar at an angle, the effect will be achieved faster.
Are you tired of balls of thread?
, tangled with each other and stuck in knots, the solution is simple - from bottles of any size we make a device for
holding the threads in one place
. At the same time, the balls will rub less, get tangled and get stuck. You can make a holder that can be attached to a chair or armchair. We cut the bottle closer to the neck, leaving a part that needs to be cut in the form of a rectangle to the bottom, after which we make a hole in the resulting tail according to the size of the lid and put it on.
Advice.
The device can be hung by making holes on opposite edges and threading a thread through them.
With the onset of cold weather, all possible types of heaters are turned on in every home and at the same time the air in the rooms becomes dry
, and we begin to experience discomfort. Headaches, skin problems, irritation of the mucous membrane and other inconveniences can be avoided by making a silent, simple, convenient and reliable room humidifier. For this you will need:
- Adhesive tape
- Scissors or knife
- Strip of fabric or lace
- Two liter bottle
- gauze fabric
Advice.
By pouring essential oils into a container, we get an air freshener.
Instructions
- We make a 5×10 centimeter slot in the side of the bottle; errors are acceptable.
- Using strips or string, we hang the resulting bottle on the straight upper pipe entering the battery with the hole facing up and secure it tightly with tape so that the bottle does not jump out and spin.
- We fold the gauze several times to form a rectangle 10 centimeters wide and a meter long.
- We place the middle of the folded fabric in the hole, and wrap the ends around the battery pipe.
- Pour water into the resulting container and moisten the wound gauze, this is the maintenance of the device.
Mosquito trap
We make a mosquito trap from a two-liter bottle
. The trap will attract small insects with the results of fermentation processes, namely carbon dioxide. To make it you will need:
- 1 gram baker's yeast
- two liter bottle
- dark fabric
- 50 grams of sugar
- 200 ml of water with a temperature of no more than 40 degrees
We begin production by cutting it so that the neck, upside down, fits tightly into the bottle and does not reach the water. Now that the container is ready, pour in sugar, yeast and fill it with forty-degree water, it should not be warmer or hotter. If the liquid is too hot, fermentation will not begin due to the death of the yeast bacteria. Pour the water slowly and stir the mixture. Now we insert the neck into the bottle like a funnel. To catch mosquitoes, the trap must be covered with thick fabric that does not allow light to pass through or with paper. Once caught in such a trap, mosquitoes will not escape. Insects will be caught in such a trap for up to a week, after which we will change the mixture.
Advice.
After preparing the mixture, place it in a warm place.
From several one and a half liter bottles we make a simple and extremely durable broom
. This broom is convenient for sweeping floors and fleecy surfaces. The hardness of the broom depends on the number of pieces cut.
Manufacturing.
First, we make preparations. We cut off the neck and bottom, spread the middle into flaps to the middle, no wider than two centimeters. You will need 4 of these, and leave another one with the top and neck. Now we put everything together, and cut off the top from the next bottle, put it on what happened and squeeze it. We take a strong wire and thread it through all the bottles along the edges. We put everything on the handle through the cork and secure it with wire. For reliability, we drive a nail through the neck into the handle.
Advice.
Use copper stranded wire.
If we didn’t have a mug
you can easily
make it from a bottle
. First, cut off the top, then use a knife or scissors to cut out a square, retreating 2-3 centimeters from the top cut. We cut it evenly and with the expectation that the width of the remaining jumper will be the handle. Turn the top ring inside out and push through the bottom. Now we have a mug that can help us out in nature.
Advice.
Without cutting out a large square, you can fold the middle section and place the cork ring over it.
Create a self-watering flower pot
just cut off the top of the bottle first, then the middle part, so that the top part fits in without touching the bottom. Then we carefully make a hole in the cork and thread a thread through it. The thread should extend 5 centimeters from both sides of the cork. Now that everything is ready, pour water and insert the top part that looks like a funnel. Now we fill in the soil, not forgetting to wet it. The plant will absorb the required amount of liquid, this will simplify plant care.
Advice.
Fertilizers can be added to the tank.
Arriving outdoors, you forgot your cutlery
there is nothing to notice them with. To save the situation, a bottle, a knife, and a lighter are enough. Cut out one of the five parts of the bottom and a little of the top in one piece after burning the edges with a lighter. You can use this spoon to eat and prepare food.
Advice.
After burning, rinse the device.
Not all refrigerators have vegetable compartments
and you have to store vegetables in a variety of forms, while the food gets beaten, scratched and rolled all over the refrigerator. For convenience, use five-liter eggplants. Cut off the top part and fill with vegetables or fruits. In this form, the food will not wrinkle and there will be significantly more free space in the refrigerator.
Advice.
Store vegetables and fruits in separate containers.
In the process of preparing dishes, the white or yolk of an egg is required separately.
. But they are not easy to separate, the yolk is very fragile and if you puncture it, it will mix with the white. You can cheat with a bottle. Crack the egg onto a plate, squeeze the bottle and bring it to the yolk. By unclenching, we will draw the yolk into it without damaging it. The method is suitable for preparing dishes whose recipe includes a lot of eggs, for example, the common French meringue dessert “Meringue”.
Advice.
Rinse the bottle before use.
Homemade scoop from a plastic canister with your own hands. Let's make a necessary item from scrap materials - a scoop. The trade offers a wide selection of plastic scoops. However, as you can probably confirm, scoops are becoming less and less durable and reliable. An accidental fall or blow and the scoop is split or a crack appears along it. Manufacturers of scoops are not interested in the long life of their products, but most likely want us to be able to buy a new scoop for our home more often. But in everyday life, we often throw away canisters of detergents, products or technical fluids. Surely, with the onset of winter, we saw empty glass washer cans in parking lots. And this canister will make a good scoop for cleaning up garbage, collecting spilled small objects from the floor, or a measuring scoop for preparing mortars from bulk materials during repairs. The method for making a scoop is like a life hack - it’s simple and fast.
How to make a homemade scoop with your own hands
1. Select a canister suitable for the required purposes. For example, canisters with a flat side are more suitable for collecting waste. Moreover, you can choose canisters of different hardness, which will affect the ease of use of the scoop and its lifespan.
2. The only tool you need is a sharp knife.
3. We outline the cutting lines for the canister; this can be done with a permanent felt-tip pen or “mentally”.
4. We cut off the excess part of the canister with our own hands using a knife. The homemade scoop is ready. See photo. The price of a life hack product is zero :).
Canisters for liquid Canister cut Scoop - cement dispenser
In the same way, you can urgently make a water scoop with your own hands, for example, when you need to quickly remove water in the event of a water supply failure and save the neighbors below from leaks. The same scoop is useful for removing water from your watercraft (boat, cutter, yacht).
By recycling plastic containers in this way, we save nature and energy resources.
And a little about DIY inventions. It is not clear why container manufacturers still do not immediately make a notch on the canister for quick cutting and obtain a scoop at the output? This is a worthy competitive advantage.
We managed to make two useful things from one plastic bottle. See for yourself.
1. Plastic bottle scoop 2. Cell phone holder
Once again I was at the market and saw an interesting thing. You also noticed it a hundred times yourself. Everything is very simple and banal, but when you need to, you won’t remember and won’t do it. A scoop cut from a plastic bottle for scooping up small amounts of bulk materials! As soon as I got home I got down to business. Take a plastic bottle, scissors and a marker. With a marker we mark the boundaries along which we need to cut, as shown in the photo, and go ahead.
We do not throw away the cap from the plastic bottle, but close the “neck” so that the collected bulk material does not spill out.
This is how we made a scoop for scooping sugar, cereals, etc.
That's not all.