Apparently, based on this, it is not so easy to buy special pipe cleaners in the store; not everyone has them. That’s why people clean pipes with whatever they can find, old brooms, tree tops, sticks, washcloths and other derivatives of “what’s tricky.”
But there is another saying: whatever you get sick, cure yourself, and if that’s the case, then why not make a pipe cleaner from the same bottles that, when burned (for example), clogged the pipe.
Everyone always has plastic bottles, because they have long become a sign of civilization.
A brush made from a plastic bottle is easy to make, costs nothing, but cleans pipes perfectly, and its design is so simple and primitive that you can make a new one every time and not clutter up your garage.
In this example, an old brass door handle is used as a weight. The rope of the required length was purchased at the store.
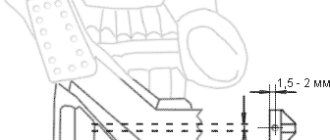
Related link: In order to make a chimney sweep's brush, I used the top part of the bottles, which I cut to form a kind of ribbon. In order to more conveniently center the load and thread the rope through the covers, I drilled holes in the covers. Then he tied the rope to the load and threaded it through the lids.
During work, it turned out that the lower and upper parts of the homemade brush could move relative to each other, so rings from another plastic bottle had to be inserted inside the brush. The cut rings had to be cut to fit the diameter, and then secured with an ordinary construction stapler.
Then I pulled the rope that was tied to the load and passed through the lid tightly so that all parts of the pipe cleaner were more tightly connected to each other, and then tied it in a knot.
My stove pipe is approximately 14 by 14 centimeters, so the diameter of the brush turned out to be 17.5-18 centimeters (with the bottle ribbons spread out). Of course, it won’t be possible to cover the entire chimney with such a diameter, but otherwise (if you make the diameter larger) it will be difficult to drag the brush up and down the pipe - it will stop. True, this can be corrected by making the load heavier.
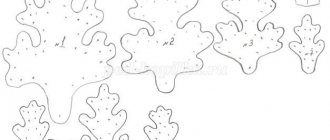
Homemade brush for cleaning pipes and chimneys with your own hands - photo for the material
- The walls of the bottles need to be cut into petals approximately 1.5 cm wide.
- The petals should not be cut all the way to the neck. This will provide them with the necessary elasticity.
- I used a solid brass door handle as a weight.
- It is necessary to drill holes in the plugs for the rope and the screw part of the load.
- The sequence of assembling the ruff.
- Stiffness rings.
This will help wash and clean dishes
Plastic tape cut from a plastic bottle can be successfully used in the household for washing dishes, only to do this you need to make a brush out of it. Plastic, as a material, has remarkable properties regarding food deposits on dirty dishes. On the one hand, it is hard enough to scrape off stubborn dirt, and on the other hand, it is not hard enough to damage the surface of kitchen appliances, be it steel, glass or enamel. To everything else, it should be added that it is easy to make such a brush both at home and in nature, as long as you have a couple of empty plastic bottles on hand.
Idea
The surface area of a 1.5 liter plastic bottle, from which you can spiral, is at least 600 sq.cm. If the width of the ribbon is about 5 mm, then its length will be about 12 meters. Not bad, right? This tape can be successfully used for gutters (see), or you can use it to wash dishes using your fingers as a template for winding ()
Job
All that remains is to wind the ribbon into a springy bundle that would not bulge during cleaning work. You can do this in different ways, but so that the bundle does not fall apart and its pieces do not bulge, I recommend doing it this way (). I would call it marine coiling, it seems that this is how the cable is attached when large ships are moored.
The fingers are used as the basis for the figure eight, and the ends of the tape are threaded several times from inside the two formed rings and tied together. This bundle is quite reliable, springy and compact for use as a brush for washing dishes. That's what we needed to get in the end.
The “fluffiness” of a brush depends on the total length of the plastic tape from which it is made. If you use only one half-brush (volume 1.5 liters), then the brush will probably be rather weak (). I think two bottles will be enough (). It is difficult to make a brush from a larger number of bottles using such a winding method - the span of your fingers is not enough))). I have several methods for making pipe cleaners, which I will talk about later, but this one is the most efficient of all. Another option, more powerful and end-mounted, with which I clean the inner surface of teapots from scale, can be viewed at
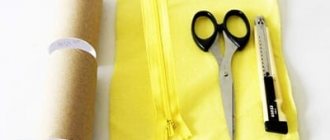
What we need for work:
- PVA glue and Moment glue or a hot glue gun;
- braid;
- scissors;
- glitter;
- beads;
- gypsum;
- jar
Here it is, a brush, brand new, it costs only 30 rubles.
We remove the handle. Quite quickly I broke it...
We pick up the scissors and start cutting. We cut the top with a cone to form the crown of the Christmas tree.
Let's start decorating. Coat the edges of the needles with PVA glue.
We pour glitter onto the paper and “crawl” over it like a Christmas tree.
I took a pendant from a New Year’s toy….
and glued snowflakes to it. This will be the top of the Christmas tree. You can do something different, here is your imagination and the presence of various little things at home.....
While the snowflakes are sticking together and the Christmas tree needles are drying up, I found in my supplies a small jar of modeling mass, which we have a lot of, because... This is my granddaughter’s favorite activity and she decorated it with braid. Your options for decorating the stand can also be very different. Then I spread the plaster and poured it, inserting the Christmas tree.
After the plaster has set, all that remains is to decorate with what is at hand: beads, garlands, …….
Look how beautiful and twisted the stem is.
Top
This is with a herringbone pattern made of textured threads. These little ones will decorate any desk at work or home interior.
We can say that a chimney brush is the main tool used for the hygiene of this structure. In some ways, the device is similar to a toothbrush for cleaning bottles, the principle and overall appearance are very similar, naturally only the dimensions are much larger. The ruff consists of a main spire (also known as the central perpendicular), on which several circles of large “bristles” are made. Often thin steel wire is used, in some cases only soft types of wire can be used.
Despite a general understanding of the cleaning procedure and an overview of the entire device, many are unaware of significant factors when purchasing finished products. It should be taken into account that the tool is not suitable for every type of channel. For example, for brick structures, a brush with hard “bristles” is suitable, where the “bitten” soot is “settled” quite tightly on the walls. If you are buying for a steel pipe, purchase soft products, with soft wire or plastic, nylon. Otherwise, the rigid wire may damage the structure. As you can see, there are enough nuances in choosing ruffs and it is important to pay attention to them.
Brush for cleaning a brick chimney
Where is it sold and how much does it cost?
You can buy such a device at any hardware store. If you don't have it, you can purchase a brush for your chimney on the Internet; as a rule, the cost does not differ significantly. The average price is within 2,000 rubles.
Which tool to use
Clogging of pipes is a consequence of the gradual deposition of combustion products on their walls. After all, smoke is not only a gas. It contains light elements, small particles of ash, etc. They constantly settle on the inner surface of the chimney system pipes, and do their job, albeit slowly but surely.
Eventually, the chimney cavity becomes clogged to such an extent that the draft is significantly weakened. But this is only the first stage. Then layering occurs in certain places of burning.
On a note! Hard plugs are much more difficult to remove, and they cause more problems. As a result, cleaning will require considerable labor.
But the chimney pipes, which look like long sections, still need to be approached somehow. This is done using a chimney brush. The effectiveness of this simple tool has been tested by time.
The ruff, or popularly the brush, consists of:
- metal tubes or cable;
- core or hook for weighting material;
- heads;
- additional nozzles.
To clean pipes, brushes of different sizes and shapes, with nozzles and weights, are used.
In most cases, the presence of tubes or cable is necessary. They enable the performer to control the movement of the instrument. The brush can be lowered to the required depth, break through the blockage by moving the tool progressively, and move on. During the cleaning process, the length of the pipes does not matter. The success of the event depends only on the length of the cable. This accessory can be made of metal wire or spring, but you can also find samples woven from rigid plastic threads.
If there are numerous solid deposits, a more preferable option is to use a metal pipe cleaner made from one or more tubes. After all, it is much easier for a person to operate with a rigid pipe, since the shoulder of the application of force is strengthened and, therefore, the growths are removed more effectively. Deterioration in mobility is the other side of the coin. A device of even a relatively short length takes up more space and is more difficult to transport.
The main working element of a pipe cleaner is a head made of rigid wire. The wire is specially wound in such a way that its parts are directed in different directions. You can also find a version where not wire is used, but plastic elements or something similar. Sometimes in homemade brushes, the heads are often made from pieces of plastic bottles.
A weight must be suspended from the brush, which helps to destroy the hard plug in the pipe
The device nozzle is mounted at a distance of 10-15 centimeters from the edge of the cable, and not directly on the edge. A special hook is attached to the end itself. This accessory is used to hang weights. As a result, the brush for cleaning chimney pipes turns into an analogue of the core, capable of breaking through the blockage formed in the pipe with its weight.
How to make a homemade brush?
If the price seems too high for you, you can make such products yourself. The main thing is to determine exactly what shape you need and for which pipe. There are three main types of brushes:
- The brush is a classic metal brush, shaped like a cylinder. Additional devices included in the kit can be a simple long rope, usually 5 meters, or a weight weighing up to 2 kg. with extension cord.
- A regular brush equipped with steel or nylon bristles. Has a special handle.
- Scraper. It saves the day when there are soot build-ups on the channels that the two previous options cannot cope with. Can be of any suitable shape.
From a plastic bottle
A homemade brush can be made from an ordinary water bottle. Manufacturing stages:
- In the center of the bottom, make a small hole.
- A hole of the same diameter is made in the lid.
- Next, cut the bottle into small strips and attach a pin with a hook to one side.
- On the other side, a pin is also inserted, which are connected together.
- Using nuts, compress the bottle and attach a weight to one side.
The process of making a plastic brush
This design is suitable for cleaning metal and ceramic channels.
From the broom
A chimney brush can be made from an ordinary plastic broom, which is now available in almost every household. Manufacturing stage:
- Cut off the stalk.
- Straighten the “stubble”, you can use a hair dryer. After straightening, we clamp it with a pin and washer.
- From the side of the handle we wind a pin with a hook.
- The structure is tightened on both sides, then a cable with a sinker is attached.
Excellent for cleaning wide channels.
From a metal brush for an angle grinder
A metal brush or brush can even be made from such a device. At the moment the price is not that high, so we recommend buying a finished product. If you decide to make a chimney brush with your own hands, remember that you will need two sheets, a threaded rod and nuts. Also, do not forget to use stiff wire or, in some cases, nylon wire as “bristles.”
A complex version made of metal cable
A cable can also be used to clean chimneys. The manufacturing process is much more complex and requires certain efforts and skills. You will need a cable, preferably 1 cm in diameter. An edge of about 10 cm dissolves into individual fibers. They bend in different directions, and in order to hold the shape to clean the pipe, two plates are taken and compressed. A counterweight should be attached to the bottom edge to break up lumps and soot build-ups.
Furnace heating systems require regular maintenance. One of the mandatory procedures is periodic cleaning of the chimney, which becomes clogged over time and becomes overgrown with soot.
For this task, a special brush can be used to clean the internal walls of the chimney.
Some useful tips
If possible, make two or three ruffs. One, with a diameter of 80 to 130% of the pipe cross-section, you will use for thick layers of soot. A second, smaller brush will help prevent minor blockages. When making a weight, focus on a third of the diameter of the chimney. The optimal length of the cable is 15% greater than the length of the pipe as a whole. A cable of this length will reach the hatch, breaking through all solid deposits along the way.
A chimney brush is a useful and necessary device. You can buy it at the store, but if you make it yourself, such a tool can be the best assistant for cleaning pipes for a long time.
What is a cleaning brush, what does it look like and what does it consist of?
Structurally, the brush consists of the following parts:
- Brush. The main element almost always has a round shape. It is this element that cleans plaque from the inner walls of chimneys. Can be made of metal, plastic or nylon.
- Sinker. Only used if the brush is attached to a cable. If it is attached to a telescopic pole, then a weight is not needed. The approximate weight of the weight is 2-3 kg. Its purpose is to add weight to a light brush. Without additional weight, a brush on a cable simply will not properly clean off even a light layer of plaque.
- T grew or pen. A brush is attached to this element, and on it it is lowered into the chimney.
The main quality characteristics include:
- Length of cable (handle). Cables are usually used 10-15 meters long, handles 1-1.5 meters long.
- Brush diameter (rectangular products are found, but less common than round ones). Can be from 20 to 250 mm. The most common range is 150-200.
Types of products by material and type of design
The main differences between all products are in 2 nuances:
- The material from which the brush is made.
- The method by which the brush will be lowered into the chimney.
By material
- the following options are currently used:
- Metal. These brushes last longer, are more durable and reliable. The disadvantages include less convenient use: if the metal bristles get caught on something, it will be more difficult to “free” it. In addition, metal products are more expensive than plastic ones (but since the cost of any brushes rarely exceeds 2000 rubles, this is not critical).
- Plastic. It is easier to make such products yourself - it is done quickly and easily (we will describe how exactly below). Plastic brushes wear out and break easily and quickly. In addition, they cope much worse with complex and old blockages.
- Nylon. A relatively new option, essentially an intermediate solution between plastic and metal.
By method
, with which the brush is lowered into the chimney:
- On a cable/rope. Can only be used from above - the brush is lowered into the pipe under the weight of the sinker. This option is relatively simple, but is not suitable for cleaning horizontal areas. The cable can be metal, nylon or rope.
- On a flexible cable (as for cleaning sewer pipes). Pros: can be used both from above and below, and on horizontal areas.
- On a rigid handle (rod). A universal and more effective option - it allows you to quickly clear accumulated soot and can be used in both vertical and horizontal areas. The length of the handle is usually adjustable - for this they are made telescopic, and, if necessary, folded or unfolded.
Signs of blockage and consequences
The stove or fireplace chimney should be cleaned regularly. Moreover, the frequency of this work, according to experts, should be at least once every few months. The maximum period of time between such events is no more than six months. This applies to any pipes - steel, ceramic, brick and all others.
Of course, delay is not critical. Some stoves and fireplaces last much longer without cleaning. But a clogged chimney constantly causes its owner certain troubles. The smoke exhaust system produces an unpleasant odor, and due to weakening draft, the flame in the fireplace becomes weaker, it may even change color, and the fireplace itself smokes more. And everything would be fine if you do not take into account the fact of partial sedimentation of carbon monoxide inside the room due to irregular cleaning of the chimney. After all, the lack of normal traction does not allow this chemical compound to be completely removed. The root of the problem lies in the fact that carbon monoxide is invisible and almost odorless. But it has a detrimental effect on human health and quite quickly.
The most powerful argument in favor of regular cleaning of chimneys is formulated as follows: at one “wonderful” moment, smoke can literally pour into the room due to severe blockage of the chimney system. In this case, everything and everyone will be smoked.
You can recognize a chimney blockage by deteriorating draft in the system
And only replacing some things and cleaning the furniture will help eliminate the consequences, but the need for a thorough repair cannot be ruled out. You can't call this thing cheap. Regular cleaning of the chimney requires less material costs.
How to choose the right chimney brush?
Let's summarize the basic selection rules:
- Rigid handle or cable? Ideally, have both options on your farm: they are inexpensive, and it will be much more convenient to work. If you need to choose one thing, and there are no hatches in the chimney, then it is better to take a cable. If the chimney has hatches and is not high, then it is more convenient to use a rigid handle.
- Which brush material should you choose? For stainless chimneys, you need to choose only plastic - it will not scratch the stainless steel. For brick and asbestos chimneys, it is better to use a metal or nylon brush.
- What brush diameter should be for a round chimney? Selected according to the pipe diameter.
- What brush diameter should be for a square/rectangular chimney? To make the right choice, you need to measure the length and width of the chimney, and select a brush with a diameter equal to the larger side.
- What should be the length of the cable/handle? Selected according to the length (height) of the chimney. It is not necessary to take the cable/handle to its full height: cleaning is carried out not only from above or below (from the fireplace or stove), but also through hatches that are located in different parts of the chimney.
Where is it sold and how much does it cost?
Furnaces of various types and sizes are sold in stores that sell equipment for fireplaces, stoves, and baths.
A tool like this is relatively inexpensive:
- polypropylene brush, diameter 100-120-200 mm: cost - about 700-1000 rubles;
- plastic brush, diameter 200-250 mm: cost - about 1700-2000 rubles;
- metal brush, diameter 150-200 mm: cost - about 1500-1800 rubles;
- metal brush, 250 mm in diameter: cost - about 2200-2500 rubles.
Please note: the amounts given are only for the brush itself and the load. The cable or telescopic extension is usually sold separately. The approximate cost of an extension cord for 1-1.5 meters is about 400-600 rubles, a cable (for 10-15 meters) is up to 100-200 rubles.
A ready-made kit (the brush itself, a cable or extension cord and a weight) will cost around 1500-2500 rubles.
Among the manufacturers on the market of the CIS countries you can find:
- Hansa.
- Sitecn.
- Biltema.
- Ragar.
How to make a homemade brush?
To clean the stove pipe, you don’t have to go to the nearest store. A homemade brush is quite simple and quick to make. True, the effectiveness of such a product will most likely be lower than a special purchased one. Therefore, it is suitable for cleaning a not very dirty chimney.
There are many ways to create a ruff with your own hands. Below we provide 5 step-by-step instructions:
- From a plastic bottle for a round chimney.
- From a plastic bottle and plywood/board for a rectangular/square chimney.
- From a broom.
- From a metal brush from an angle grinder.
- Made of metal cable.
In all cases we will need:
- A metal cable (about 2-3 mm thick, longer or at least as long as the height of the chimney) with a carabiner.
- A weight weighing about 3 kg - such a size that it can easily pass into the chimney. For example, it could be a small metal rectangle, or an old dumbbell plate, or a plastic bottle with sand.
- A coil of wire with a diameter of about 2-4 mm, or a metal pin (length about 10-12 cm, diameter about 5 mm), with unscrewing eyes on both sides.
- A product from which we will make a brush with our own hands.
Problematic point: on the farm there is a bottle, and a wire, and something for the load, and the rope can be purchased at the nearest store if you don’t have it at home. But finding a suitable hairpin will be more difficult. Therefore, it is easier to take wire instead. It will need to be twisted several times to get a rope 5-7 mm thick and 10-12 cm long (that is, used instead of a hairpin).
From a plastic bottle for a round chimney
In this case, we will make a brush from an empty plastic bottle with a volume of 1.5-2 liters (suitable for cleaning a chimney with a diameter of up to 200 mm).
Step-by-step instruction:
- A hole is burned, drilled or punched in the lid and bottom of both bottles. Its diameter should be equal to the diameter of the stud.
- The sides of both bottles are cut through. It is necessary to make slits not reaching the neck and literally 1-2 cm to the bottom. Between each slot, make a distance of approximately 1.5-2 cm.
- A pin is inserted into the holes made, “pulling” the 2 parts of the bottle together. The cut sides are bent, forming a circle of bent ribbons. It is their edges that will remove soot from the walls.
- Eyelets are screwed onto both sides of the stud. The cable is attached to the upper eyelet. On the bottom there is a load.
From a plastic bottle for a round chimney (video)
From a plastic bottle for rectangular/square chimney
The instructions are suitable for those who have a square or rectangular chimney.
To create a brush for such a ruff we will need:
- Sheet of plywood. Plywood that is not very thick will do; a small sheet 6-12 mm thick will be enough.
- Plastic bottle, volume from 5 liters.
- Screws (such that they can fasten both pieces of plywood together) - 5-10 pieces.
Cut plastic protrudes between the plywood sheets, this is not very clearly visible in the photo
Step-by-step instruction:
- You need to cut 2 identical sheets out of plywood, 1-2 cm smaller in size than the size of the chimney. Example: a rectangular hole with a size of 260x130 mm - cut out 2 pieces of plywood measuring 240x120 mm.
- The neck and bottom of the bottle are cut off, after which a cut is made on the side.
- The plastic is unbent (a rectangular sheet is obtained).
- A piece is cut out of a bent plastic sheet, 3-6 mm larger than the chimney opening. Example: the chimney hole has a size of 260x130 mm, we cut out a sheet of plastic 26 5x135 mm.
- Along the perimeter of the plastic sheet, cuts 5-10 mm long are made with scissors (or a knife) at a distance of 1-1.5 cm. It is these narrow parts that will remove plaque from the walls.
- A plastic sheet is placed between 2 cut pieces of plywood - so that the “bristles” stick out the same distance on each side.
- Pieces of plywood and a plastic sheet between them are bolted together.
- A hole is drilled in the center into which a pin or a coil of wire is inserted (or any other part onto which the cable and weight can be secured - this is easier to do with plywood).
This option can be improved. To do this, you need to cut not 2 pieces of plywood, but 3, and 2 sheets of plastic with small cuts. In this case, we will have 2 layers of “bristles” (and 3 layers of plywood).
From the broom
You can make a brush from an old broom. An important nuance: a round broom with synthetic (polypropylene) dense bristles is suitable for us.
Step-by-step instruction:
- The broom tip is removed (or cut off).
- The bristles are straightened so that all the fibers stick out in different directions (like a toilet brush).
- In the part where the bristles are collected, a hole with a diameter of about 5-7 mm is melted or drilled (for a hairpin or wire).
- A pin with unscrewed eyes (or twisted wire) is inserted into the hole.
- A cable was attached to the eyes (or to the wire) on one side, and a weight on the other.
From a metal brush for an angle grinder
This option is suitable if you have a disc brush for an angle grinder lying around, and its diameter matches the stove pipe.
In this case, a load is attached to one end of the axle, and a cable to the other.
From a metal cable (complex option)
The instructions are suitable for those who have a welding machine. Using this scheme, you can make a fairly effective brush with your own hands that will not yield
To create a brush you will need:
- Metal cable, about 10-15 mm in diameter.
- Welding machine.
- Saw for metal.
- Pliers.
- Wire cutters (optional).
- A threaded stud, about 8-12 cm long (or better yet, a fully threaded bolt, 8-12 cm long).
- Nuts for a stud (or bolt), 5-7 pieces or more (depending on how dense the bristles need to be obtained).
Step-by-step instruction:
- 2-5 pieces are cut from the metal cable. The length of each piece is approximately 5-10 mm greater than the diameter of the chimney. You can take more, and then, if necessary, trim off the excess with pliers.
- The scraps are unraveled with pliers.
- A nut is screwed onto one end of the stud (so that the thread protrudes slightly from it). This will be the bottom “support” for the first row of bristles. If you use a bolt, there is no need to screw on the nut: the head will play the role of “support”.
- A piece of wire (from an unbraided cable) is placed on top of the nut and twisted crosswise (so that it wraps around the pin). The pieces of wire should protrude
- More pieces of wire are taken and wound in the same way so that the result is a round layer of bristles. An important nuance: the bristles should stick out evenly, forming an even circle.
- A nut is screwed on top and the twisted wire (brush bristles) is tightly pressed to the first nut (or bolt head).
- Several more layers of bristles are made in the same way. Each subsequent layer is secured with a nut. It will be enough to make 3-4 rows.
- Eyelets are welded at the bottom and top - to secure the load and the cable, for which the brush will be lowered into the pipe. As an option, they can also be mounted on a thread.
From a metal cable (video)
Ruff and the specifics of its use
Sometimes you can break through a clogged pipe using a cleaner. This is a chemical method. A special composition is placed in the furnace device, softening the soot layer on the walls of the chimney. It is dissolved and removed outside by burning.
Considering the specifics of any smoke exhaust system, preference should be given to the mechanical method of cleaning it. In other words, a regular chimney brush is much more reliable than “chemistry”, which may not break through a large blockage. A metal brush is similar to a large dish brush, designed for cleaning objects with a narrow neck.
The components of the brush look like this:
- metal tube (handle). Sometimes a metal cable of small diameter is used in manufacturing;
- a hook on which a weight is attached for weighting;
- working part (“head” or brush);
- nozzles (if any).
A tube or cable helps a person direct the movements of the brush. The stronger the metal handle and the more reliable the brush, the easier it will be to “break through” a complex clog. Holding the tool by the handle, you need to make forward movements, moving further. It is the length of the cable that determines to what depth the system can be cleaned.
A commercial chimney brush can be made of solid metal or wire. It can be on springs or woven from thin metal threads that scrape off a layer of soot and soot. If hard deposits have accumulated inside the pipe, you definitely won’t find a better cleaning assistant.
The brush is the working element of all brushes. The onv is designed so that its elements “look” in all directions. It is this configuration that ensures effective cleaning of the chimney in all directions. Metal is the best material for a brush, but you can use plastic instead by making something like a brush from plastic bottles.
The distance of the nozzle from the edge of the handle should be from 10 to 15 cm. You should not place the nozzle on the edge: a hook for the weighting material is attached to it. The weight is used as a small cannonball or “battering tool” to knock compressed soot off the walls of the chimney.
What you need to know and do before cleaning: basic rules
Before you start working, you need to know (and follow) the basic rules:
- Cleaning is carried out before the heating season (ideally before each one, at least for the purpose of prevention). This way, you can prepare your furnace pipe to operate efficiently and ensure there are no clogs, leaves, debris, soot build-up, or bird nests.
- The work is best carried out on a windless and dry (and ideally also warm) day. Therefore, at the beginning of autumn it is worth paying attention to the forecast when choosing a suitable date for cleaning.
- Work on the roof must be carried out with safety harness (safety belt) and comfortable non-slip shoes.
- Prepare a more powerful flashlight - with its help you can see the condition of the chimney and the results of your work.
- For work, it is better to change into closed clothes that you don’t mind getting dirty. Even with the most careful cleaning, soot will still end up somewhere.
- Use eye and respiratory protection: wear goggles and a respirator. Naturally, the soot will not cause much harm, but sneezing or washing your eyes from it is not very pleasant.
- Since all the debris and soot will fly down, all the openings on the chimney (hatches), as well as the firebox, must be closed. If you are cleaning a fireplace with an open firebox, it should be covered with plastic wrap.
- The cleaning process is carried out from top to bottom. If you clean the bottom part of the chimney first (through the firebox), then when cleaning the top part, falling debris can again contaminate the already clean bottom.
How to properly clean a chimney with a brush: step-by-step instructions
Cleaning the chimney with a brush is carried out as follows:
- Wear special clothing, work shoes, gloves, goggles, and a respirator.
- Before starting work, you can look into the chimney by illuminating it with a flashlight. This way you can assess its condition in advance and see where it is heavily contaminated.
- All chimney hatches and the firebox are closed, except for the hole through which cleaning will be carried out.
- The deflector (or spark arrestor), if any, is dismantled.
- The brush (it does not matter whether it is on a cable or on a handle) is lowered from above, through the outlet of the chimney. Cleaning is done using up and down movements. If there are blockages in the process, it is better to use a weight on a cable (without a brush).
- Periodically evaluate the result of the work by looking into the pipe.
- When the top of the pipe is clean, go lower to the hatch and work through it.
- Upon completion of cleaning, the firebox is opened and the debris poured into it is removed.
Ideally, it is worth combining two cleaning methods: mechanical and chemical. First, clean the chimney with a brush, and then use any of the means that are set on fire in the firebox.
Cleaning process (video)
Advantages and disadvantages of use compared to other cleaning methods
If we consider existing methods of cleaning a chimney and compare them with using a brush, then this option has a number of disadvantages:
- with a brush you have to work independently, while chemical cleaners only need to be set on fire in the firebox;
- even the most careful work does not guarantee that all deposits will be removed;
- the work takes quite a long time, even if the chimney is straight and low;
- the work is inconvenient, unpleasant, physically difficult, and if you have to work on the roof, it is also dangerous;
- It is safe to clean only in dry (and ideally calm and warm) weather to reduce the risk of falling from the roof.
Causes of chimney contamination
Solid fuels have been used for a long time.
It gives off maximum heat. If the chimney is not used correctly during the heating process, the system will not work well. Attention!
The chimney should be cleaned at least once every six months.
There can be many reasons for clogging. The main thing is to find out and eliminate them as quickly as possible to avoid an emergency.
Combustion processes are accompanied by the formation of not only smoke, but also gaseous substances. The release of white smoke is due to the formation of water vapor. Its evaporation occurs from wood or coal, which is used as fuel. If black smoke appears, it is the products of soot combustion. Black smoke is a common cause of pollution, because tiny soot particles constantly settle on the inner surface of the pipe.
If garbage is constantly burned in the stove, sooner or later this will also lead to clogging. Plastic bags and plastic packaging from various products contain hydrocarbons. Hydrocarbons become combustion products and pollute not only the environment, but also the chimney.
Chimney cleaning
Regular cleaning of the chimney is necessary even for expensive and modern modules. Soot tends to accumulate, this happens even when burning with the best firewood.
Combustion products are so small that they can accumulate even on a perfectly smooth surface. The chimney can be easily cleaned with your own hands using a brush.
To clean a chimney, it is not necessary to have special education or have outstanding knowledge in this field. The only thing you have to work on is the process of creating a brush for cleaning.
It is known that without understanding the causes, it is quite difficult to solve a problem. So, in the process of burning wood, two types of waste are released: gas and smoke. There are two types of smoke: white and black.
White smoke comes from water vapor in wood, while black smoke comes from coal, soot and creosote. Black smoke causes soot to form inside the chimney.
Practice has shown that chimneys built by yourself accumulate soot better than those built by professionals.
What happens if you refuse to clean the chimney? First, soot will begin to accumulate. The accumulation process will continue until it becomes difficult for the smoke (gaseous substance) to squeeze through the pipe into the atmosphere.
In this condition, the draft in the chimney and, accordingly, the quality of heating the house are disrupted.
If the pipe is severely clogged, there are two types of events: the metal pipe will deteriorate (at best) or the soot residue will catch fire (at worst).
Chimney contamination
Over the long period of operation of fireplaces and stoves, humanity has accumulated enough experience to combat soot in pipes. Most devices do not have a complex design and can be made with your own hands.
- A brush is the most proven, and, oddly enough, one of the most effective ways to clean a pipe.
- Peeling with potato peels (old-fashioned method). This method is quite simple: you need to pour half a bucket of potato peels into the chimney and turn on the heating device. When heated, the potatoes will begin to release starch, which decomposes the soot.
- Aspen firewood is a simple and dangerous method. To clean a metal pipe you will need aspen logs. Place them in the stove and light the logs. After a while you will hear a strange hum, this means that the soot in the chimney has caught fire and after a while the metal pipe will clean itself. When using this cleaning method, you endanger the roof and neighboring buildings - hot particles can accidentally fly onto the insulating layer and lead to a fire.
- Aluminum cans. Simply burn aluminum cans while firing the stove. Aluminum particles have the same charge as soot. As a result, black smoke will not settle on the protected metal pipe.
- Dry cleaning is the most unpopular and unpleasant process. After dry cleaning, the soot partially peels off. This process is accompanied by an unpleasant odor and the formation of soot, which settles on interior items.
Making a chimney brush
A budget brush for cleaning a chimney can be easily made with your own hands. To make it, follow the instructions below:
- Go to the market and buy a synthetic round broom, a metal cable the same length as the chimney, two clamps, a pin (8 mm thread) and a few washers.
- Unfold the bristles on a synthetic round broom so that they resemble a bouquet. Keep in mind that the villi may not immediately respond to your efforts. To soften the lint, you can place it in boiling water for a few minutes.
- The straightened brush is put aside with your own hands. We take the ear and screw a hairpin onto it from both ends. Next you will need a brush for cleaning the chimney and a washer that is attached to the bottom of the brush.
- If the diameter of the brush does not suit you, you can tighten the washer more. The more it curls, the more the villi straighten to the sides. Once you have decided that the brush has the desired diameter, proceed to the next step.
- Press down on the base from above and slowly screw on the second fastener.
- The brush turns over. At the bottom you will see the mounting ear. You need to tighten it exactly as much as you want to increase or decrease the diameter of the brush.
- Look for a staple or make your own using steel wire. It is necessary to secure the cable to the brush. Before installing the cable, you need to measure the length of the chimney. After this, a part of the required length is cut off from the metal cable and attached to the workpiece. Remember that the brush also has its own length, so do not forget to take this factor into account when making brushes with your own hands.
- All that remains is to attach a metal weight to the device (2 kg will be enough).
Brush for cleaning chimneys
It's time to try out your homemade contraption. Before cleaning the chimney from the stove, it is necessary to remove any remaining firewood and other flammable materials. We climb onto the roof and remove the damper from the chimney, holding the homemade device tightly in our hand.
Slowly lower the brush into the chimney. As soon as you feel that the brush has completely sunk to the very bottom, lift it towards you as high as possible. The down and up movements must be repeated for several minutes.
After cleaning the metal pipe, you need to remove fallen soot from the fireplace. This is done with a regular broom. The brush is washed with warm water and set to dry. After cleaning procedures, the stove must be heated for several hours. Don’t worry about the broken draft; it should stabilize after a few minutes of operation of the heating device.
It is known that without understanding the causes, it is quite difficult to solve a problem. So, in the process of burning wood, two types of waste are released: gas and smoke. There are two types of smoke: white and black. White smoke comes from water vapor in wood, while black smoke comes from coal, soot and creosote. Black smoke causes soot to form inside the chimney. Practice has shown that chimneys built by yourself accumulate soot better than those built by professionals.
What happens if you refuse to clean the chimney? First, soot will begin to accumulate. The accumulation process will continue until it becomes difficult for the smoke (gaseous substance) to squeeze through the pipe into the atmosphere. In this condition, the draft in the chimney and, accordingly, the quality of heating the house are disrupted.