Kinds
To make a carousel with your own hands for a children's playground, you must first decide on its design. There are not so many types of them, but two. It’s just that other types of structures, where the seats are made in the form of various animals that rise and fall when moving, cannot be made in your garage.
The first type is disk. These are some of the most common designs found in yards. They consist of a large disk (this is where the name comes from), to which seats and handrails are attached. That is, they are located as if on a platform. Therefore, it is comfortable for children to stand on it, but it will be difficult for them to fall out of it.
The second type is radiation. It's a little different here. In such designs, the seats go as if from the base - the center. Smaller pipes extend from the main pipe, on which the seats are screwed. But it has its advantages. If you make such a carousel with your own hands, you can ride on it yourself. Just push off the ground with your feet. You can't do this on disk. There you need a second person who will twist.
Do-it-yourself carousel for a playground - instructions with drawings, dimensions, photos and videos
The carousel is an attraction that children love just as much as swings. Therefore, if there is no rotating platform in the playground in the yard, then you should seriously think about creating one. You can build a carousel yourself in a week.
Types of carousels
Depending on the design, children's carousels are divided into groups:
- Attractions with rotating chairs, thanks to the installation of which there is no need to make a solid platform. The carousels are equipped with a support element located on the central axis and fixing the handrails of the seats. The design is considered reliable, simple and attractive for children.
- Carousels, the rotation of which is provided by a platform. On the front side of the solid movable base there are original chairs. Another version of this design is also possible - rigid fastening of additional seats and handrails on an axis in the center of the platform.
- A rotating mushroom equipped with seats attached to the bottom of the support element, which sets the entire structure in motion. The handrails of such a carousel are created in the form of a closed ring that goes around the platform.
- “Planning in the air”, created by fixing seats on suspended movable elements. They are attached to the bottom of the structure, which serves as a rotational support. This carousel is called a chain carousel because the seats are suspended on chains or cables. Children like this kind of attraction, but it requires good insurance - fastening belts that will not allow them to fly out of their seats.
- Carousels with circular motion, characterized in that the movement of seats occurs along a wavy or completely flat trajectory. In this case, the attraction rotates due to the operation of pedals or handles, which are controlled by the child himself. Therefore, such a carousel not only entertains children, but also contributes to their physical development.
- An attraction where a disk rotates. The carousel is impressive in size and operates on an inclined axis in the platform. What makes such an attraction move is a physical quantity - the force of gravity that appears when children run around the playground. This particular carousel is popular because it is installed on the playground without it.
A children's carousel may require special spinning Any carousel needs to be securely fastened in the ground Seats on chains make the “flight” long Disc rides require standing, grasping the handrails Rotation of the mushroom carousel is ensured by the mushroom cap to which the seats are attached Carousel with steering wheels will appeal to boys Material chairs can be used to create seats. A disk ride is usually intended for older children, since very young ones will not be able to stay on it
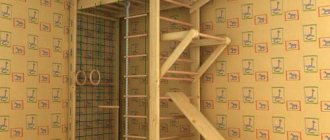
Before building a carousel, drawings must be made to make it clear that the main structural elements are the axis and the driven platform. In addition, drawing up a diagram will allow you to determine the size of the attraction.
The drawing indicates the ratio of dimensions. 1 - rotation unit, 2 - handle, 3 - floor covering sector, 4 - steel strip, 5 - cover
The dimensions of the axis - the main structural element - cannot be violated. Otherwise the carousel will not rotate.
1 - axle, 2 - lower bearing, 3 - central bushing, 4 - upper bearing, 5 - locking bushing, 6 - cotter pin
Choosing the type of carousel and building materials
At children's playgrounds located on the territory of the house, disc carousels are usually built. This choice is due to low cost and good speed of work.
In order for a disk carousel to appear in the courtyard of your house, you need to prepare the following materials:
- liquid concrete (for fixing the carousel in the ground);
- 2 bearings;
- 3 pipes measuring 25 x 6 mm and length 1.55 m;
- pipe with parameters 50 x 7 mm and length 1.15 m;
- pipe with a cross-section of 90 x 7 mm and a length of 10.9 cm;
- 6 rectangular pipes measuring 80 x 40 x 4 mm and 56 cm long;
- cotter pin 4 x 63 mm;
- 3 pieces of moisture-resistant plywood measuring 2 x 60.4 x 108.3 cm;
- steel strip with parameters 4 x 100 mm and length 3.95 m;
- bushings (central and locking).
Bearings (upper and lower), a 50 x 7 mm pipe, which will become the axis of the structure, a cotter pin, as well as a locking and central bushing will be needed to construct the axis of the carousel.
The carousel axle consists of five parts: 1 - axle (pipe 50 x 7), 2 - lower bearing, 3 - central bushing, 4 - upper bearing, 5 - locking bushing, 6 - cotter pin
When constructing a turntable, you will need a rotation unit, a 25 x 6 mm pipe (the future handle), a steel strip, plywood and a lid.
The turntable consists of five parts: 1 - rotation unit, 2 - handle (pipe 25 x 6), 3 - flooring sector, 4 - steel strip (4 x 100), 5 - cover
The rotation unit deserves special consideration. It is created from a pipe 90 x 7 mm, which becomes a bearing housing, a rectangular pipe with parameters 80x40x4 mm and a handle, that is, a pipe measuring 25 x 6 mm.
The listed parts are welded and form a single structure. In this case, the elements must be connected so that the rectangular pipes protrude 10 mm beyond the upper edge of the bearing housing.
The rotation unit consists of three parts: 1 - bearing housing (pipe 90 x 7), 2 - rectangular pipe (80 x 40 x4), 3 - handle (pipe 25 x 6)
By the way, to create the base of the swing, you can abandon plywood in favor of wood or plastic. The main thing is that the chosen material is durable and does not deteriorate from moisture. And as seats you can use small chairs whose legs have been sawed off. Whatever the seating, it is important that they do not lack backs.
Required Tools
A children's carousel is built using certain tools:
- hand drill;
- welding machine;
- drills with a metal drill.
In addition, you will need fastening elements - metal screws and self-tapping screws with a press washer.
Step-by-step instructions for making a children's carousel
The construction of the attraction consists of the following stages:
- On a leveled area, armed with a garden hand auger, create a hole, removing at least a meter of soil.
The axle is immersed in the dug hole. The element must stand strictly vertically in the ground. In this position, the axle is securely fixed by pouring a little earth into the hole. The support of the structure is not only poured with concrete, but also ground down - The hole with the axis placed on its bottom is filled with liquid concrete. Further work is carried out after a week, or better yet, two, because the solution takes time to harden.
- The lower bearing is put on the axle, and then the central bushing. After this, the first part is connected to a pre-assembled rotation unit.
- Another element is added to the axle - the upper bearing.
Having installed it, center the rotation unit in relation to the bearing. Metal pipes can be replaced with wooden blocks - A locking sleeve is attached to the axle, into the hole of which a cotter pin is inserted. After immersion in the support, the metal fastener is unbent at the edges.
- The rotation unit is covered with fragments of the floor covering. In this case, metal screws are screwed into the plywood and metal with a drill.
- A steel strip is attached to the end part of the covering laid on the rotation unit.
The task is carried out using self-tapping screws with a press washer. The material is secured using a large number of screws - A cover is placed and secured in the center of the covering, which will cover the bearing assembly.
- The plywood is coated with an antiseptic compound that protects against insect pests and exposure to bad weather.
To make the carousel safe and look presentable, the sharp edges of the metal parts need to be ground off. If you find rust on metal, you must begin to remove it, because corrosion tends to spread.
If the attraction area is made of wood, then it should be sanded with a piece of sandpaper, removing all the “splinters”. After this, it is recommended to paint the flooring. The choice of emulsion for this task should be based on how safe the industrial product is, since they will be covering a children's play area.
In the fight against weather conditions, not only the wood, but also the metal of the carousel is painted
The paint for the carousel must be of high quality in order to protect the materials from which the attraction is assembled from exposure to snow, rain and sunlight.
In addition, it is recommended to treat the carousel with an emulsion, which allows air to pass through and allows the wood or other floor covering to be properly ventilated.
It turns out that the best option for covering carousel parts is oil or acrylic paint used for exterior work.
Before painting, the flooring material is not only cleaned, but also dried and primed. The work takes place in several stages, because the surface is covered with two layers of paint. The second layer of emulsion is applied only after the first layer has dried. The area can be painted either with brushes or with a roller.
The nuances of carousel care
The reason for repairing an attraction with a rotating platform may be a strong creaking sound.
To avoid the appearance of unpleasant sounds indicating wear of the structure due to metal oxidation under the influence of weather conditions, and work to restore the functionality of the carousel, you should use a special silicone lubricant once every 3 months. It requires processing all parts of the axle that are in close contact with each other and are therefore subject to significant friction.
If lubricant does not help remove the squeak, then they resort to replacing parts
To prevent the wood or other covering of the carousel area from deteriorating, it must be cleaned as necessary using a special brush. A new layer of paint emulsion should be applied in place of the removed old layer of paint. It is better to solve these problems in the summer, because this is the season when the attraction will have time to dry out.
So, in order for a child to go on an attraction, he does not have to be taken to the park all the time. Parents can build a carousel in the courtyard of the house by drawing up the necessary drawings and preparing materials.
Source: https://grounde.ru/kak-sdelat-karusel-dlya-detskoy-ploshhadki-svoimi-rukami.html
Peculiarities
It is very important to initially think about what exactly the future attraction will be like. It is necessary to take into account the material, features of fastening and coating. The latter is also important. High-quality painting not only makes the carousel beautiful and bright, but also saves it from rust later.
A structure that is too heavy will be cumbersome, so it is inconvenient for children, since they will have to put in a lot of effort to ride it. It may be a little tight at first, but that's okay. If you constantly lubricate, then after a while the mechanism will develop a little and will move as it should.
Surprise
It's a little more complicated here. Galleries with a surprise force a person to scroll through all the photos from the first to the last and get some kind of emotion. The simplest example is a girl undressing. Moreover, in the last photo she may appear not without clothes, but in some cool pose or covered with something (your product, for example). Unpacking a gift, applying makeup - any action that ends differently than the user expects is suitable for such a gallery. Anything can end up in a gift box, and makeup can look funny even though it started out seriously. Come up with something for your account, make them giggle and write a comment in the spirit of “funny.” The main thing is that you scrolled to the end and liked it.
How to make a carousel with your own hands: design
This task is quite feasible. The main thing is to have the right tools and materials. The drawings presented in the article will help you make carousels with your own hands, but you can also create your own original design.
For the base, take a strong and large pipe. It must be thick enough to support the weight of children and the stress they create when riding. In order for it to hold firmly, it must be well secured. Therefore, it is buried to a depth of about a meter. The surface is then poured with concrete to ensure maximum immobility.
After everything has dried, you can install the cylindrical ball bearing, having first lubricated it well. 4 pipes need to be welded to the inner walls of this part to form a cross. Each of them forms the radius of the carousel circle. In order for them to form a strong structure together, it is necessary to weld the hoop-pipe. That is, the cross will be welded at one end to the bearing, and at the other to the rim.
Making carousels with your own hands: assembly
Next, you need to make a base on which the children will stand. It is usually made of plywood or thick plastic. It is necessary to take into account the density of the material so that children do not accidentally press through it. Therefore it must be quite tough.
Corners are welded to each part of the cross. Then 4 parts are cut out of plywood. The base is screwed to the corners using bolts. The main thing here is to get the dimensions right. Therefore, before cutting it out, you need to measure everything accurately.
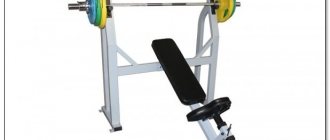
The base is already ready on which you can stand and spin. But this is not enough. For children, we also need to install seats and handrails. To do this, you will need a pipe with a slightly larger diameter than the bearing itself. It is put on over it. Such a pipe must be welded to the same crosspieces. Handrails are then installed on it - curved pipes in the shape of the letter “L”.
All that remains to be done is the seats. There is nothing complicated here either. Simply weld two small iron tubes in the shape of the same letter “G”. And with the help of screws or bolts the plywood back and seat are secured to them. And only then they are welded to the handrails. You can attach 2 seats to each railing: on one side and the other.
Education
The galleries seem to be created for step-by-step learning. A series of posts on how to make or cook something would look great here. The option is similar to the first one, only here the user doesn’t just watch how something turns into something beautiful/ready, but learns how to repeat the operation. Ideal for those who, again, know how to beautifully paint their faces or cook. Although, if you cast soldiers from a lead-tin alloy in your spare time, tell us about it using the gallery. Maybe others will want it too.