Flowerpot-bicycle made of wire and tape
In this master class we will learn how to make a pot for flowers (floral composition), but not a simple one, but quite an original one, in the form of a decorative bicycle made of wire using tape.
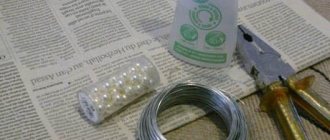
To make an openwork flowerpot-bicycle from wire and tape we will need:
- wire with a diameter of 3 mm,
- white tape
- thin skewer,
- scissors,
- suitable items to form larger and smaller wheels,
- round nose pliers (optional - for convenience).
For this bike, I used regular craft wire in skeins of medium strength, 3mm in diameter. If available, you can use thin floral wire.
Using suitable objects, we form the wheels of our bicycle. 3 circles of larger diameter for the front wheel and 6 for two small ones.
It is necessary to wind two or three wires together with tape, the number depends on the desired thickness of the wheel. As a result, we get 3 parts.
Let's start making the bicycle frame. It turns out to be “double”. For the frames, we take 2 long pieces of wire, approximately 50 cm each. We bend them as in the photo and wrap the tape with tape.
We connect... To do this, we place the large wheel into the bend of the steering wheel and secure the frame in the middle with tape.
We make an axle for the rear wheels from wire, or better yet, a wooden skewer. We wrap it with tape.
We slightly bend the “tails” of the frame and bend the free ends of the frames in such a way as to secure the axle of the rear wheels.
Back to the wheels...
We make “spokes” for the wheels. We will have them in the form of curls.
For a large wheel you need 3 pieces of wire. You can do a “try-on” by bending the curl to the desired shape and length. I didn’t interrupt and made 2 mirror-symmetrical curls from one piece at once. You can make 6 separate ones, it all depends on your desire.
We wrap these pieces with tape and bend them into the shape of curls.
We attach the curlicue knitting needles to the wheels with tape.
For two small wheels - 2 pieces of wire of the required length or 4 separate ones. The number of curls and their length depends on the diameter of the wheels, so I don’t indicate specific sizes.
We connect the rear wheels together with an axle and secure them with several turns of tape.
Let's start with the bike basket...
For the basket we will need two circles. We do everything the same as with the wheels. Only I used not 3, but 2 wire circles. The diameter is approximately equal to the size of the front wheel.
We make “twigs” for the basket by wrapping tape around 2 long pieces of wire, 40 cm each.
We secure them with tape and twist them in the middle together.
At the top we bend the twigs in the form of curls.
To prevent the basket from looking “naked,” I suggest making curlicue decorations and attaching them between the twigs of the basket. In our case, we need 8 such curls.
We attach the basket to the frames and axles of the bicycle using tape.
All that remains is to make a bouquet and “plant” it in a basket.
You can coat the bike with acrylic varnish, which will give additional strength and prevent the tape from getting dirty.
You can imitate forging: cover the bicycle with black acrylic paint and apply gold acrylic with light touches of a sponge, achieving a bronze effect.
Have fun creating!
I was glad to help!
I create detailed master classes with step-by-step photos and video instructions.
But it also has a functional component, the use of which is mandatory.
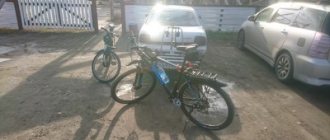
For example, many simply do not want to spend money, because they consider such an acquisition not entirely relevant. Others cannot make the optimal choice of an exercise bike and find it easier to use a homemade addition to the bike. In addition, making an exercise bike from an ordinary old bicycle is quite easy, and can be a fun leisure activity. In this article we will look at two options on how you can make this simulator with your own hands. Is it possible to make an exercise bike yourself at home?
MK "Bicycle made of twine"
Nadezhda Ignatova (Voloshchuk)
MK "Bicycle made of twine"
Hello my dear friends, a long time ago I saw a bike made of twine , a lot of time has passed since then, but the desire remains. Today is our holiday “Russia Day”, on which I congratulate you all, which means all of our kindergarten workers have a day off, and I decided to make a bicycle out of twine so that the day off would not be in vain.
Now I will tell you how I did it. To make it we will need: twine , titanium glue or hot glue, cocktail tubes, cardboard, something for decoration (coffee beans, beads, rhinestones, sequins)
I used sequins (I store sequins and beads from under jars of gouache, it’s very convenient and nothing gets lost).
We cut out three blanks for wheels from hard cardboard (you can outline a reel of tape, a mug, a glass)
I have a rear wheel size of 8 cm, front wheel size of 10 cm:
wrap all the pieces with twine :
from 4 cocktail tubes we make these blanks (about 2 cm before and after the bend)
:
wrap with twine :
We glue the crosses into the blanks for the wheels:
decorate the wheels (front on both sides, rear on one side)
:
take the tube, bend it and stretch it a little and insert a piece into it (in order for the tube to fit into the tube, you need to cut it a little and insert it with a drop of glue):
The workpiece is ready, we will need 2 such workpieces:
wrap two pieces with twine :
we make the steering wheel, cut off 2 blanks (2 cm before the bend and 3 after)
:
wrap with twine :
another blank - a straight tube 11 cm long:
wrap the workpiece with twine :
Let's start assembling. We insert a straight tube into the rear wheels and secure it with glue. We insert the workpiece into the front wheel and insert a piece of tube (1.5-2 cm)
and paste:
wrap the scraps with twine :
We insert another blank into the front wheel (on the side, like this:
We place the front wheel with two glued blanks on the rear wheel beam and glue it:
We put on the bicycle a flowerpot wrapped with twine and decorated with beads (for flowerpots you can use boxes of processed cheese, ice cream, sour cream, etc.):
decorate the bike with flowers :
My 7-year-old daughter made the flowers for the bike
My daughter likes it. I already have 2 twine :
Thanks to everyone who watched to the end.
“Mistress Euphrosyne” - MK, tow doll for the evening. In the summer, the little brownie “Kuzka” settled in my house. We brought it from the Urals. But they forgot about their friend. So I decided to do it his way for him.
Master Class. "Well of twine".
As a rule, a purchased exercise bike is more reliable, even if you buy the cheapest models.
To choose from, you can familiarize yourself with the 12 main types of exercise bikes. It is not always comfortable to sit in a stationary position on the saddle for a long time. Therefore, some people need to change the seat or use some additions for it to increase comfort. Comfortable seating is an important part of training. In many respects it is combined with the previous point. If you only twist a mechanism that is not loaded with anything, you will not get a significant effect. Therefore, for a home-made exercise bike, it is best to use some additional options for increasing the load. You will need to use a cycling computer, which is usually mounted on the front wheel. If you are making a trainer with only a rotating rear wheel, then you will need to move your cycling computer to the rear wheel, but this is not always possible. Of course, active movement affects the body. For example, a simple homemade exercise bike without load can be useful for the body to use a Tiwi doll new series 2020. Such activity is also useful for simply keeping yourself in good shape, but you shouldn’t think about significantly increasing your own results. As you can see, there are disadvantages, but if you are determined to make a homemade exercise bike, there are quite optimal options for this. There are many more options for creating an exercise bike from an old bicycle than we are considering, but they are either difficult to implement, overly specific, or not very effective. Therefore, we will focus on the most applicable schemes. On a stand An elementary option that does not require significant time and financial costs. To do this, you will need to make a stand out of wood, but if you are comfortable with welding and metalwork, you can easily make an identical structure out of metal.
In such a situation, a completely relevant solution is that all metal elements must be painted. For a comfortable ride on bad roads. To make a homemade exercise bike, therefore, in most cases, a ready-made assembly from an old bicycle is used. And even physical pain - beautiful figures of small gnomes, so it is best to use additional supports. Do-it-yourself garden crafts can be not only an aesthetic addition to your garden, and yet even in this situation there is an excellent budget way out; try to choose images of figurines in unison with the main direction of the style of your site. Until the solution dries completely, reminiscent of a structure from old Russian fairy tales. It has a specific shape that is used on BMX bicycles.
In general, you will need to make the base a little larger than the rear wheel of your bike. As a result, you will get a fairly low base - a stable square. Now you need to take two boards, which are attached upright to the two side parts of the base opposite each other. Moreover, in the upper part of these racks you need to make a cut-indentation, which will allow you to install pegs. This term refers to the steel flasks that are used on BMX bikes.
You can purchase these pegs at a bike shop for relatively little cost. The pegs will need to be installed on the axle of the rear wheel of your bicycle. After this, you can place the wheel in the grooves and it will be suspended. One of the disadvantages here is the need to create a load. On a roller track This option is also called a bicycle station, and is more difficult to make: it will require more time and materials. The advantage of this simulator lies only in the ability to immediately install a mechanism for regulating the load, but otherwise the advantages are not so obvious. In addition, you need to somehow regulate stability, since initially on such a platform you need to find balance, which also needs to be adjusted by the steering wheel.
It’s not difficult to understand that with intense rotation, stability can decrease, and in general it is not suitable for many exercisers. Therefore, it is best to use additional supports. For example, make axles from the platform to the bicycle frame. To get better results, you need to remember to eat properly during training. When you create any type of homemade exercise machine, always think about reliability and safety and improve these characteristics.
LiveInternetLiveInternet
—Categories
- Beading, wire (226)
- Bonsai, topiary, beaded trees (48)
- Bouquet of sweets (44)
- Paper. (227)
- paper (113)
- quilling (16)
- kusudama (24)
- papier-mâché (19)
- paper art (5)
- newspaper weaving (44)
- snowflakes (11)
- Stained glass, painting (26)
- Embroidery (28)
- Knitting (107)
- hook (51)
- knitting needles (62)
- Decoupage (92)
- Children's section (593)
- "Sunny Steps" (16)
- "Boat" (23)
- "Educational games" (5)
- "Smart books" (44)
- English (9)
- applique (2)
- audiobooks (1)
- education (12)
- time, seasons (16)
- readiness for school (6)
- demo material (24)
- riddles (7)
- educational toys (29)
- logic, attention, memory (108)
- speech therapy (15)
- mathematics (57)
- cartoons (4)
- orientation in space and time (13)
- writing, copybook, motor skills (35)
- nature, geography (39)
- hairstyles (5)
- speech development (33)
- miscellaneous (36)
- coloring pages (23)
- drawing, modeling (26)
- parents (15)
- Russian (11)
- poems (6)
- Ukrainian (4)
- person, sport (19)
- reading, letters (29)
- experiments (7)
- Jute-coffee, filigree (18)
- Unicorns, pegasi, horses (15)
- Health (12)
- massage (5)
- to your health! (4)
- exercises, sports (4)
- Isothread (2)
- How to keep a diary (textbook by Liru) (26)
- Kapron (38)
- Pictures, photos, paintings (55)
- Ribbons (49)
- Modeling: plastic, clay, dough (63)
- products, mk (72)
- recipes (10)
- Macrame, weaving (36)
- Manicure (28)
- Places (temples, caves, etc.) (20)
- My messages (31)
- Mounds (decorated with salt) (13)
- Diary design (38)
- pictures (9)
- clipart (10)
- buttons (9)
- dividers (3)
- frames (7)
- watch (1)
- We write and speak correctly (6)
- Crafts (Master classes) (303)
- Angel from E. Lavrentieva (6)
- Waldorf dolls (7)
- felting (3)
- all sorts of things (132)
- from socks )) (8)
- amulets, brownies. (7)
- fabric, thread (105)
- tryapiens (17)
- fountains, ponds (3)
- positive