Modern cookbooks are simply full of recipes for winter drinks that will allow you to warm up after a long walk in the cold. This includes all kinds of coffee cocktails, hot fruit drinks, and sbitni brewed according to traditional Slavic recipes. However, nothing can be better than just a cup of well-brewed tea. Moreover, it was prepared according to all the rules, in a porcelain teapot, which was previously doused with boiling water so that the tea leaves could reveal their taste and aroma. After all, tea bags or even pyramids will never be able to make a high-quality drink; after all, this is an ordinary fast food tea. To make the teapot retain its heat longer and to make the kitchen look even cozier, we suggest you make a teapot doll in the best traditions of tea drinking with your own hands.
Doll for a teapot
Dimensions:
- height 54 cm;
- the height of the inner skirt is about 30 cm;
- The diameter of the inner skirt is about 25 cm.
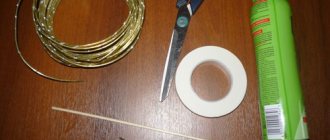
For needlework we need to prepare:
- body fabric – linen, calico;
- fabric for the outfit and ears - 4 types (you can change the style of the outfit and, accordingly, the choice of fabric) - linen, calico;
- filler;
- Rolled synthetic winterizer for skirt insulation;
- acrylic paints for decorating the eyes (can be replaced with embroidery floss);
- dry blush or shadow for blush on the cheeks;
- material for decorating the doll - beads, ribbons, buttons;
- material for making hair – wool for felting or suitable threads;
- tools and materials for sewing - pattern paper, needles, threads, chalk, measuring tape, sewing machine, scissors;
- the insulated wire is soft, copper is best;
- wire cutters
Master class (hereinafter referred to as MK)
We start by making the inner skirt. We cut out a rectangular piece 74 by 80 cm from the fabric. We cut out a warm lining 70 by 80 cm from padding polyester.
We draw two axial lines on the cut piece of fabric - horizontal and vertical. We mark vertical lines in increments of 15.5 cm from the center in both directions.
We fold the marked part with padding polyester and secure it with sewing pins. This will prevent movement when stitching.
We make two parallel lines along the marked lines at a distance of 8 mm from one another. We will insert wire into these gaps.
Fold the part in half with the padding polyester facing out and stitch it - see photo.
Turn it inside out and fold it in half horizontally.
We cut 5 pieces of wire and tuck them into the lined channels.
Having inserted all the wire pieces, carefully bend the edges of the skirt inward and pin it with pins.
We sew the edge by hand using blind stitches.
We make a hand seam with a large step and gather the top of the skirt.
It turns out like this underskirt. In essence, this is a warm cap that performs a heat-insulating function.
At the next stage of MK we will sew the body of the doll. Print out the pattern and adjust it if desired.
We place the templates on the fabric, folded in half and mark. Please note that the inner part for the ears will be made of colored fabric. Therefore, only two outer parts need to be cut from beige fabric. It’s convenient to immediately fold a sandwich from two colors of fabric and cut out a set for the ears.
Sew along the contour, leaving a small area open. Through it we will turn out the details. We cut out with allowances of 5-8 mm. We make notches in the areas of convex lines so that the fabric does not pull after turning it inside out.
We turn the parts inside out and fill them with filler. We sew open areas with hidden stitches.
Fold the ears with the hemmed bottom in half and sew them up to half the length. The thread can not be cut, but used to sew the ear to the head.
We place the horns on the head, adjusting the tilt as desired. Secure with sewing pins and sew on. We do the same with the ears.
We place the doll on the skirt and secure it with pins.
We make a seam.
Let's start sewing the doll's outfit - a hot water bottle.
From multi-colored fabric, folded in half, we cut out the bodice of the dress.
Fold the bottom edge over and iron it.
We assemble the parts into a common part. Fold the top edge over and iron it.
We sew together the second side of the bodice and put it on the doll.
We cut out the sleeves using the handle pattern with allowances of 6-7 mm. We select the style and finishing of the sleeves to suit your taste.
We decorate the bodice of the dress with thin lace. Sew on the handles. We do this with a double thread, passing the needle through the foot, then the doll’s body and the second foot. We repeat the process in the other direction. We tighten the thread moderately, fasten it, and carefully hide the knot.
Next in our MK we will figure out how to sew an overskirt. The dimensions of the total fabric for sewing are 35 by 100 cm. The skirt can be made from any combination of fabrics, dividing the pattern into fragments. For example, let's divide it into four stripes. The height of the stripes, taking into account the allowances: 10 cm, 12 cm, 11 cm, 12 cm. Sew the strips into a common fabric, process the edges of the allowances and iron.
To finish the skirt we use braid and lace. We hem the bottom and decorate it with lace. Sew the side seam and iron it.
We turn the top over and gather it by hand.
We put it on the heating pad, pinning it with pins.
Sew on with invisible stitches.
We prepare black acrylic paints, a small (No. 0) brush, a pencil, blush or pink eye shadow, and cotton swabs.
We design the doll's face.
It is convenient to use felting wool for hair.
We distribute the hairs by making a parting.
We make a fashionable hairstyle and fix it with hairspray.
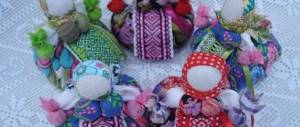
The teapot warmer doll is ready!
Tilde hare applique
Materials
- Several types of fabrics
- Adhesive tape
- White fabric paint
- Flat brush
- Fabric paints and embroidery threads
How to sew a tilde applique
Templates for application are given in mirror form. The templates should be transferred to the wrong side of the fabric. In this case, the finished application will correspond to the one shown in the illustration.
Using the adhesive side, press the adhesive tape to the wrong side of the fabric.
Transfer the templates to a protective paper layer and cut out the blanks. Remove the protective paper layer, lay the workpieces on a work surface - a sheet of paper, cardboard or acetate film - face up and iron. Look at the illustrations and pay attention to how the fabric paints were used. Use a dry brush on dry fabric. Apply the paint in quick back and forth motions, first wiping off excess paint from the brush onto a piece of paper. Leave the work until completely dry. If necessary, repeat the staining process.
If the edges of the fabric are a little frayed, wait until the paint dries and trim them with sharp scissors. Place the applique fragments on the work surface, starting from the bottom edge of the applique composition, and iron them with an iron.
The hare's head and labels are stitched along the contour using a neat running stitch with contrasting color thread. Sew along the edge - by hand or by machine - the cup and teapot. Use a running stitch to create wisps of steam rising from the cup.
The text on the labels is embroidered with long stitches. For convenience, first write the words with a disappearing ink marker and only then embroider. You can practice on a scrap piece of fabric before working on the applique itself.
Design the hare's face.
To give the “Hare” applique a finished look, we applied a small amount of white water-based fabric paint to it using the dry-on-dry technique. Working with such paints does not require any special skills. Among the template parts you will find a hare head template, a teapot template, and a cup template. Templates can be combined in any combination. Use our design or create your own.
Baba on the teapot
The pattern for such a heating pad is presented below.
First, let's sew an insulating cap. We measure the teapot at its widest point and add 3 cm to this size. The resulting number will give the size of the base of the cap.
We will make the cap in three layers: from a lining, insulation and an upper decorative skirt.
We will sew the lining from cotton fabric. We will make the insulation from batting, padding polyester or thin foam rubber. A decorative skirt will look good made of bright and colorful fabric.
Cut out the lining. Having reduced the dimensions around the perimeter by one and a half cm, we cut out the insulation. We quilt the common part through two layers. We sew the details along the side seams with insulation inside out.
For the woman's skirt, cut out two rectangles. Their dimensions repeat the dimensions of the lining, increased by 1 cm around the perimeter. Sew the sides of the skirt together, placing the pieces right sides together. Sew the details along the bottom edge. We gather the upper edge with a thread, but do not tighten it.
The apron is made of fabric of the same color as the shirt. Decorate the bottom of the skirt with braid or lace.
The woman’s head and body should be sewn from natural fabric (cotton, calico) of beige color.
After completing the seams, turn the part inside out and fill it with padding polyester. We make the nose as a separate part from a small circle. We cut it out and sew it along the edge, putting a little filler in the middle.
We mark the places of the eyes, mouth and nose. We use buttons for the eyes, we have already made the nose, and we embroider the mouth. Draw blush on the cheeks.
We make hairs from woolen threads and sew them in the center of the crown. Dividing it into the parting, pull it into a bun at the back. You can sew a scarf from bright fabric.
We make a shirt and decorate it with lace. We cut out the arms, stitch them, fill them with filler. We make the palms in the same way and stitch the fingers.
We sew the parts together and attach them to the body.
We fold our hands on our stomach and put a handkerchief in them.
Design ideas
At this stage, it is not entirely clear what the final result should be. It's time to start decorating. Decorate the walls with windows, doors, trees, flowers, pets. You can stitch the roof, imitating tiles.
See the wonderful ideas on the Crealikum website in the article about pillow houses
When sewing on decorative elements, grab all layers at once.
Pink cat
For needlework you need to prepare:
- light fabric for main parts;
- fabric for lining;
- insulation – thin foam rubber or just thick fabric;
- felt for a decorative heart and for the design of the muzzle (nose, ear pads);
- bead or ball for a keychain; ribbon for keychain;
- strip of contrasting fabric for piping and buttonholes;
- needle, thread, scissors.
Description
We measure the dimensions of the teapot and draw the necessary details by hand. We make patterns.
From materials folded in two layers, we cut out parts with seam allowances.
Total you need to cut:
- outer part of the heating pad – 2 pcs.;
- internal part – 2 pcs.;
- insulation – 2 pcs.;
- tail – 2 pcs.;
- muzzle made of pink fabric – 2 pcs.;
- paws – 2 pcs.;
- nose, cheeks, heart - 1 pc.
Hen
You can make a heating pad in the shape of a chicken. It’s difficult to design because you need to make a couple of parts. Separately, a bird's beak with a comb, wings, head and body will be cut out and embroidered. And then the whole chicken must be collected together. An experienced seamstress will make a masterpiece with her own hands. Although it is worth creating a more simplified version by making a pattern with a two-piece heating pad. Only here you will need to create a pattern with a round cap for the teapot, not taking into account the nose and handle. Then additionally build parts for the handle and nose, where the teapot will be placed.
The chicken who knows a lot about tea