Characteristics of the hero
The fairy tale about the golden key, beloved by many, attracts the attention of not only children, but also parents. Images of Malvina, the dog Artemon and other bright heroes are often used for all kinds of holidays.
In order to make a Pinocchio costume with your own hands, you need to remember the main details of its appearance:
- long thin nose;
- striped cap;
- orange shirt with a large collar;
- blue shorts;
- curly tuft;
- Golden Key.
Having refreshed your memories of this wonderful hero, you can begin making the outfit.
DIY Pinocchio costume
Pinocchio's costume is not very different from his counterpart Pinocchio's, but there are still some differences. One of the main differences is the headdress. Pinocchio's hat is shaped like Robin Hood's and is bright yellow or orange in color.
Don’t forget about the elegant butterfly, which adorns the entire costume.
So, Pinocchio's costume consists of: short red pants, a bright orange blouse with a snow-white collar, a blue bow tie and an elegant black vest.
Long-term plan for working with parents in the preparatory group for the school year
09.09.2020
Report on summer recreational work in the first junior group
09.09.2020
Photo report “Winter window decoration
09.09.2020
How to make a Pinocchio cap?
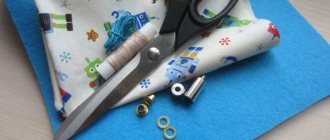
As we remember, Pinocchio’s costume had a bright, funny cap with a tassel at the end. Making such an accessory is not at all difficult. To do this, stock up on red and white striped fabric, thread and scissors.
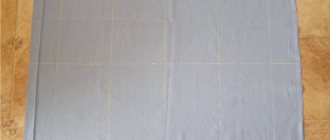
- Take a measurement of your child's head circumference and add a couple of centimeters to the resulting value. Based on the desired cap length and circumference, draw a sketch on paper.
- Cut out the sketch from paper and transfer it to fabric folded in two layers. This must be done in such a way that you end up with one solid piece. Therefore, attach the sketch on the fold of the fabric.
- Cut out the future cap from the fabric and, turning it inside out, sew it on a sewing machine.
- If the cap does not fit very well on the child’s head, then sew thin ropes or an elastic band to its lower edges.
We complete the image of Buratino - apply makeup
For a fairy-tale character, choose the simplest makeup. It should be bright and noticeable on stage if the child is performing in a play.
Highlight the blush on your cheeks, highlight your eyebrows, draw on cheerful freckles and “doll-like” eyelashes.
The false nose will be the most important part of the makeup. The boy should be comfortable wearing it, so secure the spout so that it does not fall off at the most crucial moment of the performance.
How to make pompoms for a cap and shirt?
Since there should be a pompom at the tip of the cap, and it should also be on the shirt in the Pinocchio costume, let’s start making it.
- Cut out two “bags” with a diameter of about 5 cm from cardboard.
- Place them together and start wrapping them with bright wool threads. Can be wrapped tightly and in several layers. The more thread you use, the fluffier your pompoms will be.
- Using sharp scissors, cut the threads along the side of the cardboard, in a circle.
- Tie the thread tightly between two pieces of cardboard.
- Remove the cardboard and straighten the pom pom. Then, simply tying a string to it, sew it to the desired place in the Pinocchio costume and to the tip of the cap.
How to sew a Pierrot costume?
This is another fairy tale character.
- You can very quickly make a costume for Pierrot. For this you will need a large white shirt. The cuts on the sleeves need to be continued, and puffy cuffs should be sewn at the bottom. The bottom of the pants must be decorated in the same way.
- Attach the cardboard circles to the fabric, cut out the same circles from it, but with a margin to tuck the edges under the cardboard, then sew these buttons onto Pierrot’s robe.
- Make a cap for it from whatman paper, rolling it into a cone. All that remains is to apply black and white makeup to your face to complete the look.
- See how to make flounces to trim this character's costume. To do this, cut a strip of fabric 100–150 cm long and 10–15 cm wide. If it is lace or knitted fabric whose edges do not fray, then there is no need to trim them. If the fabric is different, in this case it is necessary to hem them.
- Now draw two parallel lines with a long ruler. Sew with a thread and a needle, first along one and then along the other markings. Tighten the thread and tie in knots.
The next Pierrot costume for the fairy tale “The Golden Key, or the Adventures of Pinocchio” is also easy to make. A spacious shirt with long sleeves is sewn from white silky fabric. You need to attach a collar to it.
To do this, cut out two large circles of different sizes from transparent fabric.
Place the small one on the large one and gather it onto a thread. Top this element with knitted tape. Sew Pierrot's collar onto the neck of his shirt. Here is the shirt pattern.
The pants are also roomy. You can take the boy's trousers as a basis, increasing the pattern. Make one pant leg white, the other black. An elastic band is inserted into the belt, black circles are sewn onto the light part of the trousers and onto the shirt.
Sew on pompoms as trim. The following photo tip will help you make them.
As you can see, filler is placed in the center of the fabric circle. Then the fabric along the edge is gathered onto a thread, tightened, and secured.
Here's how to make a Pierrot costume.
Shirt Pinocchio
Since the Pinocchio costume for a boy requires a very simple shirt, you can use the one you have at home, or buy a similar one in the store. The basic requirements are orange, red or yellow fabric color, short sleeves and button closure.
Taking a classic shirt as a basis, you can begin to improve it. The first thing to do is to sew on a large white collar, as befits a Pinocchio costume.
- Draw the desired collar size on paper. It should look like the letter “C” with rounded ends. Transfer it to fabric and cut it out.
- Make notches at the folds and, having determined the middle of the collar, apply to the shirt.
- Pin the collar to the shirt, then hand baste with thread.
- Sew on the wrong side using a sewing machine.
After making the collar, we will begin re-stitching the buttons. For greater similarity, the existing buttons should be replaced with large black ones. Having made a couple of pom-poms, you can attach them to the collar on a string.
Shorts for the Pinocchio look
Having designed the shirt, you can start making shorts. They are also easier to find ready-made. Surely every boy has a similar item in his wardrobe. For a children's Pinocchio costume, you will need the simplest blue or light blue cotton shorts, just above the knees or knee-length.
If you still don’t have such a thing, then watch the video from which you will learn how to sew the simplest shorts for a boy yourself and very quickly.
To complete the look, you'll need striped socks. It is desirable that their color matches the color of the cap.
How to make Pinocchio's long nose?
Perhaps the most important distinguishing element of Pinocchio's image is his long nose. Without it, it will be difficult to understand what kind of hero the child has reincarnated into. So, there are several ways to make a false nose at home. Let's start with the simplest.
For this method, prepare a thin elastic band, thick paper, an awl, scissors, tape, and paints.
- Fold the paper to form a ball. Glue the sides together using glue.
- Mix brown (red) and white paints and paint the paper in a color close to the child’s skin color. Let it dry.
- Then glue small pieces of tape to the places where you are going to make holes for the elastic. This technique will help strengthen the puncture sites and prevent the paper from tearing.
- Using an awl, make holes for the elastic. Attach the elastic band to the nose on both sides. The nose is ready!
The second option is also quite simple. For it you will need yellow foam rubber, a glue gun, a thin elastic band and scissors.
- Using scissors, carefully shape the base of the nose.
- Then use a glue gun to make a pointed nose out of the remaining small pieces. To do this, simply plant piece by piece, trimming and sharpening them with scissors.
- Pass the elastic band near the base of the product and secure it well with knots.
The third option for a false nose is the most difficult. It will be papier-mâché.
For such a nose, prepare plasticine, flour, glue, paints, black and white newspapers.
- Tear the newspapers into pieces and place them in a bowl, filling them with water. Let the preparation brew for a couple of hours.
- After time has passed, add glue and flour to the bowl, mixing well. Leave for another hour.
- While the substance is infused, you can begin sculpting the base. To do this, sculpt from plasticine exactly the same nose as you want to make using the papier-mâché technique. Its base must be level.
- When the nose is sculpted and the mass has stood for the required hour, you can begin to paste over the plasticine nose with pieces. After making the first layer, let the workpiece dry.
- After several layers, remove the plasticine and, after complete drying, begin applying layers of paint. After mixing gouache paints to the desired color, paint the nose layer by layer.
- Before or after painting, carefully make holes for the holes and tie an elastic band. Pinocchio's nose, made using the papier-mâché technique, is ready!
Golden Key
And of course, what would Pinocchio be without a golden key? It can be made in the most simple way from thick cardboard.
To make a golden key, take: cardboard or thick paper, gold paint, decorative rhinestones, scissors and glue.
Draw a sketch of the future key on paper and transfer it to cardboard. Please note that its size must be at least 20 cm. Otherwise, the accessory will not be noticeable from afar. If the paper is too thin, glue several layers until you get the desired thickness. Then cover the workpiece with several layers of gold paint and decorate with rhinestones. The magic key for Pinocchio can be hung around your neck for convenience.
Preparation of the nose for the Pinocchio costume
In addition to the suit, Pinocchio must have a long nose. How to make it from scrap materials?
Progress
1. Draw a blank for the future nose on beige cardboard. To do this, draw a small circle, the diameter of which will be equal to the length of the nose. Cut out the workpiece.
2. Roll the cardboard into a cone shape and glue it vertically.
3. We make holes for the elastic band and thread an elastic thin ribbon. It will securely hold Pinocchio's nose during the performance.