Making crafts is a good time not only for children, but also for their parents. Children will be able to learn to do something new, and parents will happily spend their free time helping their children have fun. Why not combine fun and helping the birds? A very suitable craft for this is a birdhouse. In the end, our birdhouse will turn out very beautiful, looking like a country house. In which a bird would be happy to settle. It can be hung both in the forest and in the garden at the dacha.
To make a birdhouse we will need:
- plastic bottle 5 liters;
- two bottles 1.5 - 2 liters;
- double-sided tape + glue;
- tassels;
- paints;
- marker;
- a piece of cardboard or paper 10-10 centimeters;
- linen rope 1 meter + small elastic band;
- penknife or scissors;
1. Remember, there is no need to rush in creative work. Accuracy is the main key to beauty.
2. On cardboard we draw a trapezoid rounded at the corners and cut it out, this is a blank.
3. We apply the blank to a 2 liter bottle, outline it and carefully cut it out.
4. You should get 25-30 pieces.
5. In the middle of a 5-liter bottle, draw a circle (the entrance for the birds) and cut it out very carefully so that there are no sharp corners. A puncture in a plastic container can be easily made with a kitchen knife.
6. Just below we cut out a circle for a perch on which the bird can stand.
7. Attach trapezoids from 2-liter containers to tape. From top to bottom, in 4 rows as in the picture.
8. Insert the birdhouse perch into the small hole and secure it with glue.
9. Paint the birdhouse as in the photo.
10. We draw a rope around the neck and finish painting the roof with not very wet paint.
11. Let's make a decorative fence around the birdhouse. We cut the sticks to approximately equal lengths to each other. We stretch the elastic band over the bottom and insert sticks between it and the bottle. Then we wrap the rope at the level of the elastic band, as in the photo.
12. Let's make a beautiful entrance to the birdhouse. We glue sticks around a large circle.
13. By wrapping a string around a twig we will make a comfortable perch.
14. Wrap the perch with rope. We also wrap the recesses of the bottle with it. You can also add decorations: leaves, flowers or, like me, ladybugs.
Such an exciting master class will instill in children a love of nature and broaden their horizons.
If you find an error, please select a piece of text and press Ctrl+Enter.
The benefits of birds for the garden are extremely great. If you want to lure birds to your summer cottage, let's talk about how to make a birdhouse with your own hands from plastic bottles. Why plastic and not the classic, familiar wood? The answer is simple. Being in the open air, wooden birdhouses rot from moisture, are spoiled by parasites, and birds fly around them.
What birds are found in your area?
Building a birdhouse is not difficult, but the fact is that it is not suitable for all birds, and it is at least wrong to take care only of starlings. Therefore, pay attention to what birds live in your area and prepare several different types of houses so that different birds can live in them. For example, see how to make a birdhouse from a bottle.
Structurally, birdhouses are divided into:
- Wagtails. They are built for wagtails, since it is difficult for this species to move in standard houses due to the tenacity of its legs. These birds move mainly by walking, rather than flying. The dimensions of the box can be left the same, but it should be placed in a horizontal position.
- Nesting grounds. They are intended for pikas. The main difference is that it has two entrances.
- Birdhouse/titmouse. A standard house, familiar to everyone since childhood, which is suitable for all types of small birds.
You can make a house from non-traditional materials. You will learn below how to make a birdhouse from a 5 liter bottle.
Recommendations for feeding birds
Despite the general opinion that wild birds can eat anything, birds should be fed with caution, since they absolutely cannot eat some foods. Ideal for feeding birds:
Ideal for feeding birds:
- sunflower seeds;
- millet, millet, oats and wheat;
- unsalted lard and meat;
- dried rowan and hawthorn;
- maple or ash seeds;
- nuts, cones and acorns;
- pumpkin and watermelon seeds.
You can give calcium supplements, for example, crushed egg shells.
It is strictly forbidden to feed birds rye and wheat bread, as the yeast in them can ferment. Birds should not eat seeds or skins of citrus fruits. And also you should not feed the feathered inhabitants with salty, fried, spicy and sour foods.
Key Requirements
Before you start preparing the house, you should first consider all the measures to protect the birds. Don’t even doubt that local and neighborhood cats will try to get inside and remove the chick. For this reason it is necessary:
- Do not make a perch (perch) in front of the hole, because the cat will be able to cling to it with one paw and calmly climb into the nest with the other.
- Make the canopy longer so that the cat cannot reach inside from the roof.
- If you have migratory birds nesting, you should check your birdhouse as spring approaches. During the winter period, other representatives of the animal world, such as bats or even squirrels, could have settled in it.
In addition to security measures, attention should be paid to the following things:
- You cannot make a birdhouse from coniferous wood. The resin that escapes from such boards will make the inside walls of the house sticky, which can make it difficult for birds to fly. Is it dangerous.
- The material used to make the house should be rough from the inside, so there is no need to plan the boards. If the material is initially smooth, for example chipboard, make notches inside so that the birds can easily move, clinging with their claws.
- Make the inside of the birdhouse as natural as possible, do not prime or paint it. Decorate only the outer part of the wall; inside, the birds will equip everything on their own, the way they need.
Dimensions and types of birdhouses
In order to start creating a house with your own hands, you need to select the dimensions, as well as the materials that will be used to make the birdhouse. Next, we’ll tell you how to build a permanent structure and a lightweight version - how to make a birdhouse from a plastic bottle. Today, all structures for birds are called birdhouses, but there are size standards for different types of birds.
- Birdhouse – size 40*15*15 cm, hole diameter 5 cm.
- The titmouse is a smaller type of birdhouse that will be an excellent home for small bird species: sparrows, redstarts, pied flycatchers and others. Size 30*12*10, hole diameter 3.5 cm.
- The wagtail must certainly have a protrusion in front of the hole. Size – 15*15*30.
- Nesting is a structure for pikas; it should have the shape of a triangle with a through exit. Size 25*15, taphole – 3*6 cm.
If you don't know what birds are in your area, opt for a regular-sized birdhouse. You will learn how to make a birdhouse from a plastic bottle a little later. However, for titmice, a small house is more suitable, which can become a cozy nest for nesting, but for starlings it will be a little cramped in it. Perhaps this information is quite enough to find out how to make a birdhouse from a bottle and start making a birdhouse.
Basic safety rules when securing birdhouses
As mentioned earlier, such nesting sites are fixed at a height of 3-5 m. This means that it is necessary to adhere to special safety rules regarding climbing a tree.
These rules are:
The nesting box must be secured only in conjunction with an insurer who has the skills to provide first aid for dislocations and fractures. In case you need to quickly transport an injured person to the hospital, you need to have a vehicle on hand. Do not climb a tree with a birdhouse. The nesting box must be lifted using a rope attached to the belt after the person has secured his position on the tree. The insurer must maintain a distance of 3 m between the possible place of falling of a person or objects
In this case, it is worth taking into account the direction and strength of wind currents. The insurer must not let the steeplejack out of his sight. Otherwise, you need to give a descent command, which the steeplejack unquestioningly executes.
Large bird house
The ideal material for its manufacture would be an ordinary five-liter bottle. Due to the large size of the container, such a house will be equally good for both small birds and larger birds.
- It is necessary to make a hole (or several, depending on the type of birdhouse) of such a size that the bird can fit in there freely.
- You can place a perch inside for the convenience of the birds. This is done very simply: you need to make holes on both sides parallel to each other (using scissors or an awl) and insert a perch into them so that the ends extend beyond the holes.
Process
- Make a round hole in the container at a distance of 3 cm from the bottom.
- A little lower, we make a hole with a drill and insert a dowel into it. This will be a roost for the starling.
- We paint the bottle brown (2 layers).
- Next, we take the lid and drill small holes in it - 2 pieces, thread a wire through them and twist the ends. The result should be a loop through which the house will be attached to a pole or tree.
- Using a stencil with beige paint, paint the window with a brush or sponge.
- Cut the disk into pieces and paint them with light brown, black and green paint.
- Decorating the birdhouse. We glue double-sided tape onto the dried pieces of the disk, and then glue them to the neck of the bottle. Thus, we get an imitation of the roof.
The most democratic option
Next, you will learn how to make a birdhouse from a bottle with your own hands, and you will understand that it is quite simple and quick. The process takes approximately one hour.
- Plastic bottle with a volume of 5 liters.
- Jute or linen twine – 1 pc.
- Scissors.
- Double-sided tape.
- Glue.
- Bunches of grass.
- A piece of woolen fabric.
- Large buttons (shiny) – 2 pcs.
- Braid – 30 cm.
- Cereal grain.
- Marker.
- Threads.
- Big needle.
- Lace.
Execution steps
- How to make a birdhouse from a five-liter bottle? Take a large plastic bottle with a cap and place a strip of tape on the bottom. Glue the beginning of the twine onto it and begin winding the container.
- Each subsequent row of winding should be pressed tightly against the previous one. Secure the first and last row with glue.
- The next step is to draw a square on a piece of twine, apply glue along the path and cut a hole.
- Start making the roof; an unnecessary woolen hat or sleeve from an old sweater will do for this. Place the woolen cloth on the top of the workpiece. The edges of this canvas must be collected using a needle and thread, fastening the lids to the handle.
- Sew the previously prepared tufts of grass to the wool base. When all the grass is sewn on, secure the top with a cord threaded through the handle of a plastic bottle.
- Decoration of the entrance to the birdhouse. To do this, you need to stick strips of double-sided tape on the sides of the inlet hole, and a braid on top of it.
- Secure buttons at the top and bottom.
- To attract birds inside, you need to sprinkle a grain mixture with minerals and vitamins. It is not recommended to sprinkle bread crumbs, as over time they turn into mush due to humidity, which is very harmful to birds.
- Hang the feeder on the roof, out of reach of cats.
Now you understand how to make a birdhouse from a 5-liter bottle without difficulty and special expenses. The birdhouse should be placed on the east side. Approximately once a year, some time before the birds arrive, it must be disassembled, cleaned, and the mat there replaced. Then you can hang it again to meet the birds.
Birds bring great benefits to both the garden and the vegetable garden. Therefore, many try to attract feathered friends to their summer cottage. The easiest way to do this is to place a birdhouse in your yard. You can make it from different materials or buy it ready-made in a specialized store. Although simple and lightweight birdhouses made from improvised materials are especially popular.
Required tools and materials
To build a birdhouse, you will need very few materials and the right tools. In addition, they can be found in almost every household. For this you will need:
- 1 plastic water bottle;
- 1 two-liter plastic bottle required for finishing the roof;
- string or twine;
- burlap or any other rough material needed to decorate the inside of the birdhouse;
- various decorative elements that can be made by hand;
- regular scissors or a very sharp knife;
- A marker of any color is suitable for markings;
- quick-drying glue;
- a brush for applying fine patterns, as well as an ordinary sponge for surface treatment;
- multi-colored paints;
- a perch that can be made from a simple branch.
Shoe house
You probably have shoes that you haven’t worn for a long time or that have become damaged. Don't rush to throw it in the trash. With a little imagination and skill, you can make an original birdhouse out of old shoes. Attach your shoe to a tree and wait for someone to live in your shoe. You can put sawdust or moss inside. This way the birds will be more interested in this unusual house.
Comments (1)
Alexey 05/27/2020 at 09:29
If it’s easy to do, then why don’t you do it yourself, but publish photos from foreign sites?
How to do it yourself?
Building a bird house at home is not difficult. However, before this, it is necessary to remember to protect future birds that will settle in it. Therefore, it is better not to make a perch just before the hole, since the cat can catch its paw on it and pull out the emerging chicks. In addition, for the same reason, the visor should be made a little longer.
Then you need to prepare all the above materials and tools, and only then begin the work itself. The best way to make a birdhouse is from a five-liter bottle. To understand how it is done, it is necessary to consider the entire process step by step. There are several options.
Option #1
- First you need to take a 5 liter bottle and rinse it thoroughly. Next, you need to dry it and remove all the labels so that they do not interfere with your work.
- Then, on one side of the workpiece, you need to mark the middle and draw a small circle with a marker. Next, you need to cut it out with a sharp knife or scissors, and the edges are either carefully smoothed through a light cloth with an iron, or simply sanded with sandpaper. This is necessary so that birds do not get hurt when they fly inside.
- After this, just below the entrance you need to mark two small holes for the perch. Then carefully do them. This can be done with a hot nail. Then you need to insert a wooden perch into them. It must be held very tightly so that the bird sitting on it does not fall.
- Now it's time for the twine. It must be coated well with glue and wrapped around the entire birdhouse. But if you use twine, you only need to wrap the bottle up to the cut hole.
- After this, you can start making “tiles”. To do this, you need to take a 2-liter bottle prepared in advance. You need to draw sketches on paper and then transfer them to the bottle with a marker. Using scissors, you need to carefully cut out the required number of blanks. If one bottle is not enough, you can use another one.
- Next, you can begin installing tiles on the birdhouse. This is done using quick-drying glue. From above you need to wrap the neck of the bottle with the same twine. It will also cover all the “tails” of the tiles. In addition, you need to attach a rope to the neck so that you can hang the birdhouse.
- Since the bottle is transparent, birds can simply get into it, like a regular bird trap. To prevent this from happening, you need to cover the middle of the bottle with prepared burlap. The bird can easily get out of its house.
- After this, you can start decorating the birdhouse, however, this is done at will.
Step-by-step instructions for making a birdhouse for kindergarten
Making a birdhouse for kindergarten during labor lessons is a fun activity. It is not difficult to assemble; it can be done from one pine board. Birds are not picky creatures; a roof over their heads and walls protecting them from the cold wind are enough for them.
To do this, stock up on materials and get started.
What is needed for that:
- ruler;
- pencil;
- self-tapping screws;
- nails;
- screwdriver;
- wood hacksaw;
- drill.
Instructions for making a birdhouse for a kindergarten with a flat roof:
- Prepare a construction project.
- Make cutting boards.
- Make a hole in the front part for entry.
- Connect all parts of the house and the bottom using screws.
Assembling a simple bird house will not take much time; it is enough to allocate 2-3 lessons of “Labor Training” for this. As a result, students will learn to use hand tools and work with circuits.
Made of wood
Wood is quite a popular material among those who like to make things with their own hands.
Wood makes beautiful products.
- For the roof and bottom, you need to cut 2 circles from the tree trunk, 20-25 cm thick.
- Peel the bark from the log and cut it into four parts (lengthwise).
- Clean the wood to a thickness of 20-30 mm
- Connect all parts together using clamps and screws.
- Cover the product from above and below in circles.
- Hang the nest box on a tree branch.
This type of birdhouse for kindergarten is very simple and students can assemble it with a saw and hammer.
From a plastic bottle
During a craft lesson, schoolchildren can be asked to make a birdhouse for kindergarten from a plastic bottle. In addition to new acquired skills, schoolchildren will learn to use recycled materials.
What you will need:
- Clean plastic bottles (2 pieces two-liter, 1 piece liter).
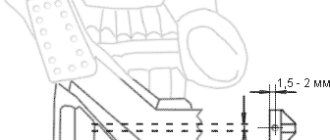
- Wire (length 1 m, thickness 2 mm).
- Scissors.
- Nails.
- Hammer.
- Dye.
Instructions:
- Cut a liter bottle in the middle at the height of the neck.
- Cut off a two-liter bottle where the neck is higher.
- Cut an entrance with a diameter of 5 cm.
- Connect the two halves.
- Use a nail to make a hole for the wire.
- Glue the lid.
- Paint it.
Plastic food bottles are not harmful to birds; they are more interested in the roof over their heads, and not what it is made of.
From plywood
During labor lessons, we recommend assembling a reliable and durable bird house from plywood. This is a common material for making furniture; some furniture factories may simply give them away, as they consider them production waste. And the children will use these leftovers to create a nest for birds and hang it in the kindergarten.
What you will need:
- plywood saw;
- drill;
- awl;
- knife;
- paints;
- pencil and ruler.
Instructions:
- Draw the project on paper (if you are not very good at drawing, you can use carbon paper).
- Secure a sheet of plywood and transfer the design.
- Use a drill to make a through hole in the center of the plywood.
- Cut out the circle with a jigsaw.
- Sand the cut line with sandpaper.
- Apply glue to the joints and connect all parts (the structure can be reinforced with nails).
- Attach a block to the back wall for installation.
- Attach a block in front of the entrance hole so that the bird can sit.
After the product has dried, you can begin decorating. If you paint a bird's house and draw a picture on it, you will get a real work of art.
From a cardboard box
A decorative accessory made by yourself - stylish, unusual, creative. Any schoolchild can assemble a bird house from cardboard; such a product will become a real decoration in the room.
For work you will need a minimum list of materials:
- cardboard;
- colored paper;
- glue;
- markers;
- scissors or stationery knife.
Instructions:
- Draw a template on paper and transfer it to cardboard.
- Cut out the product and cover it with colored paper.
- Fold the cardboard over the edges and glue everything together.
Decorate the resulting product at your discretion. Drawings with felt-tip pens look original, you can add decorative elements.
Arranging a birdhouse
However, when arranging a bird house, it is necessary to remember some preferences of birds and their safety. For example, the birdhouse must be located away from the ground so that the cat cannot reach the chicks. The branch on which the structure will hang must be strong and thick so that it does not break during sharp gusts of wind. In addition, it will be better if the birdhouse does not attract too much attention to itself. Therefore, it is worth thinking better about its disguise. If there is often wind on the site, then the house must be attached directly to the trunk so that it does not get torn off.
When spring begins, you definitely need to check if any living creatures, for example, bats or squirrels, have settled in the birdhouse. If so, then they need to be “evicted.” To attract birds to such a house, you can pour grain with various useful additives into the middle.
It is not recommended to sprinkle the bottom with bread or other crumbs, as after rain they can get wet and turn into porridge, and this will not be so beneficial for the birds.
Protection from ruiners
Birdhouses need to be protected from:
- Sonya.
- Dyatlov.
- Chipmunks.
- Protein.
- Bats.
- Domestic and wild cats.
The main protection of the birdhouse from woodpeckers is a tin collar around the entrance no more than 5-6 mm wide. You can also use upholstery with small nails at the same distance or attach an overlay to the taphole. For the overlay, it is recommended to use single-layer wood with horizontally oriented grains. Shielding is the preferred method of protection against woodpeckers, since the use of wood does not have a negative effect on the birds that have taken up residence in the nesting area.
The best way to protect a birdhouse from cats is to use a cat skirt. It is usually made from twigs or wire. The twigs are cut at the root part in such a way as to form small inclined stumps. The entire belt is fastened with wire passing under the rods. When attaching such a device, it is worth remembering that it is not recommended to survive the tree.
An alternative method of protection is to make and attach a wooden collar, which protrudes 3-5 cm around the entrance. This method is less labor-intensive, but such a threshold is inconvenient for either adult birds or chicks living in the nesting area.
A universal way to protect against destroyers of any kind is to make a tin belt. Today you can easily find a scheme according to which such devices are made and fixed to trees. When making belts, you must strictly adhere to all instructions and observe all dimensions with an accuracy of 3-4 cm. Otherwise, enemies of birds can easily catch on the bark located above or below the protective belt
It is also worth paying attention to the fact that between the belts there are no twigs, branches, feeders or any other potential support for predators
How to decorate?
Each person must approach this process individually and decorate the birdhouse in accordance with the design of the entire site and their own preferences. However, for those who do not know how to do this, here are some of the most interesting options to consider. A homemade bird house should be beautiful and appeal not only to you, but also to the birds living in it.
For example, you can decorate the entrance to the birdhouse in an original way. To do this, you can glue small strips of tape on the sides, preferably double-sided. Then attach a beautiful multi-colored braid on top. The bottom and top can be decorated with a row of large buttons, which are sure to be found in every home.
In addition, small decorative windows can be made from very thin plastic in several places. In addition to the roofs described above, others can be made. For example, a roof made from old wheels will look very beautiful and attractive. To do this, they need to be heated a little and then cut into equal parts. Each resulting piece can be painted with any paint.
Multi-colored “tiles” will look very beautiful. It is attached with good quick-drying glue.
In addition, for the convenience of the birds, the bottom of the bottle can be covered with either hay or cotton wool. The birds will like this decor the most. You can paint and paint the birdhouse, if possible. For this you can use acrylic paints and even gouache. However, the latter must be coated with varnish. By using all your imagination and creativity, you can make the birdhouse a real exclusive dream house for any bird.
When painting a structure, you need to let each layer dry thoroughly. The painting can be done differently, for example, the roof can be painted to look like a brick or the same tiles. In order not to glue the windows, you can simply draw them. At the same time, make them modern or in an old style. It all depends on what the rest of the area looks like.
The house can also be surrounded by a “fence”. That is, small sticks of the same height must be glued along the entire bottom of the bottle with strong glue. If desired, the fence can also be painted; any shade will do. You can also decorate with artificial bugs. Both ladybugs and dragonflies are suitable for this. The main thing is that the bird does not mistake them for real ones.
In addition, the perch can be wrapped with soft cloth to make it more comfortable for the bird to sit. And on its edge you can place a small bell that will ring. To summarize, we can say that if you decide to attract birds to your garden, you should not rush to the store ahead of time to buy a birdhouse. You can do it at home, because it is a very simple procedure. In addition, if you have children in your house, then this will turn into wonderful entertainment that both adults and children will enjoy.
Master class “Making a girl from flower pots”
Maria Vorobyova
Master class “Making a girl from flower pots”
Master class: “Making a girl from flower pots”
.
Master class: “Making a girl from flower pots”
.
Crafts from flower pots are an original and creative decoration.
Every gardener, as a rule, has a lot of empty flower pots. There is no need to throw them away, I propose to give them a second life and turn them into garden people with the help of your imagination and work. Make exclusive crafts with your own hands that can be used to decorate the area of a kindergarten, home, or dacha.
With the onset of summer, I wanted to make the idea of people made from flower pots a reality. I decided to build a little girl.
For work we will need:
-plastic flower pots of different sizes
-paints: acrylic and a can of red paint
-flower seedlings
Let's get to work. We have pots of different sizes. Large and smaller are the head and torso, medium are the legs, small are the arms.
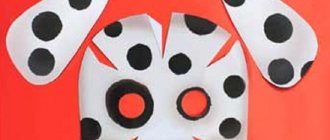
We design the head. We glue the eyes, I took them from an old soft toy, you can draw the eyes according to your wishes and abilities. Next we glue the nose (mosaic)
and finish drawing the cheeks, mouth, bangs.
In a large pot, using an awl heated on a fire, we make punctures in the area of the arms and legs. Torso (dress)
and the feet
(shoes)
are painted with red spray paint, then we paint the polka dots with white acrylic paint.
We connect the large and small pots using a self-tapping screw, you can glue them together.
Take a rope of the required length and make a knot at one end. In a small pot - hand, we also make a hole with a hot awl and thread a rope into it, so that the knot is inside. We do the same with the second hand and legs.
We thread the free end of the rope into the holes on the body and tie a knot.
Let's do our beauty's hair. We fill the pot with soil and plant seedlings of flowers, herbs, whatever your imagination desires and the size of the pot allows, so that the plant develops normally. I have a small pot and I planted a begonia. That's such a funny girl I got
I wish you a good mood and creative inspiration!
Master class “Apron for a girl” So let's get started. We take measurements for the apron pattern. To draw a pattern we need the following measurements: measure A - distance.
Master class “Making dolls from pots to decorate the site” Our kindergarten is very young and the playgrounds have not yet been inhabited. I offer you an idea for decorating a small corner on the site, we did it.
Master class “Making a laptop” Master class by teacher Nadezhda Aleksandrovna Dorofeeva Topic of the master class: Lapbook as a means of supporting children’s initiative.
Master class “Making a lapbook” Goal: to teach how to make a lapbook and work with it. - Dear colleagues! I want to share with you my manufacturing knowledge.
Master class “Making a cap” “Cap”. 1. Can be used in skits, dances, matinees and entertainment, in children’s role-playing games (“Shop”, “Cafe”, “Restaurant”).
Master class “Making herbal flowers” Herbal flowers are interesting decorative decorations - plants in which grass grows. A wonderful teaching aid for children, p.
Master class “How to sew a skirt for a girl with your own hands in a couple of hours”
A children's holiday is an integral part of the educational process of preschoolers, and is also an important part in the life of a child. For the holidays
Master class on making flower hats for the flower dance for the March 8th matinee Dear colleagues! I offer you an idea for making your own flower hats from colored paper. The idea for the hats came about during the process.
Master class on making a crown for a star girl Master class Making a crown for a star girl. Materials and equipment: to make a crown we will need a headband for the crown.
Master class on making a “Chunga from Changa Island” costume for a girl. You can come up with an interesting ensemble, make a “Chunga from Changa Island” costume with your own hands and amaze everyone present at the holiday.
Deciding on the format
First of all, we decide which birds we want to please with new housing:
- A birdhouse is a universal option suitable for most birds. Its dimensions are within the range: 40x15x15 cm, and the diameter of the flight hole is about 5 cm.
- The titmouse is a haven for sparrows, tits and other small birds. When making it, try to keep it within 30x12x10 cm, and make the flight hole no more than 3.5 cm in diameter.
- Wagtail is designed specifically for wagtails. Since these birds primarily walk and do not fly, the structure must be positioned horizontally, and also be provided with a protrusion in front of the hole. The average dimensions of the product are 15x15x30 cm, the tap hole is 3 cm.
- The nesting area often becomes a haven for pikas. Therefore, if these birds predominate in the area of the summer cottage, a new house for them should be made in the shape of a pyramid with dimensions of 25x25x15 cm, and a through exit, the diameter of which does not exceed 3.6 cm.
In this article we will talk about birdhouses, since they are universal and suitable as a temporary shelter for most birds.
Birdhouse made from a 5 liter plastic bottle
Once you have collected the above materials, move on to the “how to do” question. The simplest birdhouse from a 5-liter plastic bottle is made as follows:
Step #1. We take a plastic container, rinse it thoroughly and dry it. We get rid of the label and adhered dirt.
Step #2. On the side (approximately in the middle) we cut out a round hole and process its edges using sandpaper or an iron (in the latter case, always through fabric).
Step #3. We outline a perch. We make a small hole just below the tap hole and insert a stick of suitable length into it.
Step #4. We wrap the structure with twine (placing it on glue) or paint it with paint. Note: If you choose twine, wrapping should be done before cutting the hole.
Step #5. We draw a model of the tile on paper, use a marker to transfer it to the second bottle and cut it out. If one bottle (5 liter capacity) is not enough, we put another one under the knife.
Step #6. To prevent the birdhouse from turning into a bird trap, we cover the inner walls with burlap or other textured material. It will make it easier for birds and their chicks to get out of the house.
Step #7. We attach the tiles to the birdhouse using glue or double-sided adhesive tape. We wrap the neck of the bottle with twine, which will simultaneously serve as a fastening for the new bird house and hide the “tails” of the top layer of tiles.
Step #8. If desired, we add other decorative elements. On the outside we coat the entire structure with varnish. Let it dry properly, and our birdhouse is ready.
Now all that remains is to hang it under the windows, and very soon you will be able to enjoy the chirping of birds in the morning. And also forget about the insects that always terrorize the surrounding areas.
Bottle palm: manufacturing instructions
A step-by-step description of all the intricacies of creating a plastic tree will help you quickly, literally in the evening, assemble with your own hands, step by step, a palm tree from plastic bottles of the intended height.
The process consists of three operations:
- leaf assemblies;
- creating a plastic plant trunk;
- connecting all parts and installing the finished tree.
On this topic:
BACK
FORWARD
1 of 44
Although there are many options for creating a plastic tree, the most magnificent long leaves with any chosen method are obtained from large, for example, two-liter bottles.
Making a palm tree crown from bottles
The bottom of the prepared green bottles is cut off with a stationery knife or scissors. It is no longer needed, and the upper half will become a blank for the sheet.
It is carefully cut towards the neck into thin longitudinal strips. The larger the diameter of the plastic bottle, the thicker and more luxuriant the green palm leaves will be.
These are not the only option for creating leaves. If you cut the top of a plastic bottle, as in the photo, into four “petals”, and then cut each of them several times, you will get beautiful feathery foliage.
The resulting fragments of leaves are sequentially strung on a strong rope or durable electrical cable. A lid must be screwed onto the first piece in order to secure the “petiole” of the leaf with a knot at the top. The last part of the bottle is screwed in the same way.
A palm tree made from plastic bottles can have a top of any size, but trees whose crown consists of at least 5–7 leaves look better.
There should be a long stalk at the base of the finished palm leaves in order to later assemble and securely fasten the entire structure.
Assembling a palm tree trunk from bottles
To obtain a tree trunk similar to a natural one, you will need almost the entire bottle, except for the very bottom.
From the bottom almost to the very neck, longitudinal cuts are made on brown bottles, dividing the container into equal petals.
Only a small fragment of the bottom goes to waste
This is what the finished part of the future bottle palm tree trunk looks like.
The assembly is carried out in the same way as the green leaves of a tree were collected. To secure the palm tree in an upright position, its trunk will need a strong, rigid core. It can be made from a metal rod of suitable length and diameter or a tube.
Assembling a palm tree from plastic bottles
The finished palm leaves are attached with glue or tape to the top of the tree so that they form a uniform crown diverging on all sides.
This is what the finished tree top looks like.
The design turns out to be quite heavy. Therefore, it is advisable to secure it with such a heavy base. If it is not possible or suitable material to make a welded platform, the rigid plastic or metal base of the stem is buried at least half a meter. This kind of “root” in the hole is strengthened with brick chips and compacted after filling with soil. Large trees are best concreted.
A video on how to make a palm tree for your garden plot from plastic bottles will explain all the nuances of the creative process and help you turn your yard or corner of the garden into a real oasis with your own hands.
How to make a birdhouse from a plastic bottle: useful tips
If you want your plastic bottle birdhouse to properly perform its functions, pay attention to the following points:
- The longer the end of the perch on the outside of the birdhouse, the easier it will be for the cat to reach its feathered inhabitants.
- Decorate only the outer part of the craft; the birds will decorate the inner part themselves.
- Do you want the life of your feathered charges to be calmer and more comfortable? To decorate the birdhouse, use mostly discreet colors that blend in with the area (various shades of brown and green), so as not to attract unnecessary attention from predators.
- Do not use too small elements to decorate the birdhouse. During operation, they will quickly fall off, and the design will lose all its attractiveness.
If you know other life hacks and useful tips, write them in the comments, we’ll discuss them and use them.
Benefits of birdhouses
We have said more than once that birds as neighbors bring great benefits to humans. But what exactly is it expressed in? For example, that:
- Birds destroy harmful insects, caterpillars, and larvae, allowing them to feed their chicks.
- Most birds sing quite beautifully, helping us wake up in a good mood and be positive all day long.
- Making a birdhouse is a great chance to improve your creative and physical skills, as well as spend time with your family.
- Building a birdhouse with your own hands teaches children to work productively and care about nature.
Garden gnomes' home
Small houses for gnomes are familiar to children and adults. Many have seen them in cartoons or old fairy tales. You can create such a house for birds. But it is worth noting that you must have a rich imagination and good skills. Find a photo of a gnome or troll house on the Internet and start creating. Children will really like this option. And your garden will look like a wonderful fairy-tale corner.