We make lamps from wood
Crafting from wood requires precision, but it's okay if you make a mistake. After all, the process itself brings pleasure, and the result can be achieved with experience.
Preparing tools for carpentry work
Basically, you can find everything you need to make it at home, but if you suddenly don’t have a suitable tool at hand, you can purchase it at the store.
Now let’s take a look at what a wooden lamp can help you make:
- roulette;
- pencil or marker;
- clamps;
- jigsaw for wood (if available, then a jigsaw);
- sandpaper (sander).
Consumables
Finding the main part of the material is not difficult: even if you don’t have something at hand, you can supplement it with what you have in the garage.
1. Beam made of pine or other species. You can also use plywood and similar materials.
2. Wood glue.
3. Electrical wire.
4. Lamp socket.
5. Light bulb: it is advisable to use an LED light bulb, since wood is a flammable material, and diode lamps practically do not heat up.
6. Plug.
You can use your imagination and decorate the lamp with various varnishes and paints.
Step-by-step technology for creating a lighting fixture at home
Now we know what materials and tools we need to arm ourselves with.
All that’s left is to make a wooden lantern with your own hands. Let's begin to delve into step-by-step instructions for working with wood.
1. Draw identical 30 cm segments on plywood or timber.
2. After we have made a drawing on a piece of wood, we proceed to sawing the material. To do this, take a regular jigsaw, or if you have one, then an electric jigsaw.
3. For ease of cutting, take a clamp (to secure the wood).
4. Having already prepared blanks, lay them out on the work surface and begin sanding. We sand with sandpaper from the coarsest grain to the smallest.
5. Having received perfectly smooth blocks, you can impregnate them with wood stain, varnish, and a different palette of paints.
6. Next, coat the timber (plywood) with glue.
7. When you glue your structure, it will need to be placed under a press for at least a day.
8. The next day the frame for the lantern is ready.
9. Let's start fixing the electric cartridge to the structure. You can secure it with punched tape or similar material that you can find at home.
10. We mount the wire to the socket and, if necessary, to the electrical plug.
11. If desired, you can make an internal lampshade to make the light of the lamp soft. For this we take linen or organza.
12. Take the previously prepared suspension or hook, attach it to the socket - the wooden lamp with your own hands is ready.
DIY “Pushkinsky” lantern made from cans
Greetings to all lovers of making things with their own hands! In this article I want to tell and show how to make a nice thing out of trash that will serve as decoration for the interior of a house or the exterior of a dacha (and vice versa).
There are descriptions of similar products on the Internet, but everything is written there at such length that it’s difficult to understand anything.
To make a “Pushkin” lantern, we will need tin from tin cans, preferably larger in size, and preferably not corrugated. Our main tool will be metal scissors, although tin can also be cut with simple stationery scissors. We will also need:
Materials
- Solder POS-60
- Rosin or solder fat (I do not recommend acid or zinc chloride due to their high corrosiveness)
- Cartridge E27 (or E14, depending on what you like)
- A pair of self-tapping screws for attaching the cartridge.
- A piece of tin profile 25mm. – 250-300mm.
- Electrical seal No. 7 (smallest)
- A piece of steel wire ø3mm. for the ring (I used a welding electrode)
- Corrugated (or matte, at worst transparent) plexiglass.
- Transparent silicone sealant.
- Paint (whichever one you like, I have matte black)
Tools other than scissors you will need:
- Soldering iron with a power of 80-100W.
- Hammer
- Measuring and marking tools (ruler, compass, scriber, caliper)
- Drill or screwdriver, drill ø3.3mm.
- Stationery clips
- Personal file or flat file
- Vise
- Two pieces of L25mm corner. about 300mm long.
So, the first thing you need to do is prepare the material. Using metal scissors, we cut off the locking joints of the cans and cut the can along the generatrix. This way we get a sheet of tinplate with relatively smooth edges.
Next, we proceed to marking our lantern. First you need to decide on the size of the cover, based on its size, the entire lantern will be designed.
I got a square with a side of 230mm, therefore a circle with a radius of 115mm fits into it. Our lantern will be hexagonal, which means the size of the side of the upper part should not exceed 95-100mm, and due to the planned pattern it will be even smaller.
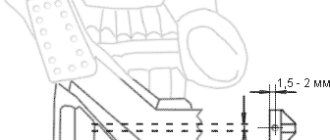
We mark the parts of the lantern body. We need to make six pieces of side, top and bottom parts. We draw the remaining (or new) piece of tin into 20x10mm rectangles (where 10mm is the fold line)
And now a small digression. To punch the holes, I used a little tool that might now be called "incredibly cool" or something like that.
It was made about twenty years ago, for the production of ø12mm “spots”. to nail the film on the greenhouse, from two steel bars welded together through a millimeter gasket. Then a hole was drilled for the punch, and that was it. So, with this marking device we punch a number of holes,
and then cut the strip along the line of the centers of the holes (the line between the holes is the fold line).
For those who are not going to make a device for the sake of one lantern, I can offer other options for making a design: 1- cut out trapezoidal cutouts with a small chisel instead of semicircular ones, 2- use scissors to make triangular cutouts. In both cases, you will first need to cut off the marked strip, and the marking itself will change slightly. As a result, we should get stripes like this:
Six with double-sided and four with single-sided punching.
We bend the workpieces using an “even cooler device”, consisting of a vice and two pieces of 25th angle.
We set along the fold line and bend an angle of approximately 120° with a wooden block over the entire plane (inaccuracies will go away during assembly, but it is better to reduce the angle a little; when gluing in the glass, it will straighten out to the required amount) for strips with double-sided cutouts and 90° for single-sided ones.
You should end up with something like this:
The length of the blanks is determined by the semicircles of the cutouts, so that later they seem to form one whole.
We assemble the side edges of the lantern using the “coolest device” called a template.
It is a piece of plywood with applied contours, axial and support points, in which windows for office clips are also cut (done in 15 minutes). We insert the blanks, adjust them along the axes, according to the coincidence of the semicircles, and solder them together. We get three trapezoid walls
Which are further connected using the same pattern
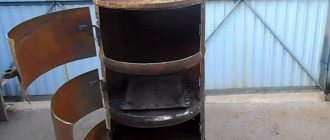
So, the flashlight body is assembled. Now let's start decorating it so that the lantern doesn't look like a trash can. From the remains of the tin we cut out a decoration, the description of which will take more time and space than just seeing it in the photo.
And solder it to the bottom of the lantern
We cut strips of tin 2mm wide. and a length greater than the length of the trapezoid diagonal of the side face of the lantern. You need 12 of these strips. Straighten it and then twist it into a corkscrew.
Solder the resulting coils into the diagonal trapezoids of the lantern
Now the body has taken its final shape
Now it’s time to unwrap the lid. Based on the size of the larger base of the trapezoid of the body edge (I got 80mm), we obtain the radius of the circumscribed circle. To construct the development of a hexagonal pyramid, we set its height. By choosing a large height we get the roof of a watchtower, a small one - a lid from a saucepan, especially since we also need to attach a socket for a light bulb there. I chose a height of 30mm. where did I get the rib length of 85mm. (I hope there is no need to quote the Pythagorean theorem). Add another 15mm to the overhang of the lid. and we get a development radius of 100 mm, which fits well into our workpiece (a square with a side of 230 mm, which we cut off at the very beginning). Well, then, as in a geometry lesson, for those who played truant, we draw a circle with a radius of 100 mm, put 6 segments of 80 mm each on it, draw straight lines from the center to the ends of the segments (these will be fold lines). In the remaining triangle, draw an allowance line for overlapping soldering (5mm), and cut it along the resulting contour.
bend along the fold lines and solder the overlap joint.
Now we need to connect the cover to the body. To do this, we make loops from strips of tin 5 and 10 mm wide. wrapping their ends around a millimeter wire.
and solder it to the cover and body.
We make the lock in the same way, soldering it on the side opposite the loop, without cutting the wire “under the root” but leaving a 10mm tip on one side. and bending it at a right angle so that when installing or replacing the lamp the wire can be removed, thus making the connection detachable.
We install the cartridge on a soldered strip of tin, securing it with two self-tapping screws.
Since the lantern is supposed to be used outdoors (at the entrance door of the dacha), to seal it, we insert the wire into the lantern through the gland, modifying it a little to install the suspension ring. In the hexagon of the oil seal we drill shallow (2-2.5mm) holes ø3.3mm. for a ring bent from a three-millimeter
electrode on 3/4" pipe
With this the “iron” part of the lantern is completed, we begin to manufacture the bracket. If a bracket is not needed (the lantern is planned to be mounted to the ceiling), or you intend to use a ready-made one (from a fix-price store it will be suitable for hanging a flowerpot), then this part of my opus can be skipped.
Since the thickness of the tin can is only 0.25 mm, its rigidity is clearly not enough for the bracket. Therefore, we act in a radical way - we draw a strip 10 mm wide, fold it in three along the mark and smooth it with the wooden handle of a hammer, then cut off the resulting strip.
We bend from the received volute strips.
We will assemble the bracket on a section of a construction U-shaped profile with a shelf width of 25mm. already having some kind of drawing. Use a screwdriver to punch holes on a wooden block where the volutes are attached.
We attach the volutes to the stand with strips of tin and fasten them together.
and then solder the joints.
Next, we wash the soldering areas with acetone to wash off the flux and grind off the excess solder with a file or needle file. This is where the “iron” work ends, let’s start painting, the technology of which I consider unnecessary to explain, we just take it and paint it in the fresh air.
Now let's move on to the glazing. We cut a strip from a sheet of corrugated plexiglass (I took it from an Armstrong ceiling lamp) with a width equal to the height of the lantern. Then we mark 6 trapezoids, reducing the size of the bases by 3mm. (so that the glass lies freely in the window) and cut them off. If there is no corrugated glass, then it is quite possible to get by with transparent glass by treating it with sandpaper.
We glue the glass with transparent silicone sealant, applying it to the edges in the form of a roller.
As a spacer to press the glass until the sealant dried, I used a children's ball with a diameter of 10 cm.
Well, that’s probably all, the finished flashlight looks like this:
Author of the article “Do-it-yourself “Pushkin’s” lantern made from cans” Hatulmadan