Quite often, a large compass is needed to work with curved wood and laminate workpieces. It is used when it is necessary to cut circles or semicircles of large diameter, as well as in the manufacture of arched structures. Ordinary compasses, even with the use of attachments, cannot provide such a large circle diameter, and even large carpenter's compasses do not always cope. To solve this problem, you can make your own simple device for forming circles of large diameter.
The design of such a homemade compass is very simple, and anyone can make such a device. A round wooden rod 1-1.2 meters long is used as a base. The diameter of this rod can be any, but the best option would be a size of 20-25 mm. If the rod is thicker, the homemade compass will be too heavy and inconvenient to work with. These round rods can be purchased at woodworking stores, or you can simply go to the market and buy a thin stem for gardening tools.
A hole with a diameter approximately the size of a regular pencil is drilled at one end of the wooden rod. Then a hacksaw is used to cut the rod along its axis. After this, you need to drill another hole (across the cut) to attach the pencil. A bolt with a nut is threaded into this hole (it is better to take a clamping bolt, which has a convenient wing for tightening and unscrewing). If you use a simple nut to clamp a pencil, you will need to use a wrench.
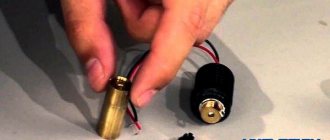
Then take a plastic pipe of suitable diameter (you can take a piece of pipe for hot water supply or heating). Its diameter is selected to match the selected wooden rod, and the length can be within 10-15 centimeters. Two holes are drilled in this tube using a drill, a nail is inserted into one of them from inside the tube, and a clamping bolt is screwed into the second.
Now you can start assembling the compass. In the part that will describe the circle, insert a pencil into the intended hole, and screw a clamping bolt into the hole through the cut and use it to tighten the cut.
From the second end of the rod, a plastic cylinder with an inserted nail is put on it, which will act as the axis of a homemade compass.
The way to use a compass is to set the required radius and fix the tube together with the nail-axis with the top bolt. If the diameters of the wooden rod and tube are successfully selected, when clamping the tube, the nail head will also be tightened. It is important not to overdo it when tightening the bolt; just tighten it a little by hand.
It was evening, there was something to do...
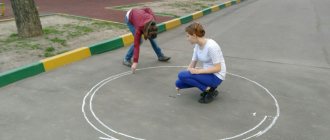
One day I got tired of drawing circles using the well-known “compass” type “plank with two nails”...
I decided to buy a compass - in the office supplies there are school "goat's legs" that cannot draw a large circle, at least 50 cm, and are also so flimsy that they bend during the process of drawing a circle (as schoolchildren draw something with them)... I understand, that this is not an option.
I looked on the websites of tool stores in my city - there are no compasses (no compasses...). But I found a couple of Moscow online stores where they offered me to buy a good compass for 3500-4000 rubles. :wacko: Why is this necessary??? - I thought.
And I decided to make a compass with my own hands. By the way, the manufacturing process took only one evening.
Compasses - it's so simple! Encyclopedia Birovits
We present a new column from the Maped company - in it we will talk about the amazing history and practical use of office supplies that are familiar to everyone. Throughout the year we will introduce you to Maped products, “reinvented” - in modern design and in a new ergonomic form. a compass is in the spotlight
Compass
(from the Latin circulus - circle, circle) - a tool for drawing circles and arcs of circles, can be used to measure distances.
According to the legends of Ancient Greece, the compass was invented by Talos. This master was the nephew of the famous Daedalus, who, together with his son Icarus, rose into the sky on wings of his own making. It was Talos who connected two rods of equal length and made a device capable of drawing a perfect circle.
The compass is about three thousand years old. The oldest one that has come down to us, iron, is 2 thousand years old. Tellingly, it was found in France. In the same place where today the head office of the world leader in the production of compasses, the Maped company, is located. There are many types of compasses, here we will describe the most popular household items to help market professionals and consumers distinguish between products of different qualities and find the most suitable model.
Simplified, the compass consists of 5
important parts:
holder, 2 rods, rod mounts, needle attachment and drawing attachment.
By age category, compasses are divided into:
* educational (primary school),
* for high school and
* for high school/students.
*Next are professional models.
Holder
Depending on the age, the size and shape, as well as the material, vary. Typically the holder is made of plastic.
The main problem is hand slipping
. Therefore, either holders with serifs or those made using soft materials are more effective.
Another way to improve performance is an ergonomic holder that is maximally adapted to the fingers, this is immediately visible from the shape of the holder.
In professional products, grooves are machined on each rod into which the rods are inserted and screwed. A decorative plastic case is placed on top. Due to the rigidity of the metal, such a compass always has a minimum stroke, the rods hold tightly to each other. Popular models use a plastic connection or the rods are directly screwed to each other. The absence of bolts in this case makes the compass very short-lived. A quality compass is easy to identify: if the rods move freely when you buy them, it will be difficult to use such an item later. Recently, models with rod clamps have become increasingly popular, when the rods are forcibly fixed in the desired position. The latches are either a lever with a hinge or a screw fastening.
Barbells
The main element of a compass. Professional compasses are made from metals of increased rigidity, which makes drawing errors minimal. Usually this is brass and its alloys. Barbells of popular models are made from different materials.
• Made of plastic, for example, educational models
- they are easier for children, they can be painted in bright colors, low cost. On the other hand, accuracy suffers, but this is not the first task of these items for children. After all, the main thing is to learn.
• Made from light alloys
, as a rule, zinc-magnesium. The alloy is lighter, easy to process, and low in cost. Very often they began to use hollow rods: when the metal is bent for volume, but there is none inside. This saves weight, which means it reduces the price, and affects the stability of the compass, and therefore its accuracy.
• Of steel
. These are, as a rule, classic models. The rods are made of solid or curved bars. Solid rods are an advantage because they provide increased accuracy. A universal rule: when purchasing, test the compass rod for rigidity. If the bar “walks”, the accuracy will not be at its best.
Rod fastening
In professional products, grooves are machined on each rod into which the rods are inserted and screwed. A decorative plastic case is placed on top. Due to the rigidity of the metal, such a compass always has a minimum stroke, the rods hold tightly to each other.
Popular models use a plastic connection or the rods are directly screwed to each other. The absence of bolts in this case makes the compass very short-lived. A quality compass is easy to identify: if the rods move freely when you buy them, it will be difficult to use such an item later.
Recently, models with rod clamps have become increasingly popular, when the rods are forcibly fixed in the desired position. The latches are either a lever with a hinge or a screw fastening.
Needle
Also responsible for accuracy. The training compasses have a non-sharp needle inserted, which is almost impossible to injure yourself on. It holds the reference point worse, but safety is more important.
In models for seniors, the needle is sharp. Only its length and method of fastening differ: it can be welded or replaceable. Since professional compasses even have a sharpened needle, a replaceable/replaceable needle is an advantage. The length of the needle is proportional to the age category: the more professional the item, the longer the needle. On school compasses the needle is 3-5 mm, on professional ones 7-9 mm.
Another feature is a special built-in cover that protects hands and pencil cases from contact with the needle. There are covers that can be moved by hand, as well as buttons for folding needles. Another interesting development in the field of safety is the foldable attachments, where both sharp ends are retracted inside the compass, making it safe even for carrying in a pocket.
Nozzles
The last and most important detail.
3 types of attachments on drawing compasses
.
The most popular - with a lead with a diameter of 2 mm
. This is the nozzle used by professionals. It is the least convenient in “school” life - you need to buy a special “refueling”.
The next most popular is a nozzle with a universal holder, where any writing instrument of a “circular” diameter can act as a drawing instrument. It is also called “goat leg”. It has come a long way and today in terms of accuracy and quality at the school level it completely competes with the traditional stylus. It is the most convenient because you can use almost any pencil with it.
And finally, an attachment with a 0.5 mm mechanical pencil, where the writing unit is a lead with a diameter of 0.5 mm. The most unpretentious of precision attachments, you just need to have leads.
Each age category has its own compass length: for educational ones - up to 12 cm, for compasses for secondary school - 12-13 cm, for high school - 13-15 cm, more than 14 cm - for professional models.
Compasses for study Professional compasses
www.birovits.md
All means are good
It would seem that I bought an office, a backpack and a school uniform - and forward to new knowledge. But it was not there. Useful life hacks will help you get involved in your studies without spending a lot of effort on it. Situation one. The pen doesn't write. It seems like there is ink in its refill, but it refuses to leave it on the paper. This has definitely happened to everyone. You shake it like a thermometer, blow with all your might - there is zero reaction. They say that if you point the flame of a lighter at the tip of the rod, the pen will quickly come to life. Lifehack for school, frankly speaking, so-so. Good girls don't go to class with a lighter. But we still tried to heat the damaged rod and paint it. And it really worked! The main thing is not to heat it for long, otherwise the rod may melt and the ink will end up on your hands and clothes.
If you point the flame of a lighter at the tip of the rod, the non-writing pen will quickly come to life.
It is not comme il faut to hand in an essay crumpled in your briefcase. A regular printer will help correct the situation. We smoothed out the crumpled A4 sheets and fed them into the printer. Then we sent a blank Word document to print. After the first printing, the sheets became smoother, but they were far from ideal. We repeated the procedure two more times... Conclusion: if you run wrinkled paper through the printer three times, it will actually become straighter.
The most popular search is “how to remove ink.” The background may vary. A blot on a test, an inscription on a textbook page... The life hack is as follows. You need to take a cotton swab, dip it in nail polish remover and apply it to the problem area for a couple of minutes. Using gauze, carefully wipe away any unnecessary ink. We did all of the above - the ink did dissolve, but not completely. The paper where manipulated has become uneven. That is, if someone tries to erase, for example, a bad grade from the diary using this method, the parents will instantly expose the sly person.
Method two: you can remove the ink using tape. The method is even more radical than with nail polish remover. If you try too hard, you may end up without a page. Place a piece of tape on the problem area and tear it off. To completely remove the inscription, we repeat the procedure several times. The ink actually came off. And along with them, the cells in the notebook were removed. Conclusion: it’s easier to do your homework than to fiddle with tape or nail polish remover in an attempt to cheat fate.
A sharpener with a waste container can be easily made from a Tic-tac box or a matchbox.
How to use a compass
Every schoolchild knows that a compass is intended for drawing arcs and circles. Its name is translated from Latin as circle. But geometry is not the only area of application of this ancient instrument. It is used to create drawings, take measurements on maps and in navigation.
Structure
The device is quite simple, it has two parts connected to each other by a hinge. A needle is attached to the end of one leg, and a writing pencil or pen is attached to the other. Typically, the leads are sold as a set of preparations in a special case. If you have to select them yourself, you need to pay attention to the diameter of the writing rod. The latter must be tightly secured. The device, designed for measurements, has needles at both ends. High-quality professional tools are made of metal. For schoolchildren, stationery store workers can offer plastic or combined ones. The price of a school compass is much lower than that of a professional one. But it's not worth saving. The plastic wears out quickly, and a loose hinge has a bad effect on the quality of work.
Modifications
- “Goat leg” is the simplest option. The user selects the writing part and inserts it into a special clamp. It could be a pencil, a pen, even a felt-tip pen. The needle is tightly attached to a single leg and cannot be replaced. Professionals don’t use this - it’s hard to achieve a perfect drawing. More often it is bought for elementary school students.
- Proportional – used for scaling. With its help, exact dimensions are transferred by marking, copying, and also models and copies are made to a given scale. Used to divide straight or circle segments into equal arcs and parts.
- Calipers have curved legs and are designed for measuring three-dimensional parts. It is also used to draw circles of very small diameter.
- Vernier calipers are very different from devices with the same root name. This is the most common measurement tool. Consists of a linear rod with markings and a movable frame.
Where to buy compasses for drawing
It is more profitable to buy stationery in an online store. The buyer has the opportunity to slowly choose the most suitable option. The assortment includes individual items and special sets - ready-to-use items. Right now you can purchase drawing compasses on the Kantstovary.ru website inexpensively, but of excellent quality.
newsvo.ru
Do-it-yourself marking compass and metal scriber
Hello, dear readers and DIYers!
When making various metal parts, a compass is often required. And if the surface of the workpiece is dirty, then it is better to mark it with a metal scriber. In this article, Viktor Nikitin, author of the YouTube channel “ROTORKOR” will tell you how he made a marking compass.
Given the relative simplicity of these tools, a small amount of welding work will be required.
Materials. — Old taps — M8 wing screws — Steel square, sheet — Machine oil, sandpaper.
Tools used by the author. — Grinder, cutting and cleaning discs — Screwdriver, metal drills, tap, file — Belt grinder — Semi-automatic welding machine, welding mask — Vise, clamps, core, hammer, adjustable wrench — Ruler, square, marker. Manufacturing process. So, old M6 taps will serve as tips.
The master cuts the rods for the compass to the same length from a 15X15 mm steel square. To do this, both workpieces are simultaneously fixed in a vice and cut off with a grinder.
The ends of the parts are leveled using a belt sander.
At one end of both workpieces, class=”aligncenter” width=”968″ height=”544″|fcw3qayjh5a| src=»https://usamodelkina.ru/uploads/posts/2020-08/1596963071_ijc-033.jpg» class=»aligncenter» width=»1280″ height=»717″[/img] Drill with a diameter of 4.5 mm is fixed in a vice, and the workpiece itself is fixed in the screwdriver chuck. Thus, by rotating the workpiece relative to the drill, the master obtains a hole coaxial with the part.
A similar technique was described in the following article, this technique was used to drill a central hole in the shaft of an electric motor.
The tap is fixed by the cutting part in the screwdriver chuck.
Using a belt grinder, the tap shanks are sharpened. During this process, it is necessary to periodically cool the part in water so as not to overheat it.
The end result is tips like these with sharp cones.
On both shanks of the rods, the master forms peculiar steps, half the thickness of the profile (7 mm).
This is what the shanks look like after processing.
The master makes the parts for the hinge from a steel plate 8 mm thick. Using a template, the contours of the parts are marked on it and cut out with a grinder.
The craftsman couldn’t find an extra M8 thumbscrew, so he borrowed one from a hand router. It is this screw that will fix the desired position of the compass rods.
In a similar way, a hole is drilled in its end and an M6 thread is cut.
Then the tap shank is sharpened and screwed into the handle.
Of course, after this it will be necessary to perform bluing to protect the products from corrosion. A reliable chemical method for bluing steel was described in detail in a recent article.
As a result, Victor came up with such beautiful and solid instruments.
Good mood, good health, and interesting ideas to everyone!
The author's video can be found here.
Source
Become the author of the site, publish your own articles, descriptions of homemade products and pay for the text. Read more here.
How to disassemble a watch rod and compass. Instructions for using a caliper
The caliper, whose instructions for use allow for fairly accurate measurements, has a simple design. It's also quite simple to use. It can be used to determine the internal and external dimensions of parts. The master can find out how deep the holes and all kinds of protrusions are.
Features of using a caliper
A caliper is a high-precision measuring instrument. The data obtained during measurements will have an accuracy within 0.1-0.01 mm. If you are faced with the need to determine the external and internal dimensions, then you should use the wide jaws located below, as well as auxiliary pointed jaws. The last mentioned above are also used for marking the surface of parts.
The depth of the holes and the dimensions of the protrusions can be determined using a depth gauge, which acts as an integral part of the described tool. The design of the caliper can be different, for example, vernier, pointer or electronic
. The last two options also have a second name - dial and digital calipers, respectively. They all have the same design, and the only difference is the type of reading device.
The above-mentioned circumstances indicate that the principles of using vernier, pointer or digital calipers are exactly the same, but there is a difference, and it consists only in the presentation of information by the device. For this reason, it is advisable to consider an example of one of the instruments, for example, a vernier.
Return to contents
Preparation before measurement
Before using a caliper, it must be cleaned of grease and dust particles, paying attention to the surfaces that will be involved in measurements. Next, the tool needs to be analyzed for accuracy. If the work is performed using a vernier device, this will be easy to do - to do this, you just need to align the main (wide) jaws of the caliper, which are located below. In this case, both scales must coincide. At the same time, the 19th scale mark should coincide with the 10th mark on the vernier. If the above conditions are met, the device can be considered in good working order and fully ready for measurements.
The instruction manual regulates the rules for the analysis of dial and digital calipers, and the jaws of the device must also be mated together.
In the case of a pointer instrument dial, the pointer should be at the zero mark.
Whereas the designation “0” should appear on the screen of the electronic device.
Return to contents
Taking measurements
When carrying out work, care must be taken, since the measuring bases of the device's jaws have dangerous edges. To determine the external size of the element, press it tightly between the main jaws located below. In this case, the tool must be held in the right hand, four fingers should wrap around the bar, while the thumb should be placed on the frame. The frame should be moved with your thumb, and after reaching the desired pitch between the jaws that mate with the base being measured, it is secured with a clamp.
The caliper got its name due to the main element of its body - the rod, but the compass we are used to is a little far from this tool in its structure. We will try to understand a subject full of mysteries with the help of this article, we will look at its structure and operating principle.
Vernier caliper design - main components and their purpose
The design of a caliper does not seem complicated from the outside, but its parts are so compact and optimally arranged that they make this device simple and easy to use. And it can do a lot, and the measurements that are performed with its help are very important in many areas of industry and construction. When using a caliper, we obtain the linear dimensions of objects, both external and internal. And the accuracy, which in some models reaches an enviable level, makes this simple tool increasingly in demand.
The purpose of a caliper is to measure lengths, diameters, and depths, but we will look at what provides this capability using the example of the simplest type of this device. The main unit is a ruler, which is called a rod, giving part of the name to the tool. The divisions on it are usually 1 mm, and the total length is usually 15 cm, but individual models can be longer. The ruler determines the maximum size that this tool can measure.
. This means that the maximum length or diameter of the object should be no more than 15 cm.
At the end of the ruler there are sponges, or rather their halves, and the other halves are located on a movable frame, which moves along the ruler, measuring the size of the object being examined. There are internal and external sponges; in the former, the incisors face outward, in the latter, they face each other. Consequently, the first ones are inserted into the object and moved apart to fix the internal geometric parameter, and the second ones are moved apart widely and then come closer to fix the
domsireni.ru
Life is easier
Well, where would we be without mobile phones?
In general, smartphones can greatly simplify life. Fortunately, mobile software developers do not forget about schoolchildren. You just need to install a mobile application to facilitate the learning process, for example, PhotoMath. This is a kind of calculator. We point the lens at the equation that is causing difficulty, and the application immediately provides an answer with a step-by-step solution to the problem. We tested the application on several problems from the 10th grade textbook. All the answers agreed. It’s a pity, in my school years this application did not exist; I had to struggle with discriminants and logarithms on my own. “We take out double leaves. Test!" - this phrase will terrify even the biggest nerd. How to carefully unfasten a double sheet without ruining your manicure? We take the rod out of the pen and carefully pry up the paper clip with the empty nose. Now the leaf can be easily removed without tearing.
Forgot your compass at home? We fasten two pencils at the top with a paper clip, insert an eraser between them and draw perfectly even circles.
Two life hacks for the text highlighter at once. Problem one: it's too bright. We dip the highlighter in warm water - and now it leaves a lighter mark. The life hack works. To celebrate, we emphasized too much and now we want to remove these yellow stripes in the textbook. Take a cotton swab, moisten it with lemon juice - and voila! There is not a trace left of the text highlighter in the textbook! By the way, we were able to revive the dried marker using a regular antiseptic, which now, in the context of coronavirus, is in every schoolchild’s backpack. We take out the plug, take out the rod and spray it on both ends with an antiseptic. Now the marker will live for some more time.