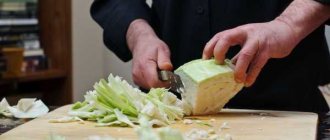
Beading, as an applied art, allows you to create beautiful products that are ideal for decorating rooms. The main thing is that making them with your own hands is not difficult even for beginners. It is enough to purchase all the materials necessary for weaving and, having chosen the master class you like, containing step-by-step photos or videos, get to work.
Our master class today will be devoted to the technology of beading trees, with a detailed description of how to make oak from beads.
Step-by-step master class oak made of beads
- Without cutting the wire from the spool, we collect beads up to about one meter.
- You need to step back about 10-15 cm from the tip of the wire and make a loop out of 12 beads, twisting up to three times.
- We make subsequent loops from twisting, retreating 0.5 mm. Cut the wire after the woven loops. There should be 15 loops on one branch.
- To form a beautiful twig, grab the edge of the first loop with one hand, and the last leaf with the other hand, and carefully and slowly rotate the twig in a circle until a bunch of loops is formed. The wire is twisted at the end.
- It is necessary to weave 37 branches.
- We take a twig, apply it to a piece of thick wire and twist the rod. Then we wrap the tape around the trunk. Using this method, it is necessary to wrap all the branches for further work.
The sequence of formation of a mighty tree from branches
Before proceeding with the next steps, try to connect the branches together not evenly, lower the branches down a little with each fastening. We make them in this sequence, connect the branches together and secure them with tape.
We leave three branches one at a time.
We make branched branches - two out of two and two out of three; three out of seven and one out of five.
We collect the tree from small branches, wrapping it tightly with tape and beautifully bending the resulting clusters.
Upon completion of assembly, we separate the wire to the sides for stability.
Unusual flower garden ideas made from wooden barrels
- Small barrels look great as hanging planters on a porch, terrace or around the perimeter of a gazebo.
- Half-barrel flower beds with a longitudinal cut are installed near the house, fence or gazebo. Large and low flower beds with variegated flowers stand out brightly against the general background of the yard or garden.
- A barrel lying on its side and slightly dug into a flowerbed, with a small embankment near the hole and flowers planted nearby, gives the impression of a fallen and spilled container.
Decoration and planting of a tree on a stand
Mix a mixture of gypsum and water (1:1). We lay it on the surface of the stone and fasten the tree (within half an hour the plaster will set).
We will need a mixture of plaster, PVA glue and some water to process the trunk and branches. We give it a day to completely harden.
We wait for the craft to dry, paint it with gouache, then carefully wipe the treated parts with a damp foam sponge.
We also paint the tree roots with chestnut color, but not completely. We decorate the surface in green, imitating grass, and sprinkle with a little beads.
At the end of everything, when the paint dries, you need to open the trunk and branches with colorless varnish.
How to do something yourself, with your own hands - home craftsman website
AN EXCELLENT TOOL FOR CRAFTS AND HANDCRAFTS AND EVERYTHING FOR THE GARDEN, HOME AND Cottage LITERALLY FOR FREE - SEE FOR YOURSELF. THERE ARE REVIEWS.
Woody containers are traditionally used to grow woody plants and small shrubs for the deck or patio. Making a tub yourself is not difficult
© Author: Sergey Ivanov
To make a wooden plant pot we will need
TOOLS FOR HOME AND GARDEN, HANDCRAFTS, ETC. PRICES VERY LOW
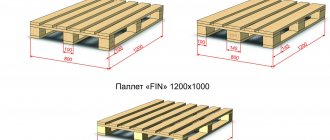
DIMENSIONS: height 630 mm, width 540 mm, length 540 mm, depth 520 mm
1. planed board (pine, oak): 520x140x20 mm - 16 pcs.
2. planed timber (pine): 40×40 mm, 3 m – 2 pcs.
3. copper tape for artistic decoration, 40 mm wide – 1 reel
4. decorative nails with long
5. rod – 64 pcs.
6. galvanized nails 20 mm long
8. protective and decorative impregnation for wood for outdoor work (such as Pinotex Ultra) – 1 can
TOOLS: jigsaw, hammer, screwdriver, mallet, brush
Tips for needlewomen
- You can cover the wire with the buds with foil before putting on the base.
- Bend the branches as the shape of the tree allows.
- It is possible to make a powerful, thickened trunk using masking tape.
- If you want to depict creeping roots, then dip the cut pieces of bandage in a gypsum solution and wrap them around the tree trunk, and then treat the surface with plaster again.
- In order to create the appearance of an old tree, twisted and wrinkled, scratch the surface of the trunk with a fork onto the mixture that has not yet hardened.
Decorating elements can include stones (glued), decorative moss. In the example photo, see how tree pallets are decorated. The beaded oak tree will now become a gift for someone or a decoration for your interior. We wish you new creations and achievements in your plans!
Wooden flowerpots
Wood may not be the best choice for making outdoor flowerpots, but it is very affordable, flexible, and easy to process. That's probably why it's popular. Wooden outdoor flowerpots can be made from scrap boards, moisture-resistant plywood, timber, tree trunks, stumps, old barrels and tubs.
From boards and plywood
If you want the flowerpot to retain its color for a long time and not turn gray, but you don’t want to paint it with some kind of opaque paint (such as oil paint), you will need to buy wood oil. It gives the wood a tint, but leaves visible pores (like a stain). Along the way, this oil kind of “preserves” it, protects it from fungi, insects, and mold.
The easiest way to make flowerpots is from rectangular or square boards. You need to cut several pieces of the same length, put them together into a box, and nail the bottom.
Wooden flowerpots made from boards
To prevent the bottom of such a flowerpot from blooming, it must be raised on its legs. In the simplest version, four small pieces of board can be nailed to the bottom, in the corners. If you want, you can try to make more decorative legs (as in the photo above).
When nailing the boards, do not try to knock the planks very tightly. When watered, they will swell and, if nailed tightly, they can lift. However, you shouldn’t leave very large gaps - the earth can spill out through the bottom.
Another way to make an outdoor flowerpot from wood is to cut four identical pieces of timber with a small section of 25-25 mm, for example). Use the bars as the ribs of the structure, nail boards to them, and attach the bottom to the bottom. This option is good because such flowerpots immediately have legs.
The second option for making wooden flowerpots
Using the same principle, you can make a flowerpot from moisture-resistant plywood. Cut out the sides from it and attach them to the bars. Wood screws are usually used instead of nails, and you will also need a drill. Before tightening the screw, drill a hole. Place the sidewall against the timber post and drill, stepping back 1 cm from the edge. The diameter of the drill is 1-2 mm less than the diameter of the screw. So, firstly, the block will not burst, and secondly, the fasteners fit into the plywood easier. Instead of wooden corners, you can take metal ones, preferably stainless steel.
The next version of a flowerpot is made of wooden beams (photo below). Here everything is even simpler - fold the beam so that the connection is in one plane, then in another. After laying each beam, it is nailed to those located below. Be sure to drive nails in the corners; you can also nail them once or twice on the long side.
Outdoor flowerpot made of timber
It's simple. Difficulties can arise only with the first row. It can be attached to some kind of bottom, for example, a piece of waterproof plywood knocked down from boards with holes drilled in it for water drainage.
Flowerpots combined with a bench
Any of these flowerpots can be combined with a bench. It will be a wonderful place to relax. Such a group can be placed in the garden, near the entrance, somewhere on the site, near a gazebo or a homemade small fountain.
Video review of oak weaving
The craft “Green Oak Near Lukomorye” is a three-dimensional composition based on the famous lines of A.S. Pushkin, which can be done together with children from six to seven years old and older. Various techniques for working with materials are used in its production. Having mastered them in making this craft, in the future you will be able to apply them in other subjects of your creative works.
The author of the master class is Elena, a mother of two sons, a reader of “Native Path”, a participant in the “Autumn Workshop” competition, and her son Dima.
How to choose wooden flower pots and barrels for dwarf trees
Decorative barrels and tubs made of natural wood are ideal flowerpots for the cottage and garden. They are great for growing flowers, dwarf trees (for example, using the bonsai technique) and other ornamental plants.
On a note!
When choosing wooden barrels for flowers, first of all, focus on their intended location.
Large wooden flower pots look great near the entrance to the dacha, smaller half-barrels and barrels will help decorate garden paths and mark the perimeter of the yard, and very small wooden barrels-pots, with a flat, longitudinal cut, will make the facade of the house brighter and more interesting.
- A multi-tiered flowerbed made from a wooden barrel makes it possible to place several types of flowers at once in a limited space. Such a flowerpot opens up broad prospects for creativity and fits harmoniously into the design of almost any yard or garden.
- Small flower beds are quite mobile and are great for planting perennial plants. In the warm season, the flowerpots are located outside, and with the onset of cold weather they can be brought into the house or other warm room without much difficulty.
- A wooden decorative flower barrel is one of the most versatile flower garden options. It is used both as a separate design element and to create an alpine slide, waterfall or other various compositions in a flowerbed.
Materials and tools for making crafts with children
Waste materials and natural materials, as well as various household items, were used in the making of the craft. It is not necessary to strictly use the listed materials; you can replace them with those parts that you have at home.
To make the craft “Near Lukomorye there is a green oak” you will need:
- thick cardboard from a box measuring approximately 35 x 24 cm for the base,
- paper towel,
- white cardboard (1 sheet A4 format),
- live oak leaves,
- acorns (a few leaves on a branch look interesting),
- acrylic paints, acrylic varnish,
- paper bag for coal - top layer, turned inside out (for oak),
- semolina, pebbles, shells, bath salts,
- PVA glue,
- colorless silicone sealant for kitchens and baths (tube),
- artificial grass measuring approximately 24 x 24 cm (can be purchased at fix-price stores),
- hot glue gun,
- wire, gold chain 1 meter,
- toys from Kinder Surprise,
- chest, rhinestones,
- play dough,
- skewers for kebabs,
- cardboard box, plastic,
- dried flowers for the landscape (for example, you can make shrubs from oregano and yarrow),
Options for making a beer drink
As for technology, there are many different methods, depending on which a certain type of beer is prepared. So, for Lambrick and Creek drinks, oak barrels are still better suited for brewing beer. They are used for secondary fermentation for a period of 4 to 6 weeks. During this time, the beer is saturated with a specific taste, which is formed due to the interaction of the liquid with oak substances.
Typically, brewing in home barrels is carried out according to one of the following principles:
- The container is sterilized with steam, due to which “spontaneous seeding” occurs every time.
- Barrels for brewing beer are washed and treated with yeast. After this, the beer is poured and aged.
- Beer is poured into the container and kept there for a certain time (for example, a year). After this, half is bottled, and the rest is added with fresh drink.
Very often, brewing in wooden barrels involves adding sediment from natural lambics. Their bodies imbue beer with a special taste and complexity.
A wide selection of beer kegs is available in our catalog
Making the craft “Green Oak Near Lukomorye”: step-by-step description
Stage 1. Making green oak for Lukomorye
Step 1. Cover living leaves with acrylic varnish in two layers (or colorless varnish in an aerosol) and dry. It is advisable to place the leaves vertically so that the leaves look natural and not perfectly even.
Step 2. Glue the acorns with a hot glue gun to their caps.
Step 3. We twist the green oak frame from wire. At the base of the frame we leave several wires – “roots” – untwisted. With their help we will attach the tree to the base.
Step 4. Turn the paper bag inside out and roll it into a tube. We insert the wire inside the tube. This is an oak trunk.
Step 5. Make the roots of the oak tree and its branches from a paper bag.
If you use a paper bag from coal to make an oak trunk, then its base must be torn into 6 strips approximately 6 cm long. Each strip must be twisted so that it looks like an oak root.
We tear the top part of the bag into about 8 strips (the number of strips should be equal to the number of branches on the oak wire frame you made). We wrap strips of wire oak branches, crumpling and twisting the paper onto them.
We fix the paper on the wire frame using a glue gun. We also glue leaf cuttings and acorns using hot glue. We mask the attachment points with paper folds.
This is what your oak from Lukomorye will look like in our craft!
What should the container be?
Storing honey is a delicate matter, because we are talking about a natural product that easily absorbs odors and substances. Once upon a time, honey was stored in clay and wooden containers. This is where the fabulous stereotype of storing delicacies in pots and barrels emerged.
Clay and wood, of course, are good containers for such a delicate product. They do not allow moisture to enter, but still allow air to pass through. So honey enclosed in such a container can breathe. In addition, the honey pot and barrels do not allow light to pass through, which is one of the main conditions for proper storage of the product. Typically, when storing it in such traditional folk vessels, the top was sealed not with lids, but with wax.
Nowadays, the range of tableware for sweet products has expanded significantly. Barrels and pots faded into the background, giving way to other, cheap and accessible vessels.
Stage 3. Assembling the craft “Near Lukomorye there is a green oak tree” from the prepared parts
— Using a glue gun, we glue the element prepared in the second stage with a sandy shore and sea onto the cardboard—the basis of the entire craft—in the right corner.
— Glue on a rug with grass. Using scissors, we adjust its edge to the curves of the sandy shore.
— We attach the oak (see the first stage) to the base with grass. To do this, we pierce it through and insert a wire into the hole. We secure the wire by bending it from the bottom.
— We wrap the chain around the oak tree. We place a mermaid and a scientist cat on the oak tree. We fix everything with hot glue using a glue gun.
— We mask the shortcomings with pebbles, if there are any. The shortcomings include sloppy places and places where the joints do not match exactly. We also mask the junction of the shore line with the grass with stones.
- The ends of the cardboard - the bases of the craft - are tinted with paints.
This is what you will get at this stage (see photo - top view of the craft).
What is the best way to ensure safety?
Honey should be stored in any container at a temperature from +5 to +10°C. It is believed that the ideal place for this is the refrigerator. However, you can’t fit a lot of cans there.
If you have stocked up on the product in large containers, then you need to place them somewhere in the underground or the coolest corners of the house, protected from light. Honey in barrels and aluminum flasks can stand without additional shading, but transparent plastic needs to be covered with something dark. The same should be done with glass jars.
Products sent for long-term storage must be checked periodically. This should be done even if storage conditions are ideal.
The fact is that honey can separate, crystallize and ferment. Crystallization is a natural process, but separation and fermentation can occur due to poor quality production. Usually such incidents happen with a product that contains a lot of water. As a result, the bactericidal properties of honey are weakened, which leads to increased activity of fungi and bacteria.
Such honey can increase in size, which leads to leakage from the vessel, tearing off the lid and other troubles. As a result, not only are the medicinal and taste properties lost, but in the absence of a sealed lid, the foaming liquid may leak out of the vessel. For this reason, you should never fill the vessel right up to the lid; you should leave some free space in case the fermented mead climbs like dough, tearing off all the lids.
Bees take a long time to prepare their product. They pass the collected nectar through their crops, enriching it with enzymes, and then dry it for a long time. And only after a sufficient amount of water has evaporated from the sweet preparation, it becomes honey and is sealed with special wax caps.
In an effort to start selling their goods earlier, beekeepers can remove early, not yet dried honey. It cannot be stored. You just need to eat it soon. It is advisable to purchase autumn products for storage, preferably in September.
For long-term storage of honey at home, it is best to use wooden barrels, glass jars and aluminum flasks. Plastic, despite the fact that it is considered food grade, still has its own smell, incompatible with the aroma of the bee product.
Thus, storing honey is a complex and delicate process. The more sweet amber you stock up on, the more care is required to ensure its safety.
Stage 4. Making Koschey: there King Koschey languishes over gold
The composition with Koschey in the craft about Lukomorye consists of three elements: a chest of gold, Koschey and magic flowers.
Element 1. The chest “with gold” is a painted trash can from a broken garbage disposal machine. Inside the chest is a wad of gold foil. The coins are made from play dough and have rhinestones glued to them.
Element 2. Koschey is a kinder gargamel. Koshchei's crown is made of modeling dough. The raincoat is made of lining fabric. The edges of the lining fabric are treated with a regular lighter to prevent them from falling apart. The design on the lining fabric is painted with acrylic paint.
Element 3. Magic flowers. We take dried flower cups on a high stem (we find them in the forest in advance and dry them). We glue rhinestones on them.
Homemade concrete flower pots
The good thing about concrete is that it can be poured into any shape. Plastic, glass, metal, wooden, clay vessels and even cardboard boxes are suitable.
Outdoor flowerpots made of concrete are easy to make with your own hands
It is most convenient to work with plastic - it is easy to remove from it. It’s even easier with glass, but such forms are usually disposable. It was not possible to take them out - they are broken.
What concrete to use
To make outdoor flowerpots, you can use ordinary concrete consisting of cement and sand in a ratio of 1:3/4 (Portland cement of a grade not lower than M 400 and clean sifted river sand). The surface of such a flowerpot will be monochromatic, gray. In some cases, it looks stylish, and the gray color does not distract attention from the main thing - the colors. But not always.
Products made from decorative concrete look more interesting. It is also called artistic, art, architectural, acrylic, polymer - concrete. All this is a designation for the same product. In addition to cement and sand, architectural concrete contains polymer additives, small fragments of natural minerals, and some contain dyes. The surface of a pot made of decorative concrete is smoother, more interesting, interspersed with natural stones. The specific type depends on the selected composition. Some types of decorative concrete are shown in the photo below.
Some types of decorative concrete
The surface of a pot made of decorative concrete is smoother, more interesting, interspersed with natural stones. The specific type depends on the selected composition. Some types of decorative concrete are shown in the photo above.
Stage 5: making a hut on chicken legs
Step 1. As the basis for the craft - a hut, we take a box of suitable size. We took half a box of medicine.
Step 2. Make 2 holes in the box, bend the box into an arc and insert 5 wires down the box.
Step 3. We twist the wire, forming 2 legs of the hut from it. To do this, we shorten 4 wires to fit the toes of the chicken legs of the hut, and leave the fifth wire long, since it is needed to attach the hut to the base.
Step 4. Cut the skewers and glue them with a glue gun, imitating a log house. We glue the roof separately.
Step 5. The hut can be slightly tinted with paints.
Step 6. Attach the hut to the base of the craft, piercing it right through along with the grass. We fix the wire at the bottom of the base, bending it in the same way as we previously attached green oak to the base.
Step 7. We make bushes around the hut. To do this, we glue dried herbs - oregano and yarrow - with hot glue to the base next to the hut.
So our craft “Near Lukomorye has a green oak tree” is ready! It turned out truly fabulous and amazing!
You will find more master classes on making crafts based on famous fairy tales in the articles on the site:
— Children's crafts made from natural materials — 25 ideas: little corn men, an old forest man, a fairy-tale composition based on the fairy tale by V. Suteev “Under the Mushroom” and other ideas
Get a NEW FREE AUDIO COURSE WITH GAME APPLICATION
“Speech development from 0 to 7 years: what is important to know and what to do. Cheat sheet for parents"
Click on the link or course cover below to subscribe for free
The author of the course is Valasina Asya, candidate of pedagogical sciences, author of the website “Native Path”
Creating an oak tree from paper will not be particularly difficult, even if it looks like a voluminous craft. You may have a tree with either green summer leaves or yellowed autumn leaves. If you chose the latter option, then yellow and orange paper will be useful for this.
Popular containers of our time
For the mass consumer, wooden barrels and ceramic dishes are expensive delights. The most popular and affordable utensils are containers made of glass, plastic and metal:
- Glass. This container is perfect for storing many products. Glass is chemically inert and does not allow moisture and air to pass through. The disadvantage of this container is its transparency and fragility. Plus, glassware is never too big. There are, of course, 20 and 10 liter bottles, but it is not advisable to fill them with honey, because such a vessel will be very heavy. Honey is usually stored in small jars at home, in a dark and cool room.
- Plastic. This material has a low price and light weight. Plastic utensils are attracting retailers. Recently, plastic cube containers adapted for storing food products have begun to be used. However, honey is chemically active. It quickly absorbs plastic odors and some substances. Such containers are not prohibited by GOST and sanitary control, but people still have a prejudice against plastic
- In order to store a lot of honey for a long time, beekeepers usually use aluminum flasks. They are chemically inert, lightweight and easy to transport. Stainless steel barrels should not be used to store honey. Metal compounds quickly pass into the contents of the vessel and make it less healing.
- A barrel of honey is considered the most environmentally friendly way to store a sweet product. The advantage of such containers is that honey in a wooden container only becomes better: it acquires the aroma of wood. It's like cognac, which is usually stored only in oak barrels. It is in this case that cognac acquires its signature oak smell. Linden honey barrels will add shades of the smell of this tree to any honey. However, not every barrel can store a sweet product. A wooden barrel should be made only from deciduous trees.
- In our time, ceramic dishes as a vessel intended for long-term storage of large quantities of food products have lost their relevance. The reason is its relative high cost, fragility and heavy weight in large volumes. Honey pots are popular only as a gift option, which combines the beauty of the form and the taste of the contents.
Honey barrels are usually made from oak, linden, acacia, maple, mulberry and other aromatic, but not resinous, types of trees. The ideal option is linden. However, linden is also an excellent honey plant, so every felled tree is a loss for bees and beekeepers.
A barrel produced specifically for storing a sweet product can be manufactured in the following options with:
- a lid that allows the contents to be hermetically sealed;
- hoops made of various alloys and metals;
- decorative carvings;
- weaving from wicker and jute rope;
- print and logo.
In other words, this is not only packaging for a sweet product. This is a work of art that will decorate any cellar. Moreover, it is a wonderful gift that can please any person who is not alien to the joys of life and the desire for beauty.
Choosing wood
First of all, of course, choose the material from which you are going to make your future barrel. We will offer you the main types of wood that coopers prefer, tell you what their positive and negative sides are, and also help you choose the most suitable option for you.
Of course, first of all, we should talk about making oak barrels. This wood rightfully deserves the title of a classic material used by master coopers. Possessing high strength and flexibility, this tree contains “tannins” that act as an antiseptic. The moisture acting on the walls of such a barrel makes them stronger. Therefore, the service life of oak barrels is measured not even in tens, but in hundreds of years. With drinks stored in such a barrel, oxidation processes and interaction with wood occur and they acquire a pleasant aroma with a hint of vanilla.
Soak
Now you know how to make a barrel yourself, but there remains one more important nuance - putting your product into operation. Before use, the barrel needs to be treated, otherwise the products stored in it may acquire an unpleasant aftertaste or even spoil.
First, you need to rinse the container thoroughly to get rid of sawdust, small debris and excess tannins. Rinsing is continued until the foreign odors disappear and the water becomes clear.
Before use, the barrel must be prepared
Next, the barrel is steamed to disinfect it and improve the sealing of the staves. To do this, fill the container about a third with boiling water and turn it so that the water “flows” over the entire surface of the walls from the inside. Then the water is left inside until it cools, drained and the process is repeated again.
After steaming, the barrel should be soaked. Typically this procedure takes about a month, and the water in the container needs to be renewed every two days. In the first days of soaking, there may be leaks in the product; this is normal, but the leaking water must be replenished.
Before adding food, the inside of the container must be doused with boiling water. This will protect the wood from absorbing odors and will allow it to be used for different foods without mixing its flavors.
A container treated with boiling water before adding food will last longer.
To summarize, we can say that a DIY barrel is an excellent solution for storing homemade pickles, as well as for wines and other alcoholic beverages. By making such a container yourself, you will not only save money, but you can also be completely confident in the quality of the product, and, consequently, in maintaining the proper conditions for storing your products.
You can buy almost everything today. But it’s quite difficult to find a wooden barrel that’s really high-quality and solid, and it’s also expensive. There is one more point that not everyone takes into account - it is not a fact that the finished barrel will be suitable for a specific purpose. The reason is the mismatch of wood species. The conclusion is clear - make the barrel yourself. And if you understand the drawings and nuances of the work in detail, then it will not turn out to be in any way complicated or impossible to do with your own hands.
Pine
- Elasticity, flexibility in bending.
- Easily processed with household tools.
- When the temperature rises, it will resin abundantly.
- A characteristic smell that will be constantly present inside the barrel.
Recommendation - such wooden barrels are not used for storing food or fermenting anything.
Juniper
Strength combined with ease of processing.
Heavy weight.
Recommendation – it is advisable to use it for the manufacture of relatively small barrels for transportation (storage) of bulk materials.
Oak
- It bends perfectly after the wood is well steamed.
- Contains fungicides that protect the structural elements of the barrel from rotting.
High cost of material. To make a high-quality barrel, you will have to use wood that is at least 80–100 years old.
Recommendation - if the barrel is intended for storing (fermenting) products, aging wines, and so on, then you should choose oak boards.
According to reviews from those who have already made a wooden barrel with their own hands, you can also use such types of wood as linden, ash, aspen, and mulberry.
The choice of material is a rather specific issue. If a barrel is needed to store stocks of wine (cognac, vodka), sourdough (pickling) of cucumbers, watermelons, apples, and so on, then the best wood for it is oak. This is undeniable. But it is hardly right to spend such wood (considering its cost) on making a container with your own hands in which you are supposed to store cement, sand, and bulk products. Other “simpler” breeds are also quite suitable for these purposes.