If you are interested in medieval weapons and don’t even mind taking part in sparring with swords, I advise you to look further at how you can make real protective chain mail from metal rings with your own hands. The work, of course, is not the easiest, but the result was very impressive.
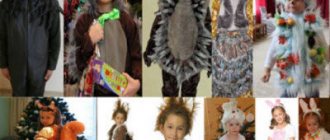
It's a rare boy who refuses to be a hero. At least once a year, at the New Year's masquerade. But not everyone decides to make a knight’s costume on their own. The fact is that it is really more made than sewn. And many mothers (usually they are the ones who prepare their children for the matinee) do not know how to approach it. To help them, I offer an option for making such a costume. Although it’s better to get dad to help too!
Cut a rectangular piece of red fabric. The size is such that it covers the shoulders and back, hanging almost to the floor. The two upper ends are fastened on the neck with a ring (3-5 centimeters). The fabric is better rich, such as silk or satin. It is advisable to sew the cloak to the armor. I'll explain why below.
A little about fabrics and colors
When presenting a knight costume for a boy, you should decide on the color scheme. This hero is very courageous and strict, and therefore an abundance of colors will harm the image. Everything should be done in subdued colors.
For example, for armor it is best to give preference to steel-colored fabric. It can be brocade or other silver-colored material. Pants can be made of soft knitwear in both dark and light natural shades. Beige trousers in combination with a burgundy velvet coat will look ideal. Or black pants with a rich blue or bottle tint.
Be sure to choose a bright fabric for the coat of arms. It is best if it is the color of silver or gold. A knight costume for a boy must include a sword or sword. And to make it convenient for the child to have fun at the matinee, you should make a leatherette belt with special fasteners for weapons.
Wardrobe Master class February 23 Modeling construction Helmet and sword of a Russian hero Cardboard
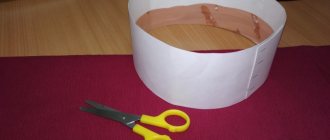
Dear friends! I am very glad to share with you the technology for making such helmets for Russian heroes. And swords to them. I made these helmets for the holiday of February 23rd for 4th grade boys. I made the helmets myself. And children from the first grade and above were quite able to make swords. I wish you success in your creativity!
We make the following drawing on ordinary packaging cardboard. Please note that the ribs in the inner corrugated layer of cardboard are directed horizontally.
We cut out the development of the helmet with “ears for gluing.” Using a not very sharp knife, we make creasing (punching) between the sectors of the helmet for better bending.
First we glue the beginning and end of the development, applying hot glue to the “ear” for gluing.
Then we glue the sectors of the helmet’s development end-to-end, also with hot glue.
If the glue seams are not very neat, you can seal them with paper tape.
We mark the cutout in the helmet from the side of the face.
And cut it out with scissors.
For decoration we use large buttons, cord, or other similar materials. I glue them on with hot glue, forming a pattern according to my own imagination.
We carefully paint the helmets with silver spray paint. This must be done in a respirator. After painting, ventilate the room well. The paint dries quite quickly. But it is better to let the product dry for 5-10 hours.
This is such a beauty!
Now let's start making a cardboard sword.
We prepare two strips of cardboard (thick, but not packaging). Long strip 30x10 cm, short strip 20x10 cm. Draw a line in the middle of each strip.
We bend the long strip after creasing it with a non-sharp knife. Cut the short strip in half along the drawn line.
Lubricate all parts of the sword with PVA glue. There shouldn't be a lot of glue. And it should be well spread over the entire surface of the cardboard. Otherwise, it will soak the cardboard.
Glue the long part by folding it in half lengthwise. And we put it between two short strips. They also stick together. The long one is the blade of the sword, and the short one is the handle stop.
How to sew a shirt
To quickly sew a knight's jacket, you should take the fabric, fold it in half with the right side inward, measure the child's distance from wrist to wrist with outstretched arms and measure this value along the fold of the fabric, adding 6 cm for hemming the sleeves. Then you need to measure the girth of the chest and abdomen and place the larger value in the middle of the already set segment. In this case, you should add 5 cm for a loose fit.
Next, using a ruler, lower the vertical lines from all points. From the extreme ones by 7 cm, and from the others at such a distance that it reaches the level of the length of the product plus the hem. Next, you should draw the neck on the drawing. You shouldn't make it too big. It is better to make a cut on the chest so that the head can fit through, and after processing the throat, leave 15 cm of free ends of the ribbon for tying. Next, all that remains is to design the side cuts of the sleeves and sides; after finishing them, you need to make notches in the corners so that the seams do not pull.
To create a spectacular “Knight” carnival costume, you should sew such a shirt from white satin.
How to sew pants
Knight's pants should first of all be beautiful and comfortable. A knitted fabric such as supplex or oil is suitable here. If this is a children's knight costume, you can use cotton fabric. These are easy to sew. Construction can be done directly on the fabric. It is bent face inward along the canvas. Thus, there will be two pant legs at once without external side seams.
You just need to make sure that the fabric is 6 cm larger than the circumference of the child’s upper leg. It is this measurement that is laid down first along the fold, adding an allowance of 5 cm.
The second measurement is ½ hip circumference plus an increase of 5 cm. It is placed in the middle of the first set aside segment.
The third measurement is the height of the seat, the value of which is lowered from the fold perpendicularly along both edges of the product from the extreme points of the larger segment. The same perpendiculars are lowered along the borders of the semi-circumference of the hips.
After this, you should draw the side internal cuts of the legs and their bottom, taking into account the hem. The final stage is the design of the top of the trousers. In front, the top cut should be approximately 3 cm lower.
How to make chain mail. Simple chain mail weave
Hello, dear friends! You and I paid quite a lot of attention to studying the designs of various types of edged weapons, but somehow it turned out that we completely ignored protection against them. If we learned how to make a sword, then why don't we learn how to make chain mail? Of course, in real life we are unlikely to need it, but for those people who play role-playing games (and this, believe me, is a very exciting activity, and I would also gladly play them if I found like-minded people, but, to Unfortunately, there are no such people in my life horizon). So, back to the topic of making chain mail.
Ancient craftsmen spent quite a lot of time and effort on making chain mail. The blacksmith forged the wire and cut it into short, identical pieces. Next, from these pieces of forged wire, he made chain mail rings. A huge number of such rings had to be bent so that they were enough for a full-fledged chain mail. Half of all the chain mail rings were tightly welded by the blacksmith, and the other half was subjected to special processing. These rings served as locking links. The blacksmith used an anvil to flatten the ends of these locking rings and then punch small holes in them. Next, the chain mail is assembled. The locking rings were connected to the solid rings, and their ends were aligned so that the holes were exactly opposite each other. Then the blacksmith inserted a rivet into these holes and flattened it with a hammer on an anvil. So, row by row, all the rings were connected until they turned into a whole chain mail. In this way, real chain mail was made, intended for brutal sword fighting.
1 - open rings; 2 - welded rings; 3 - rivet
For role-playing game players, it will be quite enough to simply connect the rings end to end, without any rivet lock. Although those who want to make real chain mail of a warrior of yesteryear will have to tinker for a long time and experience all the hardships of the ancient craft on their own skin.
Not only chain mail can be made this way. Smaller rings can be used to make beautiful belts, bracelets and necklaces. All this can be made from stainless steel. But it is best to use thick copper wire. Then, using the copper-to-gold method described in this article, you can give your chainmail a golden appearance. It will not be possible to determine that your belt or bracelet is not made of gold at first glance. In general, with such seemingly simple chain mail weaving, you can create real works of art, if, of course, you have a creative streak in you and you are not afraid to work with your hands. Good luck to you in your work, chainmail masters.
Making armor and cloak
For armor, in addition to fabric, you will need thin synthetic padding, which will make the parts more massive. The armor for the chest and back is a sleeveless vest, not sewn at the side seams. To make it, you should draw the required shape directly on the fabric, cut out the same blank from padding polyester and lining. The neck of this element also does not need to be made large. It is better to make the cut from the back. Afterwards, all three parts are folded in the following sequence: the lining and the main fabric facing each other, and padding polyester on top of the base. Before processing, it is better to pin them together with needles and stitch along the contour of the cuts, with the exception of the neck. Afterwards, the armor needs to be turned inside out and the throat treated with bias tape of a suitable color.
It is also better to make a multi-layer helmet. Its pattern is a strip of fabric around the circumference of the head with darts placed on one edge so that the product closes with the corner up.
To sew a raincoat, you should combine two rectangles of the required size from velvet and lining, stitch along the contour, leaving a small hole for turning, gather along the top with an elastic band and sew on ribbons.
The coat of arms is the main decorative element
How to make a knight costume real? Of course, use the coat of arms! He should be given special attention. You can print and transfer the pattern to the fabric of your cloak and armor. And for more experienced craftswomen, the option with fabric applique is suitable. Having cut out a pattern from non-flowing fabric, it should be glued with a cobweb to the base of the armor or cloak, and then stitched along the contour.
Despite the fact that the Middle Ages have long become history, the desire to be knights among modern representatives of the stronger sex is still great. Of course, what boy doesn’t want to become a skilled warrior who is able to protect his “kingdom” from huge dragons, treacherous conquerors and other misfortunes? School performances and matinees in kindergarten are a suitable occasion to dress your son in a children's costume of a medieval knight, sewn with your own hands. No special skills are required for this. It is enough to arm yourself with the materials and desire necessary for needlework!
We will need:
- a piece of velvet or velor;
- lining fabric;
- wide braid;
- golden satin;
- cardboard;
- template with a dragon image;
- glue;
- scissors;
- colored paper.
- To create a knight costume pattern, you will need a raglan, which currently fully fits your child. Attach it to a piece of velvet folded in half. To prevent slipping, you can use pins. Carefully outline the raglan with chalk, leaving an allowance of one or two centimeters at the edges. Cut out the tunic (no sleeves needed!). When unfolded, it will look like a rectangle with a cutout in the middle (neckline). The lower edges of the tunic can be cut in the shape of large teeth. If the fabric you have chosen crumbles when cut, then you should not do this. To make a carnival knight costume for a boy more dense, sew lining fabric cut according to a similar pattern to the back of the tunic.
- To decorate the knight’s costume that your child will wear on New Year’s, cut out a cross from satin - one of the symbols of knighthood, and sew it in the center of the front of the tunic. On the sides you can make decorations from braid. The same braid will also serve as a belt. Finish the edges of the tunic and its neck with a hidden seam. To prevent the hem of the tunic from flying apart, you can sew garters on the sides from the wrong side.
- Now let's talk about how to make a shield for a knight's costume that will complement the image. To do this, you will need a sheet of thick cardboard from which to cut a circle. You can also use the top of the cake packaging. If the cardboard is easily deformed, glue several circles of the same diameter. Wrap the base of the shield with foil or metallized paper. Then cut out the details of the coat of arms from colored paper and stick them on the shield. Symbolism can be very diverse! By the way, sewing a knight's costume is an excellent reason to create your own family coat of arms.
- Trace the dragon template with a black marker to make the outline more pronounced. Then color the dragon in the color you like and cut out the image along the outline.
- Glue the resulting part to the center of the shield. If desired, you can decorate the shield with additional knightly symbols. Attach an elastic band on the back side to make it comfortable for your child to hold the shield. For the same purpose, the accessory can be equipped with a strap.
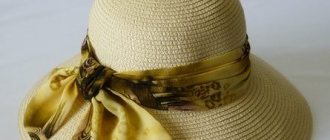
- All that remains is to purchase a children's helmet with a visor and a knight's sword - and the carnival outfit for the matinee is ready! If you couldn’t find a ready-made helmet, you can replace it with a regular hat, trimming it with vertical stripes of fabric and decorating it with a decorative feather on top.
As you can see, sewing a medieval knight costume with your own hands is not a difficult task. In such an original carnival outfit, your child will feel like a real warrior who can handle anything. And don't forget to take a few pictures as a souvenir!
The Middle Ages was an amazingly beautiful era of balls, adventures and battles. Many boys are inspired by cartoons and films on this topic and dream of such a costume. And indeed, everyone, even the youngest representative of the stronger sex, dreams of defeating a strong dragon and becoming the bravest warrior. Moreover, creating such an outfit is very simple - the answer to the question of how to make a knight costume with your own hands will not require much effort. It is enough to spend just a couple of hours of time and use available materials.
What do you need for a knight costume?
Required:
- Base fabric (it is better to choose velor or velvet) and lining
Braid or tape
Thick colored paper, cardboard
Dragon drawing
Scissors and glue.
Raglan, golf or any other sweater that fits in size is used as a basis for sewing the product. A cloth is applied to it, which must first be folded in half. Using pins will make the process easier. Before you start cutting, you need to outline the base using soap or a simple pencil - do not forget about the allowances (2-3 centimeters) on each side.
For a knight's costume, an elongated rectangular product is cut, in which there are no sleeves. The lower part can be immediately decorated accordingly by cutting out triangles. But it is worth considering the type of fabric - this method is not suitable for material that requires additional processing of the edges.
When you are looking for how to make a knight costume, it is important to make sure that the outfit is tight, comfortable and fits well; it is worth cutting out the lining and sewing it with the main product.
For decoration, you should use a drawing that was prepared in advance. A dragon, a cross, or any other element is perfect for this purpose. Ribbon or braid is sewn along the edges and around the neckline. For convenience, it is worth hemming additional garters on the sides - then the elongated tunic will not interfere with walking. In addition, this is an excellent solution that will help you always carry a sword or any other weapon with you.
Shield
A common question is how to make a knight costume from cardboard. This material will make suitable protection, because for this you only need to cut out a circle of the appropriate size. If paper is used, then you need to cut out several products and then glue them together.
Apply in the middle the same symbol that is used on the main suit. Or you can even create your own family coat of arms - a children's holiday is a good reason to do this.
The finished part must be attached to the central part of the product - the design of the shield is limited solely by the imagination of its creator. You can attach a small elastic band to the inside of the product - this will make it much more convenient for the child to use it, and most importantly, the protection will not be lost during the holiday.
After this, all that remains is to buy a helmet and other elements of a knight’s wardrobe - and you can safely go to the holiday. If you wish, you can choose a mask or make it yourself - an ordinary hat, which is trimmed with a fabric of a suitable shade and density, is also perfect as a base. You can use beautiful feathers for decoration.
The answer to the question of how to make a knight costume at home is more than simple. A stylish outfit for a carnival is very simple to make, does not require special skills and allows you to look impeccable at the holiday.
Weapon
A warrior without weapons is not a warrior. Therefore, you will have to rack your brains over your knight’s arsenal. The spear is dangerous and uncomfortable to carry. The ax doesn't look noble enough. Best sword
. True, it is difficult to make it by hand so that it looks attractive. It's better to use a store-bought one.
In children's toy stores you can find swords or even entire sets of weapons. But here I would like to make one caveat. You will come across sabers much more often than swords. The saber is suitable for a pirate. But the knight needs a sword. Like a musketeer, he needs a sword. In addition, almost all swords will be made in China and will not be suitable either. Swords in China are made exactly by Chinese people. With terrifying shapes, dragons, snakes on the handle and blade. Such a seemingly trifle can ruin the impression of a costume. Therefore, take the trouble to find a sword with a straight blade and a simple handle.
If this fails, then it is better to make your own not a sword, but a mace
. For the handle, we take a round wooden handle or a piece of plastic tube, 40-50 centimeters long. For example, from a broken mop. You need to attach a lanyard to one end to carry the mace on your hand. After all, it won’t work to put it behind a sash like a sword. Take any tape about 15 centimeters long. Its ends are folded and nailed with a decorative nail from the end of the stick.