Summer, like any other time of the year, is ending, and I really want to leave its presence and warm colors next to me longer. But autumn can also be pleasant and pleasing to the eye. You can easily verify this if you decorate your home with physalis.
For this decor of your home, you can and should use autumn colors: yellow, all shades of beige, orange, crimson and golden, brown. In addition to this, all the gifts of autumn look great, which can not spoil for a long time and are pleasing to the eye. For example, dried flowers and leaves, nuts, pumpkin. With a little imagination, you can create a beautiful bouquet that will perfectly decorate your home.
Very interesting compositions can be created using such an interesting flower as physalis. It is similar to Chinese lanterns, which can hang on a branch without water for a long time. The warm orange color of physalis will perfectly complement your fall decor.
Physalis can be grown at home
In warm climates it is a perennial plant. Ours is annual. Physalis grows up to two meters. After flowering, the calyx of physalis forms a kind of cocoon around the fruit. Such a cup remains on the branch for a very long time. Physalis fruits are usually not edible, but strawberry physalis berries are quite tasty.
Autumn gifts of nature include: nuts, acorns, chestnuts, leaves, cones, physalis flowers, rowan, viburnum, rose hips, cereals, pumpkin... Autumn time reigns with an abundance of natural materials for crafts. In this article we will look at ideas for crafts made from the gifts of nature in autumn, which are perfect for decorating the interior of a home or cottage.
How to dry physalis for a bouquet. Physalis decorative in landscape design
Ornamental physalis is grown by gardeners not for the fruits - they are inedible, and not for the flowers, because they are very small and inconspicuous. This plant attracts with its bright orange lantern-shaped fruits. Lanterns are especially delightful against the backdrop of the gray and white monochromatic Russian winter, decorating empty gardens and dacha areas with their own lights. Popularly, this plant has many names:
- Chinese lanterns;
- earth cranberry;
- emerald berry;
- winter cherry.
Physalis has the specificity of storing its own fruit simultaneously with the calyx for many months. If you leave the fruits untouched on the bushes, then by spring a beautiful cup will emerge, woven from veins with a bright berry in the middle. On one bush there can be up to 15 lantern fruits.
In landscape design, 2 types of decorative physalis are used:
- Physalis ordinary is a perennial bush 30-60 cm high with fruit cups 3-4 cm in diameter.
- Physalis Franchet - grows up to 70-90 cm. Its red capsule fruits have a diameter of 8-9 cm. It is grown as an annual.
Decorative physalis is beautiful in a composition with other flowers in a light palette on the lawn or in a mixed flower garden. Combining physalis with lunaria, immortelle, gypsophila or kermek changes the entire area, making it elegant.
Its dried branches with lanterns in bouquets of dried flowers, garlands, appliques, form a festive mood in one of the parts of the house, both from the outside and in the middle, decorating the door, window, balcony.
Ceramic floristry Physalis
Good day, our dear craftswomen!!!
Svetlana Fedorovna presents a master class on creating Physalis from polymer clay.
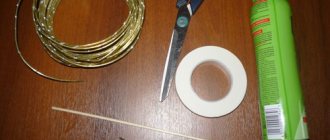
Despite the hot summer, Physalis will appear on my table today, bright and pleasing to the eye... It turns out, as in that song - “but I’m always missing something, winter-summer, autumn-spring!!!” And I really wanted to share this fascinating MK on Physalis with you, our dear subscribers. I decided to introduce you to Japanese clay SUKERUKUN, it is transparent and when completely dry, it is very easy to glue parts, but it shrinks a lot. So let's get started, for work you will need the tools listed below.
Let's start by looking at how the physalis box is structured. I have a box saved up since the fall and we will now cut it into five parts.
Mix the paint into the clay, roll out a piece of clay using a paste machine or an acrylic rolling pin and cut out the petals with a cutter (the cutter can be flattened a little with a boat), you can also insert it into a dried petal and trim the edges with scissors, then give the same shape to the upper part and send it to dry.
When the petals are dry, you need to swirl the stack with the ball in the middle, giving the box convex sides, or you can not treat some boxes with the stack, because in nature they are different. Let's prepare a stem with a base for a box, wrapping clay around it.
The next stage of assembly, after about 1-1.5 hours, glue each petal with “Moment” glue, the very edges of the petals, and we will have such a beauty.
We finish the box with a piece of polymer clay with a combination of latex glue and water.
I made about 16-17 of these wonderful boxes of different sizes. It's time for the stems. Let's take wire No. 18 3 pieces and No. 20 1 piece, cut wire 20 into 3 parts with wire cutters and connect with floral tape with wire 18, we will get three such branches.
Let's mix two polymer clays Modena and Modena Soft to make them weightless, then add green and orange paint, bend our branches so that they take a natural shape and gradually glue our stems.
Gently smooth out any unevenness with water.
Let's let the stem dry and use a special stack to make holes for our boxes.
Let it dry thoroughly, preferably a day. In the meantime, let's give free rein to painting the boxes, pour some tea and a cup of aromatic coffee and imagine how best to tint our orange wonders?! To do this, I took green and kraplak paints, applied green tinting on the bottom, and kraplak on top.
I also added tone to the stems.
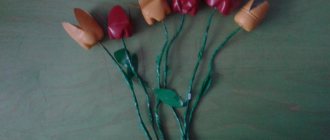
Now let’s glue the physalis buds to the branches with glue.
And then I realized that something was missing, there weren’t enough ripe, open boxes. It was decided to make them immediately, first we will make the berries using a base, wrapping it in clay and letting it dry.
Each petal is slightly dried, you need to wrap it in a napkin and gently roll it in different directions.
Next, unfold it and let it dry, then glue all the petals to the berry with glue, process the top and shade it. Glue it to the stem and cover the berry with a glossy clay varnish.
Our beauty is ready!
The result is very pleasing to the eye, I wish you to repeat this MK and enjoy your work!
Caring for physalis after planting
Physalis is resistant to frost and drought. By its nature, this is a southern plant, so for active growth and flowering it needs full lighting. If the bush grows in the shade, then it will produce fewer fruits, and the color of the cups will not be very bright. Otherwise, care is usual:
- water once a week, in dry weather - increase watering up to 2 times;
- periodically carry out weeding and loosening;
- fertilize with organic fertilizers a couple of times a month;
- mulch the soil under the bushes.
If you want to make the bush more straight, then you need to put up a support and tie up the stems. When caring for the plant, heavily overgrown bushes can be pruned and pinched to form a certain form of decorative physalis.
Attention! Physalis roots grow very strongly. To prevent them from filling the entire area, it is recommended to plant seedlings together with a bottomless container or install a rigid fence around the roots, digging it 20-30 cm into the ground.
No special care is required for winter. The bush remains in the ground. The entire above-ground part is cut off. There is no need to make a special shelter, but in case of a frosty and little snowy winter, you can mulch it with peat, dry grass or fallen leaves.
Diseases and pests
Physalis, in comparison with other plants, is unpretentious to external conditions and resistant to diseases. However, if he does not receive the necessary care, he becomes ill. This can happen due to poor lighting, high humidity, or lack of nutrients during crop cultivation. Most often, physalis suffers from mosaic, late blight, white rot, and black leg.
To combat insect pests - aphids, mole crickets, wireworms, you will have to use appropriate insecticides.
How does physalis propagate?
Annual physalis can reproduce on its own, scattering ripened seeds that will germinate the next year. Gardeners use its seeds for cultivation, planting them in March-April for seedlings, and in May - in open ground.
The perennial species is best propagated by dividing the bush. This is done in the spring, when new branches begin to sprout from the root. They need to be carefully separated and planted in another place.
Fruiting
Ornamental physalis blooms almost all summer, and only at the end of August fruits in boxes begin to form. The color of the box changes as the berries ripen. At the end of September it reaches full maturity and the calyx acquires its final color.
Advice! You should not grow different varieties of physalis nearby. Crossing, they will produce small fruits with inconspicuous cups.
Autumn crafts No. 1. Physalis wreath for interior decoration
Hello! Today I would like to tell you about my first autumn craft - an interior wreath made of physalis.
The sun was shining mercilessly, so this photo, sorry)
I really love making various decorations for the interior with my own hands, but usually it creeps me out closer to the New Year. Today my mini master class is inspired by cleaning the front garden. I cut out all the physalis, but I couldn’t bring myself to throw it away, but I got an idea of what could be done. I don’t pretend to be unique, but I did everything myself.
To make a wreath, we need physalis, wire or twine, scissors, a hammer, a mold for the base, patience and a good mood!
Wreath form. Take anything that rolls into a circle. I have this insulation from water pipes.
We will need a hammer in order to slightly beat off the brittle branches so that they bend and do not break.
Next, take a beautiful branch, cut off all the leaves and the crown with scissors, but so that a small tail remains.
We tie the branches to the base one by one. The photo below clearly shows what happens.
Well, everything is ready!
Of course, now the wreath needs to be dried; to do this, we place it on a horizontal surface and leave it to dry for a fairly long period.
While the wreath was lying out to dry, an idea came to my mind. A physalis wreath can also be used to decorate a table.
In the center you can place beautiful large interior candles, a vase or bowl of fruit.
You can add dried flowers, grains, or colorful fall leaves to your wreath! In reality it just looks “WOW”. Hope you enjoyed it. Soon I will write about what else you can do to decorate your home using scrap materials. Thank you for your attention, all the best to you!