The world of food floristry is full of amazing and sometimes simple compositions. Some of them can even be assembled with your child. And in just an hour. In this article, we suggest you put together a simple but original bouquet for the teacher on September 1st. Or rather, a whole composition of nuts in a basket.
Let's tell you:
- how to choose materials;
- place nuts on skewers;
- that the assembly can be safely entrusted to a child.
And we will share professional secrets of food floristry.
You will find a detailed step-by-step master class on how to assemble a bouquet of nuts. Involve schoolchildren and preschoolers in the assembly - this is a very exciting activity. 5-year-old Alexey helped us at the master class.
Edible bouquets are a great way to stand out and be memorable at your lineup. Especially when teachers and students find out that the present was made with their own hands.
Ideas for crafts from autumn gifts of nature
There are a lot of interesting and creative ideas, using which you can not only have fun and productive time, but also decorate your home or dacha with autumn leaves and fruits.
Extraordinary crafts from autumn materials
Chestnuts, nuts and acorns for crafts
While walking in the park, we often come across these objects under our feet, but we don’t always collect them. In fact, on earth you can find a lot of suitable material for future crafts. For example, chestnuts and nuts work well as napkin rings. Another option for using the material is to make a candlestick from a jar and fill it with autumn gifts. More ideas for crafts made from acorns and chestnuts.
Candlestick made from a jar filled with acorns
To decorate a photo frame or mirror frame, we can use acorn caps. And the pine cones will make a very beautiful basket where you can put all sorts of little things.
Unusual basket of acorns
Crafts from physalis
This material is often used to decorate apartments or cottages. Due to the fact that physalis can maintain its charming appearance for several months without watering, it is often used as decoration.
Bright and colorful wreath made of physalis
A craft in the form of a wreath, made of physalis and tree branches or berries, will become a beautiful and original decoration on the door. This decoration also looks quite colorful as decoration in a vase, as a wall decoration, or as a table setting.
Physalis in a vase as decoration
Berries for crafts
It is recommended to choose healthy berries as decorations, for example: viburnum, rose hips, rowan or grapes. They will look very attractive in a candlestick or wreath that you can make yourself.
Autumn berries as a material for decorations
Bunches of rowan and viburnum can be placed on the table or near the fireplace. This decorative element will give the room an autumn atmosphere and become a colorful decoration in the house. Combined with leaves of different colors.
Combination of berries and leaves
Autumn pumpkin craft
Another symbol of autumn, which is used for culinary and decorative purposes. This material can make an excellent candlestick or vase. Very often, various ornaments are carved or painted on pumpkins and used as decoration for Halloween.
Original pumpkin craft
A pumpkin that is large can be placed on the porch or garden path. Such a composition will look original and non-standard.
What to combine autumn flowers with?
Florists simply love creative and original bouquets. This is exactly what the autumn composition will look like. It can be diluted with various decorative elements.
It can be:
- leaves - they should be collected with special attention. Pay attention to the size of the leaf itself, as it must fit the size of the inflorescence. Leaves should only emphasize the mood, without interrupting the main idea and idea of the entire flower arrangement.
- apples - their smell and aroma will be personified with something family, homely and cozy. You will just want to be in the garden, where it will smell like Antonov apples.
- acorns - their color goes well with many autumn inflorescences.
- twigs, dried grass - all this will create the feeling as if you didn’t order flowers or didn’t pick them yourself for half a day, but just picked them in the autumn forest.
Craft “Penguin Family”
This kind of craft can be made from autumn material, using cones, ash seeds, acorn caps, plasticine and a piece of plastic for a stand. The idea of the craft is quite simple and every child can do it without any problems.
Craft Penguin Family
Craft penguins from pine cones and plasticine
Craft “Autumn Tree”
Materials that we may need in our work:
- A sheet of whatman paper in your preferred size. First you will need to draw a tree without leaves on it.
- Collect a set of multi-colored leaves of different sizes, which we will directly use in our work. They will need to be put under a press or ironed a little. The main thing here is to find the “golden mean” so that the sheet is not dry, only slightly dried.
- Glue stick or regular PVA.
DIY painting “Autumn Tree”
When we have prepared all the necessary materials, the progress of work will be as follows:
- Lay out the existing leaves in front of you.
- Select a sheet and carefully apply glue to it. It is best to do this in the corners and a little in the middle.
- We stick a leaf on our tree and decorate it until it becomes big and beautiful.
Collecting a composition: a bouquet of roses with your own hands
How to arrange a bouquet of roses?
1. Glass.
The most popular and frequently requested design option is glass. This is transparent floral paper that allows you to see not only the buds, but also the stems and leaves. Such a bouquet will look neat and without frills, so this option is a classic. To secure the film, use thin adhesive tape.
2. Kraft paper.
For roses, classic beige craft paper is suitable. Such a bouquet will look fresh, natural and beautiful. To highlight the beauty of roses, you should not use “flashy” tones. It's better to avoid neon. The bouquet can be complemented with a homemade postcard made using the scrapbooking technique. Such a postcard will make the composition as individualized and unique as possible.
3. Box.
A new and widespread option is a cardboard box. Usually it matches the color of the roses that are inside. Contrasting color option available. Red roses look very rich in a red or white box, yellow ones in gold, yellow or mint, and white roses in mint, silver or white, respectively.
Craft “Autumn Bouquet”
To create this masterpiece we will need a lot of maple leaves of different shades, strong thread and a great mood. Here are some more crafts made from maple leaves.
Craft from leaves “Autumn bouquet”
Work progress: Step 1. First you need to carefully fold our sheet in half.
Fold the sheet in half
Step 2. Next, we bend the edges inward so that we get a petal.
We begin to twist from one edge
Step 3. Using the above method, make the required number of petals at your discretion.
Take an extra sheet
Rolling another petal
Step 4. Take a thread and tie the craft tightly. We should get a full-fledged flower.
Secure the craft with thread
Step 5. Thus, we make the desired number of flowers, which can then be combined into a chic autumn bouquet and presented to your loved ones.
Ready flower from leaves
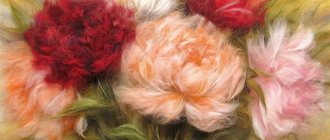
Color scheme of autumn bouquets
To compose autumn bouquets, florists strive to use a color scheme that most fully reflects the features of the coming season. To say goodbye to warm days, shades of red and yellow and bouquets of orange flowers are ideal. These rich colors symbolize the golden age.
A seasonal floral gift can be made not only in bright, elegant colors. For autumn floral works, cool tones would also be appropriate. The main thing is that they are natural. For a bouquet, you can choose blue or lilac, violet, cold pink flowers.
Vase of twigs
This vase craft will be an excellent decoration for your home or garden. In order to implement this idea we will need:
- Branches of small diameter, which will be approximately the same in size.
- Square or round jar.
- Dye.
- Glue or glue gun (recommended).
Unusual vase made of dry twigs
Further progress:
- Paint the jar the desired color and let it dry thoroughly.
- After it has dried, we need to take the branches and glue each of them to our jar in turn. Again, leave the craft to dry thoroughly.
- When everything is ready, you will need to decorate the vase with twigs with various decorative materials. You can use anything, from beads to crafts made from butterflies or dragonflies.
- Similarly, we can use autumn materials for decoration, including acorns, pine cones, peas, nuts, etc.
You will find other crafts made from twigs and twigs here.
Master class: making a composition from chrysanthemums
Let's try to make a European-style flower arrangement with our own hands. Round shapes are pleasing to the eye and create a positive mood. You can give such flowers to your mother, grandmother, sister, friend.
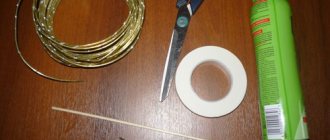
Tools and materials
- oasis.;
- scissors;
- fern, ficus or croton - 2 branches;
- branches of bird cherry or other green shrubs;
- sprig of gypsophila;
- chrysanthemums - 3 branches for a small composition;
- container for the base (vase, basket, any plastic cup).
Step-by-step instruction
- We measure out the required piece of oasis (you can press a mold into it).
- We lower the oasis into the water (easy, without pressure).
- When it is saturated with water, take it out and cut off all excess.
- When installing in a basket, first pack the oasis in polyethylene (or line the bottom of the basket).
- We secure the oasis at the base with tape, tying it to the container.
- If the base is not decorative, you can immediately cover the bowl with floral mesh or other decorative material.
- We set the length and width of the composition by inserting fern leaves into the oasis. They need to be trimmed first.
- Having secured the fern leaves around the circle or perimeter of your composition, we supplement it with branches of bird cherry or any
- blossoming bush.
- We remove the leaves of chrysanthemums, determine the size and height of the bouquet and trim the stem. We do not insert it into the oasis all the way, otherwise water will not flow.
- We insert the flowers symmetrically, at the same distance. If you are in doubt about the proportions, you can hold the flowers to the mirror, so all the errors are very clearly visible.
You can also make an ordinary round bouquet of chrysanthemums with your own hands for a vase. Just place the flowers not in parallel, but at an angle, then they do not merge, and each chrysanthemum has its own appearance. We tie up the bouquet. If the chrysanthemums are the same color, florists tint them with multi-colored floral spray paint and add sparkles. The view turns out much more interesting, brighter, more festive. If desired, add flower toys and glass beads.
We will tell you how to make a bouquet of roses. And about delicate orchids and bouquets of them in this article.
otprazdnuem.com
Leaf painting
A very creative and unusual idea that can easily be brought to life. We will need: dried flowers, as well as leaves of different sizes and shades; brushes and paints; cardboard or thick paper; glue.
DIY creative painting of leaves and flowers
Progress:
- On a sheet of paper, use paints to paint a background of your preferred color and leave it to dry.
- Next, you need to glue flowers, leaves and plant branches on the picture so that you get an interesting composition. It is advisable to think about her ideas a little in advance.
The subjects of such paintings from autumn natural materials can be created completely different, the main thing is to approach the work creatively and creatively.
Making a bouquet of chrysanthemums with your own hands
Chrysanthemums are delicate flowers. But they only look tender; in fact, the chrysanthemum is not picky. Such a bouquet will last a long time in a vase, pleasing the recipient's eye. To arrange a bouquet of chrysanthemums, you can use the following materials:
1. Transparent film.
This composition can be given as a gift for Knowledge Day and birthday. A person who loves chrysanthemums will definitely appreciate the simple but neat design. This option allows you to focus on the beauty of the flowers without being distracted by extraneous objects in the bouquet. To decorate the flowers a little, you can use glitter mixed with water. Florists apply them using a sprayer.
2. Felt + mesh.
This unusual combination of materials will delight even the most fastidious recipient with its originality. Felt is a material that is rarely used by florists. Now felt has become very fashionable. The mesh is an indispensable “ingredient” of a modern flower arrangement. You should choose a mesh for chrysanthemums in a contrasting color. For example, for white chrysanthemums you can choose a purple or yellow mesh.
Arranging bouquets is a fun and interesting thing. If you approach it with your soul, you can become a real professional for a few minutes and decorate the composition no worse than a florist with extensive experience. You can find many master classes on the Internet that will help you combine materials and flowers. The main thing in this matter is to put your soul and feelings into it: then the recipient will definitely be happy when he receives your bouquet.
1igolka.com
Dish of leaves
Moving from creative abstract to more practical things, we will try to make a craft dish. To do this, we will need directly leaves of different colors, glue and a brush and an inflatable ball.
Dish of colorful autumn leaves
- First, we inflate the ball to the desired size, on which the size of our dish will depend. The ball can be placed in any container to make your task easier.
- Next we will need to cover the surface of the ball with glue. We do the same with the leaves, while gluing it to the ball.
- An important detail is that the leaves must be attached with an overlap. It’s good if they are of different shades and colors, this accent can also be played well.
- It is recommended to stick several layers of leaves to make our dish stronger and last longer.
- Let the craft dry completely, deflate the ball and carefully pull it out.
As a result, we have an excellent decor for any table or bedside table that can be used for any purpose.
We collect a bouquet for the teacher in 1 hour
Assembling the composition consists of 3 steps. For clarity, we divided it into time intervals. And in each step we’ll tell you which step you can entrust to your baby.
Step one
.
Preparing the ingredients. 15 minutes.
First, we select the nuts. Those with cracks, chips, and dark spots are not suitable for us. The bouquet should look perfect from any angle. Therefore, it is better to buy nuts with a small supply. For example, not 150 g, but 200.
Next, place the nuts on skewers and toothpicks. It's not as difficult as it seems at first glance:
- walnuts
. Each of these nuts has a small hole at the bottom, which is where we insert a toothpick.
Food florist advice
. It is better to use toothpicks instead of skewers, because... they are thinner and there is less risk of damaging the shell.
This task can be entrusted to a child. Our 5 year old helper did a great job with her.
- almonds
_ Each nut has a space between the shell, which appears when dried. It is quite enough for a toothpick or skewer.
There’s nothing complicated here either and even a child can do it. This is also a good exercise for developing motor skills.
- peanuts
_ It's best to prepare peanuts for adults. Because A little effort is required to insert.
But here you can experiment - insert a skewer in the center or from the edge, place the nut vertically or horizontally. This is an exercise for developing imagination in adults. 
After all the nuts have taken their place, the skewers need to be trimmed to approximately the size of the toothpicks. We use pruning shears for this.
Then we begin to prepare the base for the bouquet.
Step two. Preparing the foundation
. 10 minutes.
We cut the foam or polystyrene into the shape of a basket and wrap the piece in cling film. It is needed for hygiene, so that products do not come into contact with materials.
Next, put the paper in the basket.
We put our base on the bottom.
Fold the paper over the edges.
Food florist advice: It is better to use paper in neutral shades so that it complements and does not draw attention from the base of the composition.
This completes the preparatory stage. Then the magic of creativity begins.
Step three. Putting the composition together.
From 20 to 35 minutes.
The basic rule in the arrangement of ingredients is to put the large elements first.
The nuts in the center should be slightly higher, and slightly lower towards the edges. To make the composition look like a slide, it will have the necessary volume and completeness.
Then there is only your boundless flight of creativity and time of pleasant leisure time together.
The child can be entrusted with arranging large ingredients, and adults can fill the remaining space with small details.
Food florist advice
. You can use dried fruits or dried flowers for decoration. And to emphasize the theme of September 1st, add pencils or rulers to the composition. To do this, you need to tape them to the skewers.
This is the bouquet of nuts we made.
Autumn crafts from apples “Swan”
You can always decorate your holiday table with fruits. What if we add a little creativity to these fruits and make crafts of different animals or other objects. A very interesting idea that will appeal not only to your kids, but also to adults. First, you can try making a craft from apples in the shape of a swan.
Scheme for making a swan from apples
Following the instructions we will need:
- Cut the apple into two parts, one of which should be slightly smaller.
- We set aside the smaller part and work with the larger one for now. On it you need to cut out a large slice with equal sides on one side. We won't touch the middle for now.
- In the resulting slice, you will need to cut out more slices, but smaller ones. On average, you should get about 3-5 slices. Everything will depend on the size of the apple.
- The same slices will need to be made on the other side of the apple.
- Now it's time to work with the smaller part that we set aside at the beginning. This part will represent the head and neck. We cut off a round, flat plate and then cut it into two parts. Using a knife, cut out an arched neck and a small head with a beak. You will also need to make a recess so that the neck can be attached.
- Don't throw away apple seeds. They are perfect as decorations, including making swan eyes.