During the day, we are often visited by interesting thoughts, which are quickly forgotten in the hustle and bustle of everyday life. If you write down everything that comes to mind, valuable ideas would not disappear without a trace, but could be realized over time.
To make your own mental activity more constructive, you need to keep a diary and record your judgments, observations and other useful information in it. Any notebook will be suitable for this purpose. However, a notebook with the alphabet and a bookmark will be especially convenient. Alphabetical marking will allow you to systematize information to facilitate its further retrieval.
Why do you need to keep a diary?
Some people will not understand why a regular notepad is needed if today there is the Internet, social networks, devices and many other special applications for storing information. Modern man cannot do without the achievements of IT technologies, but computers and other smart devices are just machines. It is unlikely that you should completely rely on them. Here are some arguments in favor of recordings:
- they are stored in memory longer;
- like a visual picture, they allow us to understand and rethink many things;
- a diary can become a valuable heritage for children and grandchildren, because it is known that many historical facts were reconstructed precisely from entries in the diaries of ordinary people;
- any person is overcome with excitement when he picks up a large notebook with bookmarks, which his grandmother once kept;
- Is it possible to compare a diary filled with handwritten text with a Facebook account full of links and likes?
LiveInternetLiveInternet
Quote from Mages_Queen
Read in full In your quotation book or community!
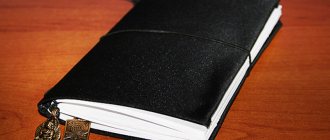
DIY notepad
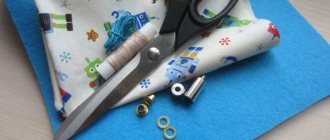
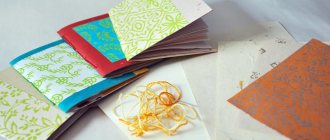
Detailed master class on making a notepad. This MK describes a technique similar to classic book binding. First we need regular office paper. You can combine colors, sew in dividers, etc. I used A4 paper 80 g/m2 in vanilla beige color and designer colored tracing paper 90 g/m2.
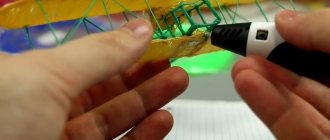
We select sheets of paper in a notebook. If the paper density is about 80 g/m2, then it is optimal to select 5 sheets. If the paper is thicker, then it is better to make notebooks of 2-3 sheets. Fold the notebook in half: And so several times, until the desired thickness of the future block is achieved. I have 13 notebooks here, i.e. The notebook will contain 130 sheets of A5 format. We place the future block at the spine with two pieces of binding cardboard (this is done so that there are no dents left on the paper from the staples, and it is pressed evenly) and secure the spine with office clips, as shown below: The block usually lies under the press for about 3 hours, but I I often leave it overnight. While the paper is being pressed, you can look out the window and drink a cup of coffee. When our notebooks are compacted, we open the clips and straighten the spine by knocking them on the table. We secure the perfectly even spine again with clips, like this: Next we have to cut 6 holes at equal distances on the spine. I use a pre-prepared sheet of paper with markings; for an A5 notebook format, you can download one from this link and print it out. If the format is non-standard, I think you can easily mark the block with a pencil and a ruler. We saw these holes on the spine (as one option, you can draw marks on the spine itself, and then pierce holes in each of the notebooks with an awl, but in my opinion this longer): I used a small file with three edges, bought at Auchan. When our holes are ready, we can easily and masterfully sew the block. We will need two fabric ribbons. I use cotton. The ribbons should be of such a width as to fit between two sawn holes: I find it convenient to sew by placing the block on the edge of the table facing me. There may be variations here, but the main thing is to try not to wrinkle or stain the paper in the process. Often, at first, not everyone succeeds. For sewing I use leather needles and Iris thread for crochet. We place one of the notebooks in front of us, as indicated in the photo. We sew the first notebook with a “forward needle” seam, using a single thread, leaving the tail outside. We do not pierce the fabric ribbons, but simply bend them around with thread: Place the second notebook on top of the first one, without confusing the right and left edges of the notebooks, i.e. don't turn them over. We insert our needle into the hole of the second notebook: And we stitch it in the same way as the first, catching the thread on the thread of the previous notebook in the place where we go around the ribbons: When we have reached the edge, we tie the working thread and our left tail into two or three knots, having first pulled them up well: Place the third notebook on top and do the same: In the places where our ribbons are located, we hook the working thread to only one previous one: Sew on the third notebook: And now we must tie a knot, connecting the third notebook with the previous ones. To do this, we thread the needle through the thread between the 1st and 2nd notebooks: We take the needle out, leaving a loop: And we thread the needle through the resulting loop like this: We press the notebooks together so that our knot is tight: In fact, this is a simple sewing knot, it is often tied when sewing is finished. Now we boldly lay all subsequent notebooks on top, sewing them to the block and tying knots along the edges. If you run out of thread, it is convenient to tie it on at the moment when we are above the ribbon. In this case, the knot is guaranteed to remain on the spine and will not be visible on the finished product. When all the notebooks are sewn together, we tie not one, but two or three sewing knots on the side. We place the block again between the cardboards, paying special attention to the even spine. The notebooks should lie next to each other: And we fasten our improvised press at the top and bottom: Now we need to glue the spine. I use Silicone Sealant. It holds notebooks together quite firmly, while remaining elastic even after drying, as a result of which the notebook opens and leafs easily. Also, after using it, there is no need to additionally glue the gaps between notebooks. Apply the sealant to the spine: And spread along it with a sponge, paying attention to filling each crack. When all the cracks are filled, you can remove the excess and level the layer. We fasten the clips along the spine again, trying to get as close to it as possible with their “pressing” part. Usually the block takes an hour to dry, but if possible, it is better to leave it under pressure longer. I also often leave it overnight. In the meantime, we can prepare future endpapers. For them we will need two sheets of thick paper (in our case A4 format), preferably from 180 g/m2, you can use scrapbooking paper. We make creases in the middle: And fold them in half, with the “beautiful” side inward: As it dries, we take our block out from under the press: I glue on a couple of pieces of craft paper before gluing on the endpaper. It will tailor the relief of the ribbons under the endpaper and add strength to the product. I glue it using a UHU glue stick like this: And I glue the ribbons on top of the craft: Next we glue the endpapers. I like to make durable and good quality notebooks, so I use Moment Crystal glue. To apply the glue strip evenly, we protect with a sheet of paper that part of the block that the glue should not get on: Remove the sheet and glue the endpaper. We glue a piece of craft with ribbons onto the endpaper on top: Now we have to align the edges of the resulting block. There are 4 ways: 1. Buy a simple guillotine cutter. It justifies itself if you plan to make notebooks often and in large quantities. The cutters are sold here. 2. Try cutting it manually using a construction knife. The knife can be bought in Auchan, Leroy Merlin, etc. Choose an expensive, heavy knife and good replacement blades. Break blades as often as possible. At first glance, this method seems impossible, but in my master classes many people manage to cut the block quite decently the first time. And with certain training, it often turns out not far from ideal. Place a metal ruler at the edge and press it firmly against the block with your left hand. You should not cut less than 5 mm, it is very difficult. With the right hand we cut with a knife, holding the hand strictly perpendicular to the work surface. We pass the knife over and over again without pressing hard. It’s better to have more “passes”, but with almost no pressure. As a result, the cut can be processed with fine sandpaper. Photo from my MK: 3. You can take the block to a printing house near your home or work. Often they will not refuse to cut a block, and it costs around 5–15 rubles. per block. If there is only one block, they are often cut for free 4. Leave as is. The shaggy edge emphasizes that the product is handmade. I use a cutter: The result is a finished block. I already wrote once about how to make a notepad out of a block, but some things there are outdated, despite the fact that the general principle remains. I have long promised to update the information - and now we will need two binding cardboards slightly larger than the block size and 300 g/m2 cardboard for the spine. We cut the cardboard so that when placed on the block there is a 5 mm overhang on 3 sides, and 5–7 mm less at the spine: On the cardboard for the spine (I have 10 cm x cover height) we make several creases 7 at a distance of 2 –3 mm apart. This is done so that the spine is beautifully rounded during use. The distance from the first to the last creasing should be 3–4 mm greater than the height of the block spine. This is approximately how the cardboard spine should sit on the block: Now we glue the spine with the cover cardboard. I use Moment Crystal glue. Do not forget to retreat those 5-8 mm from the outer creases on the spine, which we laid when cutting the cardboard. I want a softer notebook, so I glued an additional layer of fleece on top. The cover frame is ready. Now we are preparing a piece of fabric that is 15–20 mm larger than the cover. Be careful: if there is a pattern on the fabric, follow it from top to bottom and from right to left. Iron the fabric and starch it a little. Place the cover frame on the finished fabric, soft side down: And apply glue at a distance of about 3–5 mm from the edge. Here I use Corfix Hobby Glue. We glue the long sides, you can additionally iron them: Now our task is to make neat corners. First, we smooth the fabric like this: And then like this: When we glue the short sides of our cover, we will get these corners: Now the cover is almost ready: Just in case, we try it on to our block - it fits perfectly! Now is the time to add sew-on embellishments and embellishments that attach to eyelets or brads to the cover. You can save the adhesive decorations for later. I will have a notebook for recording dreams. On the block itself you can weave a captal: How to weave a captal from Janna Khusnulina on Vimeo. You can glue a bookmark or several to the cover. I glue them on with a hot glue gun. Here is the finale. Let's try on the block for the cover: Place two sheets of blank paper between the endpaper sheets, apply Moment Crystal glue to the endpaper and slam the cover shut, trying to glue it as evenly as possible. The same goes for the back of the notebook. If decorations allow, the finished notebook can be placed under a press or simply pressed firmly on it. All is ready! I recommend starting to write in a notebook 12 hours after finishing work on it.
Source
Alles in memories
How can you use an alphabet notebook?
A notebook with the alphabet can be an excellent gift not only for creative individuals who love to write, but also for business people and housewives. You can enter food recipes, personal health indicators, all kinds of data related to children, work plans, contacts and other valuable information. You can record your emotions, experiences, sensations. This will come in handy in difficult life situations. This diary organizer can be an excellent assistant for all occasions.
A notebook with the alphabet can also be a stylish accessory that emphasizes the status of its owner. An expensive diary in good binding immediately says that this is a person who knows his worth. If you put a company logo on it, it will also advertise your business.
Why do you need a mixbook?
First of all, you need to remember why you need a creative book in the first place. You can collect all your ideas and plans in it , without being afraid that some of the drawings will not work out. A smashbook differs from a sketchbook in that the brighter its pages, the better. Sometimes you can add some black and white drawings to your notebook. You can use any materials in a smashbook : paints, markers, pencils and much more. It is only important to choose a smashbook with thick pages so that paints or markers do not leave imprints.
In a creative notebook you can collect receipts, magazine clippings, printouts, pictures , stickers and even packages of eaten chocolates, although most often a mixbook is a collection of drawings made by an artist.
So what is a mixbook for?
- bring creative ideas to life;
- draw everything that the artist encounters throughout the day;
- perform sketches;
- train drawing skills;
- make sketches;
- use various drawing tools, etc.
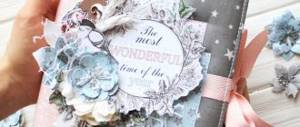
Cover Decor Ideas
There are other variations in decorating the finished product. Here are some of them:
- newspaper clippings;
- stickers;
- rhinestones and sparkles;
- various items - small keys, locks, etc.;
- wrapped in homemade covers made of leatherette, wood or fabric;
- painting with paints, gel pens, markers.
At first, making a notebook will seem like a very painstaking, complicated job. But in reality everything is much simpler - you just have to try. You can make an original craft with your own hands within one day. This is very exciting, interesting and, most importantly, useful work.
- Author: Vasily
Rate this article:
- 5
- 4
- 3
- 2
- 1
(0 votes, average: 0 out of 5)
Share with your friends!
Note book: master class
Let's start making our art diary by preparing the base. Of course, you can just buy a quality notebook or notebook and then just fill out the pages. But this option is not interesting enough; it is much more pleasant to make your own unique notebook with your own hands, inside and out. Prepare the required number of sheets. Cut them to the chosen size, paint them if desired, decorate them with stamps, small drawings, and decorate the edges. The most difficult part of the job is making the binding. The pages of the notebook can be sewn together, glued or fastened using accessories - rings, springs. Once you have your note block ready, you can start designing the cover.
Tasks that will teach you to think more broadly
If you decide to make your own creative notebook, the ideas that come to mind while filling out its pages may seem silly to you as you write.
But don’t be ashamed of your own thoughts. Write everything that comes to mind. Even if a specific task doesn’t teach you anything and turns out to be useless, it will brighten up your day and give you something pleasant. For example, in almost any ready-made creative diary you can find the following tips and recommendations: write a letter to a friend with whom you have not communicated for a long time; try something new; write down what you remember today; draw a picture; describe what bothered you most today. For people who live in an active rhythm, a creative notebook for two will be much more interesting. Such a diary is filled out by two close people or a whole group of friends at once. Accordingly, the tasks in it are designed for collective creativity. These could be questions about spending time together, suggestions to describe each other, or even draw a caricature. Don’t be afraid to include the most unexpected tasks in your notebook, and you will definitely get maximum pleasure from “communicating” with the finished book.
How to make a smashbook with your own hands
Materials:
- watercolor paper;
- cardboard with a beautiful design for the cover;
- stationery knife;
- a simple pencil;
- glue;
- ruler;
- hole puncher;
- nail file;
- cord for connecting sheets;
- mock-up rug.
To make a smashbook with your own hands, you need to follow a simple master class:
- Place a sheet of watercolor paper horizontally in front of you. Use a utility knife to cut them in half, using a ruler and a cutting mat.
- Fold all the resulting sheets in half. Bend them with the edge of a ruler to make the fold smooth and beautiful.
- Fold the sheets one by one.
- Trim protruding leaves using a ruler and a utility knife.
- A nail file will help make the edge perfectly smooth.
- Measure the sheets and transfer the parameters onto the cardboard. Glue the cover to the sheets.
- Use a hole punch to make holes at the closed edge.
- Pull the lace through the holes and tie it with a beautiful bow. The funny book is ready.
Start of production
We fold the paper in half, paying attention to the edges, which should be even. If desired, we give the sheets a shape by trimming them. When you have decided on the number of sheets to insert, we place some kind of press on our structure, for example, books.
Place thick cardboard around the edges so that the paper does not wrinkle, and attach it on both sides with binders (clothespins) to definitely secure the shape. Leave the sheets under pressure for several hours.
Upon completion, remove the press, transfer the cardboard and clothespins to the side that will need to be sewn later. Leave the cardboard to make holes for the needle. Mark a distance of 3 cm along the entire length.
The markings can be applied just to the cardboard, which is located above the sheets. Then, using a stationery knife, we make small cuts, approximately 3 mm deep. Preferably, a little more than the thickness of the incoming needle.
We unravel the paper from under the binders and open them exactly in the middle in order to sew them together. We start stitching from top to bottom with an ordinary, simplest seam. We start from the very bottom leaf. We will place the subsequent paper on top, stitching it in the same way.
Consider the order of the sheets in advance if they differ from each other. First, leave the thread up to 15 cm for further fastening. At odd intervals, starting from the third, we apply strips of fabric that are approximately equal to the distance of the segments themselves.
Individual design
It doesn’t matter who you are making a creative notebook for - for yourself or as a gift. Such a diary should be beautifully designed and evoke only pleasant emotions. Take the time to devote enough time and attention to working on the cover. You can cover it with fabric, decorate it with a beautiful postcard or painting, or glue your favorite photo. Be sure to glue the endpapers on the inside; thanks to them, your work will look much neater. Glue the cover to the note block and place the book under the press. Once your notebook is dry, you can begin the fun part of the work.