In the summer, while on vacation at the seaside, everyone likes to spend as much time as possible in the sun. If one of your favorite summer accessories is a straw hat, take a look at the ideas below that show how you can accessorize, decorate, and personalize a simple hat. A straw hat is an essential part of your summer wardrobe for hot weather, it will not only protect you from the sun, but will also complement your summer outfit. Check out these cool and not at all complicated ideas for decorating a straw hat with your own hands:
The first hats had a purely practical meaning - they protected from wind, rain and, possibly, from the troubles of medieval cities.
The material of the hats was extremely dense and held its shape well. Modern hats, first of all, decorate their owner . They are now made from a variety of materials with a variety of characteristics.
DIY jewelry options
Decorate with paints using a stencil
Suitable for: felt hats, as well as straw hats made of any dense material.
Required:
- Acrylic paints.
- An eraser, a potato, a piece of rubber - any elastic material from which a stamp can be made.
Progress:
- We cut out a convenient stamp, it is better that it is not very large.
- Apply a little paint to a flat surface.
- Dip the stamp.
- We apply the drawing randomly, or according to a pre-developed sketch.
- Dry at room temperature for 3-5 hours, depending on the thickness of the coating. It is better to leave it to dry for a day.
Fabric ribbons, scarves
Hats are decorated with satin, lace, guipure ribbons, as well as any rectangular pieces of fabric in the form of ribbons, scarves of various widths.
Suitable for any hat with a brim, looks best on straw hats and boaters.
Reference! Boater - a hat with straight brim of medium width and a flat crown.
Required:
- Chiffon, organza, viscose, length equal to the circumference of the crown, plus free edges as desired. A bow usually requires about a meter of fabric in length and 25-30 cm in width.
- Scissors.
- Threads to match.
- Sewing machine.
Progress:
- We cut out the ribbon to the required length and width.
- We stitch by machine, leaving a small area unstitched so that we can turn it inside out later.
- Turn it inside out.
- Carefully sew up the free area.
- We wrap it around the crown, draping it if necessary.
- We tie a bow or pin it with a brooch.
- Straighten the loose ends.
Decorating the edges of the hat
Along the edge of the brim you can sew various types of fringe, beads, small coins, and so on.
Suitable for straw, cowboy, classic felt.
Advice! When decorating felt hats, it is not customary to use contrasting colors and pretentious shapes. We choose laconic jewelry in complementary shades of the main color.
Required:
- Fringe with hanging elements.
- An awl if the material is very thick.
- Threads to match the hat.
- Glue for straw models.
Progress:
- We measure the fringe with a length equal to the circumference of the edge of the brim.
- We sew the fringe on the underside of the hat brim, piercing the material with an awl or thick needle if necessary.
Important! Felt hats should not be decorated with glue. These hats last for years and decades, and the remaining glue from the felt is completely impossible to remove!
Brooches, flowers
Compositions of silk flowers, various berries, shells, brooches can decorate any model of hat, but try not to overload the headdress.
Suitable for all models, including tablets, cloches, and pork-pies.
Reference! “Cloche” is a bell-shaped hat with lowered brims that fits tightly around the head. “Pork Pie” is a hat with a low crown and a brim that is curved upward and slightly flattened, in the manner of a “pie.”
Required:
- Brooches, old earrings, pendants, beads.
- Flowers, leaves made of non-shattering material.
- Other decorative elements matching color and style.
- A piece of felt or leather, suede for making a brooch.
- Safety pin for a brooch.
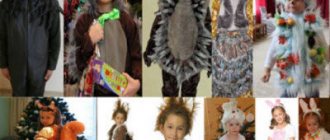
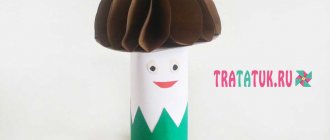
Master Class. Carnival costume “Boletus Mushroom”
From the Author: “New Year is a wonderful holiday with a lot of joyful chores - gifts, festive table menu - everything needs to be thought through, bought, made! And, of course, an important part of the holiday is carnival costumes! My friend’s sons, twin first-graders, are participating in a New Year’s performance. The characters, I must say, they got some intricate ones - “Boletus Mushroom” and “Komarik”! A friend tried to buy suits, but it turned out that finding beautiful suits in the right size was not so easy! As a result, I made the “Mushroom” costume. So, “Boletus Mushroom”... I’ll say right away that other “mushrooms” can be made in this way. For example, "Amanita".
The costume consists of a hat, trousers, turtleneck and cape. This option is suitable for both boys and girls. The costume is quite simple to make. The materials are also easy to choose. In a mushroom costume, “it’s all in the hat”!
For production we will need:
- a hat with a wide brim (preferably with a hat braid along the inside of the crown). It is important that the brim of the hat is not curved!!!
- brown fabric - 0.6 m
- fabric (preferably knitwear) white or light beige - 0.5 m
- proclamelin (can be replaced with white calico or non-adhesive interlining)
- 0.8 m - synthetic padding (you can use scraps)
- 0.5 m - brown and white threads, scissors, needle, pins, measuring tape or ruler;
- wish. patience and time" ...
Master class review
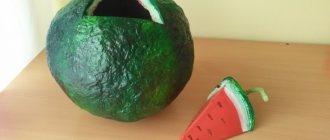
01. First, we select a suitable hat. We “found” straw in the pantry, but felt would also work. There are plenty of suitable, inexpensive hats on sale.
02. Let's start cutting the top and bottom parts of the hat. We put the hat on a brown fabric (I picked up the lining - a good, calm shine and inexpensive) and outline it with chalk. Then add 8-10 cm around the circumference and draw a circle.
Let's cut it out. This is the top part of the mushroom.
03. For the lower part we take white or light beige fabric. To simplify the work, it is better to use knitwear. In the future, we will need to “clean” the hole for the head, so the fabric must be elastic. You can use an old T-shirt to great effect (and it's great if it's no longer stark white!).
So we put the hat on a white cloth, outline it with chalk, then add 3-4 cm and draw a circle. Cut it out.
Why are we adding less than the top circle? The volume of the top part of the hat will increase significantly during the “mushroom formation”.
Turning the hat over, place a white circle on it and mark a hole for the head with chalk. Don't forget to add 3-5 cm to the hem! It’s better to make extra stock - then we’ll adjust it. Cut a hole.
We're done with the cutting - let's move on to the next stage.
04. Next, “form a mushroom.” To do this, we take padding polyester - we used scraps - and “loose” it.
05. We cover the hat with padding polyester, grabbing the edges of the hat.
The result is something like this.
06. Now we take proclamelin (or white calico - you can use an outdated pillowcase, for example) and cut out a circle 10-15 cm larger than our blank. The size of the circle should be enough for this. to completely wrap the hat.
We cover the hat with a proclamelin, aligning the center of the circle and the center of the hat. Using pins, pin the proclemelin to the padding polyester along the edges of the fields. Turn the hat over. We lay a thin layer of padding polyester on the back side of the hat brim.
Now you need to secure the proclamation along the edge of the crown from the wrong side. We lay the folds and pierce them with pins.
07. Cut off excess fabric.
We sew the proclamelin with large stitches to the hat.
08. We got this mushroom shape.
This preparation is also suitable for fly agaric.
09. And we continue to sculpt the boletus. Take the previously cut brown circle (top of the hat). Place it on the mushroom, aligning the center of the workpiece and the circle. Pin along the edges.
10. Turn over and from the back of the hat, evenly (step - 4-5 cm), attach the fabric with pins to the workpiece. The fabric should go around the edges of the hat with a margin of 2-3 cm.
To ensure that the fabric lies evenly, first pin the pins crosswise, then divide the circle into eight parts, etc.
11. Now the fabric needs to be carefully sewn around the circumference with an “over the edge” seam.
12. Next, we need to “cleanly grind” the lower part of the mushroom: we place the mushroom on the previously cut out lower part and, if necessary, cut off the extra centimeters.
The hem margin should look like this.
13. Important! Before cutting off the excess, check the alignment of the head hole! I always remind you: “Measure seven times...”.
14. After this, you can and should pin the fabric around the circumference with pins in increments of 4-5 cm. We do it this way - we bend the light fabric, overlapping the seam on the brown one. The principle is the same - criss-cross, etc.
15. Next, sew the bottom of the hat with a blind seam.
16. It remains to process the hole for the head. We make small notches around the circumference.
17. Then, bending the fabric, we pin it with pins.
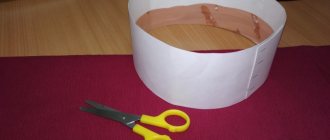
18. We were lucky - our hat has a hat band, which makes finishing the edge much easier.
If you choose a hat without a braid, sew a hat braid or any elastic one along the edge of the crown from the inside - it will be much easier to sew knitwear to it.
This is what it looks like.
19. And, the final touch - we sew the jersey to the hat braid with a hidden seam.
It is quite inconvenient to trim a hat around the crown from the inside. That is why it is better to use elastic fabric or knitwear - it turns out smooth and neat!
20. One more small nuance: the carnival hat should fit tightly on the child’s head (after all, he will jump, run or dance!), and, at the same time, not squeeze the head. If your hat is slightly larger than the required size, lay a strip of synthetic padding of suitable thickness along the edge of the crown before finishing the inner edge.
Now let's look at the result!
21. Well, the most important part of the costume - the hat - is ready. There is only one small thing left - to dress the child!
A matching white turtleneck was found in the children's wardrobe. It can be replaced with a light shirt or long-sleeved T-shirt.
The cape shirt front was “inherited” from the previous costume. In principle, you can cut such a cape from any suitable piece of fabric and sew on ribbon ties. Or choose a light vest.
But I sewed the trousers from the same jersey as the inside of the hat. Again, after rummaging through your wardrobe, you will probably find some light-colored trousers or jeans; and leggings are also suitable for girls.
The “Basic Set” has been assembled. Let's add accents. I added "grass" to the bottom of the pants. For this I needed yarn, which is called “grass”. The color is brown-green melange (very suitable for boletus!).
We randomly lay out the grass along the bottom of the trousers by hand or in a large zigzag on a machine. If you “accent” your child’s jeans or trousers, which he will continue to wear in the future, it is better to sew on the decor by hand - this will save the fabric and make it easier to rip off later.
22. I also added “along the blade of grass” along the edge of the cape and along the sleeves of the turtleneck. Slightly….
23. You can choose a different yarn, both in color and texture. You can also use braid, cord, fringe, etc. for decoration...
Imagine! And don’t forget to wear appropriate shoes for your child! Every little detail is important in a suit!
Happy carnival to your child and success in your creativity!
Ideas for hats and materials from which they can be made
Making hats from scrap and artistic materials is a very exciting creative process that will also give you great pleasure from the result. Everything can work out for you if you carefully decide on the choice of style and design!
Firstly, you should choose high-quality and optimal material. And the highlight of any headdress will always be an additional element. This can be a fringe sewn along the edge, a ribbon edging, lace, appliques, beads and pearls, buttons, artificial flowers and even small birds, metal figurines, toys, and decorative fittings.
Paper hats
For paper products you will need material of different densities and suitable colors. It is better to choose large-format paper, especially if you plan to create a large, voluminous hat - for example, a Panama hat. This product can be disposable if you do not plan to wear it for more than a few days. It is convenient to make such a headdress on the road, on the beach, on a hike, when there are no conditions for sewing, and covering your head from the wind and sun is very important.
If you find a suitable sheet of thick paper (for example, Whatman paper), we can say that the trick is in the bag. That is, we immediately begin drawing the drawing according to the head measurements and then - depending on the design. The main thing is that there is enough material for sufficiently wide margins and additional details.
Cardboard hats
Cardboard is a cheap and convenient material from which it is easy to construct almost any type of headdress. It is more practical than paper; it can be covered with fabric, fur, mesh or colored film, and painted.
Cardboard makes great hats for carnivals and parties. Cutting a cardboard headdress requires nothing more than attention and a good pattern.
Fabric hats
Panama hats, fedoras, felt and fur hats – the choice of varieties is quite large. You can cut a knitted hat if you don't know how or don't like to knit. The simplest option is the classic beret. It can be sewn from felt, leather, knitwear, tweed and even silk.
A strictly defined business hat requires attention to cut and precise measurements. But it can also be made from improvised means - update an old hat by covering it with new fabric, add decorations to it - and now it will no longer be recognizable!
You can also make a winter hat with protective “ears” from fabric, and this does not have to be earflaps. A classic women's hat may have spare compartments with warming flaps.
How to make a stylish hat with your own hands
If a creative impulse has struck you and you are ready to make a hat, do not be afraid of experiments and first trial options with errors and miscalculations. The main thing is to start, and then your hand and eye will tell you how to cut and sew correctly. Understand your preferences, check the size of the person who will wear the hat - and go ahead!
Explore your stash of fabric, scraps, different decorative beads or unexpected details that can be placed as decoration on a hat. The combinations can be the most surprising. A huge selection of decorative fittings is now on sale. Use ribbons to decorate the crown, use contrast stitching on a machine - it’s very beautiful! Hats with brooches and lace look very advantageous if used sparingly.
You must be able to wear a headdress - boldly, confidently, in the appropriate environment, and then it will delight you and those around you with its individuality and beauty.
We hope that our ideas and suggestions will help you diversify your wardrobe and add some zest to it with the help of an elegant and unique hat.
If you want to further improve your hat-making skills, then there are numerous shops with handicraft supplies at your service. There you can purchase a variety of materials in texture and composition, patterns and get a lot of interesting design ideas. Also, don’t deny yourself the pleasure of leafing through an extra issue of a fashion magazine – fashion designers often pleasantly surprise you by offering very fresh and original styles.
Batik superhero cape (from 2 years old)
The cloak is the second important item with which you can quickly create any carnival costume. The author of the idea suggests taking a pillowcase for simplicity - but you can, of course, get by with a piece of fabric of the right size. And if you have several children, choose an image that can be “replicated”, and let each one draw a cape for themselves - in a common color scheme and style. Halloween at home will be unforgettable!
Materials:
- White pillowcase
- Oilcloth or large trash bag
- PVA glue
- Acrylic paints
- Tassels
- Bowl of water to wash off the soluble glue
- A stiff brush, such as a nail brush
- Needle and thread
- Velcro fastener
- Lay the pillowcase on an oilcloth or trash bag.
- In the middle of the pillowcase, use glue to draw or write something.
- Dry the item completely (this may take 1-2 days).
- Dilute acrylic paints with water (approximately 1:1).
- Paint with thinned paints over the pillowcase and adhesive design.
- Dry completely.
- Place the pillowcase in a bowl of hot water for an hour to soften the dry glue.
- Scrape off the glue with a stiff brush.
- Dry again.
- Sew Velcro onto the pillowcase so you can close the cape around your neck.
All of the techniques described here that can be used to create Halloween costumes require time for the glue and paint to dry. So don't put off making your own Halloween costumes until the last day - start this coming weekend!
Question answer
Yes, if you do not plan to work in this room all day. In this case, it is better to do the appropriate styling and hairstyle, which will allow you to remove the hat and put it on the shelf before leaving. There is no rule for female guests to take off their hats in the home or office.
Yes, sure! Today you can wear it with a veil, and tomorrow you can wear a veil of a different color. Feel free to wear badges on your hat that match the color and design of today's suit or dress. Nowadays, badges with lettering are popular - various inscriptions, slogans and even aphorisms. For the most daring, there is an option - a brooch with a feather or rhinestones.
Of course, this will be a very fashionable option! Despite the relative labor intensity of the work, such a patchwork will look irresistible, especially in the case of a cowboy hat or bandana.