Collecting flowers
Let's try to make cone flowers. We cut out squares with a side of about fifteen centimeters from wrapping paper. We roll each one into a little bag and secure it with a small piece of transparent single-sided tape. We put candy inside, preferably a round one or a truffle. We stick a wooden skewer into it, wrap the edges of the bag, and also secure them with tape, wrapping it around part of the skewer. We mask the tape with decorative ribbon. We got a flower-cone with an empty tip and a candy at the base.
Truffle flowers in bright candy wrappers. Take the candy, place a skewer on the tail of the candy wrapper and twist it tightly around the skewer. We wrap the cuttings with tape on top.
Cylinder. For this, it is also better to take a round or oval candy in a candy wrapper with a tail. Cut out a 10 by 20 centimeter rectangle from transparent or colored paper and wrap it around the candy so that it is in the center of the cylinder. We wrap the lower edges of the cylinder around a skewer and secure them with tape or tape. We tie the free end of the cylinder with packing tape.
Round flowers. Cut out a paper rectangle, the same as for the cylinder. Place the candy in the center of the rectangle and place a skewer on it. Wrap the edges of the paper around the skewer and secure with tape. Decorate with tape. If desired, add corrugated paper petals.
DIY candy stroller.
What you will need for work:
- Thick paper;
- Ruler and pencil;
- Scissors and stationery knife;
- Drop-shaped and round candies from a box (in foil);
- Skewer and needle;
- Double sided tape.
A stroller made of candies - a master class.
We cut out a strip of paper 1 cm wide, 9 cm long. Along the edges of the strip we retreat 5 mm, and draw a mark, then the mark must be placed at a distance of 9 mm from the first line, then according to the following millimeter pattern: 9, 9, 9, 9, 9 , 18. Strips of double-sided tape should be glued to the ends. All lines must be drawn using a ruler and a needle (apply a ruler to the line and draw it with a needle).
We bend the workpiece along the lines we ran.
We glue the workpiece according to the photo below.
Take the next strip of paper, 1 cm wide, 6.9 cm long. We run it every 9 mm.
Fold according to the photo below. We insert this part into the upper compartment of the main workpiece.
We take another strip 1 cm wide, 4.9 cm long. We run every 1 cm.
We fold this strip according to the photo below. We insert this part into the lower compartment of the main workpiece.
In each formed compartment we insert a drop-shaped candy in foil, 5 pieces in total.
Next, cut a piece of similar paper 5 cm long and 1 cm wide. We wind this strip onto a skewer. And glue it with double-sided tape in the main workpiece.
We cut out a piece of paper 8 cm long, 1 cm wide. We run on the left side every 5 mm, creating 6 running lines, then the same 6 running lines need to be made on the right side. Thus, there will be a free space of 2 cm in the center. We glue double-sided tape along the edges.
We bend along the running lines according to the photo below. Glue it together.
We cut out two strips of paper, 1 cm wide and 5 cm long, and screw each of them onto a pen or felt-tip pen. We insert the resulting rings into the previously created blank. We insert a couple of round candies in foil here.
We glue the two blanks together using double-sided tape (see photo below).
If you wish, you can print out small frames-chips with your congratulatory text on the printer and glue them to the top of the stroller.
A trick for a girl. A trick for a boy.
This is the result!
A stroller made of candy.
Baby stroller made of candies and paper.
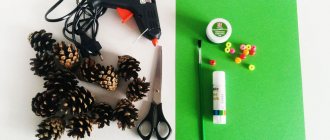
Materials and tools
Bright packaging of sweets, decorative paper and satin ribbons will help turn your ideas into reality.
- confectionery (sweets, marshmallows);
- a set of multi-colored corrugated paper;
- foil;
- wrapping paper;
- wooden skewers;
- polystyrene foam for fixing products;
- scotch;
- decorative vase, flower pot;
- satin ribbons of different sizes;
- wire of various diameters;
- scissors;
- pliers;
- glue;
- glue gun
Good imagination and a little creativity allow you to create a sweet gift that will remain in the memory of people close to you for a long time.
Additional decorations can become a kind of highlight in the bouquet.
The original use of natural materials can highlight your refined taste. For small children, it is recommended to add soft toys. They will be the main element in the composition.
A glue gun helps to secure some parts together. The main requirement when creating a sweet bouquet of candies is that the elements are correctly selected. There should be no unnecessary decorative elements here.
Carrying out preparatory work
The use of a “ship” involves the use of a fairly powerful spinning rod, with a dough of 100 to 200 grams. There are times when you have to pull out fish not with a spinning rod, but with your hands.
For such fishing conditions, it is possible to use an inertial reel, dating back to Soviet times with an open drum. As a rule, fishermen use a “Neva” reel with a drum, which holds a lot of fishing line.
Any strong fishing line of appropriate diameter will be suitable as the main fishing line. The thickness of the fishing line has no effect on fishing performance. The diameter of the fishing line for leashes is selected depending on the size of the intended prey. For normal fishing conditions, it is enough to have leashes with a thickness of 0.12-0.15 mm. If you intend to catch individuals weighing up to 0.5 kg, then it is better to choose a fishing line with a thickness of 0.18-0.2 mm.
How to make a bouquet of Raffaello sweets and organza
Sweet bouquets decorated with organza look very delicate. To create it you will need Raffaello candies or other round candies. This bouquet looks airy and voluminous. Keep in mind that organza is a fairly expensive material, and to decorate a lush bouquet you will need at least three meters of it. Wire or skewers are used as a stem.
- Each candy must be wrapped in golden foil or corrugated paper. The candy is attached to a skewer or wire.
- Wrap the flower stem (skewer or wire) in foil too.
- Let's start decorating the flower, cut out small pieces from organza, about 20 by 20 cm. Wrap each candy and tie it with a golden ribbon at the base. Make the rest of the flowers for the bouquet in this manner.
- We combine the flowers into a bouquet by wrapping the stems with tape.
- We decorate the bouquet with organase, decorating it with ribbon, beads or rhinestones.
Bright, spectacular handmade bouquets of sweets will delight and bring joy to those for whom they are intended. Don't be afraid to experiment and use your imagination when creating a sweet present.
Sweets and flowers are a pleasant gift, which, however, can cost a considerable financial investment.
If you want to surprise a loved one and save money, you can make beautiful flowers with sweets yourself.
Before starting work, you need to decide on the type of bouquet, choice of flowers, materials and treats.
Styrofoam river steamer model
After purchasing modern proportional radio control equipment, even before building my first aircraft model, I realized that the equipment provides quite a wide range of possibilities. I immediately wanted to have not only aerial models, but also ship models, as well as adapt equipment for remote wireless launch of sports model rockets. Of course, I didn’t grab onto everything at once, starting with ship modeling. Drawings of an American river steamship from the late 19th century were chosen as a prototype. I don’t have any experience in ship modeling, so for the first model I chose sheet foam plastic (ceiling tiles, laminate backing) as the material. This material has proven to perform very well during the construction of aircraft models, it is very easy to process, and when designed correctly, the models are quite rigid. To be fair, it’s worth noting that you probably can’t call this a model, at least real ship modelers would spit on it. As far as I know, in ship modeling there are no such divisions as contour model/trainer/half-copy/copy. There are either sports boats that participate in various classes of competition, or bench modeling, where the model is made of wood and is a copy (which, however, does not prevent you from installing electric/gasoline and even steam engines on them and launching them into the water). I assembled my model with the goal of probably trying it out, learning to read ship drawings, well, as I wrote, since I already have the equipment, why not. First, a little history. I’ll say right away that I wasn’t able to find much. This is a model of the paddle river steamer Marieville, built in 1886. The steamship plied the Mississippi River on a 1,200-mile route from St. Louis to New Orleans. On the first deck there were cargo rooms, staff cabins, a wood-burning steam boiler and a high-pressure steam engine. On the second and upper decks there were luxurious seats for passengers. On top was the captain's cabin of the so-called “Texas” type. The ship flew two flags: the flag of the Confederate States of America and the Confederate Navy flag.
At this point, a person knowledgeable about the ship’s topic has already rolled up his sleeves and is ready to explain. Preventing this, I will do it myself. The fact is that from the point of view of shipbuilding, this ship has only one deck. This is the lowest one, which is also the main one, and what’s funny is the upper deck. Everything that is on this deck is called the superstructure, and its levels are called tiers. However, in the literature, when describing such designs of steamships, the term “deck” is still used, so in order to avoid confusion among those who are as little informed as I am, in the process of description I will simply call it “lower/first deck”, “second” and so on . Well, in the course of the article I may be mistaken in terms, although I studied it, you can’t learn everything at once.
Anyway, let's get started. First of all, let's start with the drawings. You can download them from the link at the end of the article. I immediately advise you to print the drawings, firstly, in two copies, hang one on the wall and check it during construction, secondly, cut out patterns, and secondly, print on drafts, because it will take a lot of sheets (18 per drawing, and there are two of them in two copies). There will be some adjustments required during the printing process, especially for the third row. It is most convenient to glue printed drawings with “pencil” glue.
Construction begins with cutting and assembling the keel, stringers and frames. Since foam bends easily, I started assembling them directly on the backing sheet.
It was assumed that the edges would then be tucked in and thus the side skin would be formed. However, it turned out that it was easier to do this by gluing it separately.
By the way, what to glue with. If you have never worked with ceiling tiles, glue them... with glue for ceiling tiles) It is available under different names, Titan, Dragon, just say “glue for ceiling tiles” and they will give you what you need. It is usually sold in bottles of 250, 500 and 1000 ml, I advise you to take 250 for the first time, such a bottle (diluted, see below) is enough to assemble 3 aircraft models.
This glue is alcohol-based, so the foam does not corrode. Contact glue means that it must be applied to both parts to be glued and allowed to dry. Out of the box, the glue is very thick and, although suitable for working with small parts, is not good, so it needs to be diluted with 95-96% alcohol. If you have a question about where to get it, I’m sorry, that’s a separate conversation. Here it is sold in every pharmacy, but I have no idea where to get it in Russia or other countries. An alternative is to replace it with isopropyl, but keep in mind that, unlike methyl glue, it is not only harmful to health, but actually toxic; it will be impossible to work indoors with such glue. During storage of the glue, it will have to be diluted a little more from time to time, since it manages to dry out even in a tightly closed container. That’s why I don’t recommend taking liter bottles right away. Let's continue. The excess is cut off, it is very convenient to process the edges of the foam with “disposable” nail files, you can get these from young ladies who do manicures, and they will give you money for a chocolate bar. Well, or buy them, they cost some indecent pennies.
But this can be done with a small block of sandpaper. In the places where the trim parts meet, I glued pieces from the same ceiling. I filled the joints with epoxy resin (it doesn’t take much).
Next lay the deck. I made the aft part of the deck from plastic, in my case from foamed PVC, since the engine with gearbox and paddle wheel will be mounted on it.
The deck has a complex shape with curves in all three planes, although I'm not sure I read the drawings correctly. I don’t think sailors should roll off the deck on the bow like that)
We are building the first “floor”.
A “front” staircase leads to the second deck. There are no other ways to get there. Most likely, after boarding, passengers should not go down to the lower, technical deck.
We are laying the second deck.
Along the sides, the second deck is supported by beams. I cut them out of the same foamed PVC.
We mark the outlines of the premises on the second deck.
We will then glue the “walls” of these rooms along them, and this is also necessary to cut out a window through which the power plant, battery, electronics, etc. will then be mounted.
As you may have noticed, I immediately paint along the way. I thought it would be easier this way. Regarding painting. When choosing paint for foam plastic, you should be guided by the same principles as when choosing glue. That is, only water or alcohol based. The simplest and cheapest option is the so-called panel varnish. This is a water-based acrylic enamel. The enamel itself is milky in color, but after drying it becomes transparent. The required color is achieved by mixing this varnish with the required color tints.
We are building the second floor and laying the third deck. Windows, doors and name are printed on special self-adhesive printing film. The railings on the lower deck are made of bamboo skewers.
On the third deck we also cut a window for installing electronics.
The supports for the third deck are made from the same bamboo skewers. The handrail is made from shoe nylon thread. I cut out the curly “curtains” (I don’t know what they are called) with curly scissors taken from a young lady I knew.
Superstructure on the third deck. It has a restaurant.
Above it is the captain's cabin.
To make the superstructure rails, toothpicks and the same nylon thread were used. But to make them, it was necessary to make a small device.
The upper deck closes like a lid; for this purpose, magnets from headphones are glued into it, and small tin plates from a tin can are glued into the “lid.” To ensure even positioning of the “lid”, stops made from scraps of skewers are glued.
Let's move on to making the paddle wheel. I made the first wheel from the same PVC and sheet polyethylene. In the end, I ruined this wheel and had to make a new one, but since I ruined it through my stupidity, I add it anyway.
The new wheel was made from the same skewers and fiberboard. However, this time I decided to make a device for assembly. The lesson is tedious and long, but in the evening I collected it under the “Moonlight Agency”)
Now the wheel needs to be installed. I couldn’t find any suitable bushings, so I made them from copper wire.
If anyone doubts the reliability of such bushings for models, I want to say that Abramov proposed this idea in the book “Homemade Steam and Electric Engines” in 1946.
Next, install the wheel on the model.
And we finish painting.
Conclusion
I think the modellers noticed that the model is not complete in terms of copy. Pipes and some design elements are completely missing. Honestly, I’m blown away by how diligent a person I am, but even I find it difficult to sit on one job. This work gave me a new respect for real modellers. I’m afraid if I don’t publish it now, I’ll never publish it, because everything will simply be lost in the jungle of archives.
However, there are plans to install an electric drive on the model, which is clear from the introductory part. So, this model will definitely float, I won’t let all these hours of work go down the drain, even if the work is not completely completed.
To summarize, I want to say that this brought me at least experience. It’s unlikely that I’ll take on something like this in the near future, but when I do, I’ll definitely make it out of wood and with a steam boiler. One way or another, I won’t say that it was difficult at all, everything was done in my free time and for pleasure.
You can download the drawings here: marieville.rar [10.34 Mb] (downloads: 23)
Well, that’s all, and good luck to everyone in their creativity!
Become the author of the site, publish your own articles, descriptions of homemade products and pay for the text. Read more here.