Origami heart made of modules
The next step will be a modular heart.
For this figure we need to prepare 370 red modules.
We begin to fold the figure from the base of 5 corners.
Starting from the second row, we add 5 more modules, i.e. we already have 10 corners. In the next rows we continue to add 5 models.
Thus, in the 4th row we should have 20 corners. Now we need to visually divide the workpiece into 2 parts. After this, we add 1 triangle opposite each other, thereby giving the figure a heart shape.
In the fifth row we add the same number of modules, without changes. But the sixth row will increase by 4 corners, i.e. you also need to place 2 modules opposite each other.
We continue adding in the 7th row. To do this, in the place where 2 modules were added in the 6th row, we attach 1 more corner:
Our blank has acquired an oval shape. We are on the right track. Repeat the 8th row similarly to the 7th. And we assemble the 9th and 10th rows without adding modules. Now we return to the 8th row, to the place where the modules are added. We need to add 4 triangles to these places, in the next row we add 3 corners, then again 4. In total, we should get 7 rows on each side of the workpiece:
The last row should consist of 2 modules. Then we bend the resulting structures to the middle of the heart:
Now we fill the empty spaces with modules.
Gently squeeze the workpiece so that there are no gaps at the top. The result should be a heart like this:
If suddenly during your work you have difficulties with the origami heart figure, the video will help you figure it out and facilitate the assembly process:
Modular origami paper heart
The next option is more suitable for those who already have an initial understanding of origami and have managed to get their hands on it.
Such figures are assembled from separate module parts, inserted into each other in a special way. The finished product looks impressive and turns out very beautiful, voluminous, and bright. Can act as an independent gift.
Often in modular origami several colors of modules are combined, alternating them with each other.
You will need to prepare the component parts in advance; their number directly depends on the size of the craft. Assembling the figure begins from the bottom, gradually adding modules with each row.
In order for your heart to make you happy for as long as possible, many recommend gluing it.
This technique requires even more concentration and patience. Its production will take significantly longer than previous figures.
Don't give up what you love. Even if you don’t succeed the first time, try again and you will succeed! Don't be afraid to learn new techniques and experiment.
Let's go into the world of modular origami
to make
a paper heart
in different ways. Let's start with the simple and end with the complex option.
Hearts made from modules can be given as a gift for Valentine's Day or for any other occasion. They are suitable for room decoration. Not many parts are required to make each model. Prepare them in advance so that nothing distracts from the assembly.
Heart bookmark
Well, for romantic people who cannot imagine their day without reading another masterpiece, a heart bookmark is simply necessary.
Making such a cute book reading accessory will definitely lift your spirits every time you open a book. Such a bookmark can be given, for example, on Valentine's Day as an expression of your warm feelings. Be sure to try making this cute bookmark:
The heart shape is widely used for making a variety of crafts. Greeting cards for newlyweds or lovers are often made in the shape of hearts. If you want to tell your loved one about your sincere feelings, you don't have to buy expensive gifts. Master the origami technique and try making paper hearts
.
Heart made of beads in step-by-step lessons (photos and videos)
Bead weaving is a simple and exciting activity that will allow you to create unique products and is suitable for both beginners and experienced needlewomen. Traditionally, many craftswomen decide to weave a heart from beads before Valentine's Day.
Wicker hearts are used as memorable souvenirs and holiday attributes. However, a beaded heart can become the basis of a unique romantic decoration.
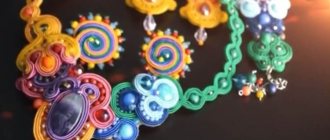
Having mastered our master class, you will be able to make unusual earrings and a pendant, which will be a wonderful addition to an evening outfit or a wonderful gift for a girl for any occasion.
So let's get started!
Weaving a pendant in the shape of a heart from beads
To weave a pendant we will need:
- thin red fishing line (more suitable for creating jewelry than wire);
- small red beads;
- special needle;
- scissors;
- Accessories for the pendant - cord, clasp.
To weave a heart-shaped pendant, we will need to master the brick weaving technique. When creating products using this technique, the beads of the new row are attached to the fishing line, and not to the previous row (the arrangement of the beads in the finished product is somewhat reminiscent of brickwork, hence the name). The weaving pattern in this technique is quite simple:
Take a piece of fishing line 50-60 cm long and thread it into a needle. You need to string 3 beads on it. Then go back and thread the line through the first two beads again, as shown in the photo:
Tighten the thread. You form a small triangle.
https://www.youtube.com/watch?v=66vsrETEw7o
Now take 2 more beads and start brick weaving. To do this, you need to string the beads, pass the needle under the fishing line between the two upper beads of the triangle, and thread the fishing line through the last bead that you strung. Gently pull the product so that the tension is even, but not excessive. Then take another bead, pass the line under the same loop and pass the line through it again. In other words, in one place you need to make two “bricks”: the first will have 2 beads, the second will have one. Everything together should form three rows of beads - a triangle:
Paper heart using origami technique
If you squeeze in the central part with your fingers and then press down, you should get a voluminous triangle on one side.
Do the same on the other side.
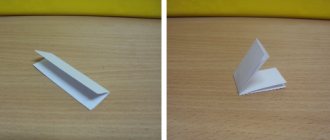
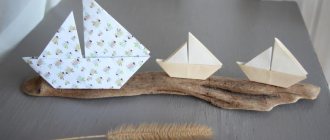
You don't have to make complicated heart-shaped crafts. Try also making a simple heart from a rectangle with your own hands. To do this, you just need to fold the paper correctly.
The craft is done in a few minutes.
Heart-shaped paper envelope
Now fold the side edges as in the photo, and you will get a heart-shaped shape for the envelope. Using the same technique, you can make a garland of paper hearts.
Braided paper heart for beginners
This craft can be done even with small children who will learn to alternate colors.
Do-it-yourself volumetric heart
Volumetric hearts can become a real decoration of the wedding table and serve as bonbonnieres.
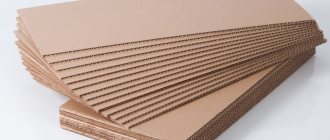
Working with paper is very convenient, so even without special skills you can make an original heart-shaped craft. hearts with your own hands from blank, corrugated or office paper
.
This handicraft technique is gaining more and more popularity among children, youth and adults. It’s so exciting to make crafts and souvenirs with your own hands. And the basis is paper, which is found in every home. You can add romance to your relationship or simply please your loved ones with the help of a heart made using the origami technique. In the photo in our gallery you can admire the paper hearts made using this technique.
Photo of a heart for a wedding
A wedding is a celebration of two hearts in love who have decided to live the rest of their lives with each other. Newlyweds dream that every person present at their celebration will receive a lot of pleasant impressions. Decoration is what will make your wedding different from other celebrations.
Unusual decor includes a variety of details. Hearts are also included in this list, because they are considered a symbol of strong relationships and pure love. You can make different hearts right at home with a simple set of materials!
Such decorations look very festive and interesting. You can decorate wedding tables, party halls, invitations, and so on with such figurines.
Preparation
Before starting work on the product, you need to prepare the materials at hand. Regardless of the complexity of the workpiece, there are no requirements for the list:
- Colored paper (single-sided, double-sided).
- Scissors, ruler, simple pencil.
- Schemes according to which you will fold
- Any metal object with a sharp rounded end (knitting needle, nail file, refill from a used pen, etc.).
Using the tools from point 4, you can fold a craft from thick cardboard without much difficulty. When using thin paper sheets, this item can be omitted.
Types of hearts
What types of origami are there and how to use them later? We have selected several ideas for origami hearts:
You can make a simple heart and use it as a valentine. And you don’t have to wait until February 14th. Such a romantic gift is perfect any day.
This heart-shaped bookmark will appeal to those who love to read.
You can put a note or a small gift in the envelope heart.
A heart-shaped box will perfectly complement the main gift. Or it will become a box for small items.
Do-it-yourself voluminous Valentine’s card – video
I think that after watching the video, all your questions should disappear and you will have a great desire to repeat the idea step by step and make a postcard for February 14th with your own hands, inside of which there will be moving hearts. Make such a Valentine's card for your mom, boyfriend or girlfriend, surprise them with an original gift. Leave comments and share the article on social networks.
I look forward to visiting you again, your Nina Kuzmenko!
A postcard like a heart, made by yourself. Photos of finished postcards.
Valentine cards in the shape of hearts have become almost the most popular cards that all couples in love exchange with each other on Valentine's Day. But why not present such beauty to your man or woman on any everyday day, showing all your love and warmth of feelings. Such a cute heart-shaped card, presented to your chosen one, can create a wonderful mood in a couple of moments and set you both up for a romantic wave. Making such a heart card is not at all difficult. Today, there are many options for techniques for its implementation, and there are plenty of materials from which this attribute of love can be made. If you decide to look at photographs of this kind of postcards, you will be surprised at how diverse and imaginative such postcards can be. An easy way to create your own valentine card. In this case, it will be a large heart made of a cardboard base, onto which you glue many small hearts cut from red and burgundy colored paper. These hearts can have different sizes and differ from each other in their shape, so the card will look more original. By the way, it can be used to decorate a romantic dinner or create a romantic mood in your bedroom. You can make a cute felt heart, pierced with an arrow. We make the arrow from a cocktail tube. We cut out a triangle from the same material as the heart, which will serve as the arrowhead. We cut one end of the tube in half lengthwise, so that a triangle can be inserted there; it is better to glue it. At the opposite end of the tube we attach feathers. We make neat cuts in the heart and insert an arrow there. If it is expected that your lover will carry your heart with him, an option with photos of you together glued to a postcard will be suitable. Photos need to be cut out so that only your faces nearby, possibly kissing, are visible... Due to the fact that the size of the postcard is not large, the entire photo will definitely not fit there, but this way you can make a mosaic from excerpts of photographs. Inside the card, of course, words of love must be written, otherwise, why give such an intimate gift. From two hearts made on cardboard of different colors, for example, red and yellow, and the red heart is larger in size than the yellow one, we make the following card. We glue the yellow heart onto the red one, and in the center of the composition we attach a bow made of golden ribbon, as a symbol of hearts tied forever. You can fantasize and invent new versions of such postcards endlessly. Perhaps after a while your loved one will have a whole collection of such beautiful valentines. Don't stop giving each other your love and care, and your journey together will be long and happy!
Comments
Simple circuits
So, we've looked at a few ideas. Now let's start implementing them. First, let's look at simple patterns for folding hearts for beginning craftsmen. After you learn how to fold them, you can safely proceed to more complex things.
Even though the pattern is very easy, practice on a scrap piece of paper. And learn, and don’t spoil the sheet.
Take a square-shaped piece with the colored side down. Fold both sides of the square diagonally. There should be a cross in the center. We bend one corner to the middle of the square. The top is an inverted triangle.
We bend the opposite corner so that its tip is in the middle of the “base” of the small triangle. Mark the bottom middle of the base. Fold parts of the figure up on both sides. We bend the corners of the heart on the sides and top to give the product roundness. Ready.
Another simple and straightforward method you can use if you don’t know how to make an origami heart with your own hands. To do this, you can find a blank (scanning) on the Internet. Then print on colored paper or cardboard. Glue the required sides together. The result is a heart-shaped box.
Option 3. Decorate the box
In order to decorate the box beautifully, you need to purchase a gift in a heart-shaped package. But giving it in a regular wrapper is not so presentable, so you can experiment a little and make a beautiful gentleman’s heart.
Necessary materials:
- Colored paper in black, red and white;
- Marker;
- Glue;
- Scissors;
- Red satin ribbon.
We recommend reading:
- Cut out a black, red and white heart from paper. They should be the same size as the box.
- Cut out the middle of the black heart, leaving only the edges. Cut off a small tick at the bottom of the red heart and a larger tick at the top. These checkmarks should be made from white paper.
- Let's start gluing. Glue a red heart onto the lid. We fill the voids with white paper - these are two ticks. Glue a black heart around the edges. Draw buttons with a marker. Glue on a satin bow.
Photos of heart crafts will allow you to create a craft step by step. This makes it much easier to create beautiful decorations and make different cards.
Modular origami
If you want to surprise with your skill and please with an unusual gift, make a modular origami heart. Let's look at how to implement this idea step by step.
A module consists of many small parts connected to each other in a certain order. For a medium-sized solid heart you will need 80 triangular modules.
Divide A4 size paper into 24 parts (long side into 8, short side into 4). We get rectangles. We fold them according to the diagram (insert photo)
Having made the required number of blanks, we proceed to assembly:
- 1 row – 1 module,
- 2 row - 2 modules.
- Next, the serial number of the row is equal to the number of modules in it.
- 10 row - 10 modules
- Row 11 – 4 modules on the left, skip one, 4 modules on the right. The outer parts in the 10th row on both sides should remain free.
- Row 12 – 3 modules on each side.
- Row 13 – 2 modules each
- Row 14 – 1 module each.
We looked at detailed master classes and showed how to make an origami heart. Products using this technique are quite simple, but very beautiful. Don't miss the opportunity to please yourself and your loved ones with a handmade creation.
The first stage is preparatory
Now you will learn how to make origami hearts. Start with the prep work.
- On a piece of colored paper, draw a template in the shape of a square. To do this, measure the width and set aside the same length along the length. Draw a line perpendicular to the long sides, and then use scissors to cut off the excess paper.
- Fold the square in half with the right red side up to mark the center line, then unfold it back.
- Rotate the workpiece 90° around its axis. Fold it in half to create a two-layer pattern. The fold should be located along the top horizontal line.
The workpiece is ready for further work.
Photo of origami heart
Paper heart. Origami heart
Paper heart crafts are most popular on the eve of Valentine's Day or Valentine's Day.
With a voluminous paper heart you can decorate a postcard, gift wrapping, or give it as a Valentine's card for a holiday to someone dear to you. In this article we will tell you about a variety of ways to make a heart out of paper. We will begin our review with the simplest origami hearts, which even a preschooler can fold. Paper heart. How to make a paper heart To make a paper heart, you will need a square-shaped sheet of paper.
For this craft, it is better to use double-sided colored paper or special paper for scrapbooking. 1. Fold a piece of paper in half diagonally twice to mark the center lines. Unfold the paper. This is what you should get as a result. 2. Fold the top corner down toward the center. 3. Fold the bottom corner up as shown in the photo, towards the center of the top side. 4. We continue to fold the paper heart. Now fold both sides one by one towards the center line. 5. The paper heart is almost ready, there is very little left... Turn your workpiece over to the other side. Fold the side and top corners to give the paper heart a finished look.
This paper heart can be used to decorate a Valentine's Day gift.
Or a postcard.
2. Volumetric paper heart. Origami heart
Follow this link to find detailed video instructions on how to make a voluminous paper heart. This paper heart is also very easy to fold, making it a kid-friendly craft.
In addition, the paper heart made according to this pattern has a pocket at the back. It is very convenient to make a garland from such hearts for Valentine's Day.
3. Paper hearts. How to make a paper heart
Another paper heart that we want to tell you about is an original bookmark.
How to make such a heart out of paper will become clear to you after you carefully examine the origami diagram below.
Instructions on how to make a paper heart bookmark:
1. Take a square sheet of paper. 2. Fold it in half. 3. Fold it in half again. 4. Unfold the paper. 5. Fold the bottom edge up toward the center line. 6. Now turn the workpiece over and fold the bottom corners towards the center line. 7. Turn the workpiece over again. 8. Fold the bottom corner up toward the center of the top side. 9. Turn the workpiece over to the other side. 10, 11 and 12. Gently straighten the “pockets” with your finger. See photo. 13 and 14. Fold the corners to create a paper heart shape. 15. Turn the workpiece over and fold the sides back along the lines marked with dotted lines in the photo.
Material prepared by: Anna Ponomarenko
Origami heart is one of the most popular paper origami. If you don’t know how to make an origami heart, then on this page you will find everything you need to assemble this simple paper figurine.
In the first photo you can see what you will get if you follow the assembly diagram below. The second photo of an origami heart was taken by one of our site users. He followed the assembly diagram published by us. This heart can be used as a valentine on Valentine's Day. If you have photos of the origami you collected, send them to This email address is being protected from spambots. You must have JavaScript enabled to view it.
Stage two - folding the heart
Now you can proceed directly to manufacturing.
- Make two folds on the two-layer template according to the diagram.
- Closer to the center line of the workpiece, perform two more turns (see picture).
- Then fold the paper into an accordion shape along the resulting lines.
- Rotate the layout 180° around its axis, placing the front side away from you.
- Pull the protruding plane downwards by its edge.
- Spread and press the top, forming an angular indentation characteristic of a heart.
- Fold the two bottom corners overlapping, bringing them towards the center line towards each other. Press and iron the fold lines for a more defined edge.
- Form the outline of a heart. To do this, turn the uppermost corners downwards by a small amount so that the product is proportional.
- Rotate the heart back around its axis, placing it face up.
So, we looked at the simplest way to make an origami heart. But there are many other modeling methods. Let's talk a little about creating crafts by cutting and gluing in separate places.
Assembly diagram
Below is a diagram for assembling an origami heart from the famous Japanese origami master Fumiaki Shingu. If you strictly follow the instructions, then assembling an origami heart will not take much time, and the result will be the same as in the picture. After doing what is described in the diagram several times, you will understand how to make an origami heart quickly and without looking at the diagram.
Long earrings with heart pattern
When creating cute beaded jewelry for yourself, it is not at all necessary to constantly use cross weaving. In addition, you can also use simple stringing of beads according to a strictly thought-out pattern, thanks to which you can create a wide variety of patterns and pictures. The same method is applicable for making long earrings. For this, the author of MK suggests using: 2 earrings, 2 connecting rings, Czech beads No. 10 in red and silver shades, a package of bugles 11 mm long, bead needles, fishing line with a diameter of 0.17 mm, bead thread, a lighter, as well as pliers, round nose pliers and scissors.
All work must be done with special diligence, otherwise the earrings will turn out to be sloppy in appearance. Also, during weaving, it is recommended to monitor the thread so that it twists less, since the latter can easily get tangled, which will require a long time to untangle the knots or, even worse, start all over again.
In general, working with beads requires perseverance and patience. Sometimes it happens that the decoration does not always turn out as shown in the example, which may be due to excessive haste or incorrectly selected materials.
So, the neat appearance of the product is greatly influenced by the thickness of the fishing line: the smaller it is, the more beautiful it is. In addition, when buying beads, you should pay attention to their quality, because if they are too cheap, the beads may be crooked and vary in size, which will also affect the final result of the work.
Share
Assembly instructions
- Fold a square sheet of paper diagonally, connecting opposite corners with two straight lines. Bend the bend well in both directions.
- Bend one of the corners of the square so that its sharp part coincides with the center of the square.
- Fold the opposite corner of the square so that its sharp part coincides with the center of the short straight line formed at the top.
- Find the center of the resulting long straight line and bend both sides of the resulting figure from it, as shown in Figure 4.
- Fold in all the sharp corners of the resulting heart to give it a rounded appearance.
- The heart is ready.
If you have any difficulties while assembling origami, we recommend watching our video master class in which we assemble a similar figurine using the same instructions.
3Making an origami heart with wings
- Fold a square sheet of paper in half twice.
- Unfold the paper. Fold one edge of the workpiece inward to the center fold line.
- On the side of the lapel you form a triangular “nose”.
- Without turning the workpiece over, bend the side parts of the resulting figure inwards towards the fold line. Smooth the figure, forming precise fold lines. Turn the sides back.
- Turn the workpiece over. Holding the edge of the triangular “nose” with your fingers, lift the opposite side of the figure and bend the side parts to the center fold line.
- Bend the sides again towards the middle line, but not completely, but only along the edge. Expand the side parts - you have new fold lines.
- Fold the corners to the newly created fold lines, creating triangles. Bend the “noses” of the resulting triangles to the bases of the latter.
- Move to the opposite side. Fold the opposite edge inward.
- Fold the corners towards the fold line. By pulling the inclined fold lines, you extend the future wings to the sides.
- Turn the central rectangle over to the other side. Make a small hem at the edge (width no more than 0.5 cm). Return the central rectangle in the opposite direction (original position). Fold the edge again by 0.5 cm.
- Repeat the previous step until the rectangle ends.
- Rotate the resulting accordion 90°.
- Turn the heart over and straighten the wings.
Envelope heart
Here is another interesting example of a paper heart. The author of this origami is Andrey Lukyanov. A heart made according to this pattern is double-sided; it can be used as a valentine, a gift or an envelope for a gift to a loved one. Origami is made from a square sheet of paper. Below you can see the diagram for assembling the heart-envelope.
If you were unable to assemble the envelope heart, we advise you to watch our instructional video in which we assemble this origami.
Origami heart diagram: photo
Origami is an ancient art that involves folding paper figures. Folding origami is a fun and rewarding activity. Thanks to the technique, you can create truly amazing figures of animals, plants and objects. An origami heart is a symbol of love and life, with which you can express your sympathy to a person.