DIY Halloween masks made of paper for children
For Halloween, children make a wide variety of unusual masks from paper and simple materials at hand. The most popular are “Holiday Pumpkin”, “Sly Leprechaun” and “Frankenstein”. In this master class we will tell you how to make masks of these unusual, mystical characters for Halloween at home.
Necessary materials for making DIY Halloween paper masks for children
- colored paper
- felt-tip pens
- scissors glue
- tape or rope
- simple pencil
Step-by-step instructions on how to make paper masks for children with your own hands for Halloween
- For the Pumpkin mask, draw the shape of the mask on the back of a sheet of orange paper and mark the locations of the eyes with circles. Carefully cut out the mask along the contour and make slits for the eye sockets. Cut out a small trapezoidal piece of green paper (the spine) and glue it in the middle on top. For additional intimidation, outline the outside of the eye socket with a black felt-tip pen. Place pieces of tape on the sides with glue. These are ties to keep the mask on your head.
- For the Leprechaun mask, cut out the mask from green paper and use scissors to cut the places for the eyes. Draw an outline of disheveled hair on orange paper, cut it out and glue it to the green part of the mask. Cut out a figure in the shape of a man's hat from black paper. Decorate it with a bright yellow ribbon and glue it over the red hair. Attach string ties to the side.
- For the Frankenstein mask, cut out a face from blue-gray paper. Using a felt-tip pen, draw a characteristic scar on the forehead. Trace the eye sockets with a black marker, and glue some brown paper, symbolizing hair, on top. Glue ribbons or elastic on the sides.
Pig or pig mask
So, the pattern will be like this.
By the way, the difficulty will not be in the mask, but in finding cardboard of the right color. I used pink photocopy paper and reinforced it from the inside with masking tape, as well as pink isolon. An ordinary travel rug. And just white isolon (for insulating floors - sold in hardware stores), I blushed it. Someday I’ll tell you about all these cunning ideas. Now let's return to the pig mask.
Attach the pattern to a sheet of A4 cardboard (landscape). It matches the width very clearly. Let's cut out, cut through all the darts, lightly draw the edges of the dart on the forehead, glue it, pinch the bridge of the nose (with a stapler is best).
We also glue the free corners of the cheeks to the patch. Ears. Well, the ears are fluffy and very interestingly bent forward, hanging over the eyes. So Naf-naf is ready. Or maybe it’s not a pig, but a pig. Then it’s worth drawing eyelashes and highlighting the blush.
DIY Halloween masks – what to draw on your face, photo
Halloween masks can not only be cut out of paper, but also painted on the face with your own hands, using traditional means of modern make-up, gouache or paints for theatrical makeup. There are no restrictions in the drawings and style of execution. The darkest gothic images and frightening elements are allowed. Bloody tears on a pale face, images of scars sewn up with harsh thread, protruding veins, skin cracked from old age, skull fragments, a specific ear-to-ear smile and other attributes of the appearance of the most terrible heroes of mystical novels and films look very impressive and stylish in combination with the appropriate costume. horror.
But in order for such a unique makeup to stick well and look catchy, the skin of adults and children is pre-prepared. The top layers must be degreased with a gentle alcohol tonic, and then a fine-textured moisturizer or cosmetic base for makeup is applied. The overall tone of the face is whitened using powder of the lightest shades or stage white. The makeup applies evenly to such a grateful base, holds the contours of the design well and does not crumble throughout the entire holiday.
DIY carnival masks
You will need:
– tulle – scissors – ribbon – black fabric paint – cling film – mask template. – glue (moment, superglue, fabric glue) 1. Prepare a template for the mask using paper and a marker or printer and place it on the table. Cover the template with cling film. 2. Prepare the tulle and cut a rectangle from it with dimensions of approximately 25 x 13 cm. 3. Start tracing the black part of the mask using fabric paint. 4. Let the paint dry and then carefully remove the tulle from the film. 5. Cut out the mask, including the holes for the eyes. 6. Prepare a ribbon and cut 2 pieces from it, each approximately 50 cm long. 7. Using glue, attach the ribbons to the mask. Let the glue dry. You can make the ribbons shorter. The main thing is that you can tie them loosely.
DIY Halloween masks for boys – video master class
This interesting master class tells how to make a Halloween mask with your own hands for boys. The process is not difficult at all, and the only materials you need are old newspapers and toilet paper. But you won’t be able to cope with making a scary mask alone, so you’ll have to take care of a reliable assistant in advance. This role can be played by a school friend, a neighbor next door, a good friend or one of the parents. In 30-40 minutes the mask will be completely ready and you will still have time to work on the carnival costume, festive menu and decorating the party room.
What kind of masks on sticks can be made?
You can do almost anything, it only depends on your imagination! These could be eyes or glasses on a stick, a mustache or lips on a stick, a bow or hat on a stick, a nose or ears on a stick, a tie or the face of an animal, etc. You can try to portray real eyes, or you can try to imitate the eyes of an alien. Or the nose of Baba Yaga, or maybe the snout of a piglet?! We draw everything that your imagination suggests!!! The level of your artistic skills is absolutely not important here, because our goal is to make fun and amuse others, therefore, the more ridiculous and funnier, the more fun and memorable! Still, if you don’t know how to draw, you can paint ready-made templates.
DIY Halloween masks for girls – video tutorial
For a girl on Halloween, you can create a very cool and truly creepy mask of a toothy zombie with your own hands. Such an extraordinary accessory will look catchy and unusual in combination with bloody rags and tangled hair, treated along the entire length with a special gel for a wet effect.
To realistically embody a monstrous image you will need bandages, cosmetic brushes, a palette of multi-colored shadows, gouache, false nails and a mirror. The girl can easily cope with making a mask herself. Moreover, this will need to be done immediately before the holiday, because all the terrible attributes are attached directly to the face and it is very important not to damage them before the start of the holiday party.
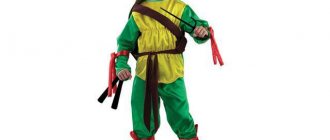
Teenage Mutant Ninja Turtle
A boy’s mask is suitable for both a holiday in a kindergarten and a school carnival.
What you will need:
- hot glue;
- pencil;
- Velcro;
- scissors;
- felt in two colors - green (main) and red, purple, blue or orange (depending on which character is needed).
How to do:
- Print the template.
- Transfer both patterns to fabric and cut.
- Separately cut a couple of strips of fabric of a non-primary color - they will serve as ties.
- Glue the parts together using hot glue.
- Attach Velcro in the right places.
Now your child is a full-fledged ninja turtle!
DIY scary Halloween mask at home
You can make your own Halloween masks from a variety of available materials. The process of making festive attributes from paper, along with the final photos and video instructions, is posted at the very beginning of the article. Therefore, now we will pay attention to the rules for creating scary masks from cardboard. They will definitely appeal to those who want to look quite frightening at a gloomy event, but do not want to paint their faces with gouache paints, decorative cosmetics or theatrical makeup, as is often done on Halloween.
Materials needed for a cardboard Halloween mask
- cardboard
- felt-tip pens
- simple pencil
- scissors
- glue
- black foam rubber
- wooden sticks
Step-by-step instructions on how to make a scary Halloween mask at home with your own hands
- Draw a shape on the cardboard that matches the shape of the face and carefully cut it out with scissors.
- Make round slits in the mask where the eyes are.
- On the outside of the mask, use a black felt-tip pen to draw a scary face with an ominous toothy smile from ear to ear (or any other image that matches the theme of the holiday).
- Cut out one small heart and two wide rings from foam rubber. Glue the heart in the center of the mask. This will be the nose. Glue the foam rings so that they surround the eye holes.
- At the end, attach the cardboard mask to a wooden stick using glue and press down in this place with a weight so that both objects are well glued together. When the glue dries, use the product for its intended purpose.
How to make a mask out of paper. Decorate with paper roses.
- a simple papier-mâché or plastic mask (without drawings or patterns), purchased in a store or you can cut it out of cardboard yourself
- feathers, optional
1. You will need to cut approximately 25 strips of crepe paper. Their length can vary from 25 to 40 cm. Fold each strip in half.
2. To make a rose out of a paper strip, start rolling it as shown in the picture. As you curl the paper, turn the strip 180 degrees. To keep the flower in place, you can secure some places with glue.
If you want to know what other flowers can be made from paper, check out our articles:
3. Start gluing the roses to the mask. Add glue to the bottom of each flower.
4. If desired, you can add decorative feathers.
You can try using different colors and types of paper.
DIY New Year's masks
You will need:
– felt – artificial flowers – ribbon – glue – sequins. 1. Cut out a mask from felt, after drawing it with a simple pencil. To make it easier to figure out where to cut the holes for the eyes, place the mask on your face and trace the approximate location with a pencil. 2. Separate the petals from the artificial flowers and glue them to the mask the way you like. 3. Next, glue the sequins to the mask around the eye holes. 4. Glue or sew the tape to the back of the mask so it can be worn.
DIY carnival masks
You will need:
– thick paper – cardboard – colored feathers – stationery knife – glue – simple pencil – sequins, if desired 1. Place the cardboard on the table, place a thick sheet of paper under it. 2. Using a simple pencil, draw the outline of the mask, and outline this outline with a marker. Draw the mask as you like, there are no strict rules. 3. Use a utility knife to cut out the mask and eye holes. 4. You should have two blanks - from cardboard and thick paper. Use glue to connect them. 5. Use glue to attach feathers and sequins around the eye holes to the mask. You can use any decorations you like. 6. All that remains is to attach a regular elastic band to the mask. Instead of an elastic band, you can try gluing a straight stick (skewer) to hold the mask in your hands.
How to make a cotton-gauze bandage on your mouth
This bandage is useful to protect against infection entering the respiratory tract. It can also be used by sick family members to protect their loved ones from possible infection.
Pattern
Before you begin, you need to take the following into account:
- The cotton wool must be 100% cotton. You cannot use one that contains impurities of synthetic materials or has been bleached using chlorine. Cotton wool containing short fibers is not suitable. When used, they may enter the respiratory tract.
- Sterile materials must be used.
- It requires 4 to 8 layers.
- The dimensions of the resulting product are universal. Its width is 14–15 cm, length (without ties) is 25–30 cm. For ties you need to use 30–35 cm of material on each side.
- These masks can be reused after they are washed.
For your information! When the risk of disease increases, it is usually difficult to buy a mask at the pharmacy due to the rush that arises. In this case, it is not difficult to do it yourself in accordance with the following instructions. The pattern of the mouth mask does not contain complex details.
You may be interested in Pregnancy and sewing with a needle and thread: possible or not
Before starting work, you need to prepare the necessary tools and materials. You will need:
- cotton wool;
- gauze or pharmaceutical bandage;
- ruler;
- scissors;
- threads and needles.
They can be made in several ways. The first one is as follows:
- you will need two pieces of bandage 7 m long and 14 cm wide;
- a pack of sterile cotton wool weighing 100 g.
You need to sew like this:
- Evenly spread cotton wool is placed on the edge of the bandage. It needs to be laid out in the form of a square 14 by 14 cm wide.
- The bandage is wrapped three times. This is done in such a way that the cotton wool is located in the central part.
- The second bandage is cut lengthwise into two strips. They are twisted and threaded through the sides of the mask, then sewn up.
The accessory is now ready for use.
The second way to sew a mask on your mouth:
- You will need two pieces of bandage 70–90 cm long. Each of them is folded separately three times and stitched along the edges.
- Make a rectangle of cotton wool measuring 14 by 25 cm.
- Place cotton wool between the folded pieces of bandage and stitch along the edges with a basting stitch.
- The edges are folded inward by 1 cm, then stitched.
- Bandage straps are sewn onto the mask along the top and bottom sides and stitched.
Production is now complete.
In order to make a bandage using the following method, you need to use a piece of gauze measuring 100 by 50 cm.
You need to do the following:
- Make a rectangle of cotton wool measuring 20 by 30 cm of uniform thickness.
- It is placed on the central part of a piece of gauze. Fold the top and bottom parts so that they wrap around the cotton wool and hem them on all sides.
- The edges of the gauze are cut lengthwise to form ribbons 30–35 cm long.
The bandage is already ready.
When making and wearing, you need to consider the following:
- The mask should cover not only the mouth, but also the nose.
- When wearing, tie the product tightly, but not too tightly. It is important that the mask does not cause discomfort when worn for a long time.
- It is especially important to wear it when entering crowded places. In particular, this will be appropriate when entering a store or when you are about to board a vehicle.
- If you spend a long time in places where there are large crowds of people, you need to change your mask at least once every two hours. Otherwise, bacteria will accumulate on the product and it may cause problems.
For your information! Cotton-gauze dressings can be used repeatedly, provided they are thoroughly washed and ironed for the purpose of disinfection and disinfection.
How to make a cat mask
You will need:
– scissors – lace trim – glue – satin ribbon – small decorative feathers, if desired 1. Cut the lace trim so that you get two equal parts. 2. Connect the binding halves as shown in the image. This should be the main part of the mask. Secure in the middle with glue. 3. Cut off unnecessary parts to obtain the desired shape. 4. Glue the feathers so that they resemble cat ears. 5. Prepare a satin ribbon, cut it into two equal halves and glue each part to the left and right ends of the mask.