If the inner lining of your shoes is worn out, no problem! There is no need to run to the store in search of a new insert; today you will learn how to make insoles with your own hands. You will be confident in the quality of the materials used, besides, it is always nice to have something that you have made yourself.
By the way! In Russia, craftsmen made the first shoe insoles from birch bark and nettle. At the beginning of the nineteenth century, insoles made of compressed cardboard appeared. Supportive orthopedic inserts were invented by Petrus Camper in 1762. And in 1914 a patented technology for taking a plaster cast of the foot, which many orthopedists still use today.
From available materials you can make different types of shoe inserts: thin summer ones, thick ones, warm ones, and even orthopedic ones!
Material selection
The way you feel when wearing shoes is largely influenced by the material from which they are made. In addition to the convenience and presentation of products, it is necessary to take into account such criteria as hygiene, thermal conductivity and strength.
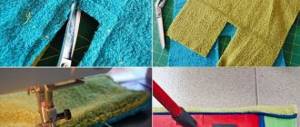
In order to sew warm house slippers with your own hands, you can use the following blanks:
- An old sheepskin coat or sheepskin coat. Sheepskin has high thermal insulation properties, softness and stretchability. It is better to make slippers from a sheepskin coat from sleeves or floors, since the back and chest parts can later be used to make a vest.
- Tops of winter leather boots. Natural material has high strength and wear resistance. The downside is that it has too thin a layer of fur, which is not enough to provide reliable protection from the cold.
- Artificial fur. Synthetic products look good, are not afraid of dampness, and can be machine washed without problems. It’s not difficult to sew slippers, but the prospects for such work are questionable - synthetics do not absorb moisture and cause a lot of steam on your feet. There is a high probability of developing fungus and allergic reactions.
After choosing the material, you need to decide on the model of slippers. Depending on individual preferences, the pair of shoes produced may have an open or closed toe, heel counter or cuff.
Old sheepskin coat
Artificial fur
Tops of old winter boots
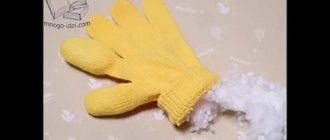
Fluffy keychain
You can use pieces of an old collar to make fluffy key rings. Any fur is suitable; colored faux fur with long pile looks especially colorful.
How to make a fluffy hedgehog keychain, master class:
- We will need dark fur, a key ring with a base, a piece of white flannel or plush, stuffing, satin ribbon, and beads.
- On paper we draw the body of a hedgehog. You need two such parts, and one will consist entirely of white fabric, and the second will be sewn from black fur (thorn) and a corner of the fabric (muzzle).
- We attach the templates to the fabrics and trace them with a margin of 1 cm.
- Sew the muzzle and back.
- Sew both pieces together, leaving a hole to turn inside out.
- We fill the keychain with padding polyester or other filler.
- We insert a satin ribbon inside so that a small loop is formed. The ring for the keychain will be attached to it. Now we sew the hole with a hidden seam.
- All that remains is to sew on the beady eyes, nose and put the ring on the loop.
Preparing the pattern
The work on patterning fur slippers begins with making patterns . You can find ready-made patterns in women's magazines or on handicraft websites. The required size of slippers is obtained by proportionally increasing or decreasing the templates. However, it should be taken into account that the found options are standardized and may not correspond to the developed idea. In such cases, you will have to make a fur pattern with your own hands. The advantage is that this event is quite simple and does not require professional skills. To implement this you will need several sheets of A4 paper, a pen and scissors.
The sequence of actions for creating a pattern of fur slippers is as follows:
- Place your foot on a piece of paper and trace the outline of your foot. Add 2 cm on each side for allowances. If you plan to make children's patterns, it is advisable to add another 2 cm based on the growth of the child's foot as he grows older. The sole pattern is ready.
- Make a template for the sock. You can do this by applying the next sheet to your foot. Having chosen the optimal completeness, you need to make folds on the sheet and mark them with a pen. After this, cut off the excess, leaving the edges for stitching.
- Make the bootleg (backs). The front part is obtained by combining the sheet with the sock pattern. Then the paper is applied to the ankle, the joint with the back of the sole is drawn.
- Cut out symmetrical patterns for the second leg.
The pattern of the slippers is transferred to the flesh side of the sheepskin coat with a pen or white marker.
You need to cut the blanks with well-sharpened tailor's scissors, otherwise you won't be able to get an even piece.
Step-by-step instruction
Want to learn how to make orthopedic insoles with your own hands? In simple instructions we will tell you how to make preventive orthopedic insoles step by step for regular wear:
- Take old insoles from shoes you plan to wear.
- Standing on the old insole with your bare foot, mark the point between the first and second toe - here you need to stick a thick cotton ball with an approximate diameter of 1.5 cm (you can secure the elements with adhesive tape).
- Now comes one of the most difficult stages - choosing a comfortable instep. For this, the same cotton wool or bandage is used. Place them under the arch of your foot, adjusting the volume if the foot feels excessive pressure or discomfort or, on the contrary, the arch does not receive the necessary support. Once you have found the right size insert, attach it to the old insole.
- Transfer the contour of the insole to a well-ventilated material, preferably cotton. Cut it along the contour and glue it on top of the insole, covering the ball under the toes and the roller under the arch. Make sure that they do not move during operation. In order for the upper part of the insole to hold better, it can be sewn along the contour with threads manually or on a machine.
- Insert the insole into your shoes and see how comfortable it is. Surely the sensations will be a little unusual, but this happens when using any orthopedic insoles. The main thing is that there is no pain.
- You have successfully completed only half the journey. Now you have to use the same instructions to make an insert for the other leg. It will not be possible to use the old template by changing the front and back sides of the old model, because human feet are not significantly different, but they are different .
Despite the fact that on the Internet you can find recommendations for making orthopedic insoles for children, we would strongly advise against using them. Buy children's insoles and shoes only from high-quality manufacturers, which include the Russian shoe manufacturing company Ortek.
The child will not be able to adequately assess the degree of convenience of a homemade insert, which means that instead of correcting the defect, you can aggravate it or acquire new problems . In addition, ready-made orthopedic insoles in the pharmacy are quite affordable, and a huge number of models allows you to choose the best option for any patient.
An insole/orthosis is a removable structure that is located under the sole of a shoe and performs a number of specific functions. You can make orthopedic insoles with your own hands without much effort. If you use high-quality materials and follow the instructions, the product will turn out no worse than store-bought.
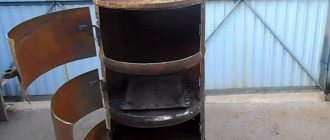
Working with the sole
Before sewing slippers from old sheepskin coats, you need to take into account that the comfort and ease of use of indoor shoes largely depend on the functionality of the sole. This part of the slippers should be non-slip, warm and moderately hard. Of course, you can make it only from natural fur, but to create an additional thermal insulation layer it is best to use felt. The tops from old felt boots work well . If you don’t have them at home, you can buy thick shoe insoles at the market. Their size is adjusted to the sole, from which the excess allowance will be cut off.
The part must be attached to the workpiece before sewing the slippers; to do this, both elements should be glued together with waterproof glue. The composition should be applied along the edges and in stripes in the middle to leave space for ventilation.
It is recommended to take into account the property of felt to release small fragments of wool. To prevent home-made fur slippers from leaving debris on the floors, the insole should be covered with dark-colored cotton fabric.
How to make insoles in 15 minutes?
In our master class you will be able to quickly and efficiently make insoles that do not need to be processed on a sewing machine.
Leather
Let's prepare the necessary materials and tools:
- Leather or leather substitute.
- Chalk, soap or white pencil.
- Glue “Moment”.
- Scissors.
- Protective gloves.
Important! To make such shoe mats, use natural leather, not artificial leather. This material is softer, and your feet will not smell or sweat.
Detailed algorithm of actions:
- We take an old insole or from another new shoe, apply it to the skin and outline the borders with a white pencil.
- We turn the piece of leather over to the wrong side - this is what we will continue to work with.
- We cut out the necessary insoles for shoes from leather with our own hands and put them in the shoes.
- We check whether the dimensions of the new lining are suitable. If it is larger, then you can fold the edges onto the sides of the shoes from the inside or carefully trim off the excess material. We carry out such manipulations until the shoe mat fits perfectly into our shoes.
- Apply Moment glue along the entire length to the wrong side of the leather material.
- Carefully glue the shoe lining, starting from the heel.
- Carefully press and spread over the entire surface.
Required Tools
To make fur slippers with your own hands, you will need the following tools and materials:
- professional tailor's scissors, which can be sharpened by cutting fine-grained sandpaper;
- paper, cardboard or tracing paper for making patterns;
- tailor's meter or soft tape measure;
- sharp knife;
- stationery - pen, marker, pencil, special ruler for curves;
- cotton threads No. 30, 40 and 50, lavsan threads No. 22L, 33L, 55L and 90L, nylon threads No. 470K and 565K or cotton lavsan No. 44LH-1, 65LH-1;
- sewing machine;
- several needles for working with thick fabrics.
If you plan to turn the seams with thick edges that a household sewing machine cannot process, you will additionally need a shoe awl.
Video
During the cold season, walking in socks on icy floors is not only uncomfortable, but also fraught with colds. Factory products solve this problem only partially, without creating the necessary amenities. The way out of the situation will be to pattern fur slippers and make them yourself. Hand-sewn shoes look beautiful, keep your feet warm, are environmentally friendly and durable. You can make slippers from fur for all family members, regardless of their age.
Interior
Fur is an excellent material for interior decoration. Examples of decorative products with fur inserts:
- cushions for chairs and stools;
- poufs;
- armrests;
- pillows;
- storage accessories;
- vases;
- flower pots;
- picture frames.
Why get rid of fur products, even if they are shabby in places? Even if you have no idea how to adapt the material, you can always sell it to needlewomen or contact a studio.
Material selection
The way you feel when wearing shoes is largely influenced by the material from which they are made. In addition to the convenience and presentation of products, it is necessary to take into account such criteria as hygiene, thermal conductivity and strength.
In order to sew warm house slippers with your own hands, you can use the following blanks:
- An old sheepskin coat or sheepskin coat. Sheepskin has high thermal insulation properties, softness and stretchability. It is better to make slippers from a sheepskin coat from sleeves or floors, since the back and chest parts can later be used to make a vest.
- Tops of winter leather boots. Natural material has high strength and wear resistance. The downside is that it has too thin a layer of fur, which is not enough to provide reliable protection from the cold.
- Artificial fur. Synthetic products look good, are not afraid of dampness, and can be machine washed without problems. It’s not difficult to sew slippers, but the prospects for such work are questionable - synthetics do not absorb moisture and cause a lot of steam on your feet. There is a high probability of developing fungus and allergic reactions.
After choosing the material, you need to decide on the model of slippers. Depending on individual preferences, the pair of shoes produced may have an open or closed toe, heel counter or cuff.
Old sheepskin coat Faux fur Tops of old winter boots
Preparing the pattern
The work on patterning fur slippers begins with making patterns . You can find ready-made patterns in women's magazines or on handicraft websites. The required size of slippers is obtained by proportionally increasing or decreasing the templates. However, it should be taken into account that the found options are standardized and may not correspond to the developed idea. In such cases, you will have to make a fur pattern with your own hands. The advantage is that this event is quite simple and does not require professional skills. To implement this you will need several sheets of A4 paper, a pen and scissors.
The sequence of actions for creating a pattern of fur slippers is as follows:
- Place your foot on a piece of paper and trace the outline of your foot. Add 2 cm on each side for allowances. If you plan to make children's patterns, it is advisable to add another 2 cm based on the growth of the child's foot as he grows older. The sole pattern is ready.
- Make a template for the sock. You can do this by applying the next sheet to your foot. Having chosen the optimal completeness, you need to make folds on the sheet and mark them with a pen. After this, cut off the excess, leaving the edges for stitching.
- Make the bootleg (backs). The front part is obtained by combining the sheet with the sock pattern. Then the paper is applied to the ankle, the joint with the back of the sole is drawn.
- Cut out symmetrical patterns for the second leg.
Working with the sole
Before sewing slippers from old sheepskin coats, you need to take into account that the comfort and ease of use of indoor shoes largely depend on the functionality of the sole. This part of the slippers should be non-slip, warm and moderately hard. Of course, you can make it only from natural fur, but to create an additional thermal insulation layer it is best to use felt. The tops from old felt boots work well . If you don’t have them at home, you can buy thick shoe insoles at the market. Their size is adjusted to the sole, from which the excess allowance will be cut off.
The part must be attached to the workpiece before sewing the slippers; to do this, both elements should be glued together with waterproof glue. The composition should be applied along the edges and in stripes in the middle to leave space for ventilation.
It is recommended to take into account the property of felt to release small fragments of wool. To prevent home-made fur slippers from leaving debris on the floors, the insole should be covered with dark-colored cotton fabric.
Required Tools
To make fur slippers with your own hands, you will need the following tools and materials:
- professional tailor's scissors, which can be sharpened by cutting fine-grained sandpaper;
- paper, cardboard or tracing paper for making patterns;
- tailor's meter or soft tape measure;
- sharp knife;
- stationery - pen, marker, pencil, special ruler for curves;
- cotton threads No. 30, 40 and 50, lavsan threads No. 22L, 33L, 55L and 90L, nylon threads No. 470K and 565K or cotton lavsan No. 44LH-1, 65LH-1;
- sewing machine;
- several needles for working with thick fabrics.
If you plan to turn the seams with thick edges that a household sewing machine cannot process, you will additionally need a shoe awl.
Toys
Furry things are fun for both children and pets to play with. A homemade soft fur toy has many advantages over a store-bought one: it is made with passion and from safe materials, saves money and helps parents get closer to their children in the creative process.
What toys can be made from old fur:
1. Animals. Hares made from rabbit fur are especially beautiful, chanterelles are made from fox fur, etc.
2. Chicks made of red, gray and black fur. The eyes are sold in arts and crafts stores; the legs and beak can be easily made from suede.
3. A fluffy bear is the dream of many children. It's nice to cuddle with him and makes it easier to fall asleep.
4. Large toys are sewn with a wire frame . This will cause their legs to bend.
In most cases, you will need other materials besides fur: cotton or plush fabric, thread, beads, wire, filler, paper and cardboard. The process is labor-intensive, but you can try hard for your favorite children's toy.
Sewing order
First you need to attach the blanks to each other to make sure that they fit together exactly . If necessary, additional adjustments need to be made. To prevent the parts from coming apart during stitching, they need to be securely fixed - for this you can use office clips or thread tacking every 4-5 cm.
Sewing fur slippers with your own hands is carried out in the following sequence:
- Connecting the tops (backs) with the socks. First, a joining seam is made between the blanks, then the edges of the back part are connected. Depending on the project, the seam can be applied from both the fur and the flesh side. To avoid chafing the foot, the choice is made in favor of an external seam.
- The connection between the sole and the upper of the shoe. Here it is advisable to stitch along the inside, creating an external seam. After stitching, the excess on the sides is carefully cut off at the level of the sole.
- Trimming of external seams. It is made using braid, cord or decorative braids. Genuine leather can be glued onto the sole.
The final touch is to make the top folds. If necessary, decorative finishing of the product is carried out with glitter, beads, stickers or paints.
DIY orthopedic insoles
Orthopedic orthoses are a medical product. They are used for transverse and longitudinal flat feet, arthrosis, and other degenerative diseases of the arch of the foot. The insoles support the foot in the correct position, reduce the adverse effects on the joints and spine, and protect the foot from shock loads. Professionals make custom insoles by first taking an impression of both feet. You can find a lot of ready-made insoles in ortho stores, but they are standard and do not always fit your needs perfectly.
By the way! Before making orthopedic insoles, consult your doctor to determine if you need them! It is not recommended to risk the health of children and make orthoses for them yourself, because you will not be able to evaluate their convenience. It's better to leave it to the professionals.
Step-by-step instructions on how to make orthopedic inserts:
- We prepare the base or take a purchased thin insole, cut out the material for the front part of the insole
- We stand on the pad with our foot and mark the point between the thumb and index finger, roll up a cotton ball and secure it with a plaster
- The lift of the foot must be precise and individual, so we apply cotton wool until the desired result is achieved; the foot should not sag, but there should not be excessive pressure. We increase the volume until the support becomes comfortable. To avoid displacement of the improvised instep support, we also glue it with adhesive tape.
- We put textiles on top of our workpiece and carefully sew them together
- We repeat the same algorithm for the second liner. Since the degree of flat feet can vary, be sure to take measurements for each foot so you will end up with custom insoles.