Autumn is generous! It provides a huge amount of material for creativity: leaves, twigs, flowers, fruits, and just the right mood for making crafts. We will take advantage of all this! I’ll give you interesting ideas, and you choose and share the results here or on your social media pages (just don’t forget to leave links to this article for your friends!).
And subscribe to our Instagram and YouTube channel! And also look at crafts made from pine cones, from various natural materials, leaves from paper and, of course, crafts from pumpkins.
DIY autumn cards for kindergarten children
Let's start with creating such a cute card in warm autumn colors. There is nothing complicated at all in the manufacturing technology, but the result is very original.
Necessary materials:
Origami maple leaves (step by step instructions)
Making cute leaves is very easy and simple. The most important thing is to be with the children. Then decorate any room (kindergarten, school or nursery) with your crafts. With step-by-step instructions and photos you can do it very easily and quickly.
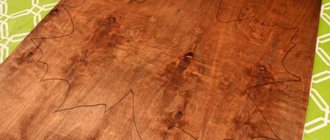
Attached is a step-by-step diagram of folding a maple leaf.
We will need:
- 3 square leaves 8.5×8.5 cm
- glue
Progress:
We can make squares of any size.
Let's take one copy. Fold it diagonally. Next, we unfold it to its original state.
Then fold the wings in half towards the middle of the fold.
Turn the craft over at an acute angle downwards.
We remove the resulting tail inside the pocket.
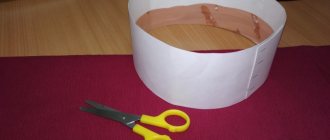
Fold the top corners towards the middle. It turned out to be small triangles. Let's bend them back and put them inside. The result is a figure familiar to us - a rhombus. Bend the top corners down. One piece is ready. Next we’ll make a few more of these blanks. Let's connect them together and secure with glue.
To ensure that the parts keep their shape well, they can be glued onto a dense round base. Don't forget to make a leg. The maple leaf is ready. You can also use them to make a crown for the autumn holiday. Only for this you need to make a rim out of paper and connect everything together.
Beautiful card made from autumn leaves
What else can you use to make an autumn card from, if not from dry leaves? Nature supplies us with them especially generously at this time of year. So let's take advantage of this.
You will need:
- Paints (gouache or watercolor) and brushes;
- Plastic palette;
- Colorful leaves;
- Album sheets;
- Glue stick;
- Scissors.
Subsequence:
Take a sheet of A4 and fold it in half. We cut out an oval hole in one of the halves, as shown in the photo below.
Now let's prepare the leaves. For ease of use, they should be flat and dry. You can dry them in advance by placing them between the pages of a book. And you can do it much faster. We put our leaves on a napkin.
Cover the top with a second napkin and go over it with a hot iron. Now the leaves are ready to become part of the composition.
By the way, you can dry flowers in the same way.
We paint a blue background on the remaining whole half of the sheet from its inside.
We lay out a composition from leaves in the form of an autumn forest. If desired, add additional details. Don't forget to attach the leaves with glue. We also glue the two halves of the album sheet together and come up with a congratulatory inscription. This is such wonderful work.
Let's look at a couple more ideas. Your favorite teacher will surely be happy with such a gift.
If the craft is for children, you can invite the children to make one of these characters out of leaves.
You can even make entire portraits from autumn leaves! Great idea for Mother's Day, wouldn't you agree?
There really are many options. And any of them can be used to design an original masterpiece.
Ideas for crafts on the theme of autumn made from paper and cardboard for children
In fact, there are so many ideas that it’s impossible to even name them all. And yet, I will try to remember the coolest and most interesting models. Many of the works do not require additional instructions; they will be easy to do if you repeat what is in the photo.
Hedgehogs
Fold the paper into a fan. Cut off a corner from one edge. We bend this strip. Unfold and glue the 2 sides to form a fan. All that's left is to glue on the hedgehog's face!)
Tree
How to make a tree trunk is clear. But for the leaves you need to cut colored paper into thin strips. Cut these strips into pieces 3-4cm in length. Roll the strips into a ring and glue the edges. Glue these rings around the tree trunk.
Acorns
Cut out yellow, orange and green oak leaves from paper. Now we need 2 blanks: an acorn and a cap. We make a fish scale pattern on the hat. Glue these 2 parts together.
Umbrella
For the umbrella itself, we will prepare 4 little bags. Let's glue them all together on cardboard. Cut out autumn leaves from colored paper and glue them onto a cardboard base. All that remains is to glue the “handle” of the umbrella.
Autumn forest
This application is the simplest. You need to glue orange and yellow circles and ovals onto the cardboard. We draw branches and a trunk on each oval.
Wreath
Cut out leaves from colored paper and glue them together like a wreath.
As you can see, all models are very simple. But it will be interesting for kids to make them.
Mushrooms
Cereals and leaves were glued with PVA glue. Holds up great! Lubricate the base generously with glue and sprinkle the cereal evenly. Then we shake off the excess by turning the work vertically. Glue the mushroom onto a cardboard base with hot glue and decorate the base to your liking.
Author https://www.instagram.com/p/CErdiKCKmkN/?utm_source=ig_web_copy_link
You can also make a leaf or a landscape.
Author https://www.instagram.com/p/CE8Y-Y2D5OT/?utm_source=ig_web_copy_link
Author https://www.instagram.com/p/B3_UJgwHt7c/?utm_source=ig_web_copy_link
How to color rice without drying it out:
- Pour into a glass as much rice as needed for the craft.
- Add a few drops of alcohol (vodka) to the rice.
- Dip the brush into the desired gouache and directly use this brush to mix the paint into the rice.
If you do not overdo it with alcohol and the amount of paint, the rice will be immediately ready for application. Everything in bits.
Plasticine tree
Let's start with drawing with plasticine. We will need:
- plasticine
- syringes without needle
- glass of boiling water
- sheet of cardboard
- creative mood
Author https://www.instagram.com/p/CEzP2amB0aF/?utm_source=ig_web_copy_link
Twisting thin strings of plasticine perfectly develops fine motor skills. We cut the plasticine into thin long strips that will fit the syringe. We take out the “piston”, insert the plasticine and lower the syringe into a glass of boiling water. The plasticine heats up inside and becomes very soft, now it is easy to squeeze out into beautiful thin strips.
Draw a tree on cardboard. We fill the barrel with plasticine, squeezing it out of the syringe. Separately, we make yellow and orange plasticine threads and twist them into snails and place them on the crown of the tree.
We complement the picture with a beautiful background.
Some more ideas in the gallery.
Autumn card made from natural material
The golden age is wonderful because the material for creativity can be found literally under your feet. In the next MK we will look at how to make a postcard from:
- Plasticine;
- Pumpkin seeds;
- "Helicopters";
- Colored cardboard.
Subsequence:
We make flowers from painted pumpkin seeds. We stick it into the plasticine base. It turns out the core and leaves.
We make stems for our flowers from flagella of green plasticine. And we make a vase.
The vase can be decorated with helicopters. It will turn out very unusual.
You can use these same helicopters to make grass if you don’t want to plant flowers in a vase.
Postcards made using natural materials always turn out very delicate and beautiful. Look at what lovely compositions you can make from dry leaves and flowers.
The edges of the work can be decorated with lace, braid or ribbons.
Look how great it turns out!
You can simply collect as many materials as possible for the children and invite them to create the composition themselves. This is a great way to develop your imagination!
Volumetric applique “Basket with mushrooms”
We also need a basket. We will collect everything we find in the forest.
For the craft we will need:
- colored paper in two shades
- glue
- colored cardboard
- scissors
Progress:
We cut strips of paper 1.5 x 21 cm wide. Then we divide them into 3 equal parts. We will glue each one into a ring.
Children will enjoy cutting and gluing the blanks.
We will glue them onto the base in a checkerboard pattern. Let's make the first row a semicircle.
There is nothing complicated here, all you need is perseverance. Therefore, adult help will be needed.
Place mushrooms in the basket. Decorate with paper leaves if desired. You can draw it yourself or use templates. They can be found at the end of the article.
Master class on how to make an autumn card in scrapbooking style
Scrapbooking is a type of handicraft that represents the design of albums: both for family and personal use. Nowadays, not only albums are made in this style, but also diaries, notebooks, and much more. Including postcards. And now we will see with you how to learn this.
We will need:
- Sewing machine;
- Ruler;
- Scrapbooking paper;
- Twine;
- Breadboard knife;
- Ribbons, pictures and inscriptions for decoration;
- Brads;
- Colored cardboard;
- Corner hole punch;
- Scissors;
- Glue;
- Artificial leaves;
- Burlap ribbon.
Subsequence:
We cut out the base for our future postcard from cardboard.
We cut the scrapbooking paper into several pieces of the specified size.
Turn the base over and glue 1 or 2 pieces of twine to it. We put paper on top. We stitch it.
Next, we create a composition from the existing decor so that we can do this outside of work.
It is important to remember the order in which you will then pin the elements.
We sew the decor to the base of the work.
If desired, decorate with brads.
The front side of the future masterpiece is decorated. Now you can do the inside.
We punch one of the cards with a corner hole punch so that you can insert a photo into it.
We fix it with glue inside the card. We will have two cards in total. One for photos and the other for congratulations.
A great gift for a birthday, Mother's Day or any other autumn holiday is ready.
Real miracles are created in scrapbooking style.
As a rule, those who engage in this type of creativity successfully sell their products. And you can try it too.
I think that anyone would be pleased to receive such a gift.
Application “Tree with leaves” made of colored paper
We have to:
- colored paper
- colored cardboard (thick paper)
- pencil
- ruler
- glue
- scissors
Progress:
Cut out a strip of brown paper 3 cm wide. Place it on a colored thick sheet in the middle.
Use a pencil to mark a point under the top of the trunk. We will cut 7-9 more strips, 2 cm wide. The length may vary.
We coat one edge of it with glue and attach it to the marked point. We twist the branch into a spiral 1-3 times.
We attach the second edge to the cardboard away from the trunk, creating the outline of the crown. None of this is difficult. Glue in any order.
When we are done with the branches, we cover the gluing area with the trunk. Next, take yellow or orange paper.
Let's cut a strip 3-4 cm wide from it. Fold it like an accordion 2 cm wide. Draw a tree leaf on it. Cut them out and glue them onto the branches. Cut from any other paper. Let's arrange a colored carpet.
Children's applique on the theme of Autumn flowers + templates
And now I offer the final information, as they say, the most interesting in the end. Make an autumn voluminous composition of flowers, and you can make the template yourself from an ordinary sheet of paper (line it in the form of squares), and how cool it will turn out. Wow!
Here's a video tutorial that will show you how your work will become a wonderful masterpiece and will captivate everyone at any exhibition, whether in kindergarten or school.
Or take ready-made coloring books and decorate them with natural resources and paint them with any colors.
Write which idea you liked the most and which of these you would like to repeat. And be sure to teach your children to be creative: they will thank you in the future. At least for a developed imagination. I hope you enjoyed reading it as much as I did researching it for you! I wish you all success in realizing your plans and good mood.
Autumn works from vegetables for school and kindergarten - all new items
You can make such fun and healthy crafts from vegetables that kids will be delighted with such work! There are trains, insects, animals, bouquets of flowers, little people, as well as candlesticks, dishes, etc.
More ideas and master classes on crafts made from vegetables here.
Baby elephant
1. Connect 2 tomatoes in the middle with a toothpick.
2. Cut off 2 sides of the third tomato. Cut one side in half. We make legs from these halves and secure them at the bottom of the structure with French pins.
3. From two more halves of the side we make the front legs of a baby elephant and fasten them near the junction of the two tomatoes.
4. Cut a long arched strip from the third tomato. We attach it to the elephant's head, like a trunk.
5. We will need the side of the fourth tomato. We divide it in half and secure it with two French pins on the sides of the head. These are ears.
6. Make holes on the tomato head. And insert black peppercorns into the holes. These are the eyes.
If you have the right paint to apply to vegetables, you can paint a baby elephant.
Author - https://www.youtube.com/watch?v=8YKQsP1XqTk
What do you think of the ideas? Did you like it? Then subscribe and receive announcements of articles with new interesting ideas. And lice children will always be ready for school and kindergarten. Their crafts will be really cool!