Volumetric flowers
Using the method described above, you can make large lush asters with your own hands from corrugated paper. The main flower is also cut out from a long rectangle, only the edges of one of its sides are cut not with a straw, but with a wide “noodle”. Then there will be scrupulous and painstaking work on cutting off the corners on each part. You should get pointed aster petals.
When everything is ready, the bottom of the rectangle is twisted around the rod and the edge is glued to the last turn in the same way. Further work continues on the creation of sepals. A circle is cut out of green corrugated paper, and the edges are cut into large petals, without affecting the central part of the craft. At the end, you can attach another small circle for strength.
Step-by-step photo lesson:
Take a sheet of yellow paper and begin to create the bottom layer of petals. They will be the longest. Their length will be 21 cm, and their height will be only 1 cm. 18 such strips should be cut out.
Now we glue them together in droplets using office glue.
Cut out a circle from yellow paper, the diameter of which will be 3-4 cm. Glue all the petals of the first tier onto it.
Now let's move on to the second layer and cut out nine strips of paper 15 x 1 cm.
Glue them together in the form of droplets and let them dry.
We attach nine petals to the center of the aster, which will create a second layer.
A third tier should definitely be created. Therefore, we will cut out nine strips of 10 x 1 cm.
Glue them one by one to the very center of the flower.
Finally, let's make the last layer of petals. They will be both shorter and narrower. To do this, take a sheet of yellow paper and cut out five stripes 6 x 0.5 cm. Glue them in the middle of the flower.
Not a single flower is complete without a leaf. Therefore, we cut out a large sheet of green paper and glue it to the back.
Now the paper aster is ready. Such a bright and voluminous craft will certainly decorate your home and attract the attention of every guest.
Fresh flowers are always great. And in winter, homemade ones can be used as an alternative. The ones made look especially good
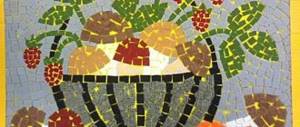
DIY asters made of corrugated paper in a vase. Master class with step-by-step photos
How to make asters from corrugated paper in a vase from waste material. Master class with step-by-step photos.
Author: Kristina Burkova, 6th grade student of the Nizhnekuryatsk Secondary School of the Karatuz district of the Krasnoyarsk Territory. Leader: Ksenia Alekseevna Kruglova, technology teacher, Nizhnekuryatsk Secondary School Description of work: The master class is designed for children aged 9-11 years, technology teachers, primary school teachers, additional education teachers, creative parents. Purpose: asters from corrugated paper and a vase from a plastic bucket can be made as a gift for any holiday, you can decorate the interior of a corridor, a children's room, a technology room, or you can make it for a competition dedicated to nature. Goal: making asters from corrugated paper and a vase from a plastic bucket with your own hands. Objectives: - learn to make asters from corrugated paper and a vase from a plastic bucket; - develop hand motor skills; - cultivate diligence and accuracy in work. Materials and tools: 1. For making asters: - corrugated paper; - tubes from newspapers or magazines; - scissors; - PVA glue. 2. To make a vase: - a plastic bucket; - toilet paper; - eggshell; - gouache or acrylic paints of brown and gold color; - brush; - PVA glue. Step by step execution of work. We prepare the necessary materials and tools for making a vase.
We cover the bucket with one layer of toilet paper, and after the paper has completely dried, with eggshells.
We paint the outer walls of the bucket with brown gouache and give time for the gouache to dry completely.
Then, using a dry brush, apply a thin layer of gold-like paint.
Since there was no “golden” outline nearby, with a thin brush we draw the gaps between the shells, also with “gold” paint.
After the paint has completely dried, apply a layer of acrylic varnish. The vase is ready!
Now let's start making asters. We prepare the necessary materials.
First, let's make tubes from old magazines or newspapers - they will serve as a stem for the flower. You can see how this is done here: /blogs/ksenija-aleksevna-kruglova/rozy-iz-gazety-podarok-svoimi-rukami-s-detmi-9-11-let-master-klas-s-poshagovym-foto.html One wrap the end of the tube into a snail shape.
Take a small piece of corrugated paper and wrap it around the rounded end of the tube. On this basis we will form the flower.
We make aster from strips of corrugated paper in this way: /blogs/ksenija-aleksevna-kruglova/podelka-iz-brosovogo-materiala-pano-maki-svoimi-rukami-s-detmi-7-10-let-master-klas-s -poshagovym-foto.html
We sequentially wrap the resulting strips onto the stem tube, gluing them in several places on the flower. The more stripes, the more magnificent the aster will be. You can vary the color scheme of the aster. We make sepals. We take a strip of green paper, cut strips on one side and sharpen them.
Carefully wrap and glue to the flower.
We make the leaves from green paper. From the rectangle we cut out an oval with pointed ends and twist the flagellum on one side.
To form the stem, cut thin strips of green paper.
We wrap strips around the top of the stem, inserting leaves. The flower is ready!
There is another way to make an aster. We make a couple of stripes, like on sepals, and carefully tuck the edges. These strips are glued first.
Next, we make strips, cut the edges and twist them a little.
We collect a flower. We decorate the sepals and stem in a well-known way.
We make the required number of flowers.
Let's move on to the final stage. We cut off a long strip of green color and stretch it from one edge, carefully so as not to tear it.
Next, we lay the folds and secure them with glue or a stapler.
Glue the resulting strip to the inside of the vase.
Place flowers in a vase. To make them stand well, fill the vase with small shreds and place strips of green corrugated paper on top. If you have green fabric, you can imitate greenery with it.
The work is ready! This vase can be placed on a shelf in a closet...
or maybe on the table.
Thank you all for your attention!
We recommend watching:
How to draw asters in a vase Astra from paper with your own hands. Master class DIY crepe paper asters DIY colored paper asters
Similar articles:
Aster made of threads. Master Class
DIY paper flowers. Aster