DIY autoclave cassette
Nov 15 • Uncategorized • 134 Views • No comments on the post DIY autoclave cassette
Contents
How to choose an autoclave for home canning
Autoclaves with pre-pumping of excess pressure and autoclaves with cassettes for installing cans. What is their fundamental difference?
There are many different models of autoclaves for home canning on the market, a wide choice in terms of the number of jars it can hold, the material used, the type of heating, etc. But the main difference between all existing household autoclaves lies in their operating principle.
Let's consider cassette-type autoclaves.
Cassette-type autoclaves are home autoclaves in which special holding devices are used to install cans - pressure cassettes. The cassettes hold the jars inside the autoclave and press the lids of the jars, preventing the lids from falling off.
These home autoclaves are most often made of stainless steel. These types of home autoclaves do not require pre-pressure pumping. Working with them is very simple, does not require additional devices, everything you need to work with the preservative autoclave is included in the kit.
Such autoclaves have a number of advantages:
– no need to pump up initial pressure
– reliable fixation of the lids with autoclave cassettes (even if the machine is not tightened properly)
– aesthetic appearance – all cassette autoclaves are made of stainless steel, they look very beautiful and reliable.
One of the most important advantages for many users of home canning autoclaves is their ability to upgrade to a moonshine still. Almost all models of cassette-type home autoclaves have the ability to connect a distiller. That is, the capacity of a household autoclave sterilizer can be used not only for canning and sterilizing products, but can also be used as a moonshine still.
The lid of such conservatory autoclaves is equipped with an adapter designed for installing a moonshine still. Thus, the cassette autoclave has two functions: it can work as a conservation autoclave and as a moonshine still (Distiller)
The main and, for some, very important disadvantage of cassette autoclaves is that the jars installed in the autoclave must be exactly the same size. Otherwise, the cassettes will not attract the lids and secure the jars.
Types of cassette-type autoclaves:
Autoclaves with distiller
Hanhi Autoclave
Do-it-yourself autoclave from a flask
designed for canning vegetables, fruits, meat, poultry and fish with maximum preservation of the natural taste, aroma and beneficial properties of the product. Built-in heating elements are used as a heating source.
Save your budget - canned food made at home using an autoclave will cost significantly less than store-bought, taking into account all costs.
Canned food prepared with your own hands from natural ingredients is not only tasty, but also safe for your health and the health of your loved ones.
The time for preparing canned food is significantly reduced; sterilization time ranges from 10 minutes to 1 hour, depending on the product being canned.
You no longer need to stand at the stove for several hours and roll up hot jars.
DIY moonshine still
In our country, moonshine stills are not new products; they are old, familiar units for preparing home-made drinks with a variety of additives. In Russia, they began making moonshine stills with their own hands during the period of strict Prohibition, when people were forced to look for other ways to obtain alcoholic beverages for the holidays.
The standard design of moonshine stills was known to both children and adults. Even those who did not have such devices at home understood the structure of these home helpers. Today, legislation is favorable to those who make alcoholic beverages for their own use.
How to make an autoclave with your own hands
To begin with, I think it’s worth telling more about the miracle device called an autoclave.
For selling, of course, there is a penalty. For many people, moonshine is now a hobby. He managed not only to preserve a unique tradition.
Modern manufacturers of moonshine stills use progressive technologies, they choose high quality materials, and constantly improve the design. Stylish, laconic and multifunctional units are a source of pride.
Parts made of composite materials are heated to + 140 C, and the pressure is five to six bar. According to the regulations, all autoclaves must be registered, because this is a rather dangerous thing, 10 atmospheres is no joke.
Making at home using a drill, grinder and ordinary household tools a full-fledged autoclave from a standard 25-liter aluminum milk flask, used for preparing stew and canning food.
1) Reinforcement of the bottom - it is flat on the can, therefore, if nothing is done, the pressure will bend it with its belly.
We install an additional flat steel pancake, attracted by a special design (more details below) 3) Re-equipment of the lid clamp - the existing standard clamp-latch mechanism is not designed for high pressure.
We make a strong pressure plate with 6 screws.
4) Installation of control and measuring instruments and the necessary automation for the autoclave - thermometer, pressure gauge, valve for the pump, safety valve with the possibility of forced pressure release.
In the online store Goni-samogon.ru you will find everything you need to make homemade moonshine.
vodka, various wines, liqueurs and other alcoholic drinks.
We paid special attention to developing a payment and delivery system.
From a variety of options, you can choose the most optimal one for yourself. Buyers trust Goni-samogon.
Stainless steel autoclave 46 l
The autoclave-sterilizer is designed for the sterilization of food products packaged and rolled in glass and tin jars, i.e. for producing home canned food.
- The maximum operating temperature in the autoclave is 120 degrees C.
- Capacity: 3 l cans - 4 pcs. 2 l - 5 pcs. 1.5 l - 6 pcs. 1 l - 9 pcs. 0.7 l - 12 pcs. 0.5 l - 24 pcs.
- Suitable for stoves: gas, electric, can be heated over an open fire
- Overall dimensions: internal diameter 444 mm, width at handles 550 mm, height 560 mm.
- Made from food grade stainless steel AISI 304
- The maximum operating pressure in the autoclave is 0.2 MPa (2 kgf/sq.cm).
- Save your budget, canned goods made at home using an autoclave will cost significantly less than store-bought ones, taking into account all costs.
Do-it-yourself home autoclave for canning
If you want to stock up on meat or fish for future use, then you can’t do without canned food. Long-term preservation, in turn, is impossible without proper sterilization, and proper sterilization is unthinkable without an autoclave. Let's look at the process of making a home autoclave for stewed meats and canned goods from an old gas cylinder or receiver.
The purpose of sterilization: to destroy or suppress the vital activity of microbes (microflora of raw meat, fish) and preserve this valuable food product without excessive breakdown of proteins, fats, vitamins and other useful substances.
Household autoclave from a milk flask (can)
Making a full-fledged autoclave at home from a standard 25-liter aluminum milk flask.
The autoclave is used for canning food and making stews, which cannot be obtained during normal cooking without creating a pressure of about 3 bar and a temperature of up to 120 degrees.
A limited set of tools is used - a drill, an angle grinder, and ordinary household hand tools. No electric welding required.
1) Reinforcement of the bottom - it is flat on the can, therefore, if nothing is done, the pressure will bend it with its belly.
We install an additional flat steel pancake, attracted by a special design (more details below) 3) Re-equipment of the lid clamp - the existing standard clamp-latch mechanism is not designed for high pressure.
We make a strong pressure plate with 6 screws.
How to make an autoclave
There are industrial autoclaves that are used in the food industry or medicine to sterilize instruments. But an autoclave can also be made at home using a gas cylinder or milk can.
The manufacture of this device requires some metalworking skills and ability to operate a welding machine, but in general the process of creating an autoclave is not difficult. To make an autoclave, you need a strong metal container, such as a gas cylinder. You can weld the body of the autoclave from a metal sheet 4-5 mm thick, but when using a cylinder there will be less work.
The structure of a homemade autoclave is shown in the figure.
Source: https://pravo-38.ru/avtoklav-iz-fljagi-svoimi-rukami-76633/
Autoclaves with pre-pressure (cassetteless)
Cassetteless home autoclaves or autoclaves with pre-pressure are essentially the very first autoclaves that began to be used in the household. These are fairly simple autoclaves in design. Such household canners are made from stainless steel, as well as from alloy steel (everyone knows the most reliable Belarusian NZGA autoclaves.)
Autoclaves with pre-pressure (cassette-free) only at first glance seem more complicated than cassette canners. In fact, now almost everyone has a bicycle, motorcycle or car, which means there is always a booster pump.
With their only drawback, autoclaves without cassettes are the most versatile and less demanding to use.
Household autoclaves without cassettes are not tied to the size of the cans used. You can collect different jars in one bookmark, for example 0.5 liters, 0.7 liters and liter jars. Such a set of different cans cannot be used in cassette autoclaves; there you need to select cans strictly according to size (height), otherwise the cans will not be fixed with pressure cassettes.
Fixation of cans in household autoclaves without cassettes is carried out due to excess pressure pumped by a pump. Cans do not float or move around the autoclave.
This is the main and, for many, very important advantage of autoclaves for home canning, without the use of pressure cassettes. There is no need to purchase identical jars in advance. Take any jars you have at home, with any type of lid (sealer, twist-off, etc.), add food and preserve.
Another important advantage of autoclaves with pre-pressure is their faster return to operating mode, in contrast to cassette-type autoclaves, since excess pressure is already created inside the autoclave initially. Plus, these autoclaves are capable of operating at higher pressures and temperatures. Sometimes it is necessary to make the sterilization temperature above 120 degrees. Autoclaves with cassettes are not capable of producing an operating temperature above 120 degrees; some models do not reach more than 117.
Cassetteless autoclaves include:
You can buy an autoclave for home canning or get more detailed advice from our managers by phone:
8-9000-29-67-67
8-905-830-20-40
8-902-864-74-77
Or write your questions by email: This email address is being protected from spambots. You must have JavaScript enabled to view it.
Found it cheaper? Write to us
Original product. There are certificates
Prepayment 0 rub. You pay for your order after inspection and checking the contents
Delivery:
- Moscow 450 rub. flat tariff
- St. Petersburg 450 rub. flat tariff
- In Russia to the point of issue 650 rubles. By courier 790 rub.
- Important. Far Eastern Federal District 990 rub. By courier 1190 rub.
- Russian Post EMS, CIS countries at carrier tariffs
- Description
- Delivery and pick-up points in your city
Standard cassette for autoclave Dymka,
holds 5 cans with a volume of 0.5 liters. or 3 cans of 1 l.
Provides reliable clamping of cans thanks to the special dome shape. Made of stainless steel 1 mm thick. Completely collapsible design. The autoclave requires 3 cassettes.
| Accessories: | Accessories for autoclaves |
| Type of equipment: | Smokehouse |
Delivery by courier and to 3000 points throughout Russia. We deliver to the CIS
- In Russia there is payment upon receipt in hand
- Cash or bank card
PICKUP POINTS IN YOUR CITY. Enter the name of the city, the map will load in a few seconds.
An autoclave-sterilizer, made from a gas cylinder or receiver, solves one of the main problems of the household - long-term storage of meat, fish, vegetable and mushroom products.
In summer, autumn and early winter, a home autoclave is the main tool for the production of canned food, allowing sterilization in accordance with the standards of scientific and technological progress, at excess pressure and temperatures up to +130°C. After autoclaving, canned food can be stored at room temperature for years without spoiling or losing its beneficial qualities.
This article will help you decide on the design of an autoclave, and will also tell you the basic rules for sterilizing home canned food.
Operating principle of the autoclave
The principle of operation of the autoclave is simple: due to excess pressure, the autoclave allows you to raise the sterilization temperature above the boiling point of water by 20-30°C. Although most harmful microorganisms die at temperatures of +80-100°C, there are a few microorganisms whose cysts can withstand this test. For example, the causative agent of botulism is guaranteed to die only with prolonged exposure to a temperature of +113-120°C.
In addition to sterilization, the autoclave allows you to combine the tedious operations of preparing canned food. By preparing canned food in an autoclave, you can avoid pre-cooking the product and subsequent sterilization. Yes, cans of raw meat or vegetables are loaded into the autoclave, and ready-made canned goods are unloaded from it, bypassing the cooking stage - the autoclave will do everything itself.
Canned food is prepared in a household autoclave as follows:
- Products intended for canning are measured and thoroughly mixed with salt and spices, according to the recipe.
- Glass jars are thoroughly washed and inspected for chips and cracks.
- The product mixture is laid out in jars so that there is a distance between the lid and the product
- The cans are rolled up using a seaming machine and placed inside the autoclave, on a pallet, in one row or in several rows one on top of the other.
- The autoclave is filled with water so that the lids of the top row of jars are hidden under water by 2 cm. A larger amount of water only increases the heating time to operating temperature.
- The autoclave lid is closed and the bolts or screws securing the lid are tightly screwed in.
- Excess pressure is pumped inside the autoclave using a car pump or compressor. In industrial conditions, steam is pumped into the autoclave, after draining the condensate with pressure.
- The autoclave is plugged in or placed on a gas stove, on the largest burner. As it heats up, the pressure in the autoclave increases to
- At operating pressure, the canned food is sterilized, then the heating is turned off and the temperature and pressure are gradually reduced to normal values (atmospheric pressure).
Some autoclaves are made in such a way that they do not provide for pumping compressed air for back pressure. Back pressure makes it possible to avoid fastening the lids of jars with staples or special devices so that the lids do not tear off when heated.
How to make a wax sterilizer with your own hands
A wax sterilizer is not a luxury, but a necessary tool for every apiary in modern beekeeping conditions.
To make a wax sterilizer, you need to purchase a stainless steel container with a 2 mm thick wall - a container for wax. It is better to immediately buy a stainless steel tank, but if not, then a stainless steel sheet is cut into pieces and a container for wax is welded. Cook with electrodes on stainless steel. Check to see if there are leaks anywhere. You determine the dimensions of the tank yourself, based on the availability of wax raw materials, you can make a large tank, you can make a small tank if the apiary is small. Then you need to make another container - which will contain the oil itself. The distance between the walls of the container is approximately 2 cm. The material can be ordinary steel 3 mm thick. Either it will be another larger tank or sheets of steel 2 mm thick, which are cut to size with a grinder and welded with electrodes. The welding machine used for this work is a conventional one - an inverter. A 2.2 kW heating element is installed below. It is better to install the heating element automatically to maintain the set temperature. To control the temperature, you can use a thermometer up to 200 degrees - for safety reasons, if the automation fails, the thermometer will help the beekeeper. You can also use a tester with a built-in thermometer to monitor the temperature. Install a tap to drain the wax. The tap is 1 inch, regular brass, ball. It is better to install the faucet not at the very bottom, but a little higher, about 1-2 centimeters, since debris accumulates below. No matter how you clean the wax, debris will still be present. A plug is placed at the bottom of the oil jacket to drain the oil. In order to avoid heat losses, we insulate the tank; to do this, we make a jacket for the tank from 0.5 mm metal, cut to size and assembled with rivets or welding. Between the tank with oil and the jacket we place a heat insulator, for example a 20 mm basalt slab or another. This will protect your hands from burns and the oil tank from accidental damage. Don't forget about the lid - it is made of stainless steel or aluminum. The oil must communicate with the atmosphere. For this purpose, a breather tube is welded into the top of the oil jacket; during wax sterilization, a tube is attached to it that removes oil vapors from the room. It is best to use transformer oil. The entire wax sterilizer is made by hand and ready for use. The wax is loaded into the sterilizer and the sterilizer is turned on. First, the temperature is brought to 100 degrees and maintained in this state for some time, until all the water present in the wax has evaporated, without covering the wax with a lid, the water should evaporate completely. Then the temperature is raised to 140 degrees and maintained for 2 hours, with the lid closed, sterilizing the wax. Then the wax is cooled to 80 degrees and poured into molds for further use - making foundation. The wax and debris remaining at the bottom of the sterilizer are then simply cleaned out. Try to follow basic safety rules when working with electrical appliances and avoid getting burned. Don't forget about room ventilation. If you think that it is very difficult to make a wax sterilizer with your own hands, then just buy a ready-made one if you have the means.
see also
Homemade wax making
How to melt wax so that it does not burst and is yellow
Foundation adjustment - little tricks
Construction of an autoclave from a gas cylinder
A gas cylinder or air receiver from the brake system of a railway carriage is the best basis for a home autoclave. Why? But because the propane cylinder and receiver are made of special boiler-grade steel, which undergoes careful testing for hidden cavities, cracks and cavities. In addition, cylinders and receivers “during their lifetime” are tested for strength under excess pressure.
Home autoclave design
Some craftsmen make autoclaves from a milk can or large-diameter stainless pipe. Of course, it is possible to make an autoclave from a can, but you need to regularly test it in fresh air under pressure
All pressure vessels require that the bottom and lid be made with rounded edges and chamfered openings. These measures are necessary in order to reduce stress in the metal walls and protect the material from cracks and destruction under pressure. The flat bottom of an autoclave, for example, can buckle or tear out under pressure.
Typically, household autoclaves are made from small-volume gas cylinders. For example, 14 cans with a capacity of 500 ml or 5 liter cans are placed in an autoclave from a 25 liter gas cylinder.
The number of cans that an autoclave can fit from a propane cylinder, depending on the volume of the cylinder
A 50-liter gas cylinder is good because it can be used to make an autoclave of optimal size by cutting off the top and shortening the middle. Often electric autoclaves are made from 50 liter gas cylinders by inserting several heating elements so that the total power is
LiveInternetLiveInternet
The fact that an autoclave is needed to prepare stew is indisputable, but the use of an oven and other methods of frying, boiling, etc. It's just bad for your health. Many cannot use an autoclave for a simple reason - its absence, thinking that the technological process is quite complex and the autoclave itself is akin to a synchrophasotron. In fact, everything is very simple. I'll try to explain it in my fingers. I took a 25 liter flask. I removed the lid, having first cut off the pin-pin securing the lid through the boss on the flask. At the base of the flask I welded a square frame from a 30x30 corner. In the corners of the frame, I welded four free-floating long studs, at the ends of which I welded an M10 bolt (it’s better, of course, not to be lazy and cut threads at the ends of the studs). I found a suitable metal plate for the lid; the thickness must be at least 8 mm (the thicker the better), otherwise the cover will be deformed when the nuts are tightened. I embedded a pressure gauge and a valve from an old motorcycle tire tube into it (these were used on old motorcycle tubes with a thread for a nut). I also pre-drilled four holes for the studs in the lid. Yes, we also need a rubber gasket under the cover; I cut it out of an old car cargo box. All. The whole autoclave. In this “primitive” at the bottom of the flask I put 7 closed (rolled up with metal lids) cans (0.7 l) on top of them another 7 cans, for a total of 14, I fill it with water so that the top cans are hidden by about 1 cm of water. I put a gasket, the lid on top, having previously inserted the studs into the lid and tightened this entire structure with four nuts. Using a car pump, I pump up a pressure of 1 atm (there should be no air leakage, the seal must be complete) and put all this crap on the fire. I won’t dwell on the autoclave technology itself, as such; in short, it’s physics - at rarefaction, the temperature of the boiling point of water is below 100°, at elevated pressure it is higher. I control the entire process using a pressure gauge; for canned fish it is enough that the pressure on the pressure gauge reaches 2.5-3 atm, for meat - 4.5 atm. When the required pressure is reached, I turn off the fire, the autoclave spontaneously cools down, and the pressure accordingly drops to the initial value (1 atm). I unscrew the nuts and take out the cans. You can fearlessly eat it, both in a year and in three, both with vodka and tea. Ideally, you can use a 20-liter gas cylinder as a container, cutting off the top part of it and welding the flange. The rest is based on the above technology. Nothing complicated. At best, you will need a welder if you don't have the skills yourself. welding works. Good luck!
taken from here: autoclave.ucoz.ru/publ/rybnye_konservy/izgotovlenie_avtoklava/2-1-0-2
and further:
A series of messages “household tricks”:
Part 1 - Detergent, eco-cleaning product from laundry soap Part 2 - CLEANING MARBLE ... Part 6 - CARE OF GLASS, CRYSTAL AND FAIENCE TABLEWARE Part 7 - CARE OF JEWELRY Part 8 - Making an autoclave for homemade stew
Making a home autoclave
The procedure for making a household autoclave from a cylinder:
- The gas cylinder is cleaned of gas residues, purged with compressed air or filled with water to the brim through a valve.
Before cutting the gas cylinder, it must be thoroughly rinsed with water. - The upper part, with the valve, is cut off with a gas cutter or grinder, but not thrown far away. The top will serve as the lid of the autoclave.
- Steel flanges, thick, are welded to both parts. Holes with a diameter of M10 bolts are first drilled into the flanges. All holes are chamfered at an angle of 45°.
It is desirable that the flanges be factory-made, DN300 - A thermometer sleeve, fittings for a pressure gauge and a ball valve, and a safety valve are cut into the upper part of the autoclave. The nipple is cut into a plug, which is screwed into the ball valve. Customizable safety valves are available
- The tightness of the two parts of the autoclave is ensured by a gasket made of paronite or rubber, with a diameter corresponding to the flanges.
- Pour machine oil into the thermometer sleeve and insert a thermometer with a measuring limit of +150°C.
- The pressure gauge must be designed for a pressure of at least 4 kgf/cm2.
- Test the finished autoclave with compressed air pressure of at least 3.75 kgf/cm 2, simultaneously checking the operation of the safety valve.
Table: determination of temperature (t) inside the autoclave by steam pressure (P)
| P | MPa | 0,175 | 0,206 | 0,242 | 0,280 | 0,326 |
| 1,72 | 2,02 | 2,37 | 2,75 | 3,2 | ||
| t | °C | 115 | 120 | 125 | 130 | 135 |
Some craftsmen advise doing without a thermometer, pointing out that a pressure gauge is the main tool for controlling sterilization. This is unprofessional advice - a thermometer is a must.
Some people advise making autoclaves by simplifying the design as much as possible, cutting off the valve from the cylinder and cutting into a narrow neck from the pipe. A square flange is welded to the top of the pipe. The cover is also square, matching the shape of the flange. I believe that a narrow neck causes significant inconvenience when loading cans.
The thermometer in a simple autoclave is embedded in the middle of the body in order to most accurately control the temperature, which is also controversial, because the hottest place in the autoclave is the top, and the thermometer serves primarily for emergency temperature control.
It is advisable to make the tray removable, made of stainless steel. Such a tray is convenient to pull out, and the bottom of the autoclave is easier to clean.
Household autoclave from a milk flask (can)
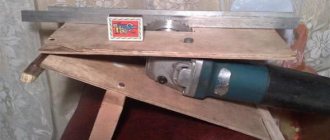
A limited set of tools is used - a drill, an angle grinder, and ordinary household hand tools. No electric welding required.
Making a full-fledged autoclave at home from a standard 25-liter aluminum milk flask.
The autoclave is used for canning food and making stews, which cannot be obtained during normal cooking without creating a pressure of about 3 bar and a temperature of up to 120 degrees.
A limited set of tools is used - a drill, an angle grinder, and ordinary household hand tools. No electric welding required.
Original milk flask FA-25
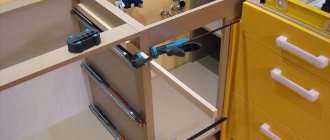
To set up an autoclave, you need to solve 4 problems:
1) Reinforcement of the bottom - it is flat on the can, therefore, if nothing is done, the pressure will bend it with its belly. We install an additional flat steel pancake, attracted by a special design (more details below)
2) Reinforcement of the cylindrical part of the can with standard clamps.
3) Re-equipment of the lid clamp - the existing standard clamp-latch mechanism is not designed for high pressure. We make a strong pressure plate with 6 screws.
4) Installation of control and measuring instruments and the necessary automation for the autoclave - thermometer, pressure gauge, valve for the pump, safety valve with the possibility of forced pressure release.
1) Bottom reinforcement
We take an old 12-inch wheel rim (ordinary rims, for example, Zhiguli - at least 13 inches, and 12-inch ones - these are from Oka and small Daewoo, rims with three bolts). We spread the disk lengthwise into three parts, as shown in the figure, to get two cup hoops.
Wheel rim 12′ and cut points with a grinder.
We place the hoops towards each other from the bottom and from the narrowing point of the flask. In the lower cup, under the bottom of the flask, we insert a circle of sheet metal 5 mm thick and 28.5 cm in diameter with a chamfer removed. We tighten the hoops with six ties from an M6 threaded rod.
An additional bottom inserted into the cup hoop.
2) Strengthening the cylindrical part
To strengthen the cylindrical part of the flask, we take five standard steel clamps 280-300 mm and tighten them at an equal distance from each other.
Tightening the flask cylinder with clamps
3) Re-equipment of the lid clamp
Remove the standard aluminum clamp with a latch. We roll the round lid of the flask and tap it around the perimeter so that the rubber gasket from under it is not squeezed out by high pressure.
We make a hexagonal or round pressure plate from fairly strong metal with six holes Ф10 mm with a diameter of 24 cm.
(The circle is divided into six parts by laying out a radius of 12 cm on it).
We make hooks from loop screws, cutting off the excess so that they fit freely on the handles of the flask.
The upper hoop of the flask, made of a cast alloy similar to silumin, contains two handles and supports for the clamping mechanism.
The 4 exit points of the flask handles, as well as the two points of the clamping mechanism, form a regular hexagon. We insert a bolt into one support and sharpen the other a little so that the hook screw fits freely into the hook.
As a result, the pressure plate with freely hung hook screws and wing nuts should fit freely onto the flask.
Pressure cover with six screws and wing nuts
4) Installation of instrumentation and automation
Autoclave instrumentation and automation: pump valve, thermometer, pressure gauge, safety valve with a ring for forced pressure release.
To pump up back pressure at the beginning and end of autoclaving using a pump, a valve must be installed. Here we use a wheel extension from a Gazelle, which is attracted by the cut off upper part of a conventional tubeless valve. You can also take a long brass valve from any load wheel and cut an M8 thread on it to secure it with nuts to the body of the autoclave.
The thermometer, since the operating temperature range of the autoclave is 0 - 120 degrees, is used with a scale of up to 160 degrees.
The pressure gauge, since the operating pressure range is 0 - 3.5 bar, is used with a scale of up to 6 bar.
To release air from the autoclave when the pressure is exceeded, a safety valve is needed.
The valve is used from the pneumatic brake system of a ZIL-130 car (the driver’s name for the valve, sorry, “fart” - that’s what you should ask in the store) with minor modifications: – replacing the rod spring with a weaker one, since the valve is designed for pressures in the region of 10 bar, and we need to limit it to somewhere around 4 bars.
– flatten the tip of the movable valve stem, drill a hole in it for a ring, by which you can manually pull the stem and forcefully release the pressure from the autoclave.
Source: https://sdelay.tv/bytovoi-avtoklav-iz-molochnoi-flyagi-bidona
Electric autoclave from a cylinder
A home autoclave from a cylinder can be electric. Heating elements embedded in the lower part of the body allow autoclaving regardless of the gasification of the populated area.
Of course, electric sterilizers consume energy, but they are easier to automate using simple Chinese thermostats, the cost of which does not exceed 300 rubles.
Autoclave automation allows you to optimize the procedure for producing home canned food - you can draw up a regime map and produce canned food according to a strict program.
By the way: An autoclave with electric heaters can be placed on a gas stove, primus stove, or even a fire. But a regular autoclave cannot be plugged into a power outlet.
Rules for operating the autoclave
All pressure vessels must be operated by people over 18 years of age who have undergone special training, are medically fit, etc. This is difficult to achieve at home, so remember the simplest rules for operating an autoclave:
- The water level in the autoclave should be kept to a minimum. The jars are sterilized with steam; the water level does not matter.
- After the water boils in the autoclave, the pressure inside will increase very quickly, so you should reduce the heat on the burner under the autoclave or turn off one heating element.
- The maximum back pressure in the autoclave is 1.5 kgf/cm 2. You can’t pump any more - this will increase the boiling point of the water in the vessel.
- Do not accelerate the cooling of the autoclave after completion of sterilization. A sharp decrease in pressure in the autoclave will cause all the jars to burst. You can open the autoclave after it has cooled and the pressure has reduced to atmospheric.
Sterilization modes for canned meat in an industrial autoclave
| Name of canned food | Capacity of cans, grams | Sterilization temperature, °C | Sterilization time in min. | ||
| Warming up | Sterilization | Cooling | |||
| "Canned stewed meat" | 400 | 112 | 20 | 70 | 15 |
| "Tongues in Jelly" | 1000 | 115 | 30 | 90 | 20 |
| » » « | 500 | 112 | 20 | 60 | 15 |
| » « | 250 | 112 | 20 | 55 | 15 |
| "Brain" | 250 | 112 | 20 | 60 | 15 |
| "Pate" | 400 | 112 | 20 | 60 | 15 |
| » « | 250 | 112 | 20 | 40 | 15 |
| « | 150 | 112 | 20 | 30 | 15 |
| "Tails" | 500 | 112 | 20 | 60 | 15 |
| "Cornbeef" | 500 | 115 | 30 | 90 | 20 |
| "Meat-vegetable" | 1000 | 115 | 20 | 70 | 15 |
| » « | 400 | 112 | 20 | 60 | 15 |
| "Pork and legumes" | 500 | 115 | 20 | 70 | 15 |
| » « | 3000 | 120 | 30 | 120 | 20 |
| "Meat and vegetables" | 3000 | 112 | 30 | 60 | 15 |
| "Roast beef with vegetables" | 500 | 112 | 20 | 60 | 15 |
| "Roast beef" | 500 | 112 | 20 | 60 | 15 |
| "Kidneys" | 500 | 112 | 20 | 60 | 15 |
| "Stewed hare" | 400 | 112 | 20 | 70 | 15 |
| "Stewed rabbit" | 400 | 112 | 20 | 70 | 15 |
Source: Meat Industry Developer's Handbook. Canned meat technology
Interesting video on the topic:
Summary
An autoclave is a dangerous vessel that operates under pressure and at elevated temperatures. The consequences of the destruction of an autoclave are terrible, so you need to learn how to work with it correctly, otherwise, instead of canned food, you will end up in the hospital with burns and barotrauma.
It is advisable that all welds on the body of the autoclave be performed by a qualified welder who has experience in welding pressure pipelines.
There are no similar posts