Today there is a tendency to independently manufacture various devices for the home, including lighting fixtures. This allows you to give a second life to old household items, and also save a lot on the purchase of new lamps. Today we will talk about making a fluorescent lamp with your own hands.
Anyone with even a minimal understanding of the basics of electrical engineering can make such a lighting device or repair a faulty lamp. Our article will help you with this.
Neon lighting on cars
One of the most spectacular and controversial types of car lighting tuning is neon underbody lighting. Properly executed lighting design of the underbody part can attract admiring glances of drivers, passengers or passers-by even to domestic cars and not very prestigious foreign cars. The inconsistency of such an upgrade in the exterior design is associated with the legality of introducing such innovations into the design of the vehicle. Although there is no direct ban on highlighting elements of the car body, there are many nuances that can be found fault with in order to fine the car owner and even deprive him of his driver’s license.
Neon lighting on cars, its types, advantages and disadvantages
The modern type of tuning, called neon lighting, gets its name from the cold glow neon fluorescent lamps originally used for this purpose. It is an additionally installed system consisting of lighting elements with auxiliary devices that are responsible for its correct functioning. Today, the light source for such car design can be not only neon.
There are the following types of lighting design for the exterior and interior of a car:
- neon lamps, which are ordinary fluorescent lamps in which the working gas is inert neon;
Neon is usually used to illuminate the underside of a car.
- gas-filled flexible tubes filled with neon, the surface of which is coated with phosphor;
- LEDs in the form of individual plates or LED strips in silicone insulation.
Depending on the installation method, light tuning can be spot-based, in which the emphasis is placed on highlighting individual elements of the car, or continuous, performed along the entire contour.
The following car elements can be subject to aesthetic upgrade:
- bottom, when lighting devices are placed under the car;
- interior, most often illuminated by the floor or dashboard;
- luggage compartment;
- individual elements of the car, for example, wheels or a radiator grille.
The advantages of colored lighting on neon lamps or tubes are:
- even diffused light;
- a brighter glow, which, with the right choice of color, can not only be aesthetically pleasing, but also improve the illumination of the road;
Neon components have their advantages and disadvantages
- no heating of lamps or tubes;
- long service life up to 15 years;
- lower cost compared to LED lighting.
The disadvantages of this type of lighting tuning include:
- susceptibility to mechanical stress when using fluorescent lamps;
- the need for additional installation of reflectors made of mirrors or foil to give direction to the light flux;
- inability to change color (this will require installing new tubes or lamps with a different phosphor composition).
Car illumination with LEDs is free of such disadvantages, and allows you not only to change color, but also to make the glow flash, including in time with music, which is especially often used in the car interior.
DIY temporary lava lamp
Of course, you can go to the gift shop and purchase this piece of furniture. But it's not that cheap. Let's look at how to make a lava lamp from scrap materials?
The first thing we need is a large plastic bottle of lemonade or mineral water. In general, absolutely any transparent container that closes tightly with a lid will do, but a plastic bottle is the best option. In order to achieve the most effective result, it is better to take a container of at least 0.5 liters.
Next, you need to fill the bottle with oil three-quarters of the entire volume, and fill the remaining quarter with water and about 10 drops of food coloring. The solution should be rich in color. Now you need to add salt or any effervescent tablet, such as Alka-Seltzer or vitamin C.
Next, tightly cap the bottle and shake it. You will immediately notice how droplets of liquid begin to form, gradually connecting with each other. But this process will not occur continuously. Over time, the drops will stop forming and you will have to add more salt or effervescent tablets.
This kind of lava lamp, made with your own hands, is good because it is absolutely harmless and safe, which is important if it is to be used, including by children.
To make everything look even more impressive, install some kind of light source at the bottom of the bottle so that the beam is directed upward onto the liquid. This way, the light will illuminate these droplets, and the lava lamp will look much more impressive. You can destroy it with your own hands if the light source produces a lot of heat, which can melt the plastic.
Is neon illumination of the underbody of a car allowed?
In the current Russian legislation, there is no formal prohibition on installing lighting equipment on a car. Most of the requirements for violation of which traffic police officers fine car owners relate to clause 3.1 of the Russian Federation Traffic Regulations, which prohibits the operation of a car if external lighting devices (their type, number or location) do not correspond to the standard design of the car. But, according to GOST 8769-75, backlighting is not included in the list of external lighting devices.
Neon light will not affect the technical component of the car in any way
. As for other restrictions, the same section of the traffic rules stipulates a ban on certain colors of light sources, depending on their location.
It is prohibited to use a car in which:
- in front there are lighting devices of all colors except white, orange or yellow, as well as reflective elements – except white;
- at the rear there are lights (or license plate illumination) that are not white, or lighting fixtures of any color other than orange, red and yellow;
- Reflective devices are installed at the rear of all colors except red.
Based on these provisions of the traffic rules, light tuning is an acceptable procedure. If it doesn't clash with the color, you can use it.
But there is another point in the rules, according to which any changes made to the design of the car must be registered with the traffic police and the documents for the car. It is unlikely that it will be possible to obtain registration for illumination with LEDs or neon, and the operation of such a machine will be considered an administrative offense.
You will probably be able to avoid a fine if you adhere to the following rules:
- direct the luminous flux from neon or LED lights when illuminating the bottom, only onto the road, and not to the sides;
- do not install lights of prohibited colors in the radiator grille or front bumper, for example, red or blue;
- do not use white light elements for the rear bumper, which is allowed here only for the license plate and lights;
- Do not use flashing LED lights for external illumination of the machine.
Attention! Flashing neon lighting of any elements of the car’s exterior can be regarded by a traffic police officer as a special signal, for the illegal installation of which the driver can be deprived of the right to drive a vehicle for a period of one to one and a half years.
DIY car underbody lighting
Installing the underbody lighting of a car is quite simple; you can do it yourself without going to a specialized center. First, you should carefully consider how to make it beautiful, functional, and not attract undue attention from the traffic police. Experienced designers recommend choosing light in a contrasting tone with the car body. But this is a matter of taste for every car owner.
To install neon lighting you need:
- Lay out the light kit on a flat surface and understand all its components. Prepare the necessary tools and materials.
- Place the car on an inspection hole, overpass or jacks, since all work will be carried out under the car. Make sure that the vehicle is secured securely and that the work is safe.
Installing neon in a car is quite simple.
- Disconnect the negative terminal of the battery to ensure electrical safety.
- Plan the installation locations for LED strip or neon lamps and tubes around the perimeter of the underbody of the car. In this case, you need to avoid moving elements and components, as well as places where wires accumulate.
- When drilling holes for installing tube fastening brackets, choose places that are not critical for the functioning of all mechanisms and systems. The drilled hole must be treated with an anti-corrosion compound and silicone sealant, which will protect the body from the appearance of rust spots.
- Install the light kit, positioning the tubes so that the wires coming out of them are oriented toward the rear of the vehicle.
- When installing lighting from neon lamps (tubes), it is necessary to provide for the installation of reflectors that direct the light onto the road. The strip of LEDs is simply oriented in the desired direction.
- The converter or transformer included in the kit is located in the engine compartment, near the battery. It should be bolted to the body elements.
After attaching the lighting tubes or neon lamps to the bottom of the car, they need to be connected to the on-board electrical network. In this case, it is imperative to observe polarity when connecting all the light elements and the transformer included in the kit in series. Power to the transformer (converter) is supplied from the positive terminal of the battery, and the negative terminal is connected through the switch button and the fuse located under the engine. Some neon lighting kits include a connector for powering the system from the cigarette lighter. When installing, you must adhere to the electrical connection diagram recommended by the backlight manufacturer.
Lava Lamp Heater
The next step is to heat the mixture. First of all, you need to close the jar tightly. Next, you need to make the following design: take a heat-resistant surface, for example a flower pot, and place it upside down. You need to place a heat source under it, and put our jar on the bottom. Over time, the lamp and the mixture inside it will heat up, the oil will expand more than the alcohol and will move up and down.
An incandescent lamp is quite suitable for creating a heating device. Its power depends on the volume, but it is better to take no more than 40 W.
Have you decided to get aquarium fish or more exotic animals that glow in neon light? Do you want to throw a neon party at home or make a sign with neon lighting yourself? There is one common solution to all these issues - to make a neon lamp at home.
Is it possible to make neon lighting with your own hands?
Published by: Arthur Kanapatsky 0
Having thought about installing neon lighting as a decorative element, many feel the desire to do everything themselves. But, there are several factors that must be taken into account. And above all, the need to manufacture special lamps. Due to the fact that they can only be made using specialized equipment, neon ceiling lighting is usually not done with your own hands, although there is such a possibility.
Let's get started
You can make such a lighting device with your own hands of any design. But it is better to choose an option with a removable top cover than to give preference to a monolithic design. So, in any case, it will be more convenient to carry out repairs. Here the manufacturing process involves the following steps:
- We make a frame around the perimeter. It is better to make it two-layer. The top layer will be decorative;
- We assemble the electrical system of the lamp according to the diagram;
Assembly diagram
- make sure that all contacts are properly insulated. In a situation with close water, this is vitally important. To do this, sealed tips should be placed on the ends of the lamps;
Note! Sealed tips can be made from available materials.
- we attach the entire electrical circuit to the plastic cover of the lamp;
- Next, using glue, fix a plexiglass rectangle on the bottom side of the device;
- We put a plastic cover on top on which fluorescent lamps are installed. The cover should be easy to remove so that the device can be repaired.
Almost finished product
If the cover is black, then it must be covered with white reflective film. For white plastic such manipulations are not carried out. Where the lamp connects to the aquarium, it is necessary to apply sealant to prevent condensation from penetrating into the lighting fixture. But before applying the sealant, do not forget to degrease the glass.
What you need
First, you need to understand how such lighting works and how all the elements included in this system work.
The basis here is special lamps filled with an inert gas - neon. It is from this gas that such lamps got their name. The inner walls of the lamp are coated with a special powder - phosphor, which interacts with neon when high voltage is applied and begins to glow. The composition of the powder affects the color of the resulting glow.
The need for high voltage to obtain the glow effect forces the use of special devices in the system - voltage converters, or voltage-increasing transformers.
This point is especially worth remembering - high voltage is unsafe for life, therefore, the installation of the electrical part of the backlight should be carried out by a person who has experience working with high-voltage components.
The lamps themselves are made of thin glass and can easily be damaged during transportation or during installation. You should be very careful when installing them.
What you need to know
All lamps that include a fluorescent light source are characterized by cylindrical and rectangular shapes. They are narrow and light weight, so they can be installed in various places in the house.
Note! Such lamps can be connected both to the mains (220 (230) V) and to be powered by a battery. The latest models are very relevant for country houses, garages and warehouses.
In addition, this type of lamps can be of different modifications:
- stationary. This group includes built-in, surface-mounted and ceiling lamps;
- mobile or portable. This includes pendant lighting fixtures that can be moved from one place to another or simply placed on the floor, table or shelf.
Lamp options
Making both options with your own hands is quite simple. If you understand the device a little and know how to do everything, then even repairing such a lamp will not be too difficult for you. And our article will try to help you with this.
How to install
The most common option for installing such lighting elements is side lighting of the ceiling. In this case, all elements of the system are located in a pre-prepared niche.
Typically, such a device is installed at the stage of installation of the ceiling structure. If there is no niche provided, you can install the lighting using a regular polystyrene plinth.
To do this, you need to stick it on, leaving a small distance between the ceiling surface and the edge of the cornice, as shown in the diagram.
Due to the location of the lamp, you can change the width and intensity of the light flux. But the same effect can be achieved by choosing lamps of a different diameter.
Neon illuminators have an interesting property - the larger the diameter of the lamp itself, the more diffuse the light flux becomes. Consequently, by installing lamps of small diameter, you can get a sharper edge of the light spot.
Other nuances are typical for all types of installed lighting. If a closed niche is constructed, that is, there is a side that cuts off the light flux, then its height will determine the degree of dispersion of the light flux.
The higher this side is, the sharper the light spot will break off and the clearer its border will be. This same side will help hide the installed voltage converter - it will not be visible behind the side.
To avoid errors during installation, you need to draw up a schematic diagram of the backlight in advance, calculating the power of all installed lamps. This is necessary to calculate the number of transformers to be installed.
It is not difficult to make such a calculation - neon lamps consume approximately 10 W of power for each meter of length. Therefore, a ten-meter structure will require about one hundred watts.
It is recommended to install voltage converters based on the fact that for every seven to eight meters of lamps, one transformer will be required. Based on this data, it is necessary to calculate the number of converters to be installed and the number of their connection points.
Options
If you do the neon ceiling lighting yourself, you can look for ready-made solutions in stores. Sometimes such kits are on sale. They include everything you need to mount and connect the lighting yourself.
But, even with ready-made kits, everything must be done strictly according to the instructions provided by the manufacturer. The lamps are very fragile, and improper installation of the electrical part can lead to a short circuit and fire. If you are not confident in your abilities, it is better to turn to electricians.
The second way to get exactly the same effect as neon lighting is to use “flexible neon,” which recently appeared on the market. There are much fewer difficulties with manufacturing and installation. The flexible cord itself, which will glow, is sold in coils or cut into pieces.
In order for the cord to start glowing, it must be connected to the converter. The power of this unit is calculated based on the length of the connected cord. It glows just as smoothly as a neon tube, however, the intensity of the glow is lower.
Installing such flexible neon is much easier, and not even the most experienced electrician can connect it. However, it is necessary to know the safety rules when handling high-voltage devices.
How to make neon lights for a car
As you know, car tuning is a whole system and an art of designing your own car that nothing can compare with. Neon car lighting is a type of tuning, and in this article we will try to understand what it does and how it is installed. Let us immediately note that in addition to the neon component, there are also other types of illuminating devices; we will also consider them.
How and from what to make
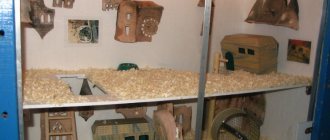
Most often, do-it-yourself fluorescent lamps are used to illuminate aquariums. Therefore, let's look at the assembly process using this example. To operate such lamps, a rather cumbersome electronics system is required. But it can be replaced with a throttleless circuit, which will take up significantly less space. But it will be less reliable than the first option and the device may soon need to be repaired. So, the first rule of assembly is that such an aquarium lamp must be made so that it completely covers the upper part of the aquarium.
Approximate view
To make a fluorescent lighting fixture for an aquarium with your own hands, you will need:
- plexiglass;
- fluorescent lamps;
- glue;
- sealant;
- insulating tape;
- wire with timer and plug;
- plastic for the frame.
Neon is power, brightness and strength
Let's try to understand what neon variation is and how it differs from other types of lighting design. If we recall the famous Hollywood film “The Fast and the Furious,” then neon was used in its shots on cars. A gas-discharge lamp is used as a luminous element of the neon illumination system. It is placed in a special tube that protects the backlighting device from damage and various external influences, including moisture, dust, dirt and much more.
Thus, the neon component can give an unusual and incredibly bright glow. As for the diffuser, for neon options it is customary to use regular foil or a mirror, which do this job perfectly. Why is foil or a mirror used instead of a diffuser? Everything is very simple. This need arises due to the fact that a neon lamp shines in all directions, and most of it (if a diffuser is not used) will go nowhere.
Neon is usually used to illuminate the underside of a car. Neon electric illumination of the bottom can turn a car rushing along the road at night into something incredible and fabulous. Such a car can be compared to a bright, high-speed meteor.
Ease of installation and low price make neon popular
The video shows how to install LED lighting on the underbody of a car yourself:
Neon is a pioneer, the first option that was and continues to be used in car lighting tuning. Ease of installation, relatively low price of the kit and other advantages have made neon lamps popular.
Today, literally in every stall you can buy this type of lighting. Neon modifications are much cheaper than LED modifications and are much easier to install. Even recently, neon components with special effects are being sold that simply captivate the eyes of others. As for the kit that goes for illuminating the underbody, it consists of a pair of neon lamps and fasteners.
Neon is fundamentally different from other types of lighting devices primarily in that it contains a gas-discharge lamp. The quality of this component is determined by the intensity of the glow. The operation of a neon lamp is based on the influence of an electric field that affects discharged neon. This discharged neon, located inside the tube, when exposed to an electrified field, turns into a mixture of ions, electrons and atoms. And neon lamps glow because electrons moving inside the tube collide with atoms, which, in turn, begin to glow.
How is this done and what do we need?
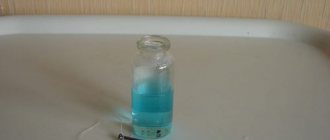
No matter how implausible it may sound to some, a neon lamp can really be made at home. Or rather, it will turn out to be a good likeness of it. The fact is that in industrial conditions, neon is obtained by liquefying air, which breaks down into many components, which include helium and neon. The process is complex, it requires special parameters of pressure, temperature, and the presence of additional substances (nitrogen, hydrogen). It is clear that we cannot provide them at home. Therefore, in apartment conditions, you can prepare a neon liquid, which has the desired property for us - glowing blue in the dark. We will need:
- 0.5 liters of Mountain Dew drink. Sold wherever Coca-Cola soda is available. The composition of this wonderful drink (by the way, the translation of the name sounds like “Mountain Dew”) includes gum arabic, esters, carbon monoxide, sodium benzoate, sodium citrate - in general, a colorful range of chemicals. It partially coincides with that used in large chemical laboratories to obtain neon from oxygen mass.
- Hydrogen peroxide
- Baking soda
What neon can do for a car
Neon light will not affect the technical component of the car in any way. This is understandable even to a schoolchild. But the lighting can completely transform the appearance of the car, complementing it with an incredibly attractive design. But besides this, neon light can also provide practical help.
The video shows how you can use the neon electric lighting of a car as a light music:
So, if you install a light at the bottom of the car, then when driving at night the road will be better illuminated.
Based on the point of view of experts and professional designers, you understand that installing neon electric lighting is most suitable for sports cars. Such light is able to highlight certain parts of the vehicle, show it in all its glory, add value to it, etc. This is a kind of business card, a means of promoting the “iron horse” among similar cars. And if the vehicle does not have anything special, is equipped with a low-power engine and does not have any special differences, it is most likely not worth filling it with lighting.
LEDs
Let's now look at LED lighting. I would like to note that this is a kind of tape encased in silicone. If in the neon modification the inner part was protected by the walls of the tube, then in this case silicone takes on the role of the shield. LED lighting can also be used under the bottom of the car, or can be installed on the license plate, trunk or headlights. The brightness of LED backlight, service life and power are significantly superior to neon, but the price does not allow you to fully enjoy it. LED lighting devices are expensive. And finding them in stores is not so easy.
In addition, LED lighting provides directional lighting and does not require the installation of a diffuser. And this type of electric backlight has a significant advantage, which lies in the design component - LED backlight allows you to use up to 256 different color shades simultaneously. Agree, this is more than just beauty. To control all these shades, an RGB controller is installed along with the LED backlighting, which controls and provides a number of decorative special effects.
Durability is another advantage of LED lighting. In addition, this type of illumination is considered more reliable and resistant to various mechanical damage. Even with the strongest shaking, stable lighting is provided, which cannot be said about neon electric lighting.
Permanent lava lamp
How to make a lava lamp that will work constantly? It should be made by an adult, as it uses alcohol and oil, which can easily ignite when heated.
For lamps sold in stores, a special mixture of liquid waxes is used. But you can also try to achieve a similar result at home. If you try, then, in principle, it is quite possible to end up with a liquid that will be interesting to pour.
The basis of the lamp will be any glass container. In this case, you should not use plastic, as it melts easily. Mineral or baby oil will serve as those iridescent bubbles.
There is no specific amount of oil that should be added. Pour approximately, as you can add more later if it turns out to be too little. If you want a more interesting effect, you can try making a lava lamp using oil paints, but be aware that over time the oil may separate from the dye, resulting in an unsightly residue.
Now you need to add a mixture of 70 percent medical alcohol and 90 percent. They can be purchased at any pharmacy. The mixture should consist of 6 parts of 90 percent alcohol and 13 parts of 70 percent. If you follow the specified proportions, the liquid will be approximately the same density as mineral oil.
Neon is easy to install
Installing neon in a car is quite simple. Probably, this simplicity makes neon lighting much more popular than the LED version. They install neon almost anywhere in the car, and handymen do it even in places where it is impossible to imagine. For example, in the wheel arches or air intake, engine compartment, etc. Still, the most common place is the bottom of the car, where the lighting looks much better.
The video shows how to install neon car wheel lights:
The basic rule for installing neon lighting is the following: the farther the lighting is from the road surface, the better.
By placing the neon component under the bottom, you also get practical help. The road will be illuminated directly under the car. Needless to say, the connected neon lighting located on the bottom of the car will create an amazing appearance that is comparable to a car flying at speed. An even greater effect is achieved when racing along a snowy road.
In addition, neon electric lighting can also be used to transform the interior of a car, since the sizes of tubes on the market today vary widely.
The backlight is turned on directly from the network or through a switch. Some car neon samples are equipped with a special plug that can be easily connected to the cigarette lighter socket. This option is not always convenient, but it makes it possible to connect the backlight without interfering with the complex wiring of the car.
Experts and craftsmen recommend connecting neon lighting through the electrical supply system of the car, and installing the switch where it is most convenient.
The video shows what neon car headlights look like:
Install long tubes of neon lighting under the bottom of the car along the entire body, and short tubes under the edges of the rear and front bumpers.
As for multi-color backlights, they are always sold together with a special block. It also controls the modes, and also makes it possible to alternate different backlight colors or turn on the blinking mode. The most expensive models are also equipped with a special vibration sensor. It responds to vibrations from the car body and sound waves from the car's audio system. In this case, the strongest sounds will be given off by a stronger glow.
As for the backlight kit, you can assemble it either yourself, or by asking a specialist for help.
In addition to the usual neon lighting, there is also flexible neon, consisting of a flexible thin transparent tube with a diameter of two to five millimeters. It is customary to install such a pendant between interior panels, recreating a rather beautiful and cheerful design.
Having learned how to make neon lighting with your own hands, you can completely transform the appearance of your “iron horse”. This will no longer be just a car, but a work of art that will be a pleasure to drive.
How to make a light bulb that glows in the dark
- Take our half-liter bottle of Mountain Dew and boldly pour ¾ of the liquid out of it. You can drink it if you don't mind the ingredients. Thus, only a quarter of the soda will remain in the bottle.
- Carefully measure out ¼ tsp. soda Carefully pour it through the neck of the bottle.
- Measure out 3 bottle caps of hydrogen peroxide and pour them one at a time into the bottle.
- Now screw on the lid and shake the mixture. If everything was measured carefully, then turn off the light and watch how our neon liquid glows in the darkness.
This wonderful liquid can be coated with an ordinary incandescent lamp. It is advisable to secure it to give the composition a chance to dry and then connect it to the network. You can coat a fluorescent lamp, a flashlight, and many other objects (for example, an electric guitar, a sign, a mask, Christmas tree decorations) with a neon composition.
To all brain friends
, good day!
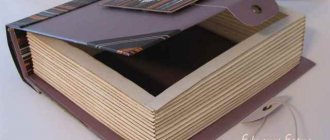
Here is a guide to creating another brain lamp
, which, however, stands out from all others due to its “coldness” :).
I collected three of these “cold” homemade products
, each of which glows in its own color, and I believe that everyone can
make one similar with their own hands
For this you need (components are designed for 3 lamps):
- several spare parts from a copper lamp
- three bulbs from 300W light bulbs (small or large, your choice, or a glass bottle or something similar)
- 6 UV LEDs and resistors for them for 9V
- 3 9V batteries
- 3 switches
- textile braided cable
- acids and potassium sulfide for coloring
- thin wires
- distilled water
- glue gun
Step 1: Stand or Case
First you need to separate the bulb bulb, and there are many tutorials
. Be careful and careful during this process, as the glass of the flask is very fragile!
The second photo shows pendants with empty flasks, and the third with painted bases.
Next, we glue a UV LED into the stand, directly under the bulb, and solder the second UV LED in parallel using a braided cable. Leave this cable long enough so that it can be trimmed if necessary.
Step 2: Flask Holder
Connecting your brain imagination
We make three flask holders, I made them in the form of spirals.
Then, calling Dremel and Proxxon to help :), we cut the test tube to a length of about 10cm. We drill a hole in the test tube stopper for the second UV LED and glue it in using a glue gun.
At the same time, we “invent” caps for the test tubes, for example, as in the second photo. After that, for every brain teaser
we mount the switches and connect them to the LED circuits (third photo).
Step 3: Filling
Now let's experiment