Quote from Nadezhda-Esperanza's message
Read in full In your quotation book or community!
MK+ video - Cotton toys... Christmas tree decorations in retro style... Author kukla_brungilda
Master class on making the Snow Maiden from cotton wool The author writes: At first I thought that making a Christmas tree toy from cotton wool would be difficult and nothing would work out.
But the process went surprisingly easily. I looked very carefully at old Christmas tree decorations made of cotton wool, trying to understand how they were made. As a result, I had a clear idea of what the toy should be. Therefore, I advise you to first clearly imagine the image that you want to create from cotton wool. And I want to tell you about the creation of the Snow Maiden from cotton wool. Its manufacturing technology can be used for any toy made from this amazing material, perfect for New Year's tree decorations.
So, we will need:
- Wire
- Board for stand
- 1 tbsp starch
- cotton wool
- Wide brush and face painting brush
- Glitter and mica
- Corrugated and tissue paper
- PVA glue
- Acrylic paints
- Varnish
Volumetric dog made of cotton wool
You just need to have a toy in the shape of this peace-loving animal or a handmade craft, say from cotton wool, in your home with your children. In this way, you will not only get great pleasure from being creative, but also replenish your stocks of last year's decorative ornaments. Let's try together to reproduce the image of a cute and cute dog.
To work you will need:
- cotton wool;
- newspapers;
- PVA glue;
- foil;
- scotch;
- Polish for hair;
- ready-made eyes, nose and tongue;
- bow or brooch for decoration.
Work process:
- First, we need to create a layout of our craft. To do this, we need to collect all the old newspapers available in your house and crumple them into peculiar balls, from which we will later have to form the body of the animal.
- The prepared paper elements should be assembled together with your own hands, fastening them tightly together with PVA glue.
- When the body has been molded, it is necessary to cover its surface with foil, which will later facilitate the process of attaching the cotton wool to the base. In order to prevent this improvised material from unfolding, we will need to secure its edges with thin strips of tape.
- After making a durable model of the dog, we should begin its further decorative design. For this purpose, we will use small cotton balls, which will need to be attached to the animal’s body with PVA glue. You need to attach the cotton pieces tightly to each other so that the “coat” looks uniform and fluffy.
- Upon completion of the collecting stage, we proceed to the aesthetic part of our creative work. We take the eyes, nose and tongue, previously purchased at a specialized store, and attach them with glue to the appropriate places.
- For a harmonious and complete image of the dog, it is advisable to decorate its head with some kind of bow or brooch. This will make her look cute and gentle.
This craft, created with your own hands from cotton wool at home for the New Year 2020, would be appropriate to place under an elegant holiday tree. It will turn out to be quite interesting for children, because its three-dimensional shapes will resemble a living creature. By the way, such an original product can also be taken to a kindergarten to make a cool addition to the group. But besides this creation, everyone would probably like to make something for their forest beauty. For example, Christmas tree decorations made from the above-mentioned snow-white cotton material. So, we present to your attention a video tutorial that will teach you how to create excellent jewelry quickly and easily.
Master class on making Christmas tree toys
LiveInternetLiveInternet
MK on cotton toys
Author MK Belozerova Tatyana (BizWoo)SOURCE
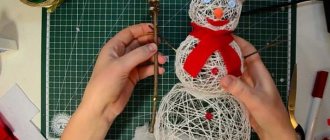
I haven’t shared anything new for a long time, and now there’s a reason - New Year and Christmas. I suggest you make a snowman using cotton papier-mâché technique. The technology is basically ordinary, nothing new, toys using this technology are very popular and have been known since ancient times. Except that the materials have changed a little, and the appearance of the toys has also become more modern.
For work we will need the following materials:
- wet wipes;
- PVA glue (or flour paste, or starch paste);
- natural cotton wool;
- toilet paper;
- white sewing threads;
- foil;
- newspapers;
- keep either a damp towel or a bowl of water on hand;
- tassels.
So, for those whose imagination is not working, we look on the Internet for pictures depicting snowmen, choose the option that suits you - according to the image and decor.
From slightly moistened newspaper we form lumps of the desired shape (I made the smallest one from toilet paper) and carefully wrap them in foil, forming the desired shape of a snowman.
Next, I added volume to the “waist” using toilet paper and wrapped it in foil again (you can immediately gain the desired volume initially using newspapers).
Next, we wrap the entire carcass in layers of cotton wool, leaving no gaps, and wrap it tightly with thread. Where necessary, add more cotton wool, thereby leveling the shape.
Now we take glue (there should be a lot of it on the brush, it is better to take a brush with flat and wide bristles), tear off thin pieces of cotton wool, apply it to the workpiece and apply it to the carcass with a brush with glue. I used flour paste.
After you have covered the entire carcass with cotton pieces, we make the hands. I make them using a knitting needle. I tear off a strip of cotton wool, coat it with glue on both sides and roll it into a tube. On one side I leave the edge fluffed to make it easier to stick to the body.
I put my hands to the body and glue them with cotton pieces.
I make the nose in the same way, using a knitting needle, and glue it in the same way using pieces of cotton wool.
The headdress can also be made in different ways: in the shape of a bucket, a hat. You can then knit a scarf and a hat separately and put it on the finished snowman, it’s up to your taste, use your imagination
I made a scarf from a damp cloth. I coated it with glue, formed a scarf and tied it around the snowman’s neck.
Well, we’ve stuck it on, and now we’ll send it to dry.
After the snowman has dried, cover it with white acrylic paint and prime it (optional). Dry it again and paint it as you please. For those who have problems with imagination, we turn to the Internet again.
Painting can be done with acrylic paints, gouache, and watercolors. Depending on the paint, we varnish it. At the very end, you can spray hairspray with glitter or use glitter.
And how they will turn out, I never know, everything is born in the process...
Thanks to everyone who created with me. Good luck and great imagination.
Never get hung up on one thing, search, create and develop and then everything will work out for you
Tatyana Belozerova (Bushmanova) was with you.
PS And don't forget to take beautiful photos of your creation!
When copying MK, please indicate an active link to the original source.
Author MK Belozerova Tatyana (BizWoo)
SOURCE
I want to show and tell you how I make some cotton toys. I don’t claim to be the leader in this idea. I made MK before the New Year, but I think these ideas will also come in handy for Easter.
We will need: Cotton wool in a roll, cotton wool balls (you can do without it), PVA glue (not thick or starch paste), threads, watercolor, varnish (acrylic if desired), cardboard, sketch, flat bristle brush.
We cut out the blank of the future toy from cardboard.
We cover both sides with cotton balls, forming volume.
We wrap it with threads. Where there is not enough volume we add cotton wool.
Then we tear off pieces of cotton wool and apply them to our workpiece with a brush and glue. We also form flagella from cotton wool and apply them to the right places, we secure everything with thin layers of cotton wool and glue (You wrap the dry workpiece with threads, then tear off thin strands from the skein with cotton wool, dip the brush thickly in glue and smear this strand directly onto the threads. They When dry, they will not be visible, they will remain under the cotton wool.).
Let's dry it. I dry it on a radiator, it dries quickly, literally in a couple of hours.
We paint the dried blanks at our discretion. I use watercolors (they paint with a brush, but they absorb a lot of paint).
I glue in a metal loop after the toy is ready.
Santa Claus made of cotton wool
If you don’t know what crafts to make from cotton wool for the New Year 2020 with your own hands with your children, then we recommend making Santa Claus, the favorite fairy-tale character of all kids. It will certainly come in handy for the whole family, since such an amazing creation can be placed under the Christmas tree or somewhere on the chest of drawers with a bag of sweets and tangerines.
To do this you will need:
- Cotton wool;
- PVA glue;
- Plasticine;
- Gouache;
- Brush;
- Wire.
Progress:
- First, for the craft, you need to make a wire frame that looks like a human body.
- After this, all its parts need to be wrapped and secured with threads. Then you should cover the figure with cotton wool, well soaked in paste. Small parts of the toy must be carefully processed to create beautiful details.
- For the figurine, you should make a wire frame for the bottom of the fur coat. Then this frame is also covered with it. For the toy's feet, create felt boots from plasticine. The body of Santa Claus should be red, and therefore it must be repainted with gouache. The edges of the fur coat need to be covered with cotton wool, and this will be the edge. It is also needed for the beard, eyebrows and mustache. At the end, you need to carefully paint your face. This simple master class turned out to be a magnificent Santa Claus.
This DIY craft for New Year 2020 will please everyone without exception!
Stage 4. Decorating the toy
When everything has dried, we again coat the surface of the toy with paste, and place dry glitter and mica on it.
Our cotton wool Snow Maiden is ready and can now join Santa Claus under the Christmas tree 
You can find out the details of making the Snow Maiden from cotton wool and ask questions to the author of the master class on our forum.
How to make this type of toy, see here...
Master class about the March cat, watch here...
COTTON CONSTRUCTOR FOR CHRISTMAS TREE TOYS... Do-it-yourself cotton wool toys... Elena Vasko cotton dolls... Mother's Country... cotton wool toys I really like the work of Elena-Peter
Christmas tree made of cotton wool
To do this you will need:
- Cotton wool;
- Cardboard;
- Plasticine;
- Stick or pencil;
- Tinsel and rain.
Progress:
- On a cardboard stand you need to install a plasticine cone with your own hands. This piece should be tight enough to hold tightly to the stand. To strengthen the barrel, you need to insert a pencil or stick into the plasticine.
- Then you should make a rope out of cotton wool and wrap it around the cone of the craft. This is where the work on manufacturing the product ends. You can decorate it with regular tinsel, as well as rain and small toys. For the New Year 2020, a beautiful Christmas tree made of cotton material is ready, created with your own hands to decorate the indoor interior of your house or apartment.
Video: master class on making a Christmas tree from cotton wool
Materials and tools
| cotton wool |
| paste |
| copper wire for frame |
| faces made of self-hardening mass |
| synthetic flat brush |
| glitters |
| gouache |
| regular brush |
| hot melt adhesive |
And yet children want to make decorations for the Christmas tree with their own hands. It is no coincidence that a toy made of cotton wool returned to our children; now technologies have appeared that give scope to the imagination; you can decorate a cotton toy with parts made from a self-hardening mass, making it different from others.
We did not immediately come to the cotton toy. We studied many technologies, including paper weaving and decoupage. There we applied the finishing of products with molded parts, purchased molds and gained experience in making mass for modeling, looked for recipes on the Internet and adapted them for ourselves. When watching master classes on cotton wool toys, I realized that this could really be applied in the activities of an artistic association. The first toys appeared in 2017 after watching video tutorials by Elena Vasko and other masters. Snowman, Snegurochka, after acquiring a face mold, I learned to make interior dolls... they were unsightly, but somehow alive, different from others.
In the fall of 2020, my children and I decided to master new technologies for working with cotton wool. This is not an easy job, requiring perseverance and patience. We purchased special Zig-Zag cotton wool and flat brushes. The paints used were gouache and potato starch paste. An important place is the dryer; we have a stick with wire fastenings.
The first sample was a fish, the basis of which was cardboard. We did it. Then we applied decoupage skills and made nesting dolls, we had napkins with matryoshka dolls, the base was also cardboard.
The balls for the Christmas tree were made from a ball of paper, covered with masking tape, attached with a wire loop, wrapped in cotton wool, thread, and covered with a layer of cotton wool and paste. Fragments of New Year's napkins were glued onto the dried ball and covered with acrylic varnish. A pig was made using a ball of paper or a piece of cotton wool covered with foil. They made Father Frost and the Snow Maiden on a cardboard base, their faces were sculpted on mold. Houses based on matchboxes.
The next stage is a frame cotton toy. The first were angels, bunnies, then girls and boys. In their hands appeared snowballs made of cotton wool, balalaikas made of modeling clay, cockerels and bagels made of cold porcelain.
The children's imagination was awakened by photographs of cotton toys from the Internet. By the New Year, many people had their own cotton toys, and Polina Popova (she is 8 years old) has a whole Christmas tree with her own toys.
Toys were also made and presented for the school Christmas tree.
The first recognition came in the form of diplomas from competitions at various levels. Now we are continuing our work, we have purchased a shelf for displaying cotton toys, in March we are planning an exhibition at the Kikinsky forum “Gifted Children”, which is held in the region every year in March.
The children brought baby dolls, I took a print of the face, made my own molds, now we are mastering interior dolls, and ones that you can play with, because in the summer you don’t need Christmas tree decorations, and you always need gifts.
A cotton toy gives children the opportunity to spend their leisure time, show their imagination, learn how to make toys as gifts and competitive products, develop perseverance, accuracy, and cultivate the desire to see things through to the end and be demanding of themselves.
DIY cotton wool snowman
To do this you will need:
- Cotton wool;
- PVA glue;
- Sequins;
- Paints;
- Toothpick;
- Beads;
- Twigs;
- Colored paper;
- A small piece of fabric.
Progress:
- A craft in the form of a snowman created on the basis of the master class can be suitable as a gift. To make it, you will need to roll 3 balls with your own hands, and you need to do this with soapy hands. Then all parts should dry well.
- During this time, you can prepare a solution for further work. PVA glue (2 parts) and water (1 part) must be mixed, and glitter must be added to the same solution. The balls need to be soaked in glue and left to dry again.
- To make a carrot, you need to wrap cotton wool around a toothpick, soak it in glue and paint it orange. It is better to connect all the craft balls with a toothpick pre-moistened in water. The snowman needs to glue beads that will be the eyes. To make hands you will need small twigs. You should cut a scarf for a toy from a small piece of fabric, and you can create a hat from colored paper.
So our product for the New Year 2020 is ready, created with your own hands quickly and easily.
Video: master class on making a snowman from cotton wool
Master classes on making Christmas tree decorations from cotton wool
Materials and tools
To make cotton toys you will need:
- salt dough, acrylic paints, varnish - for the face,
- cotton wool colored with aniline dye,
- paste,
- two-strand wire (for the body frame - two pieces 30 and 12 cm long),
- pliers,
- newspaper (cut into strips) or toilet paper,
- PVA glue,
- wooden stick with a sharp tip (kebab).
Salt dough elements
The master made the face blanks in advance from salt dough and painted them with acrylic paints. The technology is like this:
2 parts flour + 1 part salt, diluted with water, add a little beige acrylic paint to give it a flesh color. The face is molded, but not tight, but with a notch at the back, on the finger (so as not to crack). Olga bakes the faces directly in a closed frying pan (low gas), or in the oven (110-120 degrees) for about half an hour. Then the face is painted and covered with transparent varnish (can be cosmetic, for nails). The following blanks are obtained (rear view - with a notch and front view):
You need ordinary cotton wool in rolls (which is sold in pharmacies), pre-dyed in different colors with aniline dye for fabric: put unwound pieces of wet cotton wool in a pan with dye diluted in water, bring to a boil, leave for a few minutes, then wring out and hang to dry. The result is an abundance like this:
You also need to cook the paste: 2 tablespoons of starch per glass of water.
Bend a long piece of wire in half, forming a loop for the head. Then - two more loops, these will be the shoulders:
Thread a short piece of wire through the loops of the arms and clamp them with pliers so that they do not jump out:
Then bend your feet with pliers:
And twist the lower ends to create a “waist”:
Now we take a strip of gray cotton wool for felt boots and begin to twist it around the “leg”, then dip our fingers in the paste and continue to twist it, pressing lightly, then do the same for the second leg:
We make “mittens” on our hands in the same way:
Next we wrap the body with strips of newsprint, moisten it with paste,
similarly arms and legs:
Now you can start dressing. We also wrap the sleeves with strips of colored cotton wool and moisten them with paste:
We make pants with white cotton, then we form a fur coat:
and an edge of rolled strips of white cotton wool:
Bend the arms to the desired position and adjust the legs. We select a face from the blanks, glue it with PVA to a wire loop and leave it to dry.
While we are weaving a braid from cotton wool.
When the glue holding the head dries, you can make a hat and tuck the pigtail under it:
The Snow Maiden made from cotton wool is ready (you just need to make a gift in your hand, that’s what it asks for):
You can make these New Year's toys from cotton wool with your own hands. Perhaps the older generation will like this gift