When dressing for school or the office, we are obliged to adhere to the uniform: white blouses, black skirts... This is very boring and quickly gets boring, we want to stand out from the faceless crowd of identically dressed people. Unfortunately, very often this is not permissible.
In search of a compromise solution, some fashionistas began to decorate uninteresting blouses with elegant and stylish brooches. It won’t be difficult to purchase them; stores never cease to pamper us with wonderful accessories.
What if you don’t buy it, but make it yourself, purchasing fifty rubles worth of materials? How do you like this idea?
Let's try and create some amazing grosgrain ribbon brooches. They will transform your appearance, give you an elegant aristocratic look, and it will become the most vibrant and stylish!
Tie-brooch made of grosgrain ribbon
By creating something with our own hands, we begin to create magic. Now it was just a piece of ribbon, a few beads, a beautiful button and suddenly a unique product appeared!
Brooches are the most exquisite accessories that highlight the individuality of their owner. Handmade jewelry has always been highly valued, because it gives the appearance exclusivity and originality.
Remember the old films - the ladies there are often presented as very elegant, sophisticated, and a brooch was always present as the main accessory. Let us also try to create it in the form of a tie, using a grosgrain ribbon as a basis.
So, we need:
- Lace ribbons (wide and narrow).
- Pieces of grosgrain ribbons in shade 1, 2 cm wide.
- Rep shade 2 4 cm wide.
- Beautiful button.
- Measuring tape (can be replaced with a ruler).
- Glue.
- Thread and needle.
- Felt and pin.
Let's start making a brooch from grosgrain ribbon.
Cut four 14 cm strips from rep ribbon in color 2. Do the same with the lace.
Having connected the lace and rep, make loops by folding the ribbon towards the center and secure with glue. Now put everything in a bow and sew it together.
The next step is to cut the rep ribbon 1 into 3 pieces 25 cm long. Also fold and sew into a bow.
Take a wide rep and lace ribbon, cut 2 pieces of 21 cm each. Fold them together and make a bow.
Place all the received parts - bows - together, sew them and wrap the fastening area with lace. Place a ring of narrow ribbon on top, gluing it in the middle to a large bow.
Now we need to prepare the strips for the long tie. Cut 2 strips of rep 2 and lace (their length will be 14 cm) and rep 2 11 cm long.
Rep 2 and lace must be connected and cut on the bias. Cut the end of a thin strip into a wedge. Place all the strips together, placing the narrow one in the middle. This part is attached to the back of the bow.
Now cut out a small square from a piece of felt and use it to attach a pin. The button will need to be attached in the center with glue.
That's it, the tie is ready. Dress up!
LiveInternetLiveInternet
Quote from Natasha_Koch's message
Read in full In your quotation book or community!
Making brooches from satin ribbons.
Peony mania continues! I decided to post my master class on making a flower brooch from satin ribbons.
I took Tyutelka’s master class, presented in the post about peony mania, as a basis. I want to apologize for the quality of the photo - at night the photos are always of poor quality, and when using the flash, the white satin simply lit up and blended into the background.
To make a peony brooch (peony embroidery) we need: base fabric (I have white gabardine, the price in the store is 80 rubles per meter), hoops, satin ribbons of different widths (I have from 0.3 cm, 0.6 cm, 1 cm, 2.5 cm, 4 cm), tapestry needles, lighter, scissors, batik paints, glue, brooch fasteners.
Thread the gabardine into the hoop, draw a circle on the fabric - the diameter of the peony base (2-3 cm). Starting from the center, we embroider the loops with the thinnest ribbon, trying to make the height the same. After filling the center of the circle with loops (approximately 1 cm in diameter), take the tape out, cut it, and singe it. Then I cut the main part of the loops (you don’t have to do this) and singe them carefully with a lighter, pushing the ribbons apart (so that they don’t stick together when singed).
Then I take the next size ribbon (I took pink, although all the ribbons were white, I plan to tint the flower). I make loops in a circle. I also cut the loops and singe them so that the ribbon is wrapped.
2. This is the downside
From a ribbon 1 cm wide, I immediately cut the edge of the ribbon in a circle,
I singe it with a lighter
I start the ribbons from the front, stitch the fabric,
I bring it to the front
I cut, singe, etc. round. I do this because I’m afraid of catching other ribbons with the flame + this way it’s more convenient to bend the ribbon + it turns out neatly on the back side
I cut petals from 2.5 cm ribbon
I burn it with a lighter. To form a fold, you need to place a light under the center of the petal, but keep the fire below the fabric
This is how the petals curl.
and pull it through the fabric with a needle. I make a couple of circles with these petals. Please note - all petals bend towards the center of the flower
I cut petals from a 4 cm ribbon, singe them,
I pull it through the fabric with a needle. I make a couple of circles with these petals. Please note - all petals bend from the center of the flower.
When the result suits me, I cut off all the “tails” on the wrong side, singe them and carefully grab them with a thread, trying to grab (sew) everything.
Now for me the most delicious thing is the tinting of the flower. I took this picture as a basis.
I mix pale yellow paint (yellow + white) on the palette. I wet the center of the flower with a wet brush (just water), pushing the petals apart.
Then I tint the middle of the flower and dry it with a hairdryer.
I mix pale pink paint on the palette (pink + white)
I wet the tips of the flower petals with a wet brush (just water). Then I tint the edges of the flower and dry it with a hairdryer. I'm pleased with the result.
The next stage is greens. I take a green (or white) ribbon (width 2.5) and cut it into strips (I determined the length this way - I applied the ribbon to the flower and estimated how much the leaves should stick out in both directions). I fold the strips in half, singe the fold, making a fold.
After that, I cut it out (see the result). I singe the edges and centers and go to the kitchen to draw the veins.
23.
I took this picture as an example:
I lay out a piece of paper on the mouse pad, and with the blunt side of a knife heated over a fire (I have gas at home) I draw the veins. They turn out in relief.
25.
Now I will paint the leaves in a more natural color (I mix it from two colors - swamp + green).
27.
After painting, I dry the leaves with a hairdryer (I press them with a brush to prevent them from scattering).
I also experimented - I emphasized the veins on the leaves with a gel pen - she draws beautifully on a satin ribbon. The next stage is to remove the flower from the hoop, cut the fabric in a circle, leaving a centimeter and a half),
I gather it on a thread, pull it together and carefully stitch it.
Next, I take monofilament thread (you can use green thread to match the leaves) and start sewing on the leaves, trying to recreate the original...
Now I have the greenery sewn on, now I sew it through the middle, pulling it together so that the flower is flatter.
The final stage is gluing the fasteners for the brooch.
.
And now my beauty is ready! It turned out to be dense, the paint (acrylic) made the satin hard, which is very good for a brooch. The coloring turned out very delicate!!!!
Brooch made of grosgrain ribbons: master class
The next option is a very simple, but no less stylish brooch. A wonderful item for your wardrobe and a great gift.
Materials and tools:
- Rep ribbons - for example, yellow and blue.
- Metal button, cabochons.
- Pin for fastening.
- Felt.
- Glue gun.
- Sewing threads, needle.
First decide what size the result will be. Based on this, cut several strips - three (2 yellow and 1 blue) of the same length, one yellow shorter and two (yellow and black) even shorter. Fold them in the middle with loops and glue them together.
Now we collect all the bows together - first two yellow and blue, then a smaller yellow one on top, and yellow and blue combined together on top of it.
After everything has been fastened together, we cut off 2 strips of 10 cm each from both ribbons and put them on top of each other - this is the “tail” of the brooch. We cut the edges on the bias, singe them and fix them on the back side of the bow.
We sew on the button, and all that remains is to attach the clasp to the felt piece, and then to the brooch itself.
A stylish brooch made from grosgrain ribbon is ready. You can choose your own color combinations based on your own taste and preferences.
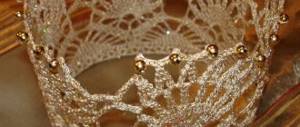
Creating a brooch-order “Primavera”
There is something secret about romantic fragility. Alexander McQueen
There's something exciting about black. Something magical and attractive. Maybe because black does not exist, but only the absence of light... But just as a flame generates light, so light generates color. Color is the child of light. And there is no light without darkness. It is extremely rare to see jewelry where the main color is black. But this order chose the colors itself. Even for me it is magic. The result was a very unusual palette of colors, almost like one of the most famous paintings by Sandro Botticelli. Let me show you how the Primavera order was created.
Materials used in the work:
- 4926 Oval Tribe 19x14 mm - Light Siam Metallic Light Gold Z (#227MLGDZ) - 1 pc.;
- 4320 Pear Rhinestone 8x6 mm - Graphite (#253) - 4 pcs;
- 4706 Trilliant Fancy Stone 12 mm – Black Patina (#001BLAPA) – 4 pcs;
- Pearls 3 mm #5810 Bronze (#295) - 4 pcs;
- Pearls 3 mm #5810 Mystic Black (#335) — 4 pcs;
- Pearls 4 mm #5810 Platinum (#459) — 4 pcs;
- Pearls 4 mm #5810 Bronze (#295) - 8 pcs;
- Pearls 4 mm #5810 Mystic Black (#335) — 4 pcs;
- Pearls 5 mm #5810 Platinum (#459) — 4 pcs;
- Pearls 5 mm #5810 Bronze (#295) - 4 pcs;
- 53200 Chaton Montees SS16 (4mm) framed, silver - Silver Night (#001SINI) - 4 pcs;
- Xilion 2.5mm – Jet (#280) – 16 pcs;
- Italian sequins 2mm flat Nero (#9919);
- Italian sequins 3mm flat Nero (#996W);
- Italian sequins 4mm flat Nero (#9919);
- French sequins LM Paris 4mm bowl, Or B2 Mat (#LM30);
- French sequins LM Paris 3mm bowl, Or C2 Mat 10003 (#LM09);
- Czech seed beads Preciosa Charlotte Cut 15/0, Jet (#23980);
- Czech seed beads Preciosa Charlotte Cut 15/0, Dark Bronze (#15-DB);
- Japanese beads MIYUKI Round 15/0 (#401);
- Metallic thread Tresse #4 Au Ver a Soie, silver/black (#4-019).
We will also need: hard gimp 0.9 mm, color: silver, simulated black felt Rayher, soft black felt 1mm Rayher, brooch pin 25 mm, beading needles (Hemline No. 10 and Pony No. 12), monofilament, thread, scissors , glue moment Crystal, cardboard.
Let's start the magic?
1. Print out an A4 sheet with our pattern. The dimensions of the brooch are 6.6 cm * 7.2 cm. In the last master class, I already told you how I translate my patterns. Here I want to draw your attention to the fact that you should first draw guide lines. I carefully cut out a square from graph paper, apply it to the felt, and holding it, mark the center lines and diagonals with dots (I put a dot next to the corner). I connect the dots with thin lines. I cut out the outline of the brooch, apply it so that the center guide lines coincide with the markings on the pattern, and the corners lie exactly on the diagonal lines. Next, I cut the pattern as in the photo and trace the missing lines. If you manage to draw lines evenly and thinly using the flute method, still make sure that the corners lie symmetrically and strictly along the diagonal guides. Please note that the distance between the two lines of the inner “square” should be the same everywhere. We immediately mark where we will have the top of the product.
2. We stretch the thread a little so that the monofilament, folded in half, does not get stuck during operation. We secure the tip of the gimp at the beginning and end with 2-3 stitches as close to each other as possible. We start sewing from any bottom corner. These places will be closed for us. I sew with a single segment: measure the length of 1/4 of the outline, multiply by 4. Here there is approximately 27 cm of already stretched rigid gimp, but I add another 1.5-2 cm in reserve. Watch for symmetry; before bending the corner, check whether it will be positioned evenly. The stitch for any corner should begin approximately half a millimeter before the drawn outline of the corner. We make a stitch by sewing on the gimp, holding the gimp tightly and slightly pulling the monofilament from below with one hand, and with the other hand we carefully bend the gimp, forming an angle. And most importantly: you can sew the gimp along the line, below the line and above the line. Choose the most convenient method for yourself and stick to it. Otherwise, the elements will turn out to be unequal in size.
Carefully sew on the remaining elements. For corners: the stitch begins half a millimeter before the drawn contour of the corner. We sew the “domes” at the top with 3 stitches close to each other, carefully and gently bend the gimp, holding it with our hand, and continue sewing further. We pay attention to symmetry; you can carefully correct the shape after the element is completely ready. Here I added markings for the central crystal. Knowing its dimensions of 19mm * 14mm, I cut out the outline of a rectangle from graph paper, attached it to the central lines and put dots.
3. Cut out the element as in the photo and apply it to our brooch. Take one of the 4706 Trilliant Fancy Stone jewelry crystals 12 mm. One of the vertices rests on the point with which we marked the boundaries of the central element, the rest is directed along the line to our pattern. On the pattern, holding the crystal, draw a line. This is the boundary of our future convex part. Without removing the pattern, we draw small elements, retreating 1 mm from the gimp. You can also see here that there are not enough corners. We remember where we need to draw on the lines a little. We repeat this step for the upper (or lower) element of the brooch. We check the opposite elements, see where and what needs to be completed or, conversely, trimmed a little.
4. We transfer our elements to soft felt. This will be our base. The small “pads” will be the same everywhere. We cut them along the inner contour of the line (that is, when you cut it, there will be no white line). Large horizontal elements may differ in size from vertical ones. It’s better to immediately mark at the back what belongs to what. We cut out large elements for the backing exactly as we need them on top. On the sides and bottom, focusing on the inside of the line, we cut it out, not reaching half a millimeter (a little white line will remain on the cut out element). We check: at the top the curves of the substrate follow the contours of the gimp (if necessary, carefully trim it), on the sides they reach the gimp if you apply the element and press on the middle.
5. Using a small drop of Moment Crystal glue, fix the small “pads”. Please note that glue is needed only for temporary fixation, there should not be a lot of it, otherwise it will subsequently interfere with the embroidery. We begin to sew small “pads” from the corners, along an oblique line. Next, baste them with small stitches at a 45-degree angle across the edge.
6. Use a few small drops of glue to fix the large elements of the substrate. And we sew them on: first the corners, then a stitch in the center of the sides, bottom, and also stitches in the top center on both sides of the bend, the bend itself. After this, we sew the entire contour with small stitches at an angle of 45 degrees, and with small stitches with the needle stitch forward we pass along the center of the backing, dividing it into two parts and creating volume. We also need this deflection to accommodate the 5mm pearls, recessing them slightly into the embroidery and making them not so tall in relation to the crystal in front of them. The central part will be the highest and the height will gradually decrease. The substrate is needed just so that this transition from a fairly high central crystal to the flat edges is smooth.
Here you can see the height of the substrate:
7. The hardest part is over. We fix the central element 4926 Oval Tribe 19×14 mm with drops of glue, guided by our markings. We remember where we have the upper hand! We constantly look for symmetry, placing the work at a distance in front of us. Draw guide lines along the ruler on top of the substrate. Fix with drops of glue 4706 Trilliant Fancy Stone 12 mm. At this stage, we check that the center of the wide part and the corner of the crystal lie on a line exactly in the middle. We sew the crystals in a circle, inserting Swarovski chatons between them, as close as possible to the central crystal. When we sew, we make sure that the diagonal lines run exactly in the middle of the chaton, we focus only on this.
8. We fix the crystals 4320 Pear Rhinestone 8x6 mm, not reaching half a millimeter to the chatons and sew them on. We focus on diagonal lines; the wide part of the crystal and the “nose” should lie exactly in the middle of the line.
9. Sew Swarovski 3mm Bronze pearls between the trilliant tip and the “nose” of the drop.
We string 6 beads of bronze shade Preciosa Charlotte Cut 15/0, 1 pearl 4mm Bronze and again 6 beads. Insert the needle into the felt next to the corner of the trilliant. We pull it up very carefully, adjust the pearls with a needle, it should seem to rise up and stand on a column of beads. We sew all the pearls with a strong thread, folded in half (here One-G).
10. The diagram at the bottom and top will be slightly different from the side elements. Sew on 4 mm Bronze pearls.
Next to the “nose” of the drop, we draw a thread, collect 6 beads of a bronze shade Preciosa Charlotte Cut 15/0, 1 sequin cup 3mm Or C2 Mat 10003 (#LM09), a pearl 5 mm Platinum, 1 sequin cup 3mm, again 6 beads. We insert the needle into the felt between the trilliant frame and the bronze pearl. We sew 4 mm Platinum pearls on the sides next to 3 mm Bronze pearls.
Another angle:
We straighten the pearls, it should seem to stand on the columns of beads.
11. Make a bridge from 3 black Preciosa Charlotte Cut 15/0 beads, 1 2mm sequins, 3mm Mystic Black pearls, 1 2mm sequins and again 3 black beads.
Next, we bring the needle out next to the hole of the pearl, pass through it and take the thread to the wrong side, fixing the pearl and preventing the bridge from rising. Sew 1 small black bead into the corners.
12. Sew at the bottom and top between the caps of the crystal frames, recessing deep, a bridge of 1 3 mm sequin (#996W), 1 Mystic Black pearl and 1 3 mm sequin.
13. Using a strong thread, folded in half, sew on 5 mm pearls in the shade Bronze, framed with sequins in 3 mm bowls Or C2 Mat 10003 (#LM09). We make a bartack where it will not be visible and sew it again, fix the thread with a bartack, and make a knot. It is important to carefully tighten the thread each time after sewing on the pearl. Let's fill out our base. It is important to remember that sequins have a reverse side (as if a small border frames the sequin), but on the front side they are absolutely smooth. Make sure that the sequins are sewn face up. We collect 1 sequin, 1 black Czech bead from the inside Always carefully tighten the thread so that the sequins are pressed and do not dangle. You can come up with your own algorithm for alternating sequins, but I advise you to first carefully lay it out on the substrate to check whether everything fits in and whether there are any voids left.
We continue to fill out:
Where there is not enough space, that is, between the frame and the gimp, I sew only 2 mm sequins, filling the voids, if necessary, with Czech tag.
Fill it out to the end:
14. The location of the sequins is clearly visible here.
We form a bridge from 2 Czech tag beads, 1 black 15/0 Miyuki beads, 2 mm sequins, 2.5 mm Jet bicone, 2 mm sequins, 2 large 15/0 Miyuki beads. We bring out the thread next to the corner of the trilliant, make a bridge and insert the needle into the corner between the pearl and the frame, as in the photo above. At the top and bottom, between the 4mm Black Mystic pearls and the drop, I sew 1 2.5mm bicone on each side. I cover the corner where the 4 mm Black Mystic pearls are located with bridges of 3 black Czech spots. Wherever there are empty spaces, I also fill them with either bridges of 3 beads or sew on 1 bead of black Czech tag. We embroider the “domes” with metallic thread Tresse #4 Au Ver a Soie, folded in half. There is nothing complicated here, we just make sure that the stitches are even and parallel to each other.
15. In this photo I will show the layout of sequins and other elements. For this part of the work we will place the sequins at an angle. This way they will be slightly raised and can be placed more tightly together. The lines show how the thread will go from above. We start from the bottom, bring the needle diagonally from the corner, pick up the sequins in the right order, insert the needle into the corner, adjust the sequins so that they stand half-sided.
We collect sequins from the front part. The first stitch is 2 mm glossy black sequin, 3 mm matte sequin, 4 mm glossy black sequin.
Next - only 2 mm glossy sequins and 3 mm matte black sequins. We bring the thread to the front side, slightly moving away from the sewn sequin, and insert the needle into the felt a little diagonally.
This row contains 1 4mm sequin and 5 3mm sequins. In the rows adjacent to the side elements there is 1 4 mm sequin and 4 3 mm sequins, pay attention to the photo. In the corners we sew 2.5 mm bicones, 1 Czech spot bead and 1 2mm sequin on the sides of the bicone. The diagram is just above, the blue lines mark the locations of the 2mm sequins.
It should look like this:
Here we also sew a 4mm bowl sequin, inside which is a 3mm bowl sequin, to the 4mm Platinum pearls on the sides with one stitch. We fill the internal space with black beads, Japanese and Czech.
16. At the back of the embroidery we mark where we have the top. We cut out our embroidery, retreating half a millimeter from the gimp. I make a blank for the reverse side at the stage of transferring the design onto felt; I immediately trace the outline on the cardboard and, retreating 2-3 mm, draw a new one. We mark on the cardboard at the same time the top and the side that will be located directly next to the leather or suede. More details about how I make the wrong side of the product and install a pin for a brooch are described in the previous master class.
I would like to draw your attention to only two details.
1) I bring the thread down. Once I've gone all the way through the outline, I go back to where I started and secure the thread for about 1cm more, passing through the beads and making stitches. Everything turns out neatly, but it is better that the resulting double thread is where it is not noticeable.
2) You need a very long thread. If you find it difficult to embroider with this thread, make very careful fastenings and start again. Or try hemming the edge with high-quality thread. I use One-G, the thread length is just over 2.5 meters. To be honest, even at this length I barely had enough thread. We work a little slower, don’t rush, but the result will be beautiful.
By the way, about the result. Ready to see what we came up with?
I thank you for reading my master class. I really hope that it will help those who are taking their first steps in creating jewelry or simply want to create a beautiful piece of jewelry for themselves. Any skill can be achieved through perseverance and hard work; any job will work out if you want it. The main thing is to do it. If you have any questions, please write them in the comments, I will be happy to answer them. If you found it interesting, useful or liked my work, please click the “Like” button. OK it's all over Now. I say to you: “Goodbye and see you again!” With all my heart I wish you more new discoveries and interesting ideas!
Best regards, Katerina.
A simple brooch for a baby
For little ladies, it is also necessary to look your best. Therefore, the presence of jewelry in clothes is important. Let's make a brooch for the baby from grosgrain ribbon.
For it, cut a narrow (2.5 cm) ribbon into 8 pieces 16 cm long. Fold each strip to the center with its edges and secure. Now place all 8 bows you have obtained on top of each other, forming a rounded shape, and sew in the middle.
Hide the stitching area with a decorative button, a bright cabochon, or simply embroider it with beads. Glue a fastener and a piece of thick fabric to the back side.
Ready. Now your little fashionista will be irresistible!