Sometimes, from completely waste material that is sent for take-out and recycling, you can make practical and useful things that will be useful to you in everyday life.
For example, accumulated deposits of worn out women's tights and balls of not the most beautiful yarn, leftovers from projects or the dissolution of old things. All this, as a rule, lies unused or is simply thrown away. But by using some imagination, you can get the right thing, for example, a soft seat mat for a stool or other attribute of a hallway, balcony, or landing. Let's prepare thick yarn or connected threads from the leftovers, which we will wind into large balls, tights that will never be worn again (old children's tights and knitwear cut into strips are also quite suitable for this purpose, but stockings are preferable, since there is no cut edge, and means debris from cut threads) and a crochet hook of at least N 5. You can knit a circular rug or a square one. We subject old tights to execution. Cut off the legs from the top. This is what the blanks for the volumetric part of the rug will look like. We start knitting with a pair of air loops of yarn. Then we put tights into the knitting and begin tying it. Having made 5-7 loops, we loop the chain, and then we do everything in columns without a cape. We knit in a circle, braiding the stocking, and not forgetting to add loops evenly as the binding is completed to get an even and dense “pancake”. When one stocking ends, we carefully “embed” the next one inside the previous one and grab it tightly with a working thread. In the finished product, the joint is completely invisible. Since the loops are large, knitting such a seat mat is quite quick. The last 1-2 rows can be done without inserting a stocking, so that the round seat has an even edge. The rug is quite thick and elastically soft, comfortable for sitting. If necessary, it can be secured to a stool using a cord or braid, tied by the legs. If you do not use leftover yarn, but select bright threads by color, the rugs will come out elegant and even with a thematic pattern, so again there is room for handicraft imagination.
Beautiful two-color stool cover for an unusual and stylish decor
Do you want to update your interior, add new shades, or want to quickly cover up slightly worn furniture? You just need to knit or sew the item with your own hands. Hand-made products will help add individuality to the environment.
Crocheted cover for the stool “Chamomile”
We all have a couple of stools in our house or cottage (where tired or out-of-fashion furniture is usually taken) that are pushed further away or pulled out of the pantry when a lot of guests come and there are not enough seats. I'm tired of their appearance, but they are strong, it would be a shame to throw them away. In such a situation, there is an original way out - to make a crocheted cover for a stool.
DIY knitted cover for a stool for the kitchen
Bright handmade woven seat mats
A set of identical covers for stools, made by yourself
Almost always there will be leftover yarn of different colors in the house; the more, the more elegant and brighter the cover will turn out. If there are no unnecessary balls, you can buy yarn. This stool will fit perfectly into a rustic, country interior. You will get the feeling that you have come to visit your beloved grandmother.
Knitted covers for stools of different shapes in the same style
Knitted round seat covers
Even a beginner in needlework can knit such a cape. The main thing is to learn how to knit simple pattern elements, which are made from chain loops, simple stitches, and stitches with slip stitches. There are many instructions on the Internet, follow them and you will succeed.
Beautiful chair covers using the African flower knitting motif
Square cover for kitchen stool
For a crocheted stool cover, it is best to use thick acrylic yarn and a large hook. The thing will be voluminous, softer, and sitting on such a stool will be a pleasure.
DIY voluminous cover for a stool
Airy and light case with floral pattern
Knitted cover for a stool: basic methods
Different options for knitted chair covers
The easiest ways to knit a cover for a round stool.
Square seat design options
DIY square covers for stools
Crochet stool cover: diagrams
Crochet pattern for a round stool cover
In order for the product to turn out beautiful, you must strictly adhere to the scheme. Only then can we talk about successfully obtaining the desired result. By following the instructions, you will not only knit the cover yourself, but also will not have to remake it.
Knitting pattern for a cape for a square stool
Such cheerful covers, in addition to beauty and mood, have practical benefits. They protect the seat from wear, provide comfort to the sitter, and are easily removed and washed. The ability to crochet gives you endless possibilities in creating beautiful, exclusive things for your home.
A simple scheme for a square case that even a beginner can handle
Having mastered crocheting and first knitted a simple cover for a stool with your own hands, you will forever remain a fan of this craft. You will definitely want to continue mastering highly complex patterns, making masterpieces to please yourself and your loved ones.
Interesting pattern for a knitted cover
A beautiful set of leftover yarn made using the freeform technique
Ideas for knitted rugs for chairs
In order to knit an attractive and unusual item, you need to decide on the knitting method. The rug can be made in one piece or assembled from motifs.
In the second option, there are two ways to do the job. The first is to knit the required number of parts and assemble them into a single fabric using a needle or use the continuous knitting method. You can also knit this item from leftover yarn and get a multi-colored item that will add bright colors to the appearance of the room.
We offer you several options of different shapes that you can use as a sample. Or come up with your own version based on their example.
Knitting a square rug
Square is one of the most common shapes for rugs.
It is good because it perfectly follows the curves of a classic stool. By extending the knitting on the sides, you can form a removable mat in the form of a cover. This will be an ideal solution for decorating the kitchen. We offer two variations of this item made in different techniques.
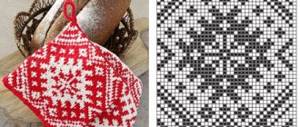
Seat connected in one piece
This variation looks very impressive when made from contrasting colors.
To implement you will need:
- yarn in red, pink and white colors;
- hook;
- thick fabric and a little padding;
- needle and thread.
Sequencing:
- Knit a fabric of the required size according to the pattern.
- Sew a lining for the rug from fabric and filling.
- Sew the lining to the base.
- Tie the product with five rows of dc.
- Tie four leaves according to the pattern and the cuttings to them.
- Sew leaves onto the cuttings at the corners of the product.
Multi-element model
This variation is often called “grandmother’s rug.” This name stuck due to the fact that the end result is similar to the ancient products that our ancestors knitted.
This method is based on making small squares and stitching them into a single piece. For work, you can use leftover threads. This method is great for liquidating leftover yarn from other projects.
Squares can be knitted according to the following patterns.
ATTENTION!
Elements do not necessarily have to be connected by a single pattern and in the same color. Experiment and get an interesting and unusual result.
How to knit a round seat
Round stools have taken a strong place in the kitchen. And with intensive use, their surface quickly becomes unusable. By covering the seat with a rug, you will extend the life of the stool.
Knitting a round cape is the easiest thing to do. But despite this, the result exceeds expectations.
This product will decorate any room. To begin, dial a chain of 4 v. p. and knit a circle of the required diameter according to the pattern.
If you wish, you can knit a border around the edge that will hold the cape on the seat.
Other options for knitting rugs for chairs
Square and circle are not the only suitable shapes for seating. They can be made in the form of a hexagon, flower or other variation.
Any option is available to you. It is enough to show your imagination and put a piece of your soul and talent into the product, and a charming, extraordinary decoration will appear in your home.
“Knitted rug” - this combination of words sounds rather dubious at first glance. But after taking a closer look at the finished products, there is a desire to repeat them. Such rugs would look especially appropriate, for example, in a nursery or bathroom. Crochet technology makes it possible to create many useful things, from rugs and blankets to handbags and jewelry. It's easy to crochet a rug for a chair. Even novice needlewomen will be able to do this. There are many options and schemes, varying in complexity of execution. Before starting work, we advise you to read the recommendations of experienced craftsmen.
In order for a knitted product to serve for many years and delight its owners, you should take care of the yarn. For work, it is better to choose synthetic yarn, for example, acrylic or cotton with the addition of synthetic fibers. For the crocheting process, it is recommended to use thicker threads. This is necessary to ensure that the rug fabric is dense and warm. Accordingly, you need to choose a larger hook. Before starting work, you need to knit a sample, a small square, wash and iron it. This technique will help with determining the size of the finished product. When the sample has dried, you need to measure it and, using a simple arithmetic proportion, calculate the number of loops that are needed to obtain a rug of the required size.
You can choose any knitting pattern. The main criterion is its attractiveness. You can even use a diagram for a napkin, or any other one you like, as well as use the diagrams and descriptions presented below.
Small scraps of yarn of different colors will make a rather attractive and interesting rug. This technique will allow you to use the accumulated remnants of threads that are a pity to throw away, but you won’t be able to knit anything from them. But it is worth remembering that the thickness of the thread should be the same over the entire surface of the product.
In order for the product to serve longer and maintain its appearance, you need to make a base for the future rug from dense fabric. If the rug is of insufficient size, the situation can be quite easily corrected with the help of a border. The rug must be tied around the perimeter with the required number of additional rows.
In order not to have to unravel the knitted rug and redo part of it, you need to carefully follow the icons in the diagram.
Crocheting washcloths with elongated loops
Good afternoon dear friends!
I’ll tell you about my story of crocheting a washcloth with elongated loops, or rather two washcloths - a double rectangular and a round one. And I will describe step by step the process of knitting them, perhaps someone will find it interesting and useful.
A long time ago, while looking for a new washcloth in the store, I came across knitted polypropylene options, but I didn’t dare buy these, because you can knit a similar one yourself. Although they didn’t really inspire me, they were just ordinary, unattractive and, moreover, sloppy washcloths. That time I bought a washcloth made of natural material.
Later, on my favorite site Pinterest, I saw photos of interesting knitted soap cases. Well, what can our needlewomen come up with!
These photos gave me the idea to knit a small washcloth for a summer shower with soap inside. Soap tends to slip out of your hands and fall through the grate on the floor, and then getting it out is problematic. A new washcloth should solve this problem.
I found it boring to knit a washcloth with regular stitches; the version with elongated loops is much more interesting.
Knitting a rectangular washcloth with elongated loops
Before crocheting a washcloth with elongated loops, we need to purchase threads for knitting. From recommendations on the Internet, I realized that washcloths can be knitted from cotton, linen, sisal, and most often washcloths are knitted from polypropylene twine, which is sold in hardware stores.
There are a lot of these threads on sale in different colors, I chose a bright pink skein of thick threads, the seller confirmed that they buy them for washcloths.
But, after knitting several rows, I realized that such threads were not suitable. The sponge they make is too hard; it is better to use it to clean frying pans. I don’t know why people knit bath sponges from this particular type.
This didn’t suit me, so I took thinner threads.
Here's a skein
I usually use them for tying tomatoes and flowers.
It is advisable to take a thicker hook, although the knitting will be looser, but the washcloth will not be too hard and pleasant to the touch. I have a hook number 3.7.
How to knit a washcloth: step-by-step description
We collect a chain of air loops twice as long as the width of the future washcloth, and close it into a ring.
We knit one or two rows with single crochets in a circle.
It must be said that knitting from polypropylene threads is not very convenient, since the thread is coarse and even flakes. But what can you do?
We knit the next row with elongated loops.
I only took a photo of the beginning of knitting and a photo of the finished washcloth. How to knit elongated loops, it was very inconvenient to take pictures while simultaneously holding the loop on your hand.
You can watch this video in detail from Natali Korneeva
My longtime regular readers probably remember the gorgeous bedspread made of elongated loops that was at our competition. I am amazed at how much patience and how much work the author of the work, Natalya, put in!
This was my first time knitting with this pattern, because I was not used to it, it was not very convenient to press the elongated loops; at first they turned out to be of unequal length. But then I got the hang of it and, in principle, I knitted a washcloth easily and quickly.
We knit the next row after the elongated loops with single crochets, the next row again with elongated loops. So we alternate the rows. We finish knitting with one or two rows of single crochets.
I crocheted the open edge of the washcloth with half-strips, leaving a hole the size of a piece of soap. It’s easy to place soap inside the washcloth through it. It won’t go anywhere, it won’t fall out, and you don’t need to soap the washcloth, just wet it with water.
In the corner I also knitted a small loop of chain stitches.
In practice, the washcloth turned out to be quite comfortable and moderately hard.
Such a cute little hedgehog. The view from both sides is exactly the same.
Since my washcloth is unusual and is used along with soap, it is small in size.
But in principle, of course, you can knit a long washcloth, make beautiful inserts from colored stripes, and attach handles (from the same air loops tied with single crochets).
If you don't want a double washcloth, crochet a single washcloth with elongated loops. The principle of knitting is the same, only not in the circle, but in reverse rows. The front row is elongated loops, the purl row is single crochet.
You can also crochet a washcloth without elongated loops using single crochets. For this option, thicker yarn would probably be more suitable.
But that is not all!
Round washcloth with elongated crochet loops
In addition to rectangular ones, there are also round washcloths, and I decided to knit this one too.
The principle of knitting a circle is probably already known to everyone. I can suggest a diagram. Here is a good circle knitting pattern.
When knitting a round washcloth with elongated loops, you need to adhere to the rule: when knitting each column above the column of the previous row, we make elongated loops, and we knit an additional column without an elongated loop to increase the number of loops in the row.
In more detail, it will look like this:
- We dial 6 VP, close it in a ring
- 1st row: 12 single crochets
- 2nd row: 2VP, *1 stitch with an elongated loop, 1 single crochet to extend the row into the same loop*, a total of 24 stitches
- 3rd row: 2 VP, *1 single crochet in the same loop, 1 single crochet in the same loop, 1 single crochet in the same loop*, 36 stitches in total
- 4th row: 2VP, *1 single crochet in the same loop, 1 single crochet in the same loop, 2 double crochets with an extended loop* (48 stitches)
- 5th row: 2VP, *1 single crochet with an extended loop, 1 single crochet in the same loop, 3 double crochets with an extended loop* (60 stitches)
- 6th row: 2VP, *1 single crochet in the same loop, 1 single crochet in the same loop, 4 single crochets in the same loop* (72 stitches)
I knitted 6 rows of a circle, you can make a smaller circle or a larger one.
I knitted the last row (7th) with single crochets without adding stitches.
Then I knitted the handle on three loops with single crochets and attached it to the opposite edge of the washcloth. This makes it very convenient to put a washcloth on your hand.
I also had the idea to crochet several multi-colored round washcloths with elongated loops or even without them for each family member and decorate the bathroom with them.
Have a nice summer mood!
Best regards, Olga Smirnova
You might be interested in:
ALL BLOG ARTICLES
comfort-myhouse.ru
Rectangular option
Knitting is performed in the following order:
- first - we knit a chain of double crochets with a length equal to the length of the product, and turn it over to the wrong side;
- second - we knit a row of single crochets, placing the hook under the front wall of the loop, and turning it over again;
- third - we make columns, but without double crochets, placing the hook under the walls of the loop;
- the fourth - knits in the same way as the second;
- fifth - now we knit double crochets, placing the hook under the back wall of the loop.
To continue, you need to repeat the pattern from the second to the fifth row.
How to crochet a washcloth
Knitting, like any other handicraft, requires not only certain skills, but also some character traits that I personally do not fully possess. As a child, I watched with a shudder as my mother’s friend, having knitted half a sweater or dress, unraveled it all, because, you see, she didn’t like the style.
The hook appeared in my life not so long ago. I suddenly wanted to know how to knit, at least scarves, at least for a child. The idea of crocheting a washcloth came unexpectedly. Anyone who knows the technique of crocheting basic loops can crochet a washcloth. Due to the fact that the washcloth is knitted in the round, you don’t have to count stitches or worry about the shape of the product.
How to crochet a washcloth?
Necessary materials
- Medium thickness hook (I have number 4)
- Polypropylene threads - 2 multi-colored skeins
Hook selection
If you want the washcloth to have a thin and neat weave, choose a thinner hook. But do not forget that you will have to knit two threads. The head of the hook should not be sharp, otherwise it will tear the polypropylene fibers.
The more convenient the hook, the easier it is to handle, and the faster you will get the finished product.
Thread selection
Washcloths are usually knitted from polypropylene threads, which can be purchased in hardware stores and craft departments. You, of course, can knit in one thread, but then the washcloth will not have the proper volume.
As for the combination of colors, it all depends on your imagination. If you want a harmonious color of the product, then choose the threads of the same color, but in different shades. To make the washcloth bright, you can play with contrast.
Crochet washcloths
If the phrase “air chain” doesn’t mean anything to you, then this is not yet a reason to give up the idea of knitting a washcloth. Try it! And I will try to explain as simply as possible.
We put two threads together.
We make a noose loop out of them for the hook.
We make a chain of air loops (grab a long thread and pull it through the loop) and close it into a ring.
The length of the chain determines the width of your washcloth. For example, for a washcloth 10 cm wide (excluding loops), we knit a 20 cm chain.
Edge
We tie the resulting ring with single crochets.
We insert the hook from front to back into the loop of the ring, grab the working thread and pull it through the loop. Two loops are formed on the hook.
Grab the working thread again and pull it through both loops. The single crochet is ready.
The columns of the second row are knitted into the loops of the previous one and so on. It is enough to knit three to four rows. You can easily determine the end of the row by the protruding thread.
Main part (“shaggy”)
You can continue to knit in single crochet stitches, adding only a stretch of stitches that will make the washcloth shaggy. But it’s much faster to knit a washcloth using double crochets (they are higher), also pulling out the loops. The choice is yours. You know how to crochet single crochet, but here is a double crochet, complemented by a loose loop.
Thread the working thread onto the hook.
Insert the hook into the loop of the previous row.
Grab the working thread from both sides so that a loop is formed on your finger.
Pull two threads through the loop of the row and slip the thread off your finger. There should be 4 loops on the hook.
Grab the working yarn with your hook and pull through the first two loops of the four. There are two loops left on the hook.
Again, hook the working thread and pull it through the remaining two loops.
Knit a row and turn the washcloth with the loops inside to make it easier to knit.
Knit with double crochets, remembering to pull out the stitches until the washcloth reaches the desired length.
We knit the last three or four rows like the first ones using single crochets (without loose loops).
Pens
We begin knitting the first handle immediately after the main fabric.
We knit a single crochet into the first loop of the row, and from the resulting loop we make a chain of air loops. The length of the chain determines the length of the finished handle.
We secure the end of the chain by knitting several single crochets in the middle of the edge of the washcloth, so that the fastenings of the future handle are symmetrical.
After securing the chain, we begin tying the handle. The principle is the same as when starting to knit the main fabric. We knit single crochets into each loop of the air chain. One row is enough, but you can knit the handles thicker. Having completed the row, we knit two or three more loops in the edge of the washcloth for security. Pull out the loop and tighten the knot. We cut the thread.
The second handle is knitted according to the same principle as the first. To begin, we tie two threads to the edge of the washcloth, secure it by knitting a park of loops in the edge. We make a chain, fasten it symmetrically, tie it with the required number of loops, and secure it at the edge with a pair of loops. Turn the washcloth so that the rags are out.
Try to knit evenly, with the same density. Even if you don’t succeed yet, it will still turn out great in the end. This principle of knitting a washcloth, as if in a spiral, allows you to hide all imperfections. In any case, with each new product it will be easier and faster.
Main
Everyone knows that knitting helps you concentrate. Tested for yourself! I got used to knitting washcloths while sitting in lectures - a great way to stay awake, I tell you. And the information fits into your head by itself. Plus: you are guaranteed increased attention from others.
A washcloth is a great holiday gift. In addition, you can buy a towel and beautiful soap. Better yet, sew a towel and make the soap yourself, then you’ll get a real set with a soul for baths and showers. Create and have fun!
www.diy.ru
Square seat
A square-shaped rug can be made using the same techniques as when knitting a rectangular one, using reverse rows.
Or you can make a more interesting option, for example, knit from the middle in a circle. Rows can only be made from single crochets under the front wall. To get a square shape of the carpet, you need to add loops in each ore in all corners. In the second row in the corners, the hook must be brought out from below the air loops. Using this principle, you can make a rug of a rectangular or hexagonal shape. You should divide the loops evenly and add loops at the corners when knitting. Focusing on the diagram, it will be easier to knit a rug of the required size and shape.
If you do not follow the pattern, difficulties may arise: the fabric will expand unevenly, bumps or depressions will appear on the surface, and the proportions of the knitted product will not match.
1.
2.
3.
4.
5.
Not long ago on the Internet I saw photos of bright crocheted rugs of stunning beauty, apparently from Japanese magazines. I tried to figure out knitting patterns and technology. These new ideas turned out to be very easy to implement and I want to talk about them, and of course show off what kind of rugs I made.
The materials you will need are a few remnants of wool or synthetic yarn of different colors, but of the same thickness, and a hook No. 2 -2.5. The threads must be of the same thickness in order to obtain a high-quality, even product.
To make such rugs, you need to knit four strips of different colors separately according to the pattern:
First, we knit a chain of 60 loops (the result is a rug measuring approximately 30x30 cm, but this also depends on the thickness of the threads), we tie the chain with non-woven stitches.
- 2nd row: 4 stitches for lifting, 1 double crochet from the first stitch of the previous row, 14 double crochets, 4 double crochets from one loop of the previous row, 14 double crochets, 4 double crochets from one loop of the previous row, 28 double crochets, 2 double crochets from one loop of the previous row. You already get a strip with 4 rounded corners.
From the 3rd to the 6th row, knit with double crochets; in the corners for rounding we make increases as follows:
Upper and lower right corners (at the ends of the strip)
At the beginning of each row, instead of the first stitch, we knit 4 loops for lifting.
- 3rd row: 2 double crochets in each of the 2 corner stitches of the previous row,
- 4th row: *2 double crochets from one double crochet from one corner of the previous row, one double crochet*, repeat one more time,
- 5th row: *two double crochets, 2 double crochets from one double crochet corner of the previous row*, repeat once,
- 6th row: *2 double crochets from one double crochet stitch from the corner of the previous row, three double crochets*, repeat once.
Upper left corner
- 3rd row: 2 double crochets in each of the 4 corner stitches of the previous row,
- 4th row: 4 groups of 2 double crochets from one double crochet from one corner of the previous row, between them one double crochet,
- 5th row: 4 groups of 2 double crochets from one column of the corner of the previous row, between them there are two double crochets,
- 6th row: 4 groups of 2 double crochets from one column of the corner of the previous row, between them there are three double crochets.
We knit the lower left corner in a special way, which gives an additional effect to the rug:
- 3rd row: 2 unfinished double crochets, knitted together, in each of the 4 corner stitches of the previous row and 1 chain stitch (CH) between them,
- 4th row: 2 unfinished double crochets, knitted together, 1 ch, 2 unfinished double crochets, knitted together, from one group of corner stitches of the previous row, knit 2 more such groups, 1 ch between them,
- 5th row: we knit 3 groups similarly to the 4th row, between them there are 2 unfinished double crochets, knitted together,
- 6th row: we knit 3 groups similarly to the 5th row, between them there are two times 2 unfinished double crochets, knitted together.
- 7th row: we tie all the loops with non-woven stitches.
The finished strips need to be sequentially sewn together: to the long side of one strip we sew the short side of the second and so on.
Now the resulting long colored knitted ribbon needs to be intertwined as follows, as shown in the diagram:
I knitted small colored strips for a sample and will show you how to weave them. I sewed the stripes in the following order: gray, turquoise, burgundy, pink.
We place one strip of the resulting colored tape (gray) on the table, and bring the entire tape up under the gray strip.
Since the stripes have rounded corners, they themselves turn where they need to. We wind the tape to the left, then down and to the right under the gray and turquoise stripes.
Then we turn up onto the gray stripe, left and down under the turquoise stripe, and bring it out in the middle part of the receiving rug above the gray stripe.
We bring the ribbon under the burgundy stripe down, bring it above the gray stripe and then turn it to the right over the turquoise stripe and up under the burgundy stripe.
If, perhaps, it is not immediately clear from the drawing how to weave a ribbon from strips, then during the manufacturing process this will become more obvious.
We connect the ends of the strips (in my case, gray and pink) and for strength, so that the strips retain their shape and do not move, we grab them from the wrong side with threads.
It turns out to be a wonderful, original, bright rug that can be used for stools, for example.
To make a floor mat, you can knit according to the pattern and sew on the base.
We start knitting from the center and knit a square with double crochets, making increases in the four corners first with two VPs, and then in the same way as when knitting stripes.
At all times, attention was paid to the smallest details in the interior. Sometimes, everything in the room looks decent, but the feeling of coziness and comfort is still lacking. Especially when you are sitting in a cold room on an ordinary store chair. It is always more pleasant to deal with something that is made with love and attention to every centimeter of space.
Here are ordinary crocheted rugs for chairs that attract the attention of not only the inhabitants of the house, but also all the guests. You don’t have to buy anything extra from a specialized yarn store. If you have some material left after knitting something large, then this will do.
Now you can clearly see all the crochet options. It does not matter the size and shape of the chairs in such cases.
How to crochet a washcloth for beginners: step by step with video
Not all hand-knitted items are clothing items. You can also tie a washcloth for bathing. After all, yarn can be made not only from wool or cotton, but also from polypropylene, products from which are easy to lather and scrub off the dead skin layers well, and then wash and dry quickly. It is pleasant to wash with such a washcloth.
We will tell you how to crochet a washcloth in a variety of shapes - classic rectangular, mitten-shaped or in the form of various toys filled with foam rubber. Children will find such bathing especially enjoyable, and adults will enjoy using handmade products that are much better than store-bought washcloths.
Durable washcloth
No holes are formed in the proposed washcloth; its loops hold firmly without moving apart. The washcloth is crocheted from special threads for washcloths using crochet number 2 into one thread. The washcloth is knitted on both sides, in the round, for which 30-40 air loops are cast. The width of the washcloth depends on their number. The synthetic thread resembles polypropylene tape, but this does not interfere with crocheting at all.
Having typed the specified number of loops, we connect them into a ring with a connecting post. The next 4-5 rows are knitted with single crochet or single crochet; no pulled loops are formed on these rows. Then comes the turn of the rows with these loops, knitted in such a way that they cannot stretch and disrupt the configuration of the product.
Video lesson:
Bathing sponge
The thread that is used to create the washcloth is specifically designed for creating washcloths and rugs; it is made of polypropylene. You can choose a thread of different colors - the color range is quite wide. A carefully knitted washcloth is much more durable than a store-bought one. First of all, a chain of air loops is assembled, twice as long as the width of the future washcloth. You need to knit carefully, not allowing the thread to delaminate.
The edges of the chain are connected to each other, and a handle is immediately knitted for holding a washcloth, made of 3-4 stitches. Everything is told step by step for beginners, all actions are described in detail. After several regular rows, rows with elongated loops are knitted, which are tied around the thumb.
Video lesson:
Single layer washcloth
When knitting this washcloth, elongated loops are knitted on both sides. To obtain a more fluffy washcloth, knitting was carried out in two threads. That is, two skeins are used or one, then the second end is additionally pulled from the inside. After casting on an air row of loops, a row of stitches with one crochet is knitted.
The next row is knitted without double crochet. After the third row, we begin knitting with elongated loops, forming them with the thumb. In the last stitch of the row, a single crochet stitch is knitted. After turning the work over, the next row is knitted with similar elongated loops, and they end up on the opposite side of the product.
Video lesson:
votinteresno.ru
Square option
Stools with a square seat are found in all kitchens across the country. That is why crocheting a rug for a chair of a similar shape will be an extremely popular solution in domestic conditions. To complete the task you only need a few colors of yarn of your choice. It could be mixed, light or dark tones.
First, the first row is formed in a circle. You need to create a ring from the thread you are going to work with. Next, a square is superimposed on this whole thing. We won’t talk about the intricacies of the work, but in the end all the rows are connected with a column, and at the end the already elongated loops are knitted.
The work is done from the arch in the corner to the final circle. Everything is repeated the same way in subsequent rows. You need to carefully monitor the elongated loops. Corner groups naturally increase with each new row.
You can always change colors. It is advisable not to tighten the loops too much so that they do not pull towards the central part. These are all specifics that professionals will talk about in more detail. In any case, the strokes should be original.
Round option
Schemes on how to make a rug for a chair are often produced for rounded samples. They can easily be placed on stools with sharp edges. All this will look good in any interior that you want to slightly “domesticate”. There are many types of work, but in every 10 centimeters of width there are about 7 columns with double yarn.
A lush column is created as follows. A slightly under-knitted stitch is knitted (2 loops on the hook). 2 times in 1 loop, resulting in three loops on the hook. All this is knitted through one opening.
Small and large rugs
The photo of the chair rug offers a wide variety of variations not only in appearance, but also in size. There are neat small samples that will not exceed 40 centimeters. They have their own knitting characteristics.
- We combine four v.p. in a circle, 2nd row ten columns b/n.
- Then two columns.s/2nak. in 1 loop around the circle.
- 1 column b/nak., 2 column b/nak. in 1 loop - a whole row.
- Then a row of two lush pillars. in 1 loop, ch 3, skip two loops.
- Then 1 column b/nak. x 2 times, 3 columns b/nak. in the arch of the row below - in a circle.
- Two columns with / 2 nak. in 1 loop, 1 post/2nd. x 4 times – etc.
- Final row – 1 column b/n., 1 v.p., 1 column b/n. x 3 times, 1 vp, 1 column b/n. x 2 times.
A larger one will have a diameter of about 51 centimeters. It is more difficult to complete all the points, but it is possible. If you read everything clearly and point by point, then the instructions for beginners will not seem like an overly heavy book.
- Set of four ch. and combine them into a circle, row 2 is knitted with 12 stitches.
- Next are two columns.s/2nak. in all pillars.
- After the circle, 1 column b/nak., 2 columns b/k. in 1 loop, 1 st. b/n., 2 st. b/n. in 1 loop.
- Subsequent circle: 2 columns/2k. in 1 column, 1 column with / 2 nak. x 2 times, 2 columns/2k. in 1 column, 1 column with / 2 nak. x 2 times, etc.
- After which the circle: 1 column b/nak. x 3 times, 2 columns b / nak. in 1 loop, 1 column b/nac. x 4 times and the process is repeated.
- Lush column, ch 3, skip three loops, 2 lush. pillar. in 1 column, 3 vp, skip three loops, fluffy. pillar. and further around the entire circle.
- 1 column b/n., 4 columns b/n. in the arch of the bottom row, 1 column b/nak. x 2 times, 4 columns b/nak. in an arch, 1 column b/nak. - in a circle.
- Next row - 1 column with / 2 back. x 11 times, 2 columns/2k. in 1 loop.
- At the end 1 column b/nak. x 6 times, (1 st. b/n., 1 ch., 1 st. b/n.) in 1 loop, 1 st. b/n. x 6 times. etc.
The master class is demonstrated to you in all details. If you learn such a craft, then you can dream up, experiment and do something with your own hands without the help of strangers.
By the way, if we knit rugs for chairs, be sure to remember that the products may settle after washing. This also needs to be taken into account. High-quality chair seats are not that cheap these days. Why not make them by hand.
In addition, you can easily hide all the disadvantages of chairs and armchairs, where scuffs and other roughness are already noticeable. The situation always changes for the better after that. A “lamp” atmosphere is created in the space.
round, children's, for peeling, back, diagrams, photos and videos
How to crochet a washcloth
If you crochet, you can find many different gift ideas for yourself and for friends. For example, you can make a washcloth using thread and a hook; it can be of any color and shape. Since knitting for a washcloth is very simple, you can easily make it yourself.
The only negative is the stiff threads, but you can adapt to this. Therefore, even beginners can easily make this thing. You can use twine, synthetic polypropylene threads, sisal or linen threads as the basis for the washcloth. The thread hook should usually be thick so that the washcloth is not too stiff. Here are some examples of how you can knit this product.
We crochet a washcloth for peeling
The shape of the exfoliating washcloth should usually be round or mitten-shaped. For such products, the threads must be stiff. For example, nylon or polypropylene, and sisal is suitable for sensitive skin. The easiest washcloth shape you can make yourself is a circle, so you can start there.
Round washcloth
How to crochet a round washcloth
- you need to fold the thread in two folds and knit in a circle;
- Next you need to make a sliding loop, then knit three stitches in this loop. And then double the number of stitches in the next row;
- then a uniform increase is made in the circle for six loops.
- The product must be knitted to the desired size;
- On the wrong side of the fabric you can sew an elastic band for convenience, or knit a loop from air loops. You can easily hang a washcloth behind them to dry.
Round washcloths can also be used for washing dishes.
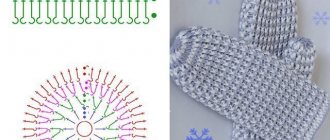
Washcloth - mitten
How to crochet a washcloth-mitten pattern
This washcloth-mitten is knitted according to the principle of making a product from ordinary thread with your own hands. But the process can be simplified and you don’t have to tie your thumb. To knit mittens for a washcloth, you must follow the pattern:
- An air chain is made from 30 loops. Make more stitches if you have a wide hand. Next, we connect the chain into a ring.
- Next, the columns are crocheted in a circle. At the beginning of the row you need to do 1 air for lifting. At the end, the last loop and the first loop of the next row must be connected with a half-column.
- the fabric must be knitted to the end of the little finger. Then divide the loops into 4 parts. In each part in the following rows you need to decrease one loop.
- at the end, the 4 loops that remain must be knitted as one, and then made a chain of 15-20 loops. Next, you need to connect the loops at the point where you knitted the first loop.
Crocheted back washcloth
How to crochet a washcloth for your back
If you knit a washcloth for your back, it is better to make it oval, rectangular or long. In this example, we will look at how to make a long rectangular washcloth:
- cast on 30-40 loops and make an air chain. Next, you need to connect the chain with a half-column.
- knit 8 rows in a ring in a circle using single stitches.
- knit elongated loops, starting from row 8 and up to the desired size. Then tuck them inside the product.
- Turn the product inside out and continue knitting 8 rows with single stitches.
- You can sew in a sponge so that the fabric foams well. You also need to sew on the handles. They can be made from a simple chain of chain stitches, or you can knit single crochets or half-crochet stitches.
In this video you can see how to knit another long washcloth:
Crocheted washcloths for children
For children's washcloths, you need to take softer threads. Threads such as sisal or linen cannot harm the delicate skin of a child. For small children, products are knitted from colored threads or several shades are used. The shape can be in the form of a rectangle, a ball, and so on. But the best option would be toy washcloths. Here are some examples of such toys:
Children's flower washcloth
For this product, colored melange thread, which consists of 100% cotton, is well suited. The hook needed is No. 5-5.5. knitting steps are as follows:
- knit a ring from a chain that consists of 50 air loops.
- Knit 6-7 rows with single stitches.
- at the end you need to assemble the product along one edge, like an accordion, and sew it. The product should look like a ball-bud.
Loofah "Ladybug"
How to crochet a baby washcloth
This DIY washcloth is very beautiful and bright, so little children will especially like it.
For such a product, you first need to make a couple of parts: points, top and bottom. The following types of loops are used for knitting:
- You need to knit the upper part with red threads like this: you need to make a ring out of 5 loops and knit 10 single stitches into this ring. Knit double stitches into each stitch, starting from the first row. You also need to add 3 loops in each row. There should be only 20 rows.
- Next comes the next round for the belly, and we knit it in the same way. The only difference is that you need to add 6 stitches evenly in each row, and the thread should be pink.
- When you finish knitting a circle, you don’t need to break the thread. Knit a chain of five chain stitches and secure in the last row of the circle using the fifth stitch. This is where you made the beginning of the head. Knit 5 single stitches into an arc and make a connecting stitch at the end of the row. At the same time, insert the hook into the loop in a large circle. Next, unfold the fabric and, in the same way, securing the circle, knit another six rows of single stitches.
- start making the legs after you finish the head. Tie a large circle to the place where the first leg will be located, and from this point you need to make 10 air loops. They should also be tied with b\n columns. the rest of the legs are done in exactly the same way.
- the dots will be made from white circles. You need to tie one row of columns around a ring consisting of four air loops. You can make as many points as you want. When the circles are ready, you need to sew them to the red circle. Then sew the top and bottom parts, while leaving the bottom of the fabric unstitched. The hand should fit freely into this hole. The ladybug is now considered complete.
As you can see, knitting these washcloths is very simple and easy, and the work does not take much of your time.
sovetprost.ru
Photo of chair rugs
“Knitted rug” - this combination of words sounds rather dubious at first glance. But after taking a closer look at the finished products, there is a desire to repeat them. Such rugs would look especially appropriate, for example, in a nursery or bathroom. Crochet technology makes it possible to create many useful things, from rugs and blankets to handbags and jewelry. It's easy to crochet a rug for a chair. Even novice needlewomen will be able to do this. There are many options and schemes, varying in complexity of execution. Before starting work, we advise you to read the recommendations of experienced craftsmen.
In order for a knitted product to serve for many years and delight its owners, you should take care of the yarn. For work, it is better to choose synthetic yarn, for example, acrylic or cotton with the addition of synthetic fibers. For the crocheting process, it is recommended to use thicker threads. This is necessary to ensure that the rug fabric is dense and warm. Accordingly, you need to choose a larger hook. Before starting work, you need to knit a sample, a small square, wash and iron it. This technique will help with determining the size of the finished product. When the sample has dried, you need to measure it and, using a simple arithmetic proportion, calculate the number of loops that are needed to obtain a rug of the required size.
You can choose any knitting pattern. The main criterion is its attractiveness. You can even use a diagram for a napkin, or any other one you like, as well as use the diagrams and descriptions presented below.
Small scraps of yarn of different colors will make a rather attractive and interesting rug. This technique will allow you to use the accumulated remnants of threads that are a pity to throw away, but you won’t be able to knit anything from them. But it is worth remembering that the thickness of the thread should be the same over the entire surface of the product.
In order for the product to serve longer and maintain its appearance, you need to make a base for the future rug from dense fabric. If the rug is of insufficient size, the situation can be quite easily corrected with the help of a border. The rug must be tied around the perimeter with the required number of additional rows.
In order not to have to unravel the knitted rug and redo part of it, you need to carefully follow the icons in the diagram.
How to decorate a knitted cover for a chair and stool
The decoration for the cover can also be a pattern from the canvas itself, various flowers, lace and other borders (for example, tassels). Pompoms are often used.
You can use embroidery, but not with beads and not voluminous. Everything that is beautiful and soft is suitable for decoration.
Leggings have become very fashionable and popular for decorating chairs and stools - these are socks on the legs of a chair. They will greatly complement the picture of a knitted fabric for a seat if they are also crocheted.
Not only the fringe around the perimeter of the cape is charming, but also the various hanging knitted things.
Beads and large beads can be used, as an exception, and only for the back of the back. It serves as a great canvas for creativity. After all, the body practically does not come into contact with this part. This could be a huge bow. Moreover, the bow itself can be made of a plain fabric, or the color simply matches the knitted item. The most interesting thing is that you can tie the bow yourself using the same crochet hook. Such a small instrument, but ready to do big things and big things. Do not forget about the limits, or you can spoil the canvas with unnecessary details. Everything should be in the same style. There is no need to fashion each style into a fashionable item.
Perhaps someone likes bows or something made from ribbons. Why not. After all, this is a matter of taste and the designer here is the creator himself.
Crocheted capes are widely used in everyday life, as this item is quite practical and can decorate any home interior. Seats for chairs or a crocheted chair are a very simple and necessary thing. It is worth noting that when making a cover, it is necessary to take into account that it must completely correspond to the shape of the seat of the chair or stool on which it is being made.
Before you start making a round-shaped cover, you need to prepare the yarn. In this case, you can use all kinds of shades that are in harmony with each other. For example, for a chair where the diameter of the seat is 35 centimeters in diameter, you will need to knit with 3 skeins, at the rate of 110 grams per 50 meters, of the main flesh-colored yarn. And also 1 riot of other 14 colors. If you use a smaller number of shades, then in this case you need to purchase 2 skeins of thread in 7 colors. To knit the product you will need a hook with a thickness of 3 mm.
Cape knitting pattern
Crocheting a chair cover for beginners is best done using patterns. They describe the principle most clearly. Having prepared the yarn and tools for work
, you can start knitting a cover for a stool with your own hands.
A detailed description of the process of making a knitted chair cover:
Petal pattern
The petals for the rug need to be made using the front half-loops. Description:
This pattern should make a great stool cover. It is worth noting that such stool covers resemble a rather beautiful bright flower. Moreover, these covers can create a warm and pleasant atmosphere in the house. In the same way, you can knit bedding and two-color pillows.
Rectangular option
Knitting is performed in the following order:
- first - we knit a chain of double crochets with a length equal to the length of the product, and turn it over to the wrong side;
- second - we knit a row of single crochets, placing the hook under the front wall of the loop, and turning it over again;
- third - we make columns, but without double crochets, placing the hook under the walls of the loop;
- the fourth - knits in the same way as the second;
- fifth - now we knit double crochets, placing the hook under the back wall of the loop.
To continue, you need to repeat the pattern from the second to the fifth row.
The best crochet rug for beginners
Even the most inexperienced knitters will be able to easily cope with making a rug thanks to a master class for beginners. It is recommended to start with a square rug on the floor. In the photo you see an example of such a product.
To knit this pattern you will need thick cotton yarn, which knitters call “spaghetti”. Choose yarn colors to suit your taste.
- Cast on a chain of v.p. the length you need.
- 1 row. Knit all stitches st. s/n. Turn the knitting to the wrong side.
- 2nd row. Knit all stitches st. b/n. under the front wall of the loop. Turn the knitting over to the right side.
- 3rd row. Knit st. b/n. under both walls of the loop.
- 4 row. Knit the same as 2nd.
- 5 row. Columns s/n. knit under the back wall of the loop.
- Row 6 and all subsequent rows are knitted in a pattern repeated from the 2nd to the 5th row.
See the video for an example of such work.
An excellent discovery of our housewives was the use of plastic bags for knitting household items. Rugs made from crocheted bags are good because they can be easily washed and dried, and they are pleasant to the touch. For the bathroom, toilet and kitchen - this is simply an irreplaceable thing. The polyethylene product is not afraid of water; it will be enough to chicken out and dry it.
First, we need to prepare the packages themselves. To do this, any plastic bags are cut into strips 2-3 cm wide, sewn with thread or glued with a warm iron through the fabric and rolled into a ball. Knit with crochet number 4. The photo above shows a rug made from multi-colored garbage bags. One such instance requires about 40 packages.
Two types of stitches are usually used: chain stitches and double crochet stitches. This rug model is oval in shape.
Cast on the required number of loops. This sample contains 12 vp. 3 v.p. rise = 15 v.p.
1 row. Insert the hook into the 4th loop of the chain from the edge and knit 5 tbsp. s/n. Further in each century. p. knit 1 tbsp. s/n. 10 times. In the last v.p. knit chains 6 tbsp. s/n. Turn knitting. We knit the other side in the same way, forming an oval. Close the row with a connecting column.
Row 2 and all subsequent rows are knitted according to the pattern. Thus, the middle of the canvas will remain straight, and the edges will widen and round, thanks to the increases in semicircles. Thus, an oval canvas is obtained.
To decorate the product, you can knit decorative elements: flowers, leaves, bows.
Square seat
A square-shaped rug can be made using the same techniques as when knitting a rectangular one, using reverse rows.
Or you can make a more interesting option, for example, knit from the middle in a circle. Rows can only be made from single crochets under the front wall. To get a square shape of the carpet, you need to add loops in each ore in all corners. In the second row in the corners, the hook must be brought out from below the air loops. Using this principle, you can make a rug of a rectangular or hexagonal shape. You should divide the loops evenly and add loops at the corners when knitting. Focusing on the diagram, it will be easier to knit a rug of the required size and shape.
If you do not follow the pattern, difficulties may arise: the fabric will expand unevenly, bumps or depressions will appear on the surface, and the proportions of the knitted product will not match.