What should the container be?
Storing honey is a delicate matter, because we are talking about a natural product that easily absorbs odors and substances. Once upon a time, honey was stored in clay and wooden containers. This is where the fabulous stereotype of storing delicacies in pots and barrels emerged.
Clay and wood, of course, are good containers for such a delicate product. They do not allow moisture to enter, but still allow air to pass through. So honey enclosed in such a container can breathe. In addition, the honey pot and barrels do not allow light to pass through, which is one of the main conditions for proper storage of the product. Typically, when storing it in such traditional folk vessels, the top was sealed not with lids, but with wax.
Nowadays, the range of tableware for sweet products has expanded significantly. Barrels and pots faded into the background, giving way to other, cheap and accessible vessels.
DIY paper barrel
Bozhikova Nelya
Master class on making crafts from a plastic bottle “Barrel of Honey”
Good day, dear colleagues. I bring to your attention a master class on making “ Barrel of Honey ”
from
a plastic bottle .
For this we need:
— plastic milk bottle;
- spray paint or acrylic paint;
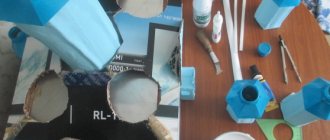
First, let's cut off the neck of our bottle , stepping back 3-4 centimeters from the top. We won't need her anymore. Cut out a circle from cardboard with a diameter slightly smaller than the cut neck. This is the lid of our barrel . In order for our barrel to be stable, we fill it with newspaper or polyurethane foam. We paint the lid and barrel using a spray can or acrylic. When the paint dries, attach the handle to the lid and write MED.
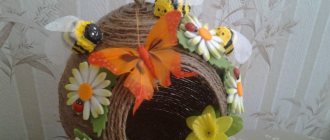
If desired, our barrel can be decorated with flowers and a bee can be attached. I used this barrel at the Autumn Festival . Thanks to all! Good luck!
“Gzhel - a Russian fairy tale, or the second life of a plastic bottle.” Master class on working with waste material Gzhel - a Russian fairy tale Snow-white background and cobalt - blue paint... Gzhel - a Russian fairy tale comes to mind. Icy graceful blue rose.
Master class “The second life of a plastic bottle” Good evening, dear colleagues and friends! Today, on Mother Earth Day, I would like to offer my work. These are flowers made from plastic bottles.
Construction in the senior group “The second life of a plastic bottle” In our everyday life there is a lot of waste that can be given a second life. This is exactly what our design lesson was dedicated to.
Master class for educators of the preschool educational institution “Dymkovo young lady from a plastic bottle” Master class for educators of the preschool educational institution “Dymkovo young lady from a plastic bottle” Educational area: artistic and aesthetic development.
Master class on making crafts from corrugated cardboard “Compass” I bring to your attention a craft made from corrugated cardboard together with children “compass”. To make it you will need corrugated cardboard of different colors, cut.
Master class on making crafts “Chicken in a Shell” Hello, dear colleagues! My children and I love to make a variety of crafts, and colored paper and cardboard are one of the most popular.
Master class on making “Temple” crafts The temple is the house of God. In another way, it is called the church. Each temple has its own name, name. The largest temple in Russia is the Cathedral of Christ.
Master class “Craft from a plastic bottle and plasticine “Peasant Young Lady”. Dymkovo toy For this work, we needed: a plastic bottle, plasticine; The pattern of Dymkovo toys consists of red, yellow, green, blue.
Master class on making crafts “Monkey” Purpose: to introduce children to creating crafts from a plastic cup, to develop fine motor skills of the fingers, creativity, and imagination of children.
Master class on modeling based on a plastic bottle “Dymkovo toy. Young lady" Master class Step-by-step presentation Topic: "Dymkovo toy. Young lady" Goal: To create conditions conducive to the development of creativity in children.
—Categories
- WITH YOUR OWN HANDS (824)
- Jewelry, accessories (144)
- Paintings, panels (102)
- Lamps, lamps, chandeliers (93)
- Candles, candlesticks (84)
- Dishes, vases, flower pots (73)
- Watches (55)
- Miscellaneous (38)
- Rugs, rugs (37)
- NEW YEAR (474)
- Christmas trees (23)
- DIY FURNITURE (413)
- HOROSCOPE (413)
- HOLIDAYS (324)
- LIFE HACKS, USEFUL TIPS (270)
- PAPER, CARDBOARD (269)
- Paper Christmas (69)
- Packaging (57)
- Miscellaneous (48)
- Postcards (35)
- Cardboard chests of drawers (29)
- Quilling (5)
- PSYCHOLOGY, SELF-KNOWLEDGE (215)
- SLAVS (139)
- EMBROIDERY (126)
- New Year embroidery (9)
- HOUSE, Cottage, VEGETABLE GARDEN (105)
- SIMORON, DREAMS, DESIRE (92)
- STONES (ZODIAC, TALISMANS) (66)
- DIY REPAIR (53)
- MUDRA (43)
- AROMATHERAPY (43)
- MEDITATIONS (38)
- HOUSE PLANTS (37)
- MISCELLANEOUS (34)
- AYURVEDA (27)
- Yoga (23)
- VIDEO (27)
- FABRIC DYING (26)
- DECOUPAGE (23)
- PLASTIC BOTTLE (18)
- NUMEROLOGY (12)
- DRAWING LESSONS (12)
- WIRE (12)
- STYLE (10)
- INTERIOR (10)
- FOAMIRAN, PORCELAIN, CLAY (9)
- INTERESTING (8)
- LIFE HACKS FOR PHOTOGRAPHERS (7)
- AFFIRMATIONS, MANTRAS (7)
- MACRAME, WEAVING (7)
- GIFTS (5)
- CONGRATULATIONS, POEMS, TOASTS (5)
- STAINED GLASS, MOSAIC (5)
- PAINTING (4)
- ART THERAPY, COLORING BOOKS (4)
- DREAM INTELLIGENCE (4)
- ISONIT (3)
- ANIMALS (3)
- DATES (2)
- FELTING (2)
- PAINTING (1)
- LEISURE (1)
- PHOTOSHOP (1)
- TRIP (1)
- POSITIVE, HUMOR (0)
- COOKING (1378)
- Salting, pickling, pickling (149)
- Jam, compotes (43)
- Sauces, ketchups, gravies (36)
- Fried baked goods (25)
- Snack (22)
- Salt, seasonings (11)
- Unbaked pastries (8)
- Dairy recipes (7)
- Creams, glazes, mastic (6)
- Porridge (5)
- Cheeses, sausages, pates (5)
- Cooking in a slow cooker (4)
- Dough (3)
- Products (2)
- Recipes for diabetics (1)
- First courses (34)
- Main courses (67)
- Salads (64)
- Baking (254)
- Desserts (145)
- Drinks (170)
- New Year's recipes (166)
- Various recipes (34)
- Useful tips (98)
- HEALTH (1082)
- Therapeutic massage, gymnastics (101)
- Runny nose, colds, flu (31)
- Stress, nerves (20)
- Insomnia (15)
- Teeth, gums, bad breath (5)
- Diet (5)
- Miscellaneous (1)
- Traditional recipes (16)
- Teas, drinks for weight loss (17)
- Women's health (12)
- VEGETARIAN CUISINE (411)
- Fried baked goods (8)
- Dough (3)
- Miscellaneous (1)
- First courses (79)
- Main courses (56)
- Salads (93)
- Sauces, mayonnaise (3)
- Baking (35)
- Desserts (36)
- Drinks (82)
- Multicooker (3)
- Snack (1)
- Useful tips (2)
- BEAUTY (752)
- Beauty calendar (58)
- Cosmetics (40)
- Body (23)
- Feet, pedicure (22)
- Miscellaneous (9)
- Tips (7)
- Neck (7)
- Bust (4)
- Face (155)
- Eyes, makeup (54)
- Hands, manicure (68)
- Hair (102)
- Bath bombs (28)
- Soap (72)
- RAW FOOD (2)
- SPORT (103)
- Stretching, warm-up (9)
- Breathing exercises (3)
- Articles (1)
- Fitness (8)
- KNITTING (6268)
- Summer pullovers, blouses (652)
- Tops, T-shirts (522)
- Men's pullovers, sweaters (426)
- Hats, berets, caps (355)
- Two-pieces, suits, sets (285)
- Magazines (283)
- Knitting for home (188)
- Men's jackets (156)
- Men's hats, scarves, snoods (148)
- Patterns, elastic bands (137)
- Vests, sleeveless vests (110)
- Magazines without translation (99)
- Men's vests, sleeveless vests (83)
- Knee socks, socks, shoes (79)
- Summer jackets, bolero (71)
- Miscellaneous (69)
- New Year's knitting (68)
- Polantines, scarves, shirtfronts (64)
- Bags, backpacks, cosmetic bags (62)
- Mittens, mittens, gloves (32)
- Shawls, scarves, bacti (27)
- Toys (25)
- Knitting for children (15)
- Men's socks, slippers (15)
- From yarn and thread (14)
- Pants, leggings, shorts (14)
- Accessories, decorations (11)
- Swimwear (10)
- Men's sets (7)
- Knitting without description (5)
- Plus sizes (4)
- Men's mittens, mittens (3)
- Knitting without translation (2)
- Chanel style jackets (2)
- Jackets, cardigans, coats (671)
- Pullovers, jumpers, sweaters (1408)
- Dresses, sundresses, tunics, skirts (450)
- CROCHET (702)
- Knitting for home (181)
- Bags, backpacks, cosmetic bags (62)
- New Year's knitting (56)
- Tops, T-shirts (53)
- Summer pullovers, blouses (51)
- Magazines (46)
- Dresses, tunics, skirts (38)
- Men's pullovers (33)
- Jackets, cardigans, coats (33)
- Caps, berets, hats (29)
- Pullovers, jumpers (28)
- Miscellaneous (20)
- Accessories, decorations (17)
- Sets, suits, two-pieces (15)
- Toys (14)
- Swimwear (10)
- Summer jackets, bolero (7)
- Vests, sleeveless vests (2)
- Men's vests (1)
- Patterns (1)
- Men's socks (1)
- SEWING (1040)
- Sewing for home (233)
- Patterns (221)
- Miscellaneous (188)
- Bags, cosmetic bags, wallets (141)
- Dresses, sundresses, tunics, skirts (71)
- New Year's sewing (46)
- Shirts, shirts, blouses (25)
- Clothes alterations (23)
- Coats, jackets, jackets, blazers (20)
- Toys (19)
- Accessories (13)
- Shoes (13)
- Pants, capris, shorts (8)
- Hats (8)
- Swimwear, underwear (4)
- T-shirts, tops, blouses (2)
- Hoodies, sweatshirts (2)
- Video sewing (2)
- MAGIC, SIGNS, DIVINATION (802)
- BEAD (286)
- Earrings (79)
- Bracelet (64)
- Necklace, necklace (34)
- Miscellaneous (27)
- New Year's (24)
- Sets (16)
- Pendants, pendants (13)
- Animals (10)
- Flowers (9)
- Ring, ring (5)
- Accessories (4)
- Brooch (2)
- QUOTES, APHORISMS, SMART THOUGHTS (7)
Popular containers of our time
For the mass consumer, wooden barrels and ceramic dishes are expensive delights. The most popular and affordable utensils are containers made of glass, plastic and metal:
- Glass. This container is perfect for storing many products. Glass is chemically inert and does not allow moisture and air to pass through. The disadvantage of this container is its transparency and fragility. Plus, glassware is never too big. There are, of course, 20 and 10 liter bottles, but it is not advisable to fill them with honey, because such a vessel will be very heavy. Honey is usually stored in small jars at home, in a dark and cool room.
- Plastic. This material has a low price and light weight. Plastic utensils are attracting retailers. Recently, plastic cube containers adapted for storing food products have begun to be used. However, honey is chemically active. It quickly absorbs plastic odors and some substances. Such containers are not prohibited by GOST and sanitary control, but people still have a prejudice against plastic
- In order to store a lot of honey for a long time, beekeepers usually use aluminum flasks. They are chemically inert, lightweight and easy to transport. Stainless steel barrels should not be used to store honey. Metal compounds quickly pass into the contents of the vessel and make it less healing.
- A barrel of honey is considered the most environmentally friendly way to store a sweet product. The advantage of such containers is that honey in a wooden container only becomes better: it acquires the aroma of wood. It's like cognac, which is usually stored only in oak barrels. It is in this case that cognac acquires its signature oak smell. Linden honey barrels will add shades of the smell of this tree to any honey. However, not every barrel can store a sweet product. A wooden barrel should be made only from deciduous trees.
- In our time, ceramic dishes as a vessel intended for long-term storage of large quantities of food products have lost their relevance. The reason is its relative high cost, fragility and heavy weight in large volumes. Honey pots are popular only as a gift option, which combines the beauty of the form and the taste of the contents.
Honey barrels are usually made from oak, linden, acacia, maple, mulberry and other aromatic, but not resinous, types of trees. The ideal option is linden. However, linden is also an excellent honey plant, so every felled tree is a loss for bees and beekeepers.
A barrel produced specifically for storing a sweet product can be manufactured in the following options with:
- a lid that allows the contents to be hermetically sealed;
- hoops made of various alloys and metals;
- decorative carvings;
- weaving from wicker and jute rope;
- print and logo.
In other words, this is not only packaging for a sweet product. This is a work of art that will decorate any cellar. Moreover, it is a wonderful gift that can please any person who is not alien to the joys of life and the desire for beauty.
How to make a paper barrel
We will need two plates of different sizes (the difference should not be very large, about one and a half to two centimeters) and a container that will then be located inside the gift barrel;
We will need corrugated cardboard. We cut out circles from corrugated cardboard: 1 circle – large (within which we cut out a circle for further gift packaging) Trace the gift along the most protruding part and then be sure to try it on, and if our gift hardly fits into the hole, enlarge it a little. 2 circles of smaller diameter with holes inside and 1 circle of smaller diameter without inner hole. We will also need 1 circle of thin cardboard (whatman paper can be used), but its internal hole should be 1-2 mm narrower than the other internal holes;
In order not to have to worry about calculations, I took a flexible centimeter and measured the circumference of our circles. The larger one turned out to be 52 cm and the smaller one was 46.
We need to determine how many centimeters in height the barrel will be (the height of the gift + the bottom and top of the barrel), I added 2 cm at the top and bottom (4 cm in total)
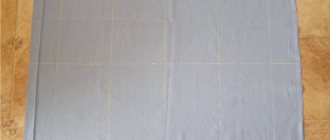
We also need to determine how many cm in length we should make the pattern of the barrels. Our barrel will consist of two canvases. Since our largest circle is 52 cm in circumference, we boldly add 3 cm, and maybe even 4 cm. (Depends on the thickness of the cardboard - the thicker it is, the more centimeters it will eat). The first half of the barrel is larger than the second, look at your box (how long it is). Our first ring will be located in the middle of the barrel and on the canvas we look for the middle, outline a straight line and from it another 2.5 - 3 cm up and down we draw lines (we get a strip of 5-6 cm. In the middle of this strip we will glue a larger circle). The cardboard has corrugated grooves; they should run vertically. Next, we need to knead 5 centimeter-thick strips along these grooves (hereinafter referred to as the boards of our barrel) and since circles of smaller diameters will be at the top and bottom, we make grooves like on a skirt (we cut along the fold line of each future board and cut to the mark that we we did it by measuring the middle) Cut to the mark closest to the edge and cut out the recess (it should turn out to be a triangle);
We do the same on the smaller half of the barrel.
This way the larger circle will be located in the middle;
Cut out strips 1 cm * 2-2.5 cm.
Those places where we made grooves on the sides of the barrel (on two halves) - crumple them with our fingers and round them off from the mark where the grooves end (we don’t take into account the area where the large circle will be located, we only round off the tops and bottom), glue the strips onto the corrugated cardboard circles with holes. The following are left without stripes: a circle without a hole made of HA and a circle with a hole made of thin cardboard.
We glue our circles with holes: two smaller circles down and up (departing from the edges approximately 1 cm.) The glue is not super fast and you have to squeeze hard to get it to stick. You can tie them with elastic bands or strings of any kind to, let’s say, tighten our circles to the maximum.
While the glue dries, let's work on the lid:
We cut off the smaller circle, which is intended for the lid, a little along the edge so that the lid is flush with the top of the barrel.
What is the best way to ensure safety?
Honey should be stored in any container at a temperature from +5 to +10°C. It is believed that the ideal place for this is the refrigerator. However, you can’t fit a lot of cans there.
If you have stocked up on the product in large containers, then you need to place them somewhere in the underground or the coolest corners of the house, protected from light. Honey in barrels and aluminum flasks can stand without additional shading, but transparent plastic needs to be covered with something dark. The same should be done with glass jars.
Products sent for long-term storage must be checked periodically. This should be done even if storage conditions are ideal.
The fact is that honey can separate, crystallize and ferment. Crystallization is a natural process, but separation and fermentation can occur due to poor quality production. Usually such incidents happen with a product that contains a lot of water. As a result, the bactericidal properties of honey are weakened, which leads to increased activity of fungi and bacteria.
Such honey can increase in size, which leads to leakage from the vessel, tearing off the lid and other troubles. As a result, not only are the medicinal and taste properties lost, but in the absence of a sealed lid, the foaming liquid may leak out of the vessel. For this reason, you should never fill the vessel right up to the lid; you should leave some free space in case the fermented mead climbs like dough, tearing off all the lids.
Bees take a long time to prepare their product. They pass the collected nectar through their crops, enriching it with enzymes, and then dry it for a long time. And only after a sufficient amount of water has evaporated from the sweet preparation, it becomes honey and is sealed with special wax caps.
In an effort to start selling their goods earlier, beekeepers can remove early, not yet dried honey. It cannot be stored. You just need to eat it soon. It is advisable to purchase autumn products for storage, preferably in September.
For long-term storage of honey at home, it is best to use wooden barrels, glass jars and aluminum flasks. Plastic, despite the fact that it is considered food grade, still has its own smell, incompatible with the aroma of the bee product.
Thus, storing honey is a complex and delicate process. The more sweet amber you stock up on, the more care is required to ensure its safety.
DIY honey extractor: materials, design, assembly
A barrel of honey is a symbol of health and sweet life. To have such a symbol in the house, you don’t have to look for a cooper. You can make a barrel out of cardboard.
It’s easy to prepare a surprise for the defenders of the fatherland. You will need corrugated cardboard, paint and glue. The lower diameter is smaller than the upper, which is why the lid holds on. Each “plank” needs to be highlighted with a fold, then walked over them with dark paint. The filling of the barrel can be varied.
A beer keg is a great gift! The packaging itself is made of cardboard and covered with corrugated paper.
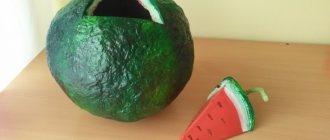
Such a barrel will decorate the interior, for example, a kitchen. The texture of this barrel is given by a layer of gypsum, plaster, along which lines, seams, and irregularities are applied. The product can be painted with gouache and varnished.
These barrels were not coated with an additional layer. The wood-like pattern is applied to cardboard. Foamy honey was applied using polyurethane foam.
If a large-sized barrel is being made, it is necessary to additionally insert stiffening ribs in the form of cardboard rings inside.
A cardboard barrel can be used as gift wrapping.
This kind of craft can decorate the interior. The inside is covered with paper, and the outside is decorated with flowers and bees.
An example of cardboard packaging for a surprise.
To add volume, you need to trim each edge from the edge to the center and glue it together with an overlap. You will get a pot-bellied barrel.
1000000diy.ru
What is the best way to ensure safety?
Honey should be stored in any container at a temperature from +5 to +10°C. It is believed that the ideal place for this is the refrigerator. However, you can’t fit a lot of cans there.
If you have stocked up on the product in large containers, then you need to place them somewhere in the underground or the coolest corners of the house, protected from light. Honey in barrels and aluminum flasks can stand without additional shading, but transparent plastic needs to be covered with something dark. The same should be done with glass jars.
Products sent for long-term storage must be checked periodically. This should be done even if storage conditions are ideal.
The fact is that honey can separate, crystallize and ferment. Crystallization is a natural process, but separation and fermentation can occur due to poor quality production. Usually such incidents happen with a product that contains a lot of water. As a result, the bactericidal properties of honey are weakened, which leads to increased activity of fungi and bacteria.
Such honey can increase in size, which leads to leakage from the vessel, tearing off the lid and other troubles.
As a result, not only are the medicinal and taste properties lost, but in the absence of a sealed lid, the foaming liquid may leak out of the vessel.
For this reason, you should never fill the vessel right up to the lid; you should leave some free space in case the fermented mead climbs like dough, tearing off all the lids.
Bees take a long time to prepare their product. They pass the collected nectar through their crops, enriching it with enzymes, and then dry it for a long time. And only after a sufficient amount of water has evaporated from the sweet preparation, it becomes honey and is sealed with special wax caps.
In an effort to start selling their goods earlier, beekeepers can remove early, not yet dried honey. It cannot be stored. You just need to eat it soon. It is advisable to purchase autumn products for storage, preferably in September.
For long-term storage of honey at home, it is best to use wooden barrels, glass jars and aluminum flasks. Plastic, despite the fact that it is considered food grade, still has its own smell, incompatible with the aroma of the bee product.
Thus, storing honey is a complex and delicate process. The more sweet amber you stock up on, the more care is required to ensure its safety.
How to make a barrel out of clothespins
To make such a barrel you will need a little time and the most ordinary items
Irina Lysenko. For the portal Masters of Handicrafts
Blog: Grunkin's autumn
- Pringles can
- wooden clothespins
- finishing fabric
- hemp rope
- wooden bead
- self-tapping screw
- cardboard
- glue
- glue gun
Cut a piece of fabric measuring approximately 13 by 10.5 cm
Make 0.5 cm cuts on one edge (which will go down the can)
Lubricate the inside of the jar with PVA glue
We also coat the fabric with glue.
Glue the fabric inside the jar, straighten it so that the edges are glued end to end. If the fabric is long, it’s better to pull it out and cut off the excess
Cut the edges of the fabric at the top
Bend it outwards and glue it
Cut out a cardboard circle slightly smaller than the diameter of the jar and a piece of fabric for the bottom
Glue the cardboard to the wrong side of the fabric, make cutouts on the fabric around the perimeter
Fold and glue the edges of the fabric
Glue the bottom into the jar
We disassemble the prepared clothespins into two parts. It took me 12 pieces
Glue the clothespins with a hot gun.
It already looks very much like a barrel.
All that remains is to decorate. Wrap the bottom part with hemp rope
Now we wrap the upper part.
It is better to secure the rope between clothespins with glue
We also wrap the edge of the jar with hemp
Making a lid. Cut out several circles from cardboard. They should fit inside the Pringles lid. We cut out thick felt or padding polyester of the same diameter. And a piece of fabric with a diameter larger than the lid - taking into account the bend of the fabric
https://www.youtube.com/watch?v=8AKVT49QIJw
We assemble a kind of sandwich: first we put cardboard in the lid, then felt on top. It is better to lightly lubricate each layer with Moment-Crystal type glue. Cover the top with fabric
We trim the edges, coat them with glue, fold them over and glue the fabric onto the lid.
We poke a hole in the center,
We screw in the self-tapping screw from the inside of the lid.
On the front side, screw a wooden bead onto the end of the self-tapping screw.
Now we’ll make a protrusion on our lid that will go inside the jar and prevent the lid from moving off. Cut out several circles from cardboard with a diameter slightly smaller than the diameter of the jar from the inside
Glue the circles together. If you have thick cardboard, you can cut out one circle. I have a thin one - I glued 4 mugs.
Cover with cloth
And glue it to the bottom of the lid
Glue jute rope to the edge of the lid
And here is the result
You can stick a couple of ladybugs from a florist store
www.mastera-rukodeliya.ru
How long can honey be stored?
The duration of this process depends not only on storage conditions and packaging, but also on the condition of the product itself, which can be:
- thick;
- liquid;
- in honeycombs.
It is believed that the healthiest honey is liquid honey. However, there is danger in this preference. The fact is that some unscrupulous producers in the spring may sell not fresh, but melted honey. Eating such a product is not only useless, but also dangerous. During heat treatment, complex biochemical reactions occur, as a result of which substances hazardous to health appear instead of useful ingredients.
Real fresh honey is not only liquid, it is transparent, with a bouquet of sharp spicy odors or delicate floral aromas. It is this product that is maximally saturated with vitamins and other beneficial substances. When honey is stored properly, it thickens and becomes sugary, gradually losing some of its properties. However, these losses are not significant. Throughout the year, such honey can be consumed with a clear conscience. A product stored for more than a year still has many beneficial properties. At least it is not harmful to the body. However, such terms are already beyond all sanitary recommendations.
But honey in honeycombs, when properly stored, does not lose its nutritional and medicinal qualities for 10 years. No wonder it is sold at inflated prices. This product does not come from beekeepers, but from the bees themselves. Honeycombs are placed in a wooden barrel, from which honey flows. Honeycomb is a wax that is also beneficial to the body. It has the property of an adsorbent, so you need to consume honey along with honeycombs, chewing and swallowing the sweet wax.
Thus, the safety of honey depends on many factors. The material from which the container is made plays an important role in this process. A pot and a barrel of honey are considered the best option for preserving the product. They are followed by glass containers, the only drawback of which is transparency and fragility. Plastic and metal have questionable qualities.
MK Imitation wood, glaze. "Gift Barrel for Honey"
1. We will need two plates of different sizes (the difference should not be very large, about one and a half to two centimeters) and a container that will then be located inside the gift barrel;
2. We will need corrugated cardboard. We cut out circles from corrugated cardboard: 1 circle - large (inside of which we cut out a circle for further gift packaging) Trace the gift along the most protruding part and then be sure to try it on and if our gift hardly fits into the hole, enlarge it a little. 2 circles of smaller diameter with holes inside and 1 circle of smaller diameter without inner hole. We will also need 1 circle of thin cardboard (whatman paper can be used), but its internal hole should be 1-2 mm narrower than the other internal holes;
3. In order not to have to worry about calculations, I took a flexible centimeter and measured the circumference of our circles. The larger one turned out to be 52 cm and the smaller one was 46.
4. We need to determine how many centimeters in height the barrel will be (the height of the gift + the bottom and top of the barrel), I added 2 cm at the top and bottom (4 cm in total)
We also need to determine how many cm in length we should make the pattern of the barrels. Our barrel will consist of two canvases. Since our largest circle is 52 cm in circumference, we boldly add 3 cm, and maybe even 4 cm. (Depends on the thickness of the cardboard - the thicker it is, the more centimeters it will eat). The first half of the barrel is larger than the second, look at your box (how long it is). Our first ring will be located in the middle of the barrel and on the canvas we look for the middle, draw a straight line and from it another 2.5 - 3 cm up and down we draw lines (we get a strip of 5-6 cm. In the middle of this strip we will glue a larger circle)! !! The cardboard has corrugated grooves; they should run vertically. Next, we need to knead 5 centimeter-thick strips along these grooves (hereinafter the boards of our barrel) and since circles of smaller diameters will be at the top and bottom, we make darts like on a skirt (we cut along the fold line of each future board and cut to the mark that we we did it by measuring the middle) Cut to the mark closest to the edge and cut out the dart (you should get a triangle);
5. On the smaller half of the barrel we do the same.
6. This way the larger circle will be located in the middle;
7. Cut out strips 1 cm * 2-2.5 cm.
8. Glue with glue;
9. Those places where we made darts on the sides of the barrel (on two halves) - crumple with our fingers and round off from the mark where the darts end (we do not take into account the area where the large circle will be located, we only round off the tops and bottom), glue the strips onto the circles made of corrugated cardboard with holes. The following are left without stripes: a circle without a hole made of HA and a circle with a hole made of thin cardboard.
We glue our circles with holes: two smaller circles down and up (departing from the edges approximately 1 cm.) The glue is not super fast and you have to squeeze hard to get it to stick. You can tie them with elastic bands or strings of any kind to, let’s say, tighten our circles to the maximum.
While the glue dries, let's work on the lid:
We cut off the smaller circle, which is intended for the lid, a little along the edge so that the lid is flush with the top of the barrel.
We cut out 6 strips: 4 smaller and 2 larger, try them on the lid;
glue two strips together;
We glue two more smaller circles to the top circle;
The two bottom circles should be less than the top by a maximum of 1 cm. Try the bottom circles on the barrel so that they fit completely and lie on the top circle of the barrel, the circle with the hole.
We cover the finished lid and the element with which we will open it later with yacht varnish.
We treat all holes and irregularities with papier mache, sand, putty, sand again, cover with yacht varnish, glaze... see further.
We choose where our barrel will have the top and pour glue into the corrugated grooves and begin to crumple the cardboard, gluing the upper and lower parts between which the grooves are located (there should be the effect of thin cardboard.) If the three parts that make up the GC are separated, then we glue them very well to avoid air bubbles in the future. If we have air bubbles, our putty will fly around. To the bottom of the barrel, to the bottom circle with a hole, glue a circle without a hole.
While the first strip is being glued, you can apply glue to the second. While it dries on the last board, glue the previous one.
You can help yourself and clamp the tops with something while they are glued (either with clamps or clothespins, just be careful so that the clamps do not stick to the barrel),
After we have everything glued, we varnish the outside of our entire barrel thoroughly with yacht varnish.
Prepare papier mache mixture. We cut the napkins into small pieces and fill them with PVA; it is better to take a larger container;
We cover all the holes with papier mache solution, remove the excess with a cloth. When the solution dries it will be difficult to sand. The remaining solution will go to the bottom of the barrel;
This is what the barrel and lid with holder look like, treated with papier mache.
After drying, we sand the entire product and apply putty, smoothing out all the unevenness. Don't forget to apply putty to the bottom and level it with a spatula.
We also apply putty to the lid and holder;
We take a spatula and at an angle of 45 degrees we begin to draw our tree, all the knots and grooves;
After the putty has dried, we take sandpaper and clean everything up. We align everything. We coat all places with putty with yacht varnish. The putty will yellow slightly from the varnish.
Next, we need to think about the internal state of our barrel. We take whatman paper and roll it into a tube, coat our holes in the circles with glue, insert whatman paper and glue it to the sides of the holes in the circles;
We make notches on the top of the Whatman paper with scissors, bend it and cut off the excess. Glue the folded parts to the top circle of HA;
On top we glue a circle of thin cardboard with an internal hole slightly smaller than the circles made of GC. , We coat the top and whatman paper with yacht varnish - the tube;
After the varnish has dried, we cover all the cracks with putty, then again with yacht varnish, wait for it to dry;
We prepare brushes, a cloth and paints for glazing. “Tair” paints brown, white and gray, ocher; "Plaid" 915;
Mix gray “Tair” and brown “Plaid” 915 paints and apply the first layer, wait for drying;
Do not forget to paint the lid along with the barrel to avoid discrepancies in color;
We added splashes of Tair ocher, bleached the dark brown a little to light brown and sprinkled it further, then we applied dark splashes - take gray paint and apply it with some water on top, giving the effect of dusty antiquity. Next, we play with color;
Don’t forget to apply all layers to the barrel lid. After we achieve the desired result and are satisfied with it, we put brown dots on the lid, near the holder, imitating carnations;
After all the layers of paint have dried, we can coat the barrel with the finishing varnish in one layer, I use “Technolog” varnish. Next, after the varnish has dried, we begin to draw the boards. To make our barrel more like a real one, we will draw small triangles on the edges of the lines, imitating cracks;
We also draw boards on the lid;
We draw our knots with brown paint, highlight all the grooves or those that we want to highlight;
Since our barrel tapers towards the bottom and towards the top, we will need to make a pattern for our hoops first from paper, cut thin strips and equip ourselves with double-sided tape.
We remember where our pattern will begin and begin measuring in small pieces. For convenience, the beginning of the pattern can be glued to the barrel with a small piece of tape. We make sure that the strip runs straight along the top; as soon as it starts to go down, we tear it off and glue the next strip onto double-sided tape so that it runs evenly. Leave an overlap.
This is the curved pattern we got. We put notches where the beginning is and mark the top. We turn the barrel over and use the same pattern to make a pattern;
We cut off the top and bottom of the tin can, cut it lengthwise to form a rectangle, and cut off any unevenness for safety reasons!!! For convenience, we will paste several small strips of double-sided tape onto the paper pattern and place it on a tin can. We also glue a piece of tape to the edge of the tin pattern and glue a tin piece to it, continuing the pattern...
We clean the resulting tin pattern from the paint layer, do not remove the paper pattern yet.
Those places where we were fastened with tape (tin to gesture) we will need to connect them;
To do this, we take either an awl or a tailor's needle (a thick needle) and make two holes at the joints, helping with either a hammer or heavy pliers. Be sure to place an unnecessary magazine so as not to spoil the table. We try on the rings to the barrel and close them with pieces of wire. We bend the wire in the shape of the letter P and clamp it from the inside out like a bracket with pliers;
We take a sponge and apply brown paint to the tin using tapping movements. If you decide to make a pattern (squeeze) on the tin, then use bitumen varnish rather than paint (it will show all the patterns, but there is a drawback - it smells terrible)
We process both rings and wait for drying;
We remove the paper pattern, remove the tape with a napkin or cloth, use coarse sandpaper to go over the rings for better adhesion to the glue, glue the hoops and pull them onto the barrel, pressing so that they stick. If the glue doesn’t work, then you need to take a hot gun. Next we coat it with finishing varnish and apply decoupage.
If you are interested, I have a video of MK.
Cooperation is one of the most difficult crafts, so answering the question of how to make a barrel with your own hands will also not be easy. This is a very labor-intensive process that requires the performer to have a decent professional level and the availability of a large number of tools for wood processing.
DIY barrel of honey made of cardboard
—Categories
- crafts (143)
- recipes (123)
- mk (87)
- decoupage (26)
- new year (51)
- comfort in the home (46)
- astrology (15)
- Katyushka (7)
- embroidery (7)
- astrology (1)
- embroidery (1)
- salt dough (1)
- blanks (1)
—Search by diary
—Subscription by e-mail
— Regular readers
—Communities
-Statistics
Saturday, January 16, 2020 12:55 + in the quotation book
MK imitation wood “Honey Barrel”
MK Imitation wood, glaze. "Gift Barrel for Honey"
1. We will need two plates of different sizes (the difference should not be very large, about one and a half to two centimeters) and a container that will then be located inside the gift barrel;
2. We will need corrugated cardboard. We cut out circles from corrugated cardboard: 1 circle – large (within which we cut out a circle for further gift packaging) Trace the gift along the most protruding part and then be sure to try it on, and if our gift hardly fits into the hole, enlarge it a little. 2 circles of smaller diameter with holes inside and 1 circle of smaller diameter without inner hole. We will also need 1 circle of thin cardboard (whatman paper can be used), but its internal hole should be 1-2 mm narrower than the other internal holes;
3. In order not to have to worry about calculations, I took a flexible centimeter and measured the circumference of our circles. The larger one turned out to be 52 cm and the smaller one was 46.
4. We need to determine how many centimeters in height the barrel will be (the height of the gift + the bottom and top of the barrel), I added 2 cm at the top and bottom (4 cm in total)
We also need to determine how many cm in length we should make the pattern of the barrels. Our barrel will consist of two canvases. Since our largest circle is 52 cm in circumference, we boldly add 3 cm, and maybe even 4 cm. (Depends on the thickness of the cardboard - the thicker it is, the more centimeters it will eat). The first half of the barrel is larger than the second, look at your box (how long it is). Our first ring will be located in the middle of the barrel and on the canvas we look for the middle, draw a straight line and from it another 2.5 - 3 cm up and down we draw lines (we get a strip of 5-6 cm. In the middle of this strip we will glue a larger circle). The cardboard has corrugated grooves; they should run vertically. Next, we need to knead 5 centimeter-thick strips along these grooves (hereinafter the boards of our barrel) and since circles of smaller diameters will be at the top and bottom, we make darts like on a skirt (we cut along the fold line of each future board and cut to the mark that we we did it by measuring the middle) Cut to the mark closest to the edge and cut out the dart (it should look like a triangle);
5. On the smaller half of the barrel we do the same.
6. This way the larger circle will be located in the middle;
7. Cut out strips 1 cm * 2-2.5 cm.
8. Glue with glue;
9. Those places where we made darts on the sides of the barrel (on two halves) - crumple with our fingers and round off from the mark where the darts end (we do not take into account the area where the large circle will be located, we only round off the tops and bottom), glue the strips onto the circles made of corrugated cardboard with holes. The following are left without stripes: a circle without a hole made of HA and a circle with a hole made of thin cardboard.
We glue our circles with holes: two smaller circles down and up (departing from the edges approximately 1 cm.) The glue is not super fast and you have to squeeze hard to get it to stick. You can tie them with elastic bands or strings of any kind to, let’s say, tighten our circles to the maximum.
Types of barrels by purpose and wood for their manufacture
Before you are interested in how to make a barrel, you should decide what you need it for. The choice of material and manufacturing method depend on this. This type of container is manufactured for the following purposes:
- for fermentation, aging and storage of spirits, wine and beer;
- for preparing and storing pickles;
- for storing dry products;
- for storing honey, etc.
Beverage barrels have two bottoms and a hole for inserting taps. The same type of container, but without holes, was previously used for long-term storage of certain products (for example, corned beef).
For other purposes, barrels with one bottom are sufficient - they are also called tubs. They are covered with a lid or a circle on top for oppression. These parts are much easier to make than the bottom. You can make a wooden barrel from such types of wood as:
- oak;
- ash;
- cherry;
- Linden;
- alder and others.
The wood of the first three types is the most versatile. It is equally suitable for containers for any purpose. However, the “champion” should be recognized as an oak barrel, which, being strong, reliable and durable, provides ideal conditions for storing food.
Oak products have antiseptic properties, release tannins into alcoholic drinks, improving their taste, and also easily withstand the effects of brines when preparing pickles. Ash and cherry are the first “substitutes” of oak wood. They have similar, but weaker properties. Therefore, we will consider, . The production of containers from other types of wood, such as linden, has no fundamental differences except for the nuances of finishing.
Oak barrel for honey
Rules for procuring material for barrels
Before you start making a wooden barrel with your own hands, you should prepare and prepare high-quality material. The wood must be mature, healthy, and free from defects (knots, cross-layers)
The best time for harvesting material is late autumn or winter, when the natural moisture content of the wood is at a minimum level.
It is unlikely that you will be able to meet all the requirements. For example, to make staves for wine and cognac barrels of the highest quality category, the process of drying and aging wood takes 6–8 years, but if you are only concerned about how to make a barrel for yourself, adhere to the following rules:
- Before drying, the logs are split into pieces of the required thickness;
- drying is carried out in a place protected from direct sunlight - under a canopy, in a barn, etc.;
- The duration of drying depends on many factors and can take 1–3 months;
- The residual moisture content of the wood before treatment should be about 25%.
Accelerating the drying process using hot air and other methods usually leads to a deterioration in the quality of the wood and its properties in the finished product. The advice also takes into account the need to condition the processed rivets before assembling the product. As a result, the residual moisture content of the wood should be 17–20%.
Making rivets and tools for this
For those who want to make an oak barrel themselves, the most difficult thing will be making the staves. The process of marking and chopping logs is clearly presented in the following figure
As a result, you will receive blanks of conical cross-section, from which, after drying, they are made into rivets. This part has a complex shape, so its production places high demands on the skill of the performer. The main dimensions of the barrel and its elements, depending on the volume, are as follows:
This table will help you figure out how to make a barrel, and the drawing will help you understand how to give the rivets the desired shape
Tool
and what tools you will need for this. The curvature of the sides should provide the barrel with a taper of about 8°, due to which the product becomes resistant to loads from the outside and inside. To process the surfaces of rivets, a plane, jointer, sherhebel, plow and other tools of this group are used. In this case, the outer surface of the part should have a slightly convex shape, and the inner surface should have a concave shape.
| Barrel capacity, l | Height, mm | Center diameter, mm | Diameter at the edges, mm | Riveting width, mm | Rivet thickness, mm | Thickness of bottoms, mm |
The accuracy and quality of planing are regularly checked using a template. To calculate the number of rivets, the longest circumference (at the center of the barrel) should be divided by the width of the workpieces. This way you will also determine the exact and uniform size of the part. The process of making rivets can be seen in the video.
After this, the answer to the question of how to make an oak barrel with your own hands will become clearer, since you will cope with the most difficult task.
Making bottom shields and tools for this
To make bottom shields, 4–6 planks are used, connected to each other with wooden or stainless steel pins. Drawings, or, more precisely, instructions, of this process are given here
But at first we will limit ourselves to only connecting the planks, since other operations are carried out taking into account the dimensions of the assembled barrel body. We just have to do the following:
- draw a circle on the shield: its diameter should correspond to the size of the bottom of the barrel, to which is added twice the depth of the morning groove (this is 6 mm);
- perform filing along the contour using a bow saw or a circular saw;
- chamfer around the entire circumference so that the bottom fits into the morning groove.
In a similar way (adjusted for a larger or smaller diameter), the lid and the circle for oppression are made. If you intend to make a drink barrel with two bottoms with your own hands, you should remember that such products are made according to individual measurements for the top and bottom. You will see the result of your efforts only after you collect all the details into a single whole. Assembling the barrel is the most enjoyable stage of its manufacture. We will describe how this process is carried out below.
How to make a barrel of honey from cardboard
—Categories
- crafts (142)
- recipes (123)
- mk (87)
- decoupage (26)
- new year (51)
- comfort in the home (46)
- astrology (15)
- Katyushka (7)
- embroidery (7)
- astrology (1)
- embroidery (1)
- salt dough (1)
- blanks (1)
—Search by diary
—Subscription by e-mail
— Regular readers
—Communities
-Statistics
Saturday, January 16, 2020 12:55 + in the quotation book
MK imitation wood “Honey Barrel”
MK Imitation wood, glaze. "Gift Barrel for Honey"
1. We will need two plates of different sizes (the difference should not be very large, about one and a half to two centimeters) and a container that will then be located inside the gift barrel;
2. We will need corrugated cardboard. We cut out circles from corrugated cardboard: 1 circle – large (within which we cut out a circle for further gift packaging) Trace the gift along the most protruding part and then be sure to try it on, and if our gift hardly fits into the hole, enlarge it a little. 2 circles of smaller diameter with holes inside and 1 circle of smaller diameter without inner hole. We will also need 1 circle of thin cardboard (whatman paper can be used), but its internal hole should be 1-2 mm narrower than the other internal holes;
3. In order not to have to worry about calculations, I took a flexible centimeter and measured the circumference of our circles. The larger one turned out to be 52 cm and the smaller one was 46.
4. We need to determine how many centimeters in height the barrel will be (the height of the gift + the bottom and top of the barrel), I added 2 cm at the top and bottom (4 cm in total)
We also need to determine how many cm in length we should make the pattern of the barrels. Our barrel will consist of two canvases. Since our largest circle is 52 cm in circumference, we boldly add 3 cm, and maybe even 4 cm. (Depends on the thickness of the cardboard - the thicker it is, the more centimeters it will eat). The first half of the barrel is larger than the second, look at your box (how long it is). Our first ring will be located in the middle of the barrel and on the canvas we look for the middle, draw a straight line and from it another 2.5 - 3 cm up and down we draw lines (we get a strip of 5-6 cm. In the middle of this strip we will glue a larger circle). The cardboard has corrugated grooves; they should run vertically. Next, we need to knead 5 centimeter-thick strips along these grooves (hereinafter the boards of our barrel) and since circles of smaller diameters will be at the top and bottom, we make darts like on a skirt (we cut along the fold line of each future board and cut to the mark that we we did it by measuring the middle) Cut to the mark closest to the edge and cut out the dart (it should look like a triangle);
5. On the smaller half of the barrel we do the same.
6. This way the larger circle will be located in the middle;
7. Cut out strips 1 cm * 2-2.5 cm.
8. Glue with glue;
9. Those places where we made darts on the sides of the barrel (on two halves) - crumple with our fingers and round off from the mark where the darts end (we do not take into account the area where the large circle will be located, we only round off the tops and bottom), glue the strips onto the circles made of corrugated cardboard with holes. The following are left without stripes: a circle without a hole made of HA and a circle with a hole made of thin cardboard.
We glue our circles with holes: two smaller circles down and up (departing from the edges approximately 1 cm.) The glue is not super fast and you have to squeeze hard to get it to stick. You can tie them with elastic bands or strings of any kind to, let’s say, tighten our circles to the maximum.
Jewelry Review
–Categories
- WITH YOUR OWN HANDS (814)
- Jewelry, accessories (142)
- Paintings, panels (102)
- Lamps, lamps, chandeliers (92)
- Candles, candlesticks (82)
- Dishes, vases, flower pots (72)
- Watches (55)
- Rugs, rugs (37)
- Miscellaneous (33)
- NEW YEAR (450)
- DIY Christmas trees (19)
- DIY FURNITURE (406)
- HOLIDAYS (259)
- LIFE HACKS, USEFUL TIPS (259)
- PAPER, CARDBOARD (252)
- Paper Christmas (62)
- Packaging (54)
- Miscellaneous (45)
- Postcards (31)
- Cardboard chests of drawers (29)
- Quilling (4)
- HOROSCOPE (225)
- PSYCHOLOGY, SELF-KNOWLEDGE (213)
- SLAVS (134)
- EMBROIDERY (125)
- New Year embroidery (9)
- HOUSE, Cottage, VEGETABLE GARDEN (105)
- SIMORON, DREAMS, DESIRE (92)
- STONES (ZODIAC, TALISMANS) (66)
- DIY REPAIR (52)
- MUDRA (43)
- AROMATHERAPY (40)
- MEDITATIONS (38)
- HOUSE PLANTS (35)
- MISCELLANEOUS (34)
- VIDEO (27)
- FABRIC DYING (26)
- AYURVEDA (26)
- Yoga (22)
- DECOUPAGE (23)
- PLASTIC BOTTLE (18)
- NUMEROLOGY (12)
- DRAWING LESSONS (12)
- WIRE (12)
- STYLE (9)
- INTERIOR (9)
- FOAMIRAN, PORCELAIN, CLAY (8)
- INTERESTING (8)
- AFFIRMATIONS, MANTRAS (7)
- MACRAME, WEAVING (7)
- LIFE HACKS FOR PHOTOGRAPHERS (6)
- STAINED GLASS, MOSAIC (5)
- CONGRATULATIONS, POEMS (4)
- PAINTING (4)
- ART THERAPY, COLORING BOOKS (4)
- DREAM INTELLIGENCE (4)
- ISONIT (3)
- ANIMALS (3)
- DATES (2)
- FELTING (2)
- GIFTS (1)
- PAINTING (1)
- LEISURE (1)
- PHOTOSHOP (1)
- TRIP (1)
- POSITIVE, HUMOR (0)
- COOKING (1313)
- Salting, pickling, pickling (148)
- Jam, compotes (43)
- Sauces, ketchups, gravies (34)
- Fried baked goods (25)
- Snack (18)
- Salt, seasonings (11)
- Dairy recipes (6)
- Unbaked pastries (6)
- Creams, glazes, mastic (6)
- Porridge (5)
- Cooking in a slow cooker (4)
- Cheeses, sausages, pates (4)
- Dough (2)
- Products (2)
- Recipes for diabetics (1)
- First courses (34)
- Main courses (64)
- Salads (62)
- Baking (240)
- Desserts (136)
- Drinks (167)
- New Year's recipes (146)
- Various recipes (33)
- Useful tips (93)
- HEALTH (1038)
- Therapeutic massage, gymnastics (97)
- Runny nose, colds, flu (27)
- Stress, nerves (20)
- Insomnia (15)
- Teeth, gums, bad breath (5)
- Diet (4)
- Miscellaneous (1)
- Traditional recipes (16)
- Teas, drinks for weight loss (17)
- Women's health (12)
- VEGETARIAN CUISINE (402)
- Fried baked goods (7)
- Dough (3)
- Miscellaneous (1)
- First courses (79)
- Main courses (56)
- Salads (91)
- Sauces, mayonnaise (3)
- Baking (33)
- Desserts (36)
- Drinks (77)
- Multicooker (3)
- Snack (1)
- Useful tips (2)
- BEAUTY (731)
- Beauty calendar (46)
- Cosmetics (39)
- Body (23)
- Feet, pedicure (22)
- Miscellaneous (8)
- Neck (7)
- Tips (6)
- Bust (4)
- Face (154)
- Eyes, makeup (52)
- Hands, manicure (66)
- Hair (102)
- Bath bombs (28)
- Soap (72)
- RAW FOOD (2)
- SPORT (99)
- Stretching, warm-up (8)
- Breathing exercises (2)
- Articles (1)
- Fitness (8)
- KNITTING (6211)
- Summer pullovers, blouses (651)
- Tops, T-shirts (521)
- Men's pullovers, sweaters (426)
- Hats, berets, caps (345)
- Two-pieces, suits, sets (278)
- Magazines (275)
- Knitting for home (188)
- Men's jackets (156)
- Men's hats, scarves, snoods (147)
- Patterns, elastic bands (137)
- Vests, sleeveless vests (110)
- Magazines without translation (85)
- Men's vests, sleeveless vests (83)
- Knee socks, socks, shoes (79)
- Summer jackets, bolero (71)
- Miscellaneous (68)
- New Year's knitting (68)
- Bags, backpacks, cosmetic bags (62)
- Polantinas, scarves, shirtfronts (61)
- Mittens, mittens, gloves (30)
- Shawls, scarves, bacti (26)
- Toys (21)
- Knitting for children (15)
- Men's socks, slippers (15)
- Pants, leggings, shorts (14)
- From yarn and thread (13)
- Accessories, decorations (11)
- Swimwear (10)
- Men's sets (7)
- Knitting without description (5)
- Plus sizes (4)
- Men's mittens, mittens (3)
- Knitting without translation (2)
- Chanel style jackets (2)
- Jackets, cardigans, coats (665)
- Pullovers, jumpers, sweaters (1397)
- Dresses, sundresses, tunics, skirts (444)
- CROCHET (700)
- Knitting for home (181)
- Bags, backpacks, cosmetic bags (62)
- New Year's knitting (56)
- Tops, T-shirts (53)
- Summer pullovers, blouses (51)
- Magazines (46)
- Dresses, tunics, skirts (38)
- Men's pullovers (33)
- Jackets, cardigans, coats (33)
- Caps, berets, hats (29)
- Pullovers, jumpers (28)
- Miscellaneous (20)
- Accessories, decorations (16)
- Toys (14)
- Sets, suits, two-pieces (14)
- Swimwear (10)
- Summer jackets, bolero (7)
- Vests, sleeveless vests (2)
- Men's vests (1)
- Patterns (1)
- Men's socks (1)
- SEWING (1022)
- Sewing for home (232)
- Patterns (219)
- Miscellaneous (182)
- Bags, cosmetic bags, wallets (138)
- Dresses, sundresses, tunics, skirts (71)
- New Year's sewing (44)
- Shirts, shirts, blouses (25)
- Clothes alterations (23)
- Coats, jackets, jackets, blazers (20)
- Toys (16)
- Accessories (12)
- Shoes (12)
- Pants, capris, shorts (8)
- Hats (8)
- Swimwear, underwear (4)
- T-shirts, tops, blouses (2)
- Hoodies, sweatshirts (2)
- Video sewing (2)
- MAGIC, SIGNS, DIVINATION (717)
- BEAD (280)
- Earrings (79)
- Bracelet (63)
- Necklace, necklace (34)
- Miscellaneous (26)
- New Year's (23)
- Sets (16)
- Pendants, pendants (13)
- Animals (9)
- Flowers (9)
- Ring, ring (4)
- Accessories (4)
- Brooch (2)
- QUOTES, APHORISMS, SMART THOUGHTS (7)
–Search by diary
–Subscription by e-mail
– Regular readers
–Communities
-Statistics
Wednesday, July 20, 2020 14:47 + to quote book