Do-it-yourself grass cutter driven by an angle grinder
I have birch trees growing in my dacha. Leaves are falling from the trees. We have to clean it up, burn it, and fill up the compost pit. The foliage takes a long time to rot. I decided to chop it up. For this you need a grass cutter. I looked at what they were making on the Internet. I turned on my brain and this is what I came up with.
Do you like an inexpensive option for a garden shredder? Read the article further and find out how to make a homemade product from an angle grinder and a metal tank. Tok2Z acted like this:
- He thought about how to twist the chopper blades. The choice is small - install a motor from a washing machine, or buy an electric motor. According to the user, the motor from the washing machine is weak, and I didn’t want to purchase a three-phase unit and convert it to one phase.
- Tok2Z bought on the market, for 2 thousand rubles, an old grinder with a power of 2 kW and blades from a lawn mower for 700 rubles. I ordered an adapter sleeve from a turner, spending another 500 rubles.
- I welded the frame and placed a galvanized water tank on it. I assembled the structure and turned on the grass cutter.
The turnover is crazy. I threw a shovelful of leaves into the tank, and they blew away! I checked where the flow was going. Air goes up from the edge of the tank and is sucked in in the middle. I cut out a galvanized ring and installed it in the center of the tank. Threw the leaves. The knives crushed it just right, and it flew into the lower pipe.
To grind the grass into a very fine fraction, the user installed a corner in front of the “exhaust” pipe.
The grass cutter shreds the leaves directly into the compost bin.
Compare: a pile of leaves.
The grass cutter threshes everything - grass, leaves. Sometimes, along with the foliage, a wire comes across. Pebbles. Pieces of metal. The crusher crushes the stones. No iron. You have to turn it off, look for trash and throw it away. The noise is terrible. One of the disadvantages is the thin walls of the tank. It breaks through. I will redo it. I will make a tank from a sheet of iron 1-2 mm thick.
Shutdown
A four-blade trimmer disc is preferable to a wood trimmer disc design as it actually gets the job done. It is known that the maximum thickness of branches that it can cut corresponds to the length of the petal. It is worth noting that the potential also depends on the power of the device itself.
You also need to make sure that the shredder is stable. For this, old metal pipes or pieces of fittings will be useful, then you will get comfortable legs for the device.
Now you can run your homemade shredder in test mode. To begin with, you should choose thin branches, preferably dry ones literally 1.5 cm thick. Gradually increasing the size of the branches, you can understand how well the newly made device copes with the task. Experience shows that the size of the resulting chips depends on the rotation speed of the grinder. It must be taken into account that with more frequent rotation, the total power of the chopper will become less. If apple tree branches are chopped, the resulting wood chips are suitable for a smokehouse; the rest of the wood is good for covering beds and other needs on the site.
Cool homemade product from a REGULAR GRINDER. Garden shredder from a GRINDER (1 video)
Do-it-yourself country grinder from a grinder (6 photos)
Universal grass cutter and corn sheller
I also made a grass cutter. I mainly use it to chop grass for poultry. The basis of the homemade product is a kilowatt motor made in the USSR. I bought it for 1400 rubles. Works great. The engine is three-phase, but converted to operate from a 220 Volt network.
Making a homemade grass cutter step by step:
- Holes were drilled and threaded in the flange.
- The knives were made from a piece of an old rusty two-handed saw.
- The knives were screwed to the flange.
- The grass cutter frame was made from a sheet of metal 4 mm thick. A strip of metal with a cross-section of 4x40 mm was welded to the square, which was bent in a circle. A hole was drilled in the center of the frame.
I bent the strip with a hammer, striking the metal on the jaws of a vice. The radius was controlled in a circle by drawing it on the bed.
At the finish, the user welded the legs to the base. Fixed the electric motor. I made a large tank with a lid so that debris would not fly out of the grass cutter while the engine was running.
The tank is removable for ease of use of the grass chopper.
Corn husker from grass cutter
Alex Nk decided, based on a grass cutter, to make a mechanism for shelling corn. The result is a two-in-one unit. To make a homemade product you need:
- Cut a disk out of metal.
- Drill holes in it for M6 bolts.
- Rework the base so that the outlet is at the bottom. This is how the grass is chopped finer, and the corn is not chopped.
- The disk was screwed to the flange.
The tank has been redone. A “reflector” was attached to it to throw the corn “cobs” into the bucket.
Grass cutter-corn sheller assembled.
Places for storing fasteners.
To prevent the grass from wrapping around the motor shaft, the user installed a protection ring.
I found experimentally that the optimal option for chopping grass is two knives. Four knives turn the grass into mush. I also threshed apples for the poultry. One bucket of apples is crushed in 4-5 minutes. The result is a grass cutter-vegetable cutter-fruit cutter.
conclusions
Most home craftsmen can make a grass cutter. Use an oil flask, barrel, etc. as a tank. To make a homemade product you will need a set of tools:
- Bulgarian;
- drill;
- welding inverter;
- set of locksmith tools.
The main consumable part is the engine. Users used used drives. Is it profitable to make grass cutters yourself? Compare prices for factory models and calculate how much it will cost you to buy parts for homemade products. Don't forget to add time costs.
Want to know more? to the authors of grass cutters in the topic Homemade Grass Cutter “Monster 2015”.
- Photo instructions for making a profile bender yourself for 2000 rubles from spare parts from old cars and bicycles, bearings, threaded rods and channels.
- 5 options for a sawhorse for sawing logs into firewood - cheap homemade devices for sawing logs into logs and splitting firewood: drawings, design, experience of use.
- A universal homemade stand for an angle grinder with a rotating mechanism, an eccentric clamp and metal cutting in two planes.
How to make a wood chipper
When pruning trees in winter, every gardener is faced with the problem of storing thin branches, since they take up quite a lot of space. You have to chop them manually or using a special chopper. The second option is preferable, as it makes it possible to process the wood into small chips very quickly. Only factory-made units are too expensive, and therefore in this article we will tell you how to make a branch chopper with your own hands much cheaper.
Housing cover
It would be impractical to make the case non-removable, so you need to take care of a removable cover . The second square metal sheet must be equipped with wide washers on both sides, and accordingly, a pair of bolts must be welded on the body. With the help of nuts you can close and open the housing if necessary.
Related article: 5 main rules for decorating a living room
How to make a disc crusher?
If you like this type of chopper, then you need to understand that its assembly will require good welding skills. In addition, you need to prepare the following materials:
- steel sheet with a thickness of 10 to 16 mm;
- the same, 5 mm thick - on the casing and loading hopper;
- high-carbon steel for knives, a car spring is suitable;
- round or profile pipes to weld the frame;
- steel shaft with a diameter of 20 mm;
- 2 rolling bearings No. 307 or others;
- fasteners (bolts and nuts)
- pulleys, belt.
Note. There is no need to install a belt drive if you plan to use an electric motor with a speed of 1500 per minute for the crusher.
On various Internet resources you can find all sorts of drawings of a wood chipper; we bring to your attention one of the popular options:
A regular circle with a diameter of 400 mm is cut out of thick metal, and a hole for the shaft is made in its center. The pulleys and shaft must be turned on a lathe, and threads must be cut at the ends of the shaft to attach the flywheel and pulley. Knives can be made at home, following the drawing; in extreme cases, entrust this task to a milling machine operator. Next, a protective casing with a hopper must be welded from a steel sheet, and cages for bearings with holes must be made from it.
In essence, a homemade wood chipper is a cutting mechanism mounted on a frame of any design. The drive motor can be placed in a convenient location depending on the length of the belt. Do not forget to make the engine mount sliding so that the belt can be tensioned. The mechanism shaft is also installed on the frame, and a pulley and flywheel are attached to it. The knives should be bolted to the flywheel so that their angle of inclination is 30°. To do this, you need to prepare special steel linings.
Do-it-yourself mushroom cutting diagram
This annual ritual is supposed to help combat forest fires.
Currently, 125 fires have been recorded in the forests of the Irkutsk region.
What are the gifts used for?
A small step for a robot is a big step for humanity.
Why is it so difficult to get rid of the housing office?
Mid-July is the beginning of the mushroom season. Some people love to go on quiet hunts, others go to the market to buy forest products.
Rospotrebnadzor specialists warn that cases of botulism are not uncommon in Angarsk. This means that you should not preserve mushrooms at home in hermetically sealed jars, where, in conditions of lack of oxygen, botulism microbes produce their toxins. You also need to wash and peel the mushrooms especially carefully. Most of us try to avoid this matter under various pretexts. However, it turns out there is a way to peel mushrooms easily and quickly. Our reader Vera Fedorovna FOMINA told about him.
-First, I wash the mushrooms in a deep bowl of water (if the tap has a shower function, that’s great). Then I take a pastry brush or any other wide brush with stiff bristles and clean each mushroom. Stiff bristles perfectly clean the legs and caps of small leaves, sticks and other dirt. All that remains is to rinse the mushrooms under running water.
You should not keep mushrooms in water for a long time, as they quickly absorb water, especially old specimens. And many mushrooms (butter mushrooms, boletus mushrooms, saffron milk caps, boletuses, champignons) contain substances that quickly darken in air and give the mushrooms an unattractive appearance. To prevent this from happening, the forest crop must be processed quickly, not left in the air, but immediately immersed in water to which a little salt or citric acid has been added.
Once, in one of the Hangarsk household goods stores, a special device for slicing mushrooms caught my eye. What nonsense, what use are your hands, someone will say. And he will be wrong. Using a mushroom cutter, you can easily and quickly cut forest gifts into neat equal parts, and then dry them in the oven. As the seller said, such devices come in various shapes, colors, sizes and configurations. They are easy to use and have stainless steel blades. There is only one drawback: the price. The copy we saw cost more than 400 rubles. It’s really cheaper to cut it by hand. Another device for slicing mushrooms has a very interesting design and consists of two parts: a cup without a bottom and a removable knife block.
Recipe from Vera Feodorovna
Mushrooms with zucchini
You will need a mixture of wild mushrooms, two small zucchini, 1 onion, 1 tbsp. l. olive oil and a little butter, half a teaspoon of grated ginger, 2 tbsp. l. soy sauce, salt and ground black pepper. Heat olive oil and butter in a frying pan. Fry the onion until golden brown, sprinkle with garlic and sauté for another minute. Add the zucchini and mushrooms and fry for another 5 minutes, shaking the vegetables from time to time. Add ginger, soy sauce, salt and black pepper. It is advisable to serve the dish slightly cooled.
The main thing is that the mushrooms have been obtained, and how to cut them is everyone’s personal business.
The site administrator prepared the material for publication.
Processing and packaging of garden and wild berries
Processing of berries can be carried out using a set of equipment made in Italy or Poland. Equipment for processing berries can be used when industrial processing and packaging of wild berries, such as cranberries, lingonberries, blackberries, blueberries, is required, as well as in cases when processing of garden berries is necessary - strawberries, wild strawberries, gooseberries, currants, etc. This equipment for processing of berries is made only for a specific order, taking into account the requirements for the product, productivity, taking into account the specific technology of processing berries and the final packaging. Processing of berries can be carried out with a productivity of 500 kg per hour to 30,000 kg per hour. The design of the machines as part of the berry processing line is stainless steel. Our website provides general information; for additional information on the topic of “processing and packaging of berries,” please contact us by phone.
Chopper with a working matrix of saws
The assembly of this unit is somewhat simpler than the previous one; there is less welding work. For the shredder you will need:
- wood saws with hard alloy teeth – 20 pieces;
- separating washers 5 mm thick with a hole of 20 mm – 19 pcs.;
- sheet steel 2 mm thick;
- pipes for making a frame;
- shaft with threads at the ends with a diameter of 20 mm;
- 2 rolling bearings;
- fasteners (bolts and nuts)
- pulleys, belt.
This simple garden shredder is assembled by alternating washers and saws on a common shaft, after which they are compressed from the sides with nuts. Washers are placed between the saws so that their thicker carbide cutting parts do not press against each other and are not compressed when the nuts are tightened. Then the bearings are pressed onto the shaft and installed in cages welded to a frame made of pipes.
The remaining work on assembling the chopper is carried out as in the previous version: it is necessary to make a belt drive on pulleys with the engine attached to the frame, make a casing with a hopper and put them in place, as shown in the photo:
Note. During operation, the resulting matrix of circular saws can become clogged with small fractions of wood, and sometimes wood chips get stuck in it. But carbide teeth serve for a long time without sharpening; the main thing is not to overheat them, otherwise the soldering tips may fly off.
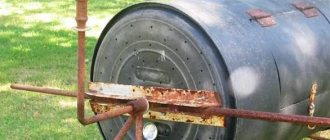
Fixing the grinder
It is quite possible to secure a powerful device. To do this you will need two regular lock loops. It’s good if the metal is strong enough, but at the same time bends, so that you can bend them after screwing the tool. The hinges are welded on both sides of the hole in the body. Additional rigid fixation would not hurt either. It will require two metal rods made of reinforcement approximately 20-25 cm long so that they can hold the handle of the grinder. They are welded approximately at the level of the locking hinges and the opposite ends converge towards each other, repeating the shape of the grinder handle.
The tool itself will be fixed to the rods using a metal bracket welded to the reinforcement. At both ends there should be a thread for bolts, on the opposite side a metal plate with holes is put on the bracket, and a pair of bolts are screwed on top.
We make a simple drill, practically from rubbish
A drill or engraver is a great help in “desktop” work. In fact, there are many different attachments and their sets on the market that allow you to cut various materials, clean, grind, engrave, again drill, all sorts of little things, often in very hard-to-reach places. The drill can be successfully used in jewelry, amateur radio practice, model making, small plumbing and carpentry work, and when working with glass. This is a truly universal tool that greatly contributes to the integrity of the fingers and for small work, it would be nice to always have it ready, at hand.