Where to place the microwave
The microwave shelf must be placed within the work area. The meaning of this decision is that all equipment involved in cooking should form a triangle and be always at hand
Where can I find a place in the kitchen for a microwave? There are several options, each of which has its own advantages and disadvantages.
Microwaves can be placed:
- on the desktop;
- on the windowsill;
- on the refrigerator;
- in the closet;
- on the wall.
It makes sense to place the microwave on the work table if the work area is large. Otherwise, the oven will take up space for cutting food and will be extremely inconvenient to operate. The same can be said about placing the stove on the windowsill. In addition, not all apartments have a window sill so wide that you can put a microwave on it. In addition, in winter there can be a sharp change in temperature, which can cause the glass of the microwave to crack.
You can place the oven on the refrigerator only if it is low. Otherwise, the housewife loses the opportunity to reach the stove and will not be able to use it normally. Recently, placing microwaves in cabinets has become popular. This allows you to hide the equipment from prying eyes. This placement is especially relevant if the kitchen design is designed in a folk country style, where the presence of modern appliances stands out from the general style.
There remains one best option - placing the microwave on the wall. This will require shelves.
Do-it-yourself microwave placement in the kitchen
It is recommended to place a microwave oven in the work area, because this equipment can be used when preparing food. That is why the microwave should always be at hand for the convenience of the housewife. There are several options for placing household appliances, which have their pros and cons. We wrote more in this article.
The microwave oven can be placed on:
- table;
- window sill;
- refrigerator;
- closet;
- wall.
It is possible to install a stove on the table if the parameters of the cooking area allow this. The same applies to window sills. Moreover, not all residential premises have window sills wide enough to allow the device to be installed there. In winter, sudden temperature changes often occur, and as a result, the glass of the microwave oven may well crack.
The oven can be placed on a refrigerator if it is not too high, otherwise it will be impossible to use the appliance normally.
It turns out that the most optimal option for placing equipment is wall mounting.
Microwave shelf on the wall and other options
Several types of structures can serve in this capacity:
- brackets for household appliances;
- hanging shelves;
- racks.
Important : in any case, it will be necessary to ensure air access to the oven. In the absence of proper ventilation, it can quickly fail.
Brackets are one of the most successful ways to mount a stove. In this case, proper ventilation is ensured, while almost anyone can fix the brackets.
The shelf can be made in the form of a bookcase. In this case, several more useful niches will appear, which can be very necessary in small kitchens. The shelf can be attached with a special bracket. In the case as in the photo, the mount takes up minimal space and fits perfectly into the design of the kitchen set
Homemade shelves are rightfully considered the most economical way to place a stove.
They can be:
- open;
- closed.
If you make closed shelves with hinged doors, then it is extremely important to make the sides with ventilation. In addition, the doors must be open when cooking to prevent the oven from overheating.
Preparing for work
In order to make shelves on the wall yourself, you do not need any special carpentry skills. To ensure accurate work, it is important to take careful measurements after choosing a location.
We recommend watching a video where you will see various options for placing a microwave in the kitchen:
Important : You need to think about the movement of people around the kitchen before choosing a place to place the shelf. The shelf should not interfere with movement; it should not be at head level to avoid injury. Once the microwave is placed, it should be comfortable to be and work in the kitchen.
Then you need to select materials for the structure. The shelf must withstand the load, so for its manufacture it is necessary to take high-quality materials that are strong and durable.
Selection of materials
First of all, you need to select the material for the shelf itself.
A metal microwave shelf will fit perfectly into the design of a modern kitchen. It can be:
- wooden boards;
- ready-made furniture panels;
- ready-made shelves sold in building materials stores.
Tools and materials:
- drill;
- screwdriver;
- roulette;
- jigsaw;
- drill;
- self-tapping screws
Option 1: Making shelves from ready-made elements
This is one of the easiest ways to make a shelf for a microwave. Here it is enough to purchase standard shelves for cabinets in the store. They have dimensions of 568x450 mm. This is quite enough to place the microwave on the wall.
A very effective solution is to free up space in the top wall cabinet and convert it into a microwave shelf. The advantage of this solution is that the work area will be fully used and there will be no unnecessary items on it. The disadvantage of the solution is that it will not always be convenient to use a microwave
You can purchase a ready-made shelf design with side posts and a top shelf. In this case, all that remains is to hang the shelves on the wall, securing them with self-tapping screws.
This method has a number of tangible disadvantages:
- The shelf does not provide the required degree of ventilation. If there is a top shelf, it will heat up while the microwave is operating.
- Such a shelf cannot be installed in the area of the work area, as it will interfere with work.
But such a structure can be installed very quickly, without having any carpentry skills. This is a big advantage of this method.
Wall shelf for a microwave using whatever is on hand
It is very easy to create something useful at home. Even a simple wall-mounted microwave shelf is extremely easy to make if you have a few sheets of plywood, a screwdriver and a little imagination.
What do you need to create a microwave wall shelf?
If we talk about plywood as an excellent functional material, then its use is determined by the fact that it is light, durable and cheap. It’s a pity that you can’t build houses from plywood, otherwise many developers would be happy to use plywood to build multi-story buildings. But creating a creative microwave shelf from plywood sheets is very simple if you use maximum creative thinking and imagination.
You can imagine such an amazing decorative element in the kitchen when the shelf will have a microwave design and there will be a real microwave on it.
Plywood sheets, if connected correctly, can support significant weight, so even a child can create a simple shelf from five pieces of plywood.
But you need to show creative thinking and create something special and colorful, something that will really change the design of the kitchen, and you can’t think of anything better than a shelf in the form of a microwave.
To create a shelf you will need:
- Several sheets of plywood.
- Screwdriver with screws.
- Wooden corners.
- White paint with primer.
- Paint brush.
- Black paint and a piece of clear plastic.
- Scissors and glue.
- Various elements from an old microwave.
- Hand saw and pencil.
All this can easily be found at home or somewhere nearby. The main thing is that you should always approach the task of imitating something with inspiration and diligence, so that the work is completed successfully. The decorative effect it will have in the kitchen depends on how similar the microwave shelf is to a real microwave.
The assembly process of a creative microwave shelf having a microwave oven design
You need to start by assembling a box of plywood sheets, the dimensions of which will fit the size of a real microwave. In this case, you will need to use a pencil to mark the plywood sheets of the required pieces of the future shelf and a hand saw or jigsaw, with which you can easily cut out all the necessary elements of the shelf.
You will need to connect all the parts using wooden corners, which can easily firmly connect all the plywood parts into one structure using screws.
Important! It is best to use hot melt adhesive, which will help glue all parts of the microwave shelf without difficulty! This glue is characterized by high bond strength, non-toxicity and ease of use!
Next, you will need to use white paint to paint the wooden shelf with it. Before the paint is applied, it is worth applying a coat of primer. The paint will not only make the shelf look like a microwave. It will also protect wooden parts from exposure to high humidity in the kitchen.
As soon as the shelf is painted, you will need to attach all the decorative elements to the shelf using hot glue.
Separately, it is worth noting that you can cut glass from a sheet of thick transparent plastic and paint one side black - it will help increase the similarity of the shelf to a real microwave.
As soon as the glass is glued to the shelf, painted white, you can install it on the wall. Using a drill, you can make holes in the shelf and hang it on screws screwed into the wall.
The main thing is to achieve high similarity between the microwave shelf and the microwave oven that will be located on it, thereby creating a special decorative effect due to the repetition of objects.
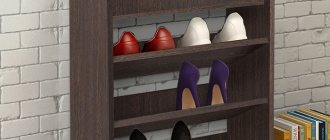
Option 3: shelf-shelf
If you have a lot of different appliances in your kitchen, then a shelf with several niches will help solve the problem of using space. For example, you can put a microwave on the top shelf, and a multicooker on the bottom. Or do it as in the photo - put 2 microwaves. A metal shelf-shelf differs from a wooden one in that it looks “lighter”, and therefore can be used in almost any kitchen without causing an imbalance. In addition, you can use rails together with it to store tableware. Thus, a metal microwave shelf is one of the best options.
A very original and convenient shelf.
It has many advantages:
- it can be outweighed;
- it can be used to place other things;
- it does not spoil the interior;
- ensures proper ventilation.
To make a shelf-shelf you will need:
- three furniture boards of standard sizes 600x450 mm, which are sold in building materials stores;
- metal rods with a diameter of 22 mm;
- steel flanges for rods – 16 pcs;
- steel corners 200x300 mm.
Manufacturing procedure:
- On the horizontal planes of furniture blanks (boards), mark the places where the flanges are attached, which are spaced from each corner at a distance of 30 by 30 mm.
- Drill holes with a diameter of 22 mm in the middle shelf;
- Attach the flanges to the middle shelf on both sides;
- Four identical sections are cut from the rod - each section should be equal to 650-700 mm;
- Secure the rods with a clamping screw to the flange;
- The shelves are attached to each other;
- corners are attached to the back of the structure;
- The shelf is hung on the corners to the wall with self-tapping screws.
Types of shelves and their manufacture
In order to attach the microwave to the wall, you have several options:
- hanging shelves;
- shelving;
- brackets.
Important ! For any type of fastening, it is necessary to ensure a sufficient amount of air for the equipment. If there is no ventilation, the oven will soon stop working.
The brackets provide ideal conditions for the operation of equipment, and anyone can install them.
Shelves can be in the form of racks . As a result, you get some more useful space for placing items, which will definitely come in handy in a small kitchen.
You can make a shelf open and closed from prying eyes. If you plan to hide the stove behind hinged doors , then ventilation should be provided on the sides for normal operation of the device.
Starting to Install a Microwave on the Wall
To install shelves on the wall with your own hands, you need to make the necessary measurements.
It is not recommended to hang the shelf at head level or in the path of people to avoid injury. It should be hung so that later working in the kitchen will be convenient and comfortable. You also need to purchase good quality materials to place the device so that they are reliable and durable and last for a long time.
“Mezzanines” can be created from various materials:
- wooden boards;
- furniture panels;
- ready-made type.
Tools that may be needed to make shelves, brackets and racks:
- drill;
- screwdriver;
- roulette;
- jigsaw;
- self-tapping screws
Creating shelves and stands for microwave ovens
For stands for household appliances, you should buy ready-made shelves. Their usual dimensions are 56.8–45 cm. A microwave oven will fit perfectly on them. You can free up some space in your wall cabinets and adapt them. There will be no unnecessary objects in the work area, which will be very convenient.
It is quite possible to buy a ready-made shelf for a microwave oven, which you only need to attach with self-tapping screws.
Negative sides of shelves:
- lack of necessary ventilation;
- if the shelf is installed in the work area, it will get in the way.
Manufacturing of shelving
If the kitchen has a large number of appliances, then you should think about creating a shelving unit with several levels to solve the problem of lack of free space. For example, adapt the topmost one for installing a microwave, lower the multicooker a little lower, and also leave room for a waffle iron or other appliance.
Shelving can be made of metal or wood, and metal looks much more stylish in the room, because it has a light appearance. It can be used in almost any design and fits perfectly into any interior or style.
When creating a rack, it is worth leaving a special place for storing cutlery or those items that are used too often, but there is no suitable place for them. Metal racks will be one of the best options for placing a stove.
Positive aspects of racks:
- you can move the rack to another place;
- many application options;
- the rack fits perfectly into any interior;
- Provides excellent ventilation.
Necessary tools for making a rack:
- three boards 60–45 cm from a hardware store;
- metal rods 2.2 cm;
- steel flanges for rods;
- steel corners 20–30 cm.
First you need to make the necessary markings on the boards and determine the places for attaching the flanges. After this, you need to drill holes in the middle shelf and attach flanges there on both sides. Divide the rod into four equal sections, and then secure it to the flange with a screw. After this, securely attach the shelves to each other, secure the corners at the back, and then hang the rack using self-tapping screws.
Making a microwave shelf from wall brackets (photo)
The microwave oven can be quickly and effortlessly placed on a special shelf made of brackets. Such devices can be purchased at any hardware store. They are usually intended for televisions, but they are very often used for microwaves.
The shelf needs to be attached to ready-made brackets, and this does not require any special skills. You can install the microwave oven directly on the brackets, or you can first install a shelf, and then place the household appliance on it.
Positive aspects of brackets
The brackets are considered universal, because they can be attached to the wall absolutely anywhere, and practically not noticeable to prying eyes. It is also worth noting that thanks to the brackets, the microwave oven is fully provided with the necessary ventilation, and accordingly, it will operate for a long time in optimal mode.
Negative sides of brackets
The disadvantages of such a location of household appliances may be that the bracket design almost never fits into the design of the room and interior. That is why you should pay attention to wooden shelves or other devices.