Installation in a niche with your own hands
To install the oven in a niche you will need:
- level;
- screwdriver;
- drill (if necessary);
- adjustable wrench (needed for installing a gas oven);
- pencil and ruler (tape measure).
It is optimal if the oven is mounted in a niche specially created for this appliance. If installation is carried out in already finished furniture, then holes must be made in the back wall for connecting electrical cables.
Requirements
Wooden furniture is suitable for installing electrical and gas appliances. If the device is connected incorrectly (insufficient grounding), metal surfaces will receive electric shock. Ovens are installed so that the distance to the back wall exceeds 4 centimeters, the sides - 5 centimeters, and the floor - 9 centimeters. If the device is mounted under the hob, then there should be at least two centimeters of free space between these devices.
Ovens are aligned strictly horizontally. Failure to comply with this requirement will lead to rapid breakdown of the device. Lack of level causes uneven heat distribution inside the oven.
How to choose a place?
When choosing a place for an oven in the kitchen, it is recommended to follow the following rules:
- place in close proximity to food storage and preparation areas and sinks;
- install at the most comfortable height (if mounted in a pencil case);
- install at a distance from the refrigerator;
- Place it near the outlet and gas pipes.
When choosing a location, you also need to take into account that the oven should not interfere with free movement around the kitchen.
Preparation rules
Due to the fact that you can only install an electric oven yourself, the rules for preparing gas appliances are not considered. To avoid possible problems in the future, the following recommendations must be observed during installation of the device:
- connect the device to a separate machine;
- connect cables using screw terminals;
- do not twist the wires.
It is recommended to “run” a separate branch from the electrical panel under the electric oven. The device should be connected using cables with copper conductors. In addition, before proceeding with installation, you need to understand the icons on the device.
The choice of connection option depends on the type of device. Low-power ovens are connected to standard machines. Others require a current of 32 Amp or more. In this case, it is necessary to replace one of the circuit breakers in the electrical panel. You will also need to connect another cable with three wires. In both cases, you will have to seek help from a specialized specialist.
Surge protection
To protect against voltage surges, household appliances are connected to the electrical network through:
- Relay interrupters. This device, if it deviates by 10% from the permissible values, automatically interrupts the current supply. Expensive relays are complemented by buttons for adjusting the upper and lower voltage limits.
- Stabilizers. During surges, the device equalizes the voltage level in the electrical network. Stabilizers are selected taking into account the number of phases.
- "Smart" sockets. Such devices do not protect against power surges, but they allow you to remotely disconnect household appliances from the power supply.
Voltage stabilizers are considered the best choice for an oven, since relays interrupt the current supply, and sockets do not provide adequate protection.
Grounding
Modern ovens are equipped with grounding plugs. However, some homes are left with wiring that does not have the appropriate protective conductor. In such cases, it is necessary to seek help from an electrician so that he can route the pinched cable to the electrical panel. It is not recommended to operate the oven without such a protective wire, as this can lead to fire and other unpleasant consequences.
Ventilation
If you follow the previously stated placement rules, you will not need to organize additional ventilation for the oven. Air is supplied and removed from the device through the gaps left between the device and the walls of the box. There are also models that provide forced airflow. For such ovens there is no need to organize additional ventilation.
Installation
Installing an oven into a kitchen set is relatively simple, provided that the installation rules given in the instructions for the device are followed. The manufacturer recommends connecting devices of this type to an electrical network of a given power. Installation of an electric oven is carried out according to the following algorithm:
- Following the diagram from the instructions, connect the wire coming from the outlet and the corresponding wires in the oven.
- Disconnect the back panel and connect the PVS 3x6 cable to the contacts.
- Place the phase wire (has a brown or gray braid) to the “L” terminal.
- Connect “zero” to terminal “N”.
- Place the grounding wire under the screw marked “Grounding”.
- Secure the wire clamp and return the contacts of the protective cover to their place.
- Install and secure the oven in a pre-prepared niche.
Homemade oven oven (24 photos)
Camping stove, oven for camping and summer cottages, detailed photo report on production, description and video.
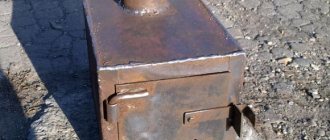
Hi all! I would like to show you a homemade oven that can be made from a receiver from a ZIL car and a container for sterilizing medical instruments.
I used the sterilizer as a smokehouse for some time and it took me a lot of work to wash it from soot and stubborn fat accumulated over many years, and the receiver was just lying around and rusting, but its time has come and I start cutting.
To remove paint I use Proflex gel remover, I have been using it for a long time and it is a very good remover. The paint can be cleaned off with a simple spatula and a wire brush in hard-to-reach places. Of course, the rust had to be cleaned off using an angle grinder and a wire brush.
To begin with, I cut off one edge from the receiver. Now you need to cut a strip along a width of about 20 cm, turn it over and thus weld it in the same place.
On the reverse side you also need to cut a strip 50 mm wide. A 50 by 50 metal profile will be inserted here. I weld all the seams between the profile pipe and the walls of the receiver.
From different pieces of sheet metal 2 mm thick. I welded the walls and I will weld them on both sides. And I also weld metal plates on top.
Next, I will need a small piece of 50 by 50 profile pipe, a nail, a spring, a piece of 2 mm metal plate and two washers. Putting it all together, this is what we got. I will weld this blower to a metal plate, having previously cut a hole in it for it, it will cover the square hole. And from the round part of the receiver that was cut off at the very beginning, I cut off one edge and leveled it also using a metal plate. It will cover the round hole.
These doors must somehow open, so I will make hinges for them from these metal blanks and a nail. It turns out to be some kind of steam locomotive, with a wood firebox in the lower part and an oven in the upper part. The oven door is fixed with a latch, and my stainless steel sterilizer can easily fit inside, which will play the role of a roasting pan.
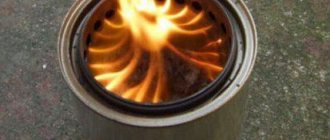
This is what my camp oven looks like when finished. I painted it with black thermal paint. I attached handles bought at a hardware store to electric rivets, one at the top for easy carrying, and the second to the oven door, having previously shortened it. I made a latch, which is also a handle for the firebox door. Everything you need fits inside it, these are three legs that allow you to install it on any surface, a pipe for better traction, and the fryer itself. The legs are made of thin-walled metal tubes and are inserted into special mounts on the sides and back. The pipe is tightly inserted into the chimney from behind, allowing for improved draft.
Now on to the field tests. At the bottom of the roasting pan we place a special baking mat that prevents the products from burning; by the way, at the bottom of the sterilizer there is a recess along the edge due to which a gap of approximately 4 mm is formed between its bottom and the surface of the firebox. which also prevents the prepared dish from burning. Lay out the potatoes, carrots on top, lay out the onions, add a little vegetable oil, and cover everything with marinated meat on top. We put the prepared firewood in the firebox and set it on fire. We are waiting for the field oven to warm up and you can put the roaster on, not forgetting to maintain the fire and temperature, regulating them using the blower.
After 40 minutes, the dish is ready; if you stir it periodically, it will be crispy.
There is also a video of creating a camp oven:
Connecting an electric oven
Low-power ovens of 3-3.5 kilowatts are connected to the general electrical network through European sockets. If the latter are not in the house, then before installing the device you will need to install a 25 Ampere circuit breaker in the brush, from which you then need to extend a 3x2.5 VVG wire into the kitchen.
More powerful devices will require a different organization of the power source. If ovens with a capacity of 3.5 kilowatts or more are used, then it is necessary to install a 40 Amp machine in the electrical panel and extend a 3x4 VVG wire into the kitchen.
After this, a three-phase socket is connected to the supplied cable. If necessary, a separate wire is stretched, which will act as a grounding conductor.
All described work is recommended to be carried out with the assistance of a professional electrician and in accordance with the technical plan of the apartment or house.
Features of installation in an MDF tabletop
Installation of ovens in MDF countertops is carried out according to the following algorithm:
- Holes are cut in the countertop corresponding to the dimensions indicated in the oven instructions. It is recommended to carry out the work with a jigsaw with a fine-toothed file. The latter will reduce the likelihood of defects appearing on the surface of the countertop.
- The sawn edge is treated with a sealant that will protect the material from water.
- The oven is installed in the hole and then secured.
When sawing a hole, you must guide the jigsaw strictly along the marked mark. If there is a deviation of 10 millimeters or more, you will have to completely change the tabletop.
Can I connect a gas stove myself?
Installation of gas stoves is carried out by the relevant services. Independently connecting such devices to public highways is prohibited by current legislation. In case of non-compliance with this rule, a fine is imposed on the owner of the apartment or house.
A gas stove complete with oven has long become an indispensable attribute of the kitchen, without which it is difficult to imagine running a household. In recent years, there has been an increase in the popularity of built-in ovens powered by electricity. Such equipment requires proper installation and proper connection. After reading this article, you will learn how to install an electric built-in oven yourself without damaging your kitchen furniture or violating electrical safety rules.
Types and features of ovens
The classification of ovens is extremely simple. According to the type of energy used they are divided into:
Both of them are a fairly voluminous chamber with a loading door and a body equipped with heat-insulating materials. Without this, heat losses would be prohibitively large, and the risk of burns and fire of nearby objects would increase.
In gas appliances, the necessary heating is created by burning methane or a propane-butane mixture on a burner located at the bottom of the chamber. In this case, heat rises due to the resulting convective flows, but a uniform temperature distribution is usually not achieved. The housewife has to spend a long time selecting the temperature and the optimal place to place the dish so that it bakes but does not burn.
For information! The built-in fan additionally creates circulation of gases, which leads to uniform heat treatment of products.
Depending on the installation location, there are:
- dependent ovens, which can only be located under the hob;
- independent, able to function normally in any place assigned to them.
DIY camp oven
What do you think can be made from an air cylinder from a ZIL car, a so-called receiver and container for sterilizing medical instruments.
Next, I will need a small piece of 50 by 50 profile pipe, a nail, a spring, a piece of 2 mm metal plate and two washers. Putting it all together, this is what we got. I will weld this blower to a metal plate, having previously cut a hole in it for it, it will cover the square hole. And from the round part of the receiver that was cut off at the very beginning, I cut off one edge and leveled it also using a metal plate. It will cover the round hole.
These doors must somehow open, so I will make hinges for them from these metal blanks and a nail. It turns out to be some kind of steam locomotive, with a wood firebox in the lower part and an oven in the upper part. The oven door is fixed with a latch, and my stainless steel sterilizer can easily fit inside, which will play the role of a roasting pan.
Everything you need fits inside it, these are three legs that allow you to install it on any surface, a pipe for better traction, and the fryer itself. The legs are made of thin-walled metal tubes and are inserted into special mounts on the sides and back. The pipe is tightly inserted into the chimney from behind, allowing for improved draft. Now on to the field tests.
At the bottom of the roasting pan we place a special baking mat that prevents the products from burning; by the way, at the bottom of the sterilizer there is a recess along the edge due to which a gap of approximately 4 mm is formed between its bottom and the surface of the firebox. which also prevents the prepared dish from burning. Lay out the potatoes, carrots on top, lay out the onions, add a little vegetable oil, and cover everything with marinated meat on top. We put the prepared firewood in the firebox and set it on fire. We are waiting for the field oven to warm up and you can put the roaster on, not forgetting to maintain the fire and temperature, regulating them using the blower.
There is also a video option for creating a camp oven, which you can watch below:
Preparatory work for installation and site selection
The choice of location for installing a do-it-yourself electric oven should be approached with the utmost responsibility. At the same time, in addition to observing the basic rules of electrical and fire safety, it is necessary to ensure normal conditions for the operation of the oven and make sure that it does not interfere with the functioning of other household appliances located in the kitchen.
A far from complete list of recommendations is as follows:
- there should be no curtains, towels, paper products or other flammable items in the immediate vicinity of the oven;
- furniture elements in contact with the cabinet must withstand a temperature of 50 o C without damage;
- placing the oven close to a refrigerator or freezer is unacceptable;
- It is advisable to install the oven as far as possible from water sources;
- to ensure natural air circulation, it is necessary to provide gaps of at least 90 mm from the bottom, 40-50 mm for the side and rear walls of the oven;
- On the side of the installation site, at a height of at least 10 cm from the floor, there must be an electrical outlet with grounding that can be easily reached.
Before you build a new oven with your own hands, you should decide on its installation location. The most convenient locations for ovens:
- In the cabinet under the table top. In this case, the hob does not have to be nearby at all. This placement is optimal for small kitchens with limited work surface area;
- Column cabinets. This option is good for spacious rooms. The niche intended for the oven can be located at eye level, which makes it easier to monitor the cooking process and removes hot surfaces from children;
- To the skeleton Many housewives find it convenient and natural to install an oven in the supporting structure of a hob, located in the center of the kitchen area;
- In a high cabinet. In a medium-sized kitchen, it is quite possible to mount the oven in the outermost cabinet of the kitchen unit.
As preparatory work after choosing the location for future installation of the stove, the following should be provided:
- availability of reliable ventilation;
- grounding inspection;
- checking the electrical network for the possibility of connecting a new large energy consumer.
Popular marshmallow recipes
Let's look at two types of marshmallows cooked in the oven.
Fruit pastille
It’s easy to prepare marshmallows in the oven from a mixture of fruits. To do this you need:
- apples, green, sweet and sour 1 kg;
- any plums 500 g;
- sugar 150 g;
- odorless oil 20 ml;
- lemon juice from 1/2 part.
Procedure:
- Wash apples and plums. Dry.
- Peel the apples. Cut in half, remove seeds and finely chop. Sprinkle with lemon juice.
- Using a blender or food processor, puree until smooth.
- Break the plums in half with your hands or cut them with a knife. Remove the seeds and grind with a blender.
- Mix apple and plum puree. Add sugar, mix well.
- Place the puree on the stove, stirring, and bring it to a boil.
- Simmer over low heat for about 35 - 40 minutes.
- Take a baking sheet. Cover it with foil and grease it with oil. Instead of foil, you can use a silicone mat. There is no need to lubricate it with oil.
- Pour some of the puree, spread it in a thin layer of 5 - 6 mm.
- Preheat the oven to + 80 degrees. Place a baking sheet in the center of the oven. Open the door 1 cm.
- Dry for 3.5 - 4 hours.
- Pry off the layer on one side and turn it over. Dry the marshmallow for another 50 - 60 minutes.
- Cut the finished layer into strips and roll them into a roll. Wrap in film. Store in the kitchen cabinet for no longer than 3 - 4 weeks.
Classic apple pastille with egg whites
To prepare classic Belyov marshmallow you need:
- sour apples 1.5 kg;
- fresh egg whites from 2 eggs;
- sugar 200 g;
- oil 10 ml.
Procedure:
- Wash the apples. Bake in the oven until soft.
- Rub the baked apples through a sieve.
- Combine the apple mass with 100 grams of sugar. Beat with a mixer or whisk.
- Beat the chilled whites with a mixer. Add the remaining sugar in parts, continuing to beat until soft peaks form.
- Separate 1/3 of the protein mass and put it in the refrigerator. Combine the remaining whites with the apple mixture and beat everything together.
- Next you need to start drying the apple-protein mass. Don't know how to dry marshmallows in the oven? This is easy to do on paper. Cover the baking sheet with a sheet of parchment paper and grease it with oil. Spread the mass in a layer of 6 - 7 mm, smooth it out.
- Preheat the oven to 100 degrees. Place a baking tray inside. Open the door 2 cm. Dry for 6 - 7 hours.
- Cut the layer into 4 parts. Brush each layer with the remaining egg white. Stack them and dry for another 2 hours. Store for 1 week.
Although homemade marshmallow requires a long drying time, the finished product takes up much less space than usual jars of jam.
How to install an oven: steps
In order not to rack your brains over how to accurately install a built-in oven with your own hands, act according to a pre-developed plan.
Preparation of tools and auxiliary materials
In general, to quickly install an oven in a suitable kitchen niche, you will most likely need:
- drill with a set of drills and cutters;
- screwdriver or screwdriver;
- insulating tape;
- standard connecting terminals for wires;
- knife;
- a plug with a piece of cable of the required length, if the oven was purchased without them.
If it turns out that there is no electrical network connected to the installation site, ending with a suitable socket, you will have to take care of the method of laying it and masking the laid route.
Preparation of the workplace
When considering options for how to build in a new oven, you should take care in advance of having a niche that is somewhat larger than the size of the oven. There can be several ways to create it:
- provide an appropriate compartment when ordering a kitchen set;
- purchase a separate module manufactured specifically for built-in ovens;
- select a suitable compartment in existing furniture;
- make changes to the design of the existing cabinet by independently equipping the necessary niche.
The size of the gaps left was discussed earlier.
Important! Deviations of clearances in a larger direction are not as critical as in a smaller direction.
Installation
Before installation, you need to make sure that the cable with a plug can be connected from the oven to the outlet intended for it. If there is no corresponding hole in the back or side wall, you must carefully make it yourself using a drill or jigsaw.
The oven is installed in a niche in accordance with the requirements of the instructions supplied with the product. It can stand on adjustable legs or be attached with special screws to the side walls of the compartment allocated for it. In this case, its front panel with the door becomes an integral part of the interior. During the installation process, it is important to ensure a horizontal position of the device and reliable fixation.
Connection
The stage of connecting the oven is usually combined with its installation, since after final installation, access to the rear wall of the device is most often impossible. There are two ways to connect electrical equipment to the electrical network:
- directly;
- through a plug-socket connection.
In the first case, it is recommended to use standard terminals designed for suitable power. The second option is more preferable. Ovens are usually sold with an existing power cable ending in a standard plug. Otherwise, you will have to make it yourself by connecting to the corresponding sockets inside the oven body.
During the connection process, it is important to correctly secure the grounding wire to the terminals intended for this purpose on the oven body, in the plug, socket and on the input panel. To eliminate the possibility of error, it is painted yellow or green in three-core cables.
Carefully! Electrical connections of powerful household appliances using twists are not allowed. Direct contact between aluminum and copper should be avoided. Professionals use soldering or screw clamps.
Functionality check
Any installation must end with startup tests. Before turning it on for the first time, it is recommended to carefully remove any remaining grease from the internal surfaces of the oven chamber using a clean and slightly damp cloth. The test run takes place for 30 minutes at a temperature of 250 o C without placing food in the oven. The appearance of a faint burning smell and a little smoke is not evidence of a malfunction. Most likely, it is the factory oil burning out.
It is advisable to check the equipment in all modes provided for in the instructions. At the same time, the operation of indicators and useful functions is checked. If no deviations are noticed, you can begin operation.
Safety first
A domestic gas leak is an extremely dangerous situation that can lead to serious poisoning, explosion, property damage and death. This happens infrequently, and the cause of accidents is usually common - errors in connecting devices and violation of their operating conditions.
The set of rules and safety standards boils down to ensuring that all connections of gas pipes and appliances are sealed; the number of such components must be kept to a minimum. Having studied the rules for installing gas household appliances, even a home craftsman can cope with this task.
During the work, it is necessary to follow the procedure for connecting the equipment, use suitable materials, and strictly follow the instructions. Upon completion of work, all connections are checked. Compliance with the rules will allow you to get the desired result - a safely installed and connected gas oven.
When installing a built-in gas oven with your own hands, the most common violation is the use of a tee for a gas pipe to which the hob is already connected.
Inexperienced craftsmen believe that if it works with a water supply system, then it will work for a gas supply system. The result is three joints that must be carefully sealed.
According to the rules, connecting the oven and hob should be done separately, connecting each device to its own pipe. The number of connections in this case will be reduced to two.
In practice, using a tee can be quite safe. If the threads are properly sealed, it does not really matter whether two connections are made when connecting or three.
But this method contradicts the existing rules for installing a gas oven. If during an inspection a gas service representative discovers such a tee, the owners of the apartment or house will face a completely legal fine.
Therefore, from the very beginning it is necessary to take this point into account in order to connect the oven correctly. In addition, a dielectric gasket should be used, and a shut-off valve should be installed for each gas-consuming appliance.
How to cook marshmallows in the oven
Using a household oven, you can dry marshmallows from any raw material. This method has one drawback - more than 500 - 600 g of fruit raw materials cannot be placed on a standard baking sheet. If you can install two baking sheets inside the oven, then this amount of dessert will take approximately two kg of fruit. Many housewives are put off by homemade delicacy recipes, because they simply don’t know how to dry marshmallows in the oven and are afraid they won’t be able to cope with this process.
Stove Requirements
Gas stove with oven - this type of appliance can be used to prepare marshmallows. However, this is a rather inconvenient option for drying for many hours. Since the gas can simply go out. You will have to stay at home for several hours and monitor its combustion process. Even the newest stoves with gas control function require this. Modern gas stoves with ovens have convectors that ensure uniform heating of food; older appliances do not have this option. To prepare dessert, you can also use an independent gas oven, although the choice of such models is small.
An electric stove with a built-in oven - this version of the stove is more convenient. Unfortunately, not all stoves have a convector, which improves the distribution of warm air inside the cabinet and the marshmallows in a convection oven are dried evenly over the entire area of the stove. Although even without this option, electric heating provides fairly uniform drying. You can also use an independent electric oven.
Temperature
The temperature regime depends on the capabilities of the device and on the desire to preserve the beneficial properties of the fruit. It is optimal to turn on the heating at + 60 + 70 degrees. You can find out at what temperature to dry marshmallows in the oven experimentally. Prepare several baking trays with puree and dry the first one at + 55 degrees. The next baking sheet can be dried at + 60 or + 70 degrees. And the third baking sheet can first be heated for 20 minutes at a temperature of + 200 degrees, and then dried in an open oven at + 60. After this, you can choose the optimal temperature for your oven.
Cooking time
The preparation time for marshmallows can be divided into two stages:
- preparatory stage;
- drying stage.
The first part can take from a few minutes to several hours. It all depends on the recipe. If the dessert is prepared from fresh fruits, then you can prepare a puree from them in less than an hour. If the puree needs to be boiled, then the first stage may take 1 - 2 hours.
The second stage of drying in the oven will require 5 to 8 hours. It all depends on the water content of the feedstock. How long to dry the dessert in the oven also depends on the thickness of the layer. It is advisable that it be no thinner than 4 - 5 mm and no thicker than 9 - 10 mm. The treat is considered ready when it does not stick to your hands.
Installation and connection procedure
The oven can be dependent, i.e. a common control panel combined with the hob, or independent. The first is mounted under the stove and installed simultaneously with it, and for the second you can choose almost any convenient place, not necessarily under the cooking surface or next to the gas stove.
The connection procedure for both types of ovens is practically the same. To do this you need:
- select and prepare the installation location;
- connect the device to the power supply;
- connect to the gas supply system;
- install in a niche or cabinet;
- check connections for leaks;
- test all device functions.
Before you replace your built-in gas oven, it should be unpacked and inspected to ensure there is no damage caused by careless handling.
Then you should read the manufacturer's instructions. It contains useful information that will help you consider the features of this particular model when installing and using it.
For effective ventilation of the outer walls of the oven, the following gaps must be provided:
- from the rear wall of the niche – 50 mm;
- bottom – 100 mm;
- on the sides - 50 mm.
In practice, these dimensions are rarely observed. If the oven has a wall blowing function, you don’t have to worry about the ventilation gap. The clearance available near the back wall of the device is usually sufficient. Before installation, the back panel of the furniture niche is simply removed or holes are made in it for the appropriate communications.
The material from which adjacent furniture is made must withstand heat up to 120 degrees. After the device is unpacked, you need to place it near the connection point, for example, by placing it on wooden blocks. This will make the necessary manipulations easier.
If you need power
Modern gas ovens are equipped with many additional features, such as:
- electric ignition;
- fan;
- grill;
- electronic control, etc.
These useful devices require electricity to operate. To ensure connection from the electrical panel to the device, a three-core power cable is connected, a 16A RCD is installed (for devices with a power of more than 3.5 kW - 32 A, but such indicators are typical for electrical cabinets), and the device is grounded.
In some modern kitchens, a grounded socket is provided by the design and is intended for an electric stove. It can be used to connect a gas oven. Before carrying out work, turn off the power supply, use a tool equipped with an insulating coating, and adhere to other safety rules.
Sometimes you have to connect the power cable to the oven yourself.
This simple operation is performed as follows:
- Open the connection box (installed on the rear panel of the device).
- Loosen the screws that secure the terminals.
- Secure the power cable wires to the terminals.
- Secure the connection by tightening the screws.
- Close the lid of the box.
The exact diagram for connecting the power cable is usually given in the instructions.
Safety rules prohibit the use of extension cords, double sockets, twists and other elements for such connections that may not withstand the voltage, cause a fire, short circuit, etc. The position of the cable should be such that it heats up to no more than 70 degrees.
Connecting the device to the gas supply
At this stage, it is better to adhere to the rule “if you’re not sure, call a specialist.” Errors and negligence when installing a gas oven are unacceptable. A gas leak can cause a serious explosion. Inexperienced craftsmen should turn to professionals from the gas service.
As mentioned, the oven requires a connection branch separate from the hob, on which a tap is installed so that the gas flow to the device can be interrupted. Be sure to install a dielectric gasket, which will open the electrical network if voltage occurs on the gas pipe.
For connection, use a flexible bellows gas hose or a metal pipe - copper or steel. A rigid connection is used if the oven is very close to the main line.
It is more convenient to use a hose where the distance is greater or where it is more difficult to install a pipe. The connection point usually has standard dimensions - a half-inch pipe equipped with an external thread.
When using a hose you must:
- make sure that it is not pinched, stretched or comes into contact with moving elements;
- make only two connections - at the oven inlet and on the main gas pipe;
- be sure to install a dielectric gasket and a tap;
- use a length of no more than 1.2 meters;
- do not extend the hose, it must be solid.
Tools for sealing the connection may include gas wrenches and double-pipe pliers. As a sealant, you can use FUM tape equipped with a fluoroplastic film intended for gas pipes.
A universal nylon cord impregnated with sealant will also work. A gasket must be inserted into the nut that secures the connection. The fasteners should be tightened tightly, but carefully so as not to damage this gasket.
Some craftsmen use the old method - linen thread with drying oil, but it is considered not very reliable. In any case, you need to take a product that is certified as intended specifically for gas pipes. It must be resistant to pressure changes, vibration, temperature changes, corrosion and other destructive factors.
The thread is wrapped three times with Teflon tape, then the connection is tightened until it stops. The connection must be tightened with a gas wrench. It is normal for some sealant to come out.
Other sealing agents must be used in accordance with the instructions. For example, the base for a nylon thread should be slightly rough. A smooth surface reduces adhesion, so it is treated first.
Checking tightness and completing work
To ensure the tightness of threaded connections, use a simple method. Soap foam is applied to all joints and the gas is turned on. Foam will bubble in areas of leakage. To eliminate the error, you need to perform the sealing again, and then check the result again.
After connecting to the gas pipe and power supply, you need to fix the oven in the mounting niche. This is usually done using four self-tapping screws; details are described in the instructions. Then the operation of the device is checked.
First you need to remove all films and stickers. Then connect the oven to electricity and turn on the RCD. After this, open the tap on the gas pipe and light the oven. If the device works correctly, the installation can be considered complete.
How to build an oven that can bake bread
Do you want to build a wood-burning oven that you can use to bake bread?
You may have seen instructions on how to build it from brick and adobe, but we decided not to use these materials, since a brick dome is too awkward and adobe (clay) is not resistant to bad weather. If you want to build a free-standing oven that will sit outside, this article will show you how to do it. In photographs and instructions we will talk about: • The principle of construction and planning the project • The necessary materials • Where is the best place to install the oven in your garden • Construction of the base • Construction of the oven floor - fireproof layer • Construction of the dome - fireproof layer, insulating layer and chimney • Plaster or finishing layer and decoration • How to make tools for a wood stove • Using the oven
Principles of building a wood-burning oven
• The inside diameter of your oven will depend on what you want to cook in it. An oven with a diameter of 750 mm will allow you to cook two 20 cm pizzas at a time (from 2 to 3 minutes), two chickens or two trays of meat. If you want to make a larger pizza, your oven should have a larger diameter. • A wood-burning oven is built using fire-resistant materials that line the inside of the oven to “hold” the heat and fire. Around this fire-resistant layer there must be an insulating material that helps maintain the high temperature. In addition to this layer, a layer of plaster is applied to protect the oven from the elements. • The chimney is located at the front of the oven, near the door. This design of the furnace makes it possible to reheat the gas and retain heat. • The height of the doorway should be 60-70% of the internal height of the dome. • A door that covers the oven opening helps retain heat.
Planning the oven
The oven shown in the photo has an internal diameter of 750mm.
The refractory layer is 100 mm.
The thickness of the insulation layer is 100 mm.
The internal height of the dome is 375 mm and its width is 370 mm.
If you want to build an oven with a diameter of 1 meter, increase the fireproof and insulating layer to 120 mm, the door height to 60% of the internal height of the dome, and the door width to half the diameter of the dome.
Preparing the oven plan
On a large sheet of paper, draw up a real-scale plan of the stove.
To create circles, take a meter tape. Make a knot at one end of the tape and secure a pin or nail in it, and then, holding it in the center of a large piece of Whatman paper, draw circles with a felt-tip pen with a diameter of 350 mm, 450 mm and 550 mm. Once you have drawn the circles, draw the door as shown in the picture. This real scale oven plan will be very helpful when you build your oven. Required materials: 3 bags of cement, 4 buckets of sand, 20 kg of clay, 20 kg of lime, 200 kg of pumice, water.
Little tips when building a stove
Always wear rubber gloves when working with concrete or lime to prevent them from burning the skin on your hands. Mix this solution in a wheelbarrow if you don't have a concrete mixer. Place the dry mortar there and mix thoroughly with a shovel. Add water gradually so that the solution does not become too thin. Carefully read the step-by-step instructions for building a stove. The concrete will dry completely in two weeks. Wet the dry layer of concrete stove cover before adding the next one.