Furnace for melting gold – buy or make it yourself
To work with a significant volume of metal, you will need various large laboratory furnaces.
At home, you can get by with non-professional installation that meets your requirements. We will describe in more detail all the work processes so that everyone can figure out which option is most suitable. A professional melting furnace allows you to produce high-purity gold in “clean” conditions
Features of gold smelting
Gold used to make jewelry always contains additives called alloys. They help improve the quality characteristics of the finished alloy. For these purposes, use any of the following non-ferrous metals:
The presence of a certain metal affects the final color of the alloy. Silver and copper give a reddish color, increased inclusion of copper will provide a rich red tint, an increase in the proportion of silver will give a yellowish color. We will tell you in more detail how to melt silver and other non-ferrous metals in other articles.
This is what gold looks like with the addition of various non-ferrous metals
The remaining metals listed are added only to white gold.
If copper is completely excluded from the alloy, but the amount of silver is increased to 50%, then the resulting products will have a characteristic greenish color
Melting gold at home
Melting gold at home is carried out using a special stove. It must meet several conditions:
- Have small overall dimensions.
- Be convenient for indoor use.
- Ensure sufficient heating temperature.
You need to understand that you cannot use a grill or barbecue to melt gold scrap. Regular heat from coals is not enough to achieve the required temperature parameters
To create a furnace for gold with your own hands, you can use materials that are accessible to everyone, such as tiles, graphite or a cement board. To determine the optimal size of the stove, you should correctly calculate the power and possible voltage. If you plan to use high voltage, then increase the distance between the electrodes. When using a welding machine, the minimum width between them will be 20 cm. This is enough to melt 20-40 grams of gold.
Melting gold is possible using improvised means
Useful tips for working with gold at home
Let's give some tips regarding designing a stove for domestic use:
- When assembling a gold smelting furnace, use mica plates as a substrate. This way you will better protect its walls and provide the necessary thermal insulation.
- The thickness of external cement walls should be at least 1 cm.
- Ordinary bricks can serve as a stand for the stove.
- Connect the finished structure to the transformer using copper wires. They must be insulated to prevent short circuits.
- If there is a shortage of carbon graphite powder, you can make it yourself. To do this you will need graphite rods and a regular file.
It is better to prepare graphite powder with a reserve, since it will burn out during the smelting process
Gold melting process
The first condition is that before starting work, the gold smelting furnace must be well heated. This will ensure that there is no soot during main activities.
After making a hole in carbon graphite powder, you need to put a small amount of metal into it, and then sprinkle it on top. When working with gold scrap, large pieces of it are first placed in the recess, and small pieces are placed on top.
A few minutes after the start of warming up, rock the stove. If the powder poured on top begins to sway, this means that the metal can be turned over. Repeat these steps several times until the molten gold reaches a spherical shape.
After cooling, you need to tap the metal ball with a small hammer. Your gold bar is ready.
Gold bars obtained at home are rarely the correct shape
Furnaces for industrial gold smelting
Professional gold furnaces are used to smelt metal for jewelry workshops and factories, as well as for the production of ingots. To obtain a homogeneous mass, scrap gold consisting of broken jewelry, out-of-fashion jewelry and broken items is melted down.
All material entering the work is called “charge”
Induction melting furnaces
The entire production process is as follows:
- Cleaning incoming gold scrap.
- Preheating of a special crucible.
- Loading scrap into the crucible and heating it to the required temperature.
- Coating gold with a mixture of sodium carbonate and borax after it has been melted.
- Metal settling and slagging with flux.
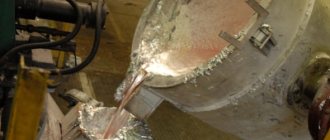
To obtain ingots, molten gold is poured into metal flasks (molds). After crystallization, the ingot is removed and dipped in cold water.
High purity gold bar with engraved information
Before applying the manufacturer's mark, a gold sample is taken and tested in a laboratory for quality. If cleaning is insufficient, the metal is melted down again
Muffle furnaces for gold smelting
The muffle furnace for melting gold is mainly used in the work of jewelers. For this type of activity, small equipment is chosen, since specialists in this industry use a small amount of noble metal.
Muffle furnaces are used in cases where the use of open fire is impossible.
The stove design includes:
- Metal body . The outside of the device is coated with powder paint, which when heated does not emit harmful substances into the environment.
- Inner space . The walls of the furnace are covered with a thick layer of ceramics or special fiber, which allows for sufficient thermal insulation.
- Heat source . For heating, tubular heating elements are used, fixed around the entire perimeter of the chamber. This arrangement helps achieve uniform heating on all sides.
The big advantage of these furnaces is the availability of program control. Using a thermostat, you can set a certain temperature to achieve better smelting results.
Set for safe gold smelting: muffle furnace, crucible and tongs
We told you how to melt gold at home, and also presented the main types of furnaces. Which option to choose is entirely up to you. If you need professional advice, contact specialists. We will show you how to choose the right electric furnace for use at home or at work. Waiting for you!
Arc furnace structure
The heating element in an electric arc furnace consists of three graphite electrodes with holders, to which cables conducting three-phase alternating electric current are connected. The stove body has the shape of a cylinder with a spherical lower part, into which the melting material is placed. When voltage is applied, an electric arc is formed between the metal inside the smelter and the electrodes and heating occurs.
The inside of the stove walls have fireproof insulation, and the outside has a durable steel casing. Water coolers may be included. The furnace has a removable roof on top with holes for electrodes; it prevents the leakage of gases and heat. The molten metal is drained through a special chute when the stove is tilted. Also, the design provides windows for monitoring the smelting process, taking samples, and draining slag.
For the stove to operate, related equipment is also necessary: a transformer (connected to a high-voltage power line), a power regulator, lifting mechanisms, cables of different conductive strengths, as well as a variety of control, measuring, regulating work, and devices. The most important complementary element of an electric arc furnace is a transformer; the duration of metal melting depends on its power. The transformer regulates the necessary parameters of the electric arc voltage: maximum for the start of melting and a gradual decrease in the further process to maintain the working condition of the furnace elements.
Electric arc furnaces are used in many industries, not only in metallurgical, but also in chemical, for example, for the production of phosphorus and calcium carbide. Units of smaller capacity are used in small workshops, in laboratory conditions for test melts and experiments, in the jewelry industry, medical field, arts and crafts and in many other areas of human activity.
Homemade electric furnace for melting metals
If you have a need to anneal metals, create ceramics, melt non-ferrous and including precious metals, you can build yourself such a simple furnace. Most of these stoves cost a lot of money; according to the author, in his region prices are in the region of $600-12,000 per stove. In our case, the oven cost only $120, not counting the temperature controller. This small oven can produce temperatures around 1100 o C.
The homemade product is easy to assemble, all the parts are not expensive, and they can also be quickly replaced if the stove malfunctions.
Some craftsmen manage to make wedding rings, earrings, various talismans, brass knuckles and much more in such ovens.
Materials and tools for homemade work:
Materials:
- bolts and nuts (8x10, 1/4 inch); - seven fire bricks (they must be soft, as grooves will need to be made in them, dimensions are 4 1/2″ x 9″ x 2 1/2″); - a corner for creating a frame; - a square sheet of metal for the door (the author used aluminum); - heating element (you can buy ready-made spirals for the oven, or wind your own from nichrome) - heat-resistant contact screws for fastening the spiral; - a piece of good cable (must withstand at least 10A).
Operating principle of steel-smelting electric arc units
The main function of arc furnaces is to release heat to the arc due to the high accumulation of electricity. Thanks to this, metal is melted at a significant heating rate.
An arc can burn both in the vapor of the processed material and in a normal atmosphere. The most popular in the industrial sector are electric arc steel-smelting furnaces. To produce steel, secondary raw materials – scrap – are consumed. The melting process consists of several stages:
- the vault rises;
- the charge is loaded into the furnace using a special crane;
- the arch is fixed in place;
- electrical power is supplied to the electrodes;
- electrical conductors touch the scrap loaded into the unit;
- an interphase short circuit is formed;
- automatic lifting of holders with electrodes is triggered;
- an electric arc ignites.
Thus, the operation of the furnace begins, which occurs at a high power temperature. It consists of the following main stages:
- Melting scrap metal. The heated charge is covered with a protective film, which blocks the access of harmful gases to the material. At the same time, various substances that have a bad effect on the quality of the metal are absorbed.
- Oxidation process. Harmful elements are corrected. At this time, the temperature in the unit rises. Its value becomes 120 degrees higher than the limit established for metal melting. Phosphorus and sulfur should occupy no more than 0.15 percent in the total composition. Hydrogen and nitrogen levels are also monitored.
- Recovery. Sulfur elements are removed from the material, and the composition of the metal is brought to standard values.
Melting methods
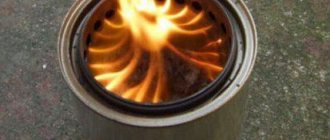
Folk craftsmen have invented many devices for artisanal melting of precious metals. Modern Kulibins can make an electric furnace at home, melt gold in a microwave, barbecue, gas welding, deposit gold by electrolysis, make a gasoline, propane or oxy-acetylene burner for melting, or even decide to use a gas stove for melting.
I strongly do not recommend the last option, unless you want to start a fire in your own home. In addition, gold melted on a gas stove heats up for a long time, unevenly and mixes with atmospheric air. Such an alloy will be very brittle.
Among several popular methods of melting at home, I have chosen for you three that, in my opinion, are the most reliable.
Burner
The most affordable and fastest way to melt small volumes of solar metal. You will need a gas canister with tourist gas (a mixture of butane and propane) or acetylene, and the burner itself, which is easy to buy at any hardware store or order online. The main thing is that the unit has a sufficiently high efficiency. The device data sheet indicates the maximum temperature - compare it with the melting point of gold.
This video shows that a 15g gold bar can be melted in about 5 minutes even at home.
You can melt gold using a gasoline torch. It is not inferior to gas, but is more often used for jewelry soldering of finished jewelry.
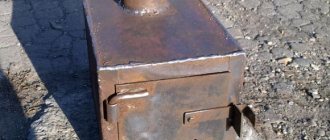
Using a homemade oven
For those who plan to engage in melting regularly, I recommend purchasing a jewelry muffle furnace. Or you can be patient and make such a stove with your own hands at home.
Melting furnaces are either electric or charcoal-fired. How to make such a stove is a separate topic, I will only say that a variety of materials are used for its manufacture: refractory bricks, cement slabs, steel cylinders of different diameters, stainless steel beer kegs and other materials resistant to high temperatures.
Electric arc furnace design
Regardless of design features, all arc furnaces are designed almost identically. Thermal steelmaking units consist of the following basic elements:
- mechanical device;
- electrical department;
- automated system control;
- device for feeding materials into the working part;
- the container in which the melting is carried out;
- waste disposal system;
- gas purification.
The cylindrical body of the furnace includes detachable parts - a casing and a bottom. The frame is highly resistant to significant temperature influences.
The design has holders in which graphite electrodes are installed. Electricity supply cables are connected to them. During operation of the furnace, a constant arc is formed between the electrodes. Thanks to it, a temperature arises in the device, which ensures the melting of metals.
What does an electric arc furnace look like?
Devices designed for automatic control of the entire system are built into the closed body of the furnace structure. The melting process is controlled using doors. There are several cavities in the frame to remove waste. Through them, various additives are also introduced to adjust the composition of the metal.
The charge can be loaded into the furnace through the working window or from above. Devices that feed material through a special opening are usually small in size. It is fashionable to load scrap metal into such units manually using a wide shovel.
Furnaces with top charge feed are more powerful and larger devices. They have a rather complex design. The mechanism of the device can be of three types:
- rotary vault;
- roll-out housing;
- rollable vault.
The most common are arc units with a rotating mechanism.
At what temperature does gold melt?
The melting point of the 79th element of the periodic table in its pure form is 1064.18 °C. Different ligatures can change this indicator. So, silver and nickel will significantly lower the melting point, palladium will increase it. But with a copper alloy, the melting point will not change.
585 and the old Soviet 583 standard (an alloy of gold with silver and copper) melts at a temperature of 840 °C. This additive makes it possible to increase the strength of gold while maintaining its ductility and aesthetic appearance. That is why this particular sample is so popular among jewelers and ordinary people. Jewelry alloy of 375 gold melts at 770 °C. It should be remembered that molten gold evaporates quickly.
How much does it cost to melt gold
It is quite expensive to melt gold from a specialist, and the cost is in direct correlation with the purity. The higher the metal standard, the higher the price. The price range for such a service is from 500 to 1500 rubles per gram. The cost of melting a house is much lower. But you will need to study the features of the process in detail so as not to suffer yourself and avoid losses.
It is difficult to name the exact costs of melting at home - it all depends on what materials and tools for melting you have available and which you will need to purchase.
DIY kiln
Electric kiln for firing ceramics “Studio – 1200”
“Studio – 1200” is a compact, universal studio electric oven. It is suitable for a wide range of tasks: creating enamel, enamels, glass, ceramics, as well as other processes requiring controlled heating or firing in the range of up to 1200 degrees.
Design features
A distinctive feature of this furnace is that its components are not tightly connected to each other with masonry mortar. Therefore, during long-term operation, with regular heating and cooling, the formation of cracks in the heat-insulating body, which is typical for furnaces with an extremely rigid structure, is unlikely (heat loss due to the “fault” of such cracks can reach 30%, in addition, uniform heating becomes impossible, which is extremely important, especially when firing ceramics). Such “living”, “breathing” masonry significantly increases the service life of the stove.
The oven quickly disassembles (in 30-40 minutes) and can be packaged for transportation in containers of convenient weight and volume. Assembling the finished stove takes 1-2 hours.
You can also, if necessary, increase or decrease the volume of the internal (firing) chamber and accordingly change the power of the electric furnace.
In addition, it is possible to replace any individual components of the furnace that fail (instead of completely repairing the entire furnace).
Other benefits:
1. Front loading is an undeniable advantage compared to top loading. Our many years of experience working with various ovens convinces us that if there is a choice, front loading is preferable. Even the annotation for German bell-type furnaces says: “These furnaces are designed to eliminate certain difficulties that arise when loading shaft furnaces.”
2. Lack of lining (thermal insulating lining) on the oven door.
Usually it is the door lining that fails first, and repairing it is quite complicated. In the Studio 1200 oven, the walker (the hole for placing products) is filled with a special brick, and only then the door of the outer casing is closed. Replacing such a brick if necessary is not difficult.
3. The aluminum body of the furnace is not subject to corrosion and is safe to use.
Furnace bodies made of ferrous metal are destroyed quite quickly. Dried clay contains a very large amount of water, the evaporation of which continues up to 500 degrees. Moisture is deposited on the walls of the furnace in the form of condensation, and corrosion at high temperatures proceeds much faster.
In addition, the aluminum (or aluminum-magnesium) body makes the stove relatively light (its weight is about 50 kg.)
4. Thermos effect.
An air space is left between the outer walls of the firing chamber and the outer casing, which in itself is an excellent insulator and also lightens the weight of the kiln as a whole.
5. Relatively lower oven power - due to lightness and better thermal insulation. The oven uses less electricity to achieve similar results compared to heavy duty ovens.
6. The presence of two independent heating elements allows firing in both automatic and manual modes (the latter fundamentally reduces the cost of the furnace).
7. Automatic firing allows you to completely eliminate control over the firing after pressing a button. The thermostat device will very accurately carry out firing according to the schedule you set and stop the process at the desired point. You can fire at night and pay for the kiln’s energy consumption at the night rate. The thermostat, which we selected after a lengthy analysis and evaluation, is reliable (has a 5-year manufacturer's warranty), relatively inexpensive and very easy to use.
8. The cost of “Studio-1200”, subject to self-assembly, is approximately 100 thousand rubles lower than commercially available analogues! The cost of our furnace depends on the prices for materials for it that exist in the regions. But these materials are available almost everywhere, which makes it possible for subsequent inexpensive repairs.
9. Easy to manufacture.
You can make such a stove without difficulty if you have at least basic skills in working with an electric drill, hacksaw and screwdriver, and can assemble a simple electrical circuit. The speed of production depends on many factors, but a very realistic period is two to three days. You will receive a flawlessly working stove that also has a very attractive appearance.
General parameters of the Studio-1200 furnace
The maximum firing temperature is 1200 degrees.
External dimensions – height 740 mm, width 540 mm, depth 540 mm.
Internal dimensions - height 400 mm, width 230 mm, depth 230 mm.
Power – 3.3 kW. (power supply from 220 V)
Weight – 50 kg.
In our experience, these parameters are optimal for working with ceramics in not only amateur but also professional workshops, if it is planned to produce products up to 40 cm in height and up to 23 cm in diameter.
We ourselves have been working professionally with such a stove for 15 years, we have built and operated other stoves, so we consider this model to be very successful in many respects.
We offer those who wish to make such a stove themselves, using our calculations, drawings and detailed instructions for manufacturing and assembly.
Muscovites can take advantage of the opportunity to receive all materials and expert advice directly in our “Drop of Dew” workshop. Here you can see the stove and its components with your own eyes, and understand all the nuances of its manufacture.
Rules for self-smelting
In order for the process to be enjoyable and the result to please, novice jewelers should follow all the rules and not neglect safety precautions. Be sure to use heat-resistant gloves, safety glasses, and an apron made of thick fabric.
How to melt pure gold
Pure gold is a soft metal with a noble yellow color. Although it has the highest melting point, it melts quite easily. Plus, it does not require pre-cleaning. Just put a piece of metal in the crucible and you can start melting.
How to melt gold scrap
If you have some substandard jewelry, scrap, or gold dust, it won't be difficult to melt it down into a more attractive form.
- Gold sand must first be cleaned with acids, washed and dried. Then it is wrapped in tissue paper, moistened with a solution of sodium tetraborate, placed in a crucible and heating begins.
- Gold scrap is sorted by sample (or at least by color), cleaned and placed in a crucible, having first poured a thin layer of flux (borax and boric acid) onto the bottom. As melting progresses, you can add more flux. One ounce of precious metal usually requires two to three pinches of sodium tetraborate.
- The molten metal is poured into a mold and quenched. Be careful! Use only heat-resistant materials. Basic protective equipment can prevent serious burns and protect against fire.
How to make a homemade melting torch
It is not difficult to purchase a gas or gasoline device. A jewelry gasoline unit is safe and costs between 1000-2000 rubles. However, if you have the time and desire, you can make a melting torch yourself. It’s easier to make gasoline at home.
- Any compressor - from a refrigerator, an aquarium, a nebulizer or a foot compressor - to supply air.
- Plastic container - for example, a milk bottle.
- Hoses.
- Sealant.
- And, the most difficult thing, nozzles for supplying a directed flame. It is better to make several of them to order in order to get a powerful stream of flame for melting or a flame-needle for repairing jewelry or solder. But you can also use an air injector, make several injectors from gas jets - you can buy them in the gas industry and drill larger holes, from 1 to 3 mm.
- We weigh down a plastic container for gasoline by gluing it to a ceramic tile or sheet of metal. This must be done for fire safety purposes, so as not to overturn the bottle of gasoline during operation.
- We make two holes in the container - one in the lid of the bottle to supply air from the compressor to the bottle, the second to supply gasoline-air vapors to the burner.
- We connect the hoses: the first - from the compressor to the bottle (it should reach the bottom), the second - from the container with gasoline to the burner itself.
- We seal the joints.
- The simplest version of the burner is a steel tube with a gas jet screwed into it. But for the sake of simplicity and safety, I recommend purchasing a ready-made one - its cost will not exceed 200 rubles.
The assembly process of the entire structure is described in the video:
Device
A homemade furnace for melting metals has a fairly simple design and consists of three main blocks placed in a common body:
The crucible is placed in an inductor, the ends of the winding are connected to a current source. When current flows through the winding, an electromagnetic field with a variable vector appears around it. In a magnetic field, eddy currents arise, directed perpendicular to its vector and passing along a closed loop inside the winding. They pass through the metal placed in the crucible, heating it to the melting point.
Advantages of an induction furnace:
- fast and uniform heating of the metal immediately after turning on the installation;
- direction of heating - only the metal is heated, and not the entire installation;
- high melting speed and melt homogeneity;
- there is no evaporation of metal alloying components;
- The installation is environmentally friendly and safe.
A welding inverter can be used as a generator for an induction furnace for melting metal. You can also assemble a generator using the diagrams below with your own hands.
Furnace for melting metal using a welding inverter
This design is simple and safe, since all inverters are equipped with internal overload protection. The entire assembly of the furnace in this case comes down to making an inductor with your own hands.
It is usually performed in the form of a spiral from a thin-walled copper tube with a diameter of 8-10 mm. It is bent according to a template of the required diameter, placing the turns at a distance of 5-8 mm. The number of turns is from 7 to 12, depending on the diameter and characteristics of the inverter. The total resistance of the inductor must be such as not to cause overcurrent in the inverter, otherwise it will be turned off by the internal protection.
The inductor can be fixed in a housing made of graphite or textolite and a crucible can be installed inside. You can simply place the inductor on a heat-resistant surface. The housing must not conduct current, otherwise eddy currents will pass through it and the power of the installation will decrease. For the same reason, it is not recommended to place foreign objects in the melting zone.
When operating from a welding inverter, its housing must be grounded! The outlet and wiring must be rated for the current drawn by the inverter.
Induction furnace with transistors: diagram
There are many different ways to assemble an induction heater yourself. A fairly simple and proven diagram of a furnace for melting metal is shown in the figure:
- To assemble the installation yourself, you will need the following parts and materials:
DIY assembly sequence:
- Field effect transistors are installed on radiators. Since the circuit gets very hot during operation, the radiator must be large enough. You can install them on one radiator, but then you need to isolate the transistors from the metal using gaskets and washers made of rubber and plastic. The pinout of field-effect transistors is shown in the figure.
How to melt gold at home
Once we have decided what, for what purpose and how much gold needs to be melted, it’s time to check whether we have everything that may be required during the melting process.
Necessary materials and equipment for smelting
Exactly what you need depends on the melting method you choose. But there is a list of what a person who decides to do such an exciting business at home should definitely have:
- heat-resistant hand, face and body protection;
- asbestos cardboard or ceramic tiles - to protect the table surface;
- melting furnace or burner;
- crucible;
- forceps;
- flux.
Optional - acids for cleaning, alcohol and water for hardening, a mold for casting the finished product.
Melting process
The melting process begins with preparing the material for melting: sorting, cleaning, grinding. The oven is then turned on to preheat, or if you are using a gas burner, you can preheat the crucible and the heat-resistant surface on which it sits.
The crucible bowl is sprinkled with flux, and metal is placed in it for melting. Once the metal is melted, it is poured into a mold or left as an ingot.
Is it possible to melt and cast bronze at home?
It is impossible to recreate industrial technology using a homemade method. The metal is overheated to improve fluidity. At a temperature above the melting point, a certain time interval is maintained, only after this the melt is poured into molds. Technologists calculate the temperature regime for each alloy.
You can independently produce simple small parts that require serious fine-tuning to precise dimensions. How bronze is melted at home is worth telling in detail. This requires special conditions and tools. Scrap bronze does not melt in a tin; it requires a fireproof crucible or old black cast iron utensils. The melt is poured into homemade molds. Larger castings are made on the ground or on a concrete floor.
For scrap, alloys of similar color are selected; bronze is difficult to crush; metal scissors are required. The crucible is heated to the melting temperature of the scrap in a forge by throwing in coal, or in an electric muffle furnace. The hot container with the melt is clamped with special tongs with a long handle to minimize the risk of burns.
Expert advice
- Potato crucible is a budget and safe option. First you need to give the root crop stability - cut off the convex parts at the top and bottom of the potato and make a depression for melting. It is convenient to do this with a teaspoon. We prepare the surface of the potato crucible by burning it until charred. The resulting carbon serves as a good container for molten metal: high heat resistance and low thermal conductivity make such a crucible so convenient that you can pick it up with your hands - no tongs are needed. The disadvantage of this option is that it is only suitable for small volumes of gold - up to 15 g, and only for melting using a gas or gasoline burner.
- Pure gold is a very soft metal. To increase its strength, it is melted with various alloys: copper, nickel, palladium.
- Before you start working with precious metals at home, you should practice using cupronickel.
Jewelry making is a fascinating and creative process. However, to start it, I recommend consulting with specialists. When working with gold, mistakes are costly.
Stay safe and be careful when working with molten metal, especially at home. Share this article with your friends, and we will delight you with new interesting topics!
Safety precautions when working
- The main danger when working with a homemade installation is the risk of burns from the heated elements of the installation and molten metal.
- The lamp circuit includes high-voltage elements, so it must be placed in a closed housing to prevent accidental contact with the elements.
- The electromagnetic field can affect objects located outside the device body. Therefore, before work, it is better to wear clothes without metal elements and remove complex devices from the operating area: phones, digital cameras.
It is not recommended to use the device for people with implanted pacemakers!
A furnace for melting metals at home can also be used to quickly heat metal elements, for example, when tinning or forming them. The operating characteristics of the presented installations can be adjusted to a specific task by changing the parameters of the inductor and the output signal of the generating sets - this way you can achieve their maximum efficiency.
Once again the question arose about the source material for the work. Based on the results of the search activities “from what...”, it turned out “..., not from what!”. These are not the old days of the USSR... Somehow, a hopeless situation led to the design and construction of a smelting furnace.
I didn’t invent anything new, I used standard solutions. I only decided on the type of design and what type of fuel the stove will run on. Of the main types of fuel (coal, gas and electricity were considered), gas turned out to be optimal. Coal pollutes the melt, and electricity is very expensive. The source for the project was a small barrel of fuel and lubricants. I made a small drawing for it: