And the consultant suggested taking holders like these (I myself was looking at Velcro, which is cheaper). After our short discussion, I realized that he was right: Velcro is easy to lose, especially for children (I later became convinced when I saw them outside in winter on a snowy “blanket”). Velcro can also stick to gloves and mittens (also a small “nuance”). Perhaps, if I buy skis for myself (for now our family has a “full” set of only skates), I’ll take these Velcro for comparison and as a more budget-friendly option.
Place of purchase - "Spormeloch" store - 1 year.
This year I have already noticed ski covers (black) on sale, but only in one size, as I understand it. In any case, it is much more convenient to store in cases (it will allow you to preserve its presentation longer). We have skis in the hallway (in the corner), nowhere else.
The holders allow you to connect poles and skis together (this is convenient not only for storage, so that nothing scatters in different directions, but also a nice bonus when carrying). At our school we have physical education 2 times a week (in winter, when there is no severe frost and the weather permits, children go skiing). We also sometimes go for a walk on the weekends ourselves. Most often, I drive my son to school myself, but it’s not always easy to place a ski kit in the cabin of the car (in addition to it, there is also a heavy backpack, a bag with shoes, a bag with sports uniform, crafts and much more). The presence of holders also acts as a small help - everything is compactly located on the floor where the rear seat is.
In general, you can store your skis and boots at school; most often we leave them there if we don’t plan to ski them on the weekend.
My son’s skis have bindings for boots (the boots were taken separately), so they are quite heavy.
Two holders are needed so that one fixes (holds) skis with poles on the upper side, and the second on the lower side. It turns out that the poles serve as a kind of carrying handle, but I carry them by holding the skis themselves (somewhere in the middle). It seems to me that this method of carrying (holding on sticks) is not entirely reliable.
Nuance:
the rings that are placed at the ends of the ski poles will interfere with each other when inserted into the holder. That is, one stick will be inserted, but the second one will not be fully inserted and may fly out, because... the rings interfere with each other (raising one stick up will not solve the problem).
In the photo below you can see that one stick is in place, and the second has come out of the “nest”. I specifically lowered the holder down.
Therefore, it is better for adults to insert skis and poles into such a holder, or for a child to practice with adults. During a physical education lesson, there is no guarantee that the child will not lose these holders (depending on where he leaves them/falls/forgets somewhere, etc.).
The holders are dimensionless, so they should fit adult skis (my son’s size is 140 cm, in a year or two he’ll have to get new ones). The width of the ski is about 4 cm, the thickness is about 1.1 cm. I am writing for information: we still have free space “inside” the holders.
The material is plastic and the manufacturer writes that it was made in Russia (obviously, not China). The plastic is quite high-quality in appearance and pliable (it is also well processed, there are no rough areas anywhere). So far, nothing has cracked anywhere, although children are not particularly “caring” about things. There was no smell from the product, it was sold in packaging.
I don’t know what temperature range it will withstand, most likely it is designed for “comfortable” storage with skis (skis are also all made of different materials).
Size of one holder, if anyone needs:
length (total) - 9.5 cm
width (at the widest point) - 4.7 cm
thickness of plastic walls (partitions) - 4 mm
the length of the hole for holding skis is 6 cm (including the thickness of the partitions)
the width of each ski hole is 1.8 cm (without the thickness of the partitions)
===================================================================
Does the holder peel off the coating (paint) on the skis? In general, the part is very smooth and well processed. I think that if you use it carefully, no incidents will happen (in general, children can “rip off” with the help of something else).
I will still recommend it, but I would advise you to go to Spormeloch, which many people take without much hesitation (they are not suitable for children’s skis, they keep them for themselves).
So, guys who love skiing, but don’t love fat-assed capitalists who charge exorbitant prices for all sorts of bullshit…. Now I will tell you how to save money.
A beautiful, lightweight and all fashionable machine for preparing cross-country skis in stores costs from 3 thousand and above, usually 4,500 - 10,000 rubles just for the machine itself, and for the frame (legs or a special table) they will ask you the same amount.
There is absolutely no need to spend that kind of money. It took me 1000 (one thousand) rubles to make such a machine.
It may be unprepossessing, but it performs the function of holding the ski during procedures with a slide perfectly. For stability, you can secure it with clamps on any table, or drill holes in the base and secure it with bolts, again on the table.
To make it you will need:
1) Glued wood panel at least 1650 x 250 x 40 mm, I bought a regular window sill made of laminated wood in a hardware store for 900 rubles (2014) - 1 piece 2) Mounting plates 40 x 80 mm with 10 mm holes (again in any construction equipment there are) - 4 pcs 3) A pair of bolts (or a piece of threaded rod) 50-60 mm long, 10 mm in diameter and wing nuts for them. I took the stud and cut it, it is more convenient to tighten the wing nuts on both sides than to hold the head of the bolt and tighten the nut. 4) 100 g of stain with varnish (Belinka is suitable) 5) A piece of hose with a wall thickness of 3-5 mm. I used old bike grips (rubber grips from the handlebars)
Tool:
Electric jigsaw and long, medium-tooth files for carving soft wood - drill (screwdriver) - metal drill D10 mm - wood drill D10 mm - coarse sandpaper 300 x 300 mm - fine sandpaper 300 x 300 mm - medium-width paint brush
How to do it? We mark and cut the window sill (or whatever you have) according to the following drawing:
After cutting out the base, we round the ends of the tops, as seen in the photo above.
We cut out grooves (see photo) convenient for attaching the machine to the table. There is no need to get carried away and reduce the strength of the machine in critical places, especially close to the middle, where the mount will hang. By the way, on real machines it is by the mount that they attach the ski to the machine (it can be done, but I can’t figure out how).
We sand all the cuts with coarse sandpaper, then fine sandpaper.
We drill holes in the mounting plates (usually 6-8 mm there, drill out to 10)
Trying on the clamping plates. They need to be placed so that their edges can clamp the ski, but at the same time the ski should lie on the machine itself, and not on the edges of the plate. Understand? Let's mark it. We drill holes for the clamping plates in the machine.
We put pieces of hose cut to size on the ends of the clamping plates.
We adjust everything by trying on the ski.
We remove the plates and paint the machine. I painted Belink. You don’t have to paint it, but if you paint it, paraffin and other production waste will stick less.
We collect and get something like this:
You can prepare your skis.
I use a simple set for preparation.
3 more tips for a skier in crisis))))
To prepare your skis, buy an old Soviet iron from an advertisement; it will cost 200-300 rubles, and it can be adjusted and warmed up just as well for 3-5000 rubles.
Instead of a branded hard brush for 700 rubles at a hardware store, buy the stiffest one for 50 rubles and cut the bristles in half with a knife.
Instead of Neil (Fig. 4). Short crossbars are welded across the steel pipe, the length of which is equal to the length of the skis.
Both the pipe itself and the crossbars are made of pipe of the same diameter. The crossbars serve as a kind of support for the skis, giving them the required deflection.
SOMETHING ABOUT THE SKI POLE. The Italian inventor D. Gambesi believes that nothing should irritate a skier during competitions. Even such a trifle as straps on
)5 A 63 C 11/O SANTION OF THE INVENTION WITNESS U T (57) Used when storing a device in a bracket with a folded outer side, over the branches for installation of a crimping element in the groove, making the bracket. 3 il (54) ADJUSTMENTS FOR SKIS AND SKI P 10 USSR 11/02, 1989. NIE FOR CARRYING the running surfaces and put the rings of both ski poles on the toe of one of them, while passing the shaft of one pole through the ring of the other for short-term carrying of skis is not Necessarily; in the upper part of the skis, where the skis are thin, they put a ski on the skis, having previously inserted ski poles into it; then the bracket is moved down onto the thickened part of the skis until it stops at the boot fastening elements, as shown in Fig. 3. You can move the bracket with one hand, squeezing the middle of the skis with the fingers of the other. You can lower the bracket by grasping it with both hands at the same time and placing the skis in a vertical position. position, while the protrusions 5 of the bracket do not allow it to slide off the skis. With the last movement, the bracket shifted to the center of the skis is moved across the skis until it stops with a light blow of the palm in order to pinch the poles more tightly, as shown in Fig. 1. The reliability of the position of the skis and poles is ensured by force elasticity of skis and a high coefficient of friction of rubber on the surface of skis, Formula of the invention 1. A device for carrying skis and ski poles, containing a hard shell and a ski pad STATE PATENT OFFICE OF THE USSR (USSR STATE PATENT) The invention relates to sports equipment, more specifically to means of fastening skis and poles for their skis. The purpose of the invention is to expand technological capabilities. Figure 1 shows the appearance of the device pushed onto the middle of the skis; figure 2 - section A-A, figure 1; Fig.3 shows a view of skis and poles fastened together for carrying. On the outer surface of the parallel branches of the bracket 1 there is a groove 2 along the width of the skis 3. On the inner surface of the bracket 1 there is a groove in which a crimping element 4 made of an elastic material with a high coefficient of friction is clamped , for example, made of rubber, made in the form of a bundle located in a groove, and there are also edge protrusions s.5. The number 6 indicates a reinforcing edge that covers the entire outer edge of the bracket, 7 - ski poles. The device is used as follows. fWhen used as a regular spacer, the device is inserted between the connected skis and the middles of the skis rest on grooves 2. To quickly fasten the skis to carry them, proceed as follows: f: as a spacer g. The essence of the invention: made in the form of C-shaped ends, with a groove on the side of its parallel skis along their width and a band located on the inner surface of the 1801527pus in the form of a C-shaped bracket with bent ends and fixed on its inner surface along the perimeter of the crimp an element made of elastic material, characterized by the fact that, in order to expand technological capabilities, a groove is made on the outer surface of the parallel branches of the bracket for installing skis along their width. 2, Device according to item 1, differing in that. a groove is made on the inner surface of the bracket, and the crimping element is in the form of a bundle located in the groove. Uzhgorod, Gagarina St., 101 Order 807 Circulation. Subscription VNIIPI of the State Committee for Inventions and Discoveries at the State Committee for Science and Technology of the USSR 113035, Moscow; Zh, Raushskaya embankment, 4/5
Making your own water skis
The editors receive many letters from water skiing enthusiasts asking for recommendations on making their own water skis.
Readers often ask to send drawings of “universal” skis, suitable for walking and performing various exercises. Let's start with the fact that there are no “universal” water skis. After all, such skis, when moving from one exercise to another, during the ride would have to change in size, shape, weight, remove and re-adjust the keels, etc.
Currently, there are: recreational, slalom, figure and jumping water skis. It is within this classification that the required recommendations can be given.
Ski arch
When both skis are planed and contoured, they will need to be given curves - front, middle and rear, as shown in Figure 2. The bending of the skis is done using a special machine, the structure of which is clearly visible in Figure 3. Both skis, slightly heated over the fire, they are tucked into a machine where they are given the necessary shape and curves are made. However, you should carefully ensure that the bends are correct, since if the skis are skewed, they will no longer have the correct move. Skis tucked into the machine should also be steamed with boiling water, and then strongly calcined and heated over a fire so that the wood is soft and docile, and can take the shapes and curves you need. Then they can be taken out into the cold. When the skis have completely cooled down, they are removed from the machine and inspected for possible distortions in the arch, and further marking and burning of special holes for fastenings begin. return
Walking skis
Perhaps it would be a stretch to call them universal. With these skis you will be able to perform simple turns in free water, go through a slalom course on one or two skis at a towing boat speed of up to 42÷45 km/h and jump from a springboard up to 1.5 m high at the same maximum speed.
For a wide range of towing vehicles - from a motor boat with an outboard motor to a pleasure boat with a stationary engine, we can offer the following design of pleasure skis.
The cross-sectional profile shape of the ski is chosen to be the usual rectangular one, which greatly simplifies its manufacture. For the same reasons, the simplest form of longitudinal bend was chosen: flat, with a curved nose and a constant thickness along the length of the ski. The planform was chosen to be close to the “banana” type, which, according to general opinion, best satisfies the “versatility” of recreational skis.
These skis can even be used for jumping. When Americans first began to master the “double cut” technique when performing ski jumps in the fifties, they used exactly these skis. And the famous American athletes, the Osborne brothers, until very recently, jumped well over 30 m on banana-shaped skis.
The most difficult issue is installing bindings on recreational skis. After all, if one of them will be used as a monoski for slalom, then the bindings must be shifted forward from the transverse line passing through the center of gravity of the ski. And for ski jumping, we must move the fastenings in the opposite direction. Therefore, each water skier chooses the best option for himself, in practice. In Fig. 1 shows an option for installing bindings for the selected length of recreational skis.
One of the design features of modern recreational water skis is the small range of change in their maximum width, about 17÷19 cm.
In view of this, while maintaining the proposed shape of recreational skis, their various variations in length, depending on the maximum towing speeds and the weight of the skier, can be presented in the form of a graph (Fig. 2).
The graph is shown for paired recreational skis, and the recommended ski lengths should be chosen inside the shaded area. If pleasure skis will be used for jumping, then the keel 0.8÷1.5 cm wide must be made of wood. It is advisable that recreational skis should not be particularly heavy, otherwise they will be difficult to control, which is very important for beginner water skiers. The approximate weight of a pair of walking skis with binding is 6.5÷8 kg.
Slalom monoski
Water ski slalom competitions for athletes of the second and higher categories are now held exclusively on monoskis, so we will focus on this design.
At the 1965 Brisbane World Championships in Australia, the first type of clinker monoski was demonstrated (Fig. 3, a). However, this type of monoski, the increased lateral stability of which is based on the hydrodynamic effect and an increase in the wetted surface, has not found widespread use. Of the leading water skiers, only the current world champion, American Liz Allan, uses a clinker monoski of the Diabla type (cassock 3.6), and then only, apparently, for advertising reasons.
As the 1967 World Championships in Sherbrooke (Canada) and 1969 in Copenhagen (Denmark) showed, most of the world's strongest water skiers use concave monoskis. The most popular are French skis (Fig. 3, c) and American monoskis of the “tunnel” type (Fig. 3, d).
The reader can read about the increased lateral stability of this type of ski, compared to skis with a simple rectangular cross-section profile, in collection No. 9, 1967.
Recently, some English companies have been advertising a new monoski design, the transverse profile of which (Fig. 3, e) combines the qualities of clinker and concave skis.
In the 1968 season, Leningrad designers created a “trimaran” monoski (Fig. 3, e), the transverse profile of which contains a central and two symmetrical side tunnels. Extensive testing of this ski has shown it to have great lateral stability. The ski enters the turn quite well and “holds” when edged at angles of up to 60° and higher. However, if the tilt angle is, for example, 45°, then exiting the turn and edging the ski is difficult, which often leads to the skier falling.
Practice shows that the most promising are “tunnel” monoskis (Fig. 3, d).
If we talk about the nature of the longitudinal profile of modern monoskis, then first of all I would like to note that skis of variable thickness along the length of the “taperflex” type, recommended until recently by the Americans, are not popular among leading athletes.
The requirement for increased longitudinal rigidity for “tunnel” monoskis led to an increase in their thickness to 22 mm and higher, which remains approximately constant along the entire length of the ski and decreases slightly only at the point of the nose bend (for technological reasons).
The monoski has a longitudinal bend only in the bow.
The shape of the monoski in plan has also changed recently - from the former popular “drop” shape to the “banana” shape, although not clearly expressed (Fig. 3, g). In any case, the tendency to narrow the rear end of the ski is now absent.
You can read about the dimensions of the keel, as well as how to install the fastenings and keel on a monoski in the same ninth issue of the collection, or, if you make monoskis of the length recommended here, take these dimensions from Fig. 3, f.
The maximum width of most sports monoskis varies within small limits (16÷17 cm) and can be taken as constant. When selecting the length of a monoski based on the weight of the athlete and the maximum towing speed, you can use the graph in Fig. 4.
We remind you that when installing bindings on a monoski for slalom, you can use the following ratios:
where l is the length of the selected ski. The specific value of the coefficient in the formulas is selected by the athlete individually, depending on the variation r convenient for him according to the formula:
Here are a few typical sizes of modern “tunnel” monoskis. The maximum height of the tunnel in the middle part of the ski does not exceed 10÷12 mm, in the bow part at the exit point of the tunnel - 4÷5 mm, and in the rear part, in the area of the keel, the groove extends to the sliding surface. The width of the groove in each section is (1/2÷2/3) the width of the ski.
The weight of the monoski with bindings ranges from 3.5÷4.5 kg.
Materials needed
To assemble the holder, I used lightweight materials: a 20 mm polypropylene pipe and fittings of the same diameter.
Total required:
- ten 90 degree corners;
two connecting tees;
four clips from 16 mm pipe wiring;
four screws.
Tools:
- soldering iron for polypropylene pipes;
scissors for polypropylene pipes;
screwdriver;
Water skis for figure skating
Figure skiing is practically the only type of water skiing where sizes are limited by competition rules. Their length, measured along the bottom surface, cannot be less than 100 cm, and their maximum width should not exceed 25 cm.
Until recently, people talked mainly about two schools of figure skating technique: American and French, which implied two types of skis - heavy and light. Now, when the results of the best European and American water skiers and figure skaters are quite close, we can only talk about the most rational technique, which ensures the execution of the maximum number of “expensive” figures in a given time - 40 seconds.
Jump skis
The shape of the skis in plan (Fig. 6), as well as the shape of the cross-sectional profile, are the most characteristic parameters of jumping skis, which makes them similar to walking skis. However, they are much heavier in weight than the latter: the weight of one jump ski with bindings reaches 4÷5 kg. The longitudinal profile of jumping skis differs from the profile of recreational skis in that the nose bend here is quite smooth and starts from the middle part of the ski. This, on the one hand, makes it easier to enter the turn before the start of the cut, and on the other hand, it provides greater strength to the nose of the ski, which experiences maximum load during splashdown.
The binding on jumping skis is installed so that the following condition is met:
And of course, these skis should be durable enough to withstand several hundred jumps.
To make a ski, you must first 'construct a theoretical drawing on a natural scale.
The shape of the ski in plan is drawn using patterns on a thick sheet of paper and cut out along the contour (Fig. 1, 3, 5, 6). Subsequently, it will serve as a template for final processing of the workpiece.
The longitudinal profile of the ski is drawn along the center plane on a frame or thin plywood and is used as a template when making a “boob.”
If the shape of the transverse profile is complex, as, for example, in a slalom monoski, then to control it at each cross-section point, you can also make templates from cardboard, but this is advisable to do only for mass production of skis.
Making kamus
Simultaneously with the manufacture of the wooden part of the skis, it is worth doing the finishing, selection, cutting and stitching of the casing. The paws, dried in a stretched position, should be scraped and fat and pieces of meat removed from the flesh. The paws scraped in this way must be selected so that the camus is the size of the skis (corresponding to their length and width) with a slight overlap for turning over the sides. Then, each paw will need to be cut lengthwise in the middle and soaked in cold water. When the paws become soft, they are picked up - that is, both halves are folded so that their shaggy edges lie towards the middle of the sliding surface of the ski - see Figures 4 and 5, and the smoother edges lie towards the sides. Then, they are sewn together using vein threads or nylon thread. The transverse edges of the paws should be beveled, as this increases the fracture strength of the ski during its operation and use. As for lining skis with seal skin, it is worth noting that the skin taken from the seal’s belly is consumed entirely, and that taken from the sides must be sewn in the middle so that the pile meets at a herringbone angle, otherwise, if it is oblique, direction the ski will constantly slide to the side. return
Water skiing? It's very simple! Lesson 1
“Dear editors!
I have a boat with an outboard motor. From publications in your magazine I know that it is suitable for towing a water skier. Unfortunately, there is no water ski section or club in our city, but my friends and I really want to learn how to ski on water. Help us master this wonderful sport and recreation." Our magazine receives quite a lot of letters like this. And in order to help those who want to expand the range of use of their motorboat or speedboat, we decided to open a water skiing section for beginners at the “University of Sports Excellence”, classes in which will be taught by one of our oldest water skiers, the winner of the first USSR championship and the first master of sports of the USSR in water skiing Yuri Ivanovich Zhukov.
So, we wish you success on the water skiing!
Making and using a ski pole
An indispensable accessory to skis is a ski pole or, as the Nanais themselves call it, a tunepun. You can see how it is structured in Figure 7. Such a stick is made from a block of walnut or birch. At the lower end it has a blade, and at the upper end there is a ring and a claw. On the stick, starting from the edge of the blade, every 5 centimeters, divisions are applied - with them it can also serve as a snow measuring rod when you need to measure the thickness of the snow cover. This tunepun will come in handy when walking on fragile ice, with its help you can test the road, clear the snow at the place where you are going to set up a tent, it will also help you slow down if you have an unsuccessful descent from the mountain... return
Lesson 1. Before you go out on the water
To the chagrin of some, we will have to start our first lesson on the shore. First, a little information about what we need.
Water skis and bindings of various types are produced by industry and sold in sporting goods stores; You can also buy a towing halyard with a handle there (it’s better not to waste money and buy a “branded” cable - it meets all the requirements for reliability and safety).
For the first outings on the water, paired recreational skis are most suitable, as they “forgive” many mistakes.
Rice. 1. Main dimensions of paired recreational skis
If desired, the simplest recreational skis can be made independently from light varieties of wood and then coated with waterproof paint. The main dimensions of a pair ski of this type are shown in Fig. 1. Recently, the most common recreational skis have a “banana” shape in plan. The maximum width bmax ranges from 18 to 22 cm depending on the engine power and the weight of the athlete (naturally, the “weaker” the engine and the heavier the skier, the larger the area the skis should have).
Rice. 2. Diagram for determining the length of recreational skis depending on the weight of the skier and the speed of the boat Vк
You can determine the length of skis for beginners from the diagram (Fig. 2), in accordance with the speed capabilities of the boat and its own weight. If there are several people in your group who will learn on the same skis, when choosing sizes, focus on the heaviest athlete (although, of course, it is better if everyone is approximately the same weight).
Rice. 3. Installation of bindings on paired water skis Fig. 4. Grouping position when simulating a launch on the shore
Success on water skiing also depends on the correct installation of the bindings. To effectively control skis, the skier's weight must be applied to the center of gravity of the skis. Therefore, we act like this: we bring the ski with the installed guide keel into balance on a wedge-shaped support and mark the center of gravity with a transverse line (Fig. 3), with which we align the rear section of the toe part of the rubber mount. We install the heel part of the fastening after adjusting it to the size of the foot.
The key to successful starts on the water is mastering simulation exercises on the shore. They are all very simple, but quite effective.
Imitating a start on... grass is very useful for beginners. The student puts on skis and assumes a tuck position: back straight; the body is slightly tilted back; arms are bent at the elbows at an angle of 90° and pressed to the body; feet shoulder-width apart and slightly bent at the knees; the gaze is directed forward. The “trainer” takes the free end of the halyard 3-4 m from the handle and prepares to pull (Fig. 4).
The “skier” gives the “ready” signal and secures his stance, tensing the muscles of his arms and legs and leaning back slightly. When the “coach”, pulling the halyard, begins to pull the “skier” towards himself, you need to counteract this pull by resting your feet on the skis. Maintain the grouping position even after you start moving.
Repeat the “start” several times, increasing the thrust and bringing it to a significant jerk. If you have learned to maintain balance and move to a stable movement, then you can do this on the water.
But before taking the first real start, let's remember the basic safety rules.
I think that everyone understands: those who cannot swim have nothing to do on the water. But the ability to swim does not exempt a novice water skier from using life-saving equipment - a water ski belt, vest or bib.
Carefully inspect the skis, bindings and halyard for any sharp or protruding parts that could cause injury. The fastenings must ensure unhindered release of the legs in the event of a fall. Check that the handle is securely attached to the halyard - even the slightest movement along the cable is unacceptable.
Selecting hole locations for fastenings
Figure 4.5 The locations of holes for fastenings are determined as follows. The ski turned on its edge is taken with the thumb and forefinger in the area of the loading area and lifted. In this case, the ski itself should be positioned at an angle of 45 degrees relative to the floor with the toe raised up and the heel down. Having found this point on the ski, mark it, and then draw a straight line across the ski through it. From this line, retreating 4 centimeters towards the toe, draw another line, strictly parallel to the first. When this is done, mark the middle along the width of the ski on the lines, and placing a clenched fist on the ski so that its middle aligns with the middle point, points for holes are placed along the edges of the fist along the first and second lines, and points for holes are marked on the front line holes with a general approach between them to the width of the little finger at its base. When such markings have been carefully calculated and carried out, the holes are burned, and from below they are connected in pairs in the longitudinal direction with grooves for passing the belt. The grooves should be made so deep that the straps can accurately align with the sliding surface of the ski. return
Making water skis with your own hands
The shape and design of the water ski is as simple as it is unique. Today, many extreme sports enthusiasts can afford to purchase a riding kit, but not all. Those whose financial capabilities do not allow them to purchase them can not give up the dream of practicing this active form of recreation, but create such water skis with their own hands. This process is not entirely simple, but anyone can do it if they approach it with due attention.
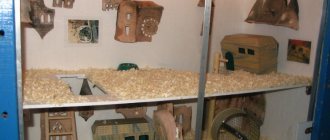
Ski storage
Skis should be stored tied in pairs, on special spacers, which will be suspended in a dry but well-ventilated place. Today we talked about what ideal hunting skis should be, and how to make such skis yourself, with your own hands. We examined the technology for making skis from Amur hunters. Well, we hope that if you follow our tips and recommendations, your skis will be just like that - light, reliable and durable... Oh, do you use skis during winter hunting? What skis do you prefer? We are waiting for your stories, hunting stories, comments and reviews. The article was prepared based on materials by K. Abramov, taken from free sources.
Water ski design
First, let's look at the design of water skis. Each of them is a long frame, which consists of square profile slats and plywood partitions. In a homemade version, this design is covered with plastic film on top to create negative buoyancy due to the air inside. The thickness of such a film does not exceed 0.5 mm. The place where the foot will be installed is equipped with a ring shield, also wrapped in polyethylene. This is necessary to prevent water from rushing inside the skis. Plywood partitions serve as stiffening ribs and strengthen the structure of the skis, and the slats must always be sawed with a hacksaw where the nose bevel goes - otherwise they will break during bending.
If desired, you can make water skis from duralumin plates - although this will increase the weight of the set to about 10 kg, the load capacity will remain the same, but the strength of the product will increase many times over. Ski poles are selected based on the individual parameters of each person, but they rarely exceed 1.6 meters.
By the way, if you doubt that you can successfully ski on what you created with your own hands, then don’t worry: walking on them on water is no more difficult than on regular skis on snow. Some beginners are trained on special training water skis, which are fastened together, and when they switch to regular ones, they find that they are very easy to walk on.
Ski size and production
Figure 1, 2, 3 Skis will be able to lift a hunter (that is, they will not sink under his weight in the snow), only if their sizes correspond to the person’s height and weight. Calculating the required dimensions is very simple. If you place the ski on the heel, then the length from the floor to the end of your outstretched arm should be from 180 to 250 centimeters. The width should be equal to the distance between the maximally spread thumb and index (sometimes middle finger) of the hand, that is, on average it should be 18-20 centimeters. The thickness under the foot - where the loading area is located - is taken as equal to the distance between the middle and top lines on the palm of a person (in a straight line passing between the middle and ring fingers with the palm fully open) and on average it is 12-13 millimeters. However, this applies to those cases when “flax” is not placed under the camus - the so-called fiber from the animal’s backbone, which makes your skis unusually strong and allows you to make them as thin as possible (in any case, much thinner than ordinary skis). At the end, the thickness of the skis is increased to 0.8 centimeters, and in the places of the front and rear bends - up to 0.5 centimeters. The outer contours of the ski are shown in Figure 1. return
Creation of water skis
In order to make water skis yourself, you need to prepare pine or spruce slats with a square profile. The main thing is to choose them of approximately the same size and without defects in the form of knots; the structure should be straight-layered. The dimensions of the slats are selected according to the weight of the owner; to select them, you can use the following table:
Having decided on the dimensions, you need to find a suitable template according to which they will need to be cut. Fortunately, there are plenty of them on Internet resources and finding them will not be difficult. After trimming, you need to cleanly plan these blanks for future water skis.
The next operation is to clamp the workpieces in a vice and make a longitudinal cut in the bow. After this is done, a very important moment comes - preparing the product for bending. To do this, you need to keep them in boiling water for about two hours and after it has thoroughly steamed, you need to place it in a special homemade template, which can be made even from a simple stepladder. So it should lie for several days. If you work in the summer, you can dry it outside, but under no circumstances in the sun, otherwise the wood will crack. In order to speed up the drying process, you can place a piece of coarse fabric in the cut, which will act as a wick and draw out moisture.
After all the moisture has left the workpiece, it is removed from the template and the sock is sealed. For this, resin glue or epoxy resin is best suited, which needs to be poured into the cut and then a plywood insert coated with glue should be installed there. You need to wait until the glue fills all the seams, install it in the template in which the water skis were given a bend during drying, and fix the bends with screws and dowels made of wood, lubricated with glue, whose diameter is 8 mm. For them, you first need to make through holes and, having driven in these wooden nails, leave the skis until completely dry.
After drying, you need to clean the entire surface using a plane, rasp and sandpaper. In order to avoid splitting, the bow part is sealed with fiberglass. It is best to use epoxy as a binder or, as a last resort, BF-2 glue. As additional safety measures, it is necessary to make and hammer dowels on the sides of the water skis, the dimensions of which are calculated as follows: 10–15 mm is added to half the width of the reinforced area, and the diameter is turned out around 7–8 mm. Before hammering in the dowel, the hole, which is drilled the entire length of the wooden nail, is generously lubricated with glue. After the binder has dried, the ends of the dowels are carefully cleaned.
Next, you can manufacture and install the keels according to the chosen design. One of the best materials for this is a cutting board, which makes excellent stabilizers. Once the keels are in place, the ring guards are glued on and the fastenings are installed. If you have ready-made fastenings, then it is best to install them using through bolts, whose heads should then be recessed into the body of the skis and putty. If there are no fastenings, then the simplest ones can be made yourself from old rubber boots or women's boots. The top is cut off, and the galosh itself is attached to the water ski through a metal or wooden plate.
More complex models of fastenings are made from duralumin plates 2 mm thick and pieces of rubber truck wheel inner tube 3–5 mm thick. They themselves have two parts, the toe and heel, the first of which is fixedly attached, and the second can be adjusted, moving back and forth. The appropriate size is fixed with a small bolt.
All that remains is to paint and start walking on the water. The paint used plays an important role in this process. The best choice would be nitro coating, as it is the fastest drying, and it looks very good. But if you decide to use nitro paint or glypthal dye, then you should first coat the water skis with a primer. In general, you can paint with anything - even oil paints. In this case, the surface must first be soaked twice with drying oil, drying it thoroughly after each application.
Ski bindings
Figure 6, 7 For fastenings or yuxes, it is worth taking soft, well-smoked and roasted belts, made of elk leather, rawhide (old tugs that have already been in use are also good for this). Remember, you should not make fastenings from hard leather, which will creak in the cold - this way you will scare away all the animals in the forest. The finally finished skis are inspected again and the camus that has fallen off on the sides is now glued with nitro glue or BF glue, and temporarily these places should be nailed down with thin pins, which you will then remove as the glue dries. Under the foot, on the cargo area, it is worth sticking either birch bark or rubber (this option is better), then the snow will not stick to the skis. return