31.07.2020
Autumn crafts for school are needed for various exhibitions. They help develop imagination and creativity. On the theme of autumn, we will make a hedgehog from leaves.
We will need:
- dried leaves;
- PVA glue;
- colored paper for background;
- a sheet of white paper;
- scissors;
- brown felt-tip pen or pencil.
Step-by-step instruction:
- First, let's cut out the face for our hedgehog. To do this, take a sheet of white paper and scissors. First, use a brown felt-tip pen to draw a thick outline to make it easier to cut out. We make a pointed muzzle with a circle at the end (this will be the nose).
- Glue the cut-out piece onto colored paper closer to the left edge.
- Now we are making an imitation of needles on a hedgehog. Glue the dried leaves overlapping. It is better to take multi-colored elongated blanks. We start doing this from the top and cover the entire back of the animal.
- Use a brown felt-tip pen to paint over the hedgehog’s nose, draw a mouth and paint over the outline of the entire face.
An interesting and simple autumn craft for school is ready. You can also make hedgehog grass from small green leaves. This manual work only takes a few minutes.
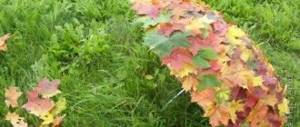
Autumn is not only cloudy days and raindrops that constantly drum on the windows and roof, but also a time of bright colorful landscapes. During a normal walk. which takes place in a city park or public garden, it is easy to assemble a whole collection of materials of various sizes, shapes and colors (yellow, brown, green, red, orange), with the help of which craftswomen, and even children, create crafts from tree leaves with their own hands for gifts or home decoration, interior decoration, for school exhibitions, presentations for Teacher's Day or the autumn holiday.
Hedgehog made from leaves
This applique is very easy to make. But only in the autumn season, when you can collect red and yellow leaves in the park.
To work, you will need a model of a hedgehog, which you will print or draw yourself, scissors, glue and small leaves of different colors.
Cut out the hedgehog and start creating “needles”; in our craft they will be made from maple leaves. It is better to glue the leaves from top to bottom, in rows.
The finished product can be glued to a thick sheet of paper or left as is.
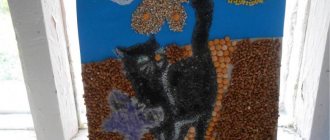
Application from leaves: creating together with children
Application from leaves: creating together with children
Pictures made from autumn leaves are a wonderful craft and good entertainment for children and parents. For any medium-sized picture, occupying about three-quarters of an A4 sheet, you will need a lot of leaves, at least 20-30 pieces, and a variety of them.
Collect them with your children in early autumn and dry them - you can use a special press for this, but the easiest way is to put the leaves in books (but, firstly, these should either be books you don’t really need, because drying even leaves among the pages spoils them a little these pages, or place the leaves between sheets of tissue or plain paper.
And, secondly, put these books in a visible place or remember them in some other way, because the leaves in the book are easy to “lose” in the home library). Drying usually takes 1-2 weeks, even if the leaves you picked were not fresh, but already slightly wilted.
If there is any damage on the leaves (for example, a few holes from insects), this is completely normal; such leaves can also be dried and used in crafts.
In the process of collecting and creating the application itself, you can additionally tell children about what kind of leaves they are, what trees they are, their features, etc.; creative work that develops motor skills and imagination can also be educational.
Hedgehog made from leaves
So, for a simple autumn applique in the form of a hedgehog, take:
- paper;
- glue and scissors;
- felt-tip pen;
- a sheet of cardboard for the background;
- oak leaves;
- linden leaves;
- elm leaves;
- birch leaves
- and any other “single” leaves (that is, not chestnut or maple, for example, they are not suitable for a hedgehog applique, because the leaves should imitate many small needles).
The total number of leaves depends on the size of the application, but in any case it is better to take at least 20 pieces. Take leaves of any color, those that children will like most - the color of the hedgehog is not so important, especially since all the leaves after drying will acquire a more or less similar color - yellow-brown shades.
But you can try to make soft color transitions; if some of the leaves are lighter after drying, and some are darker, you can make the middle of the body darker, for example, by gluing dark leaves there, and lighter “needles” - leaving lighter leaves for the edges, or vice versa.
Draw a hedgehog with the children on colored cardboard (beige, yellow, any light color) (following the example in the photo). It should be drawn almost in one line, without many details, of which only the eyes, nose and smile on the face should be left.
Cut out the image and glue it onto cardboard.
Now spread glue over the entire body of the hedgehog, except for the muzzle - that is, all the space that will be covered with leaves.
And start gluing the leaves! How to arrange them - by color, size, texture - depends on the child’s imagination. One of the most common options is to either gradate the color, as described above, or place oak leaves on top; they look most like needles. But all options are suitable - the main thing is that there are no empty spaces left for the hedgehog, not covered with leaves.
Hedgehog leaf applique is ready!
You can make an applique not only of a hedgehog, of course - any drawn picture pasted over with leaves will be an excellent autumn craft for the garden. Choose simple animal pictures that kids can easily draw themselves - such as a hare, ladybug, dog or cat. Remember that the applique should contain fewer drawn small details - they are filled with glued elements. The lines should be simple, like in a vector drawing.
otvetkak.ru
Paper hedgehog craft
Step-by-step instruction
This hedgehog should be done with older children, because little ones will not be able to cope with such a task, but under the strict supervision of parents or educators, your child will definitely succeed.
We recommend reading:
To create such a hedgehog you will need two sheets of colored paper: yellow and brown, glue and scissors.
We make an accordion, like a fan, from a brown sheet. To get needles, you need to trim the top edge on both sides.
Fold the accordion and bend it in the middle, then straighten the two edges. Now you can cut out the face of our hedgehog and draw eyes, a nose and a mouth on it. Glue the muzzle to the fan.
Let's start the lesson
How to make a hedgehog from dry maple leaves for 1st grade children? Below we will describe the method of making such an application. In addition, for the base we need one birch leaf. We make a body for our hedgehog from a small birch leaf, and we will have a maple leaf protruding in the form of thorns. After gluing with felt-tip pens, we draw a cute face for the hedgehog and apple-shaped supplies.
In the photo below you can see what kind of hedgehog you will get:
You can make an applique using a pencil sketch that will replace the hedgehog’s body. Then the forest dweller will look like this:
If you come across a maple with multi-colored leaves in the forest or park, you can make such a bright hedgehog. On a sheet of colored cardboard (we took blue cardboard) we draw the outlines of the future hedgehog. We glue multi-colored maple leaves onto the body, and outline the muzzle and legs with a dark felt-tip pen.
Good afternoon. In this article you will find a large collection of ideas for creating a HEDGEHOG craft. Here are some ideas that are suitable for children in kindergarten and school. We will work with our own hands using a variety of techniques. Glue hedgehogs from paper and cardboard, make a hedgehog craft from natural materials. I will show you the most beautiful hedgehog appliques using several techniques. We will sew hedgehogs from felt and felt them. Cross stitch hedgehogs. Crochet hedgehogs and much more. I also have articles with hedgehogs’ favorite foods – apples and mushrooms. You can also make an apple craft or a mushroom applique for your hedgehog.
Here's what you'll find in this article.
Crafts hedgehogs
For small children
(age 3-4 years).
In the junior group of kindergarten, children are just learning paper appliqué techniques. Children 3 years old cannot yet use scissors - and their task is simply to glue the ready-made appliqué parts, cut by the hands of the teacher, into the right places with glue. And this is already quite a difficult job, a craft that is not easy for small children. Using a clumsy brush, try to distribute the sticky glue evenly over the paper part. And stick all the parts in the right places, without confusing anything or turning it upside down.
Here are convenient applications for children 3-4 years old. A simple cute chubby hedgehog for children - pictured below. It is simple and easy to make with your own hands. First we glue the spines, then we put the tummy part on them and lay out the paws and ears. Just for 15 minutes - that’s how long a lesson lasts in kindergarten in the 2nd junior group.
But in this craft below, children are given a hedgehog back made of cardboard. And paper outlines of the head and paws. Girls can also be offered a bow. As a boy, add an apple to the back. It is better to let the teacher himself draw the eyes and mouth on the face in advance (a pencil in children’s hands will tear the paper wet from glue, and a felt-tip pen may get into a puddle of glue and stop writing).
Here is another task that children can do - a hedgehog craft. Here a prickly back is glued onto a cardboard apple, then a muzzle on top, then eyes, cheeks, and a nose on it. It looks like a complex craft - but simple and accessible to children 3-4 years old.
And here is another craft below - where a hedgehog hugs an apple. Children really like the very fact of COMMITMENT. Important Note
– do not give children hedgehog hands in advance. They will rush and glue them to their tummy before the apple - and will cry that their hedgehog does not hug the apple.
First, let them glue an apple to the hedgehog’s belly, and give the hedgehog’s hands to those who succeeded.
But the task is already for the second half of the junior group
.
Here it is important to correctly glue the triangles of spines onto the hedgehog - so that the acute angle looks in the other direction
from the hedgehog’s muzzle. Keys can be cut not only from ordinary colored paper. It is very good to cut spines from COVERS of colored paper - this way they will turn out multi-colored with bright splashes of pattern. Paper is saved and covers are not thrown away. And the hedgehog turns out to be festive.
Craft Hedgehog
For the middle group of kindergarten
Age 4-5 years.
In the middle group of kindergarten, children are already beginning to master scissors
. They learn to hold them correctly and do CHICK-CHIK in the air without straining their fingers (make sure that during the chik-chik process the child’s fingers do not curl from tension). Let him learn to do this movement in a relaxed manner.
The first tasks of cutting with scissors for children are the simplest. As a rule, this is cutting fringe grass. Using this fringe cutting technique, you can also make a craft in the shape of a hedgehog. We give the child a wide oval (a rectangle with rounded edges). And the child’s task is to push this oval into the cuts in a circle (as in the picture below). You can draw lines for future cuts on each oval in advance with a pencil. This way the child will have a clear guideline for applying the scissors.
Pay special attention to children
, that when we glue hedgehog needles onto a paper background, we apply glue ONLY to the MIDDLE of the back - we DO NOT apply glue to the cut fringe at all. And after gluing, we twist this fringe onto a pencil - or bend it upward with our hands.
In preparation for the lesson, the silhouettes of the hedgehog’s body can be drawn with a black marker on a sheet of paper - and this sheet can be copied on a photocopier.
. You need to cut out the body silhouettes of the hedgehogs so as not to create marker lines. The child’s task will be to bend the hedgehog’s arms and head forward. And in order for the hedgehog’s ears to stick out above the fold line of the hedgehog’s head, you need to remember to cut them in advance.
And here is another craft using the FRINGE technique
(cutting with scissors) – for children in the middle group of kindergarten = in the shape of a hedgehog.
For younger children
a ready-made curved base of the hedgehog's body is given
.
Older children themselves bend a wide strip of paper into the shape of a DROP.
THEN you will need to teach children to control scissors well: keep the hand with the scissors straight - change the cutting direction without turning the hand with the scissors, but by turning the sheet of paper (this is the correct cutting technique)
And when the children master this technique, you can give them the task of cutting out the prickly silhouette of a hedgehog’s coat with zigzags (as in the photo below). This is already a task for the second half of the year in the middle group of kindergarten.
You can offer children this hedgehog craft (as in the photo below).
On a sheet of colored paper we draw a large silhouette of a hedgehog. We make cuts on it with a blade in advance (children will not make such internal cuts themselves with scissors). And the child’s task will be to cut out the entire hedgehog drawn on the cardboard along the contour and bend the cuts with his fingers.
COLLECTIVE
crafts with hedgehogs
in kindergarten.
When children become comfortable with cutting along the contour, you can give them cardboard cards on which the contours of fruits (pears and apples) will be drawn. And some children will receive the contours of a hedgehog's needle-like skin.
And then you can make such a COLLECTIVE craft, a hedgehog with fruit, in kindergarten classes. Each child participates, cuts out their part of the craft - and then at the end of the lesson, the children, together with the teacher, assemble all the parts into a craft.
In the same way, you can give children cards with the outline of autumn leaves (maple, oak) drawn on them. And after cutting out, we collect the autumn leaves into a garland held by a hedgehog cut out of cardboard.
Children's craft Hedgehog
From newspaper and glue.
You can cut a hedgehog from an unusual material - multi-layer newspaper cardboard. Take a white sheet of paper
Spread it
with PVA glue
- and quickly, before the glue dries, lay out
pieces of torn newspaper
.
Again we spread glue on top of this sheet - and again lay out the newspaper pieces in places not covered by the newspaper. We dry this multilayer newspaper cardboard. This is the first lesson for children.
Continuation of the craft in the second lesson.
After all the layers have dried, place a silhouette-template of a hedgehog
– outline with black marker.
And we have a preparation
for the second lesson with children. On it they will have to cut out the drawn silhouette of a hedgehog. Then lay dry leaves on a sheet of paper - on glue. And stick the silhouette of a hedgehog on top. On scraps of newspaper cardboard (remaining after cutting out the hedgehog) we draw an apple and a leaf. We paint them in red and green watercolors. Let's dry it. Cut it out. And glue the apple onto the back of the hedgehog.
Craft HEDGEHOG
for older children
using the VEER technique.
We fold a sheet of colored paper into an accordion (like a fan). From both ends of this folded accordion we make an OBLIQUE CUT with scissors (due to which the fan will have a jagged edge).
Now we bend the accordion in half in the middle and fold it. And we straighten the blades from one half of the accordion and from the other half of the accordion. And now all that remains is to glue the hedgehog’s face. A simple hedgehog craft for children in the senior group of kindergarten.
Crafts-pendants for the window
In the shape of a hedgehog.
From cardboard we cut out the contours of a hedgehog with a large hole cut inside. On the reverse side we attach a piece of plastic film to the tape.
And we place dry autumn leaves on it with PVA glue. We hang the craft on the window - the light shines beautifully through the foliage, and in the sun the leaves shine like an autumn lamp. Children like this hedgehog craft the most - they love working with natural materials. And below in this same article I will have many more hedgehogs made from natural material.
You can also stick pieces of paper napkin with a colored pattern
. The napkin will also shine through in the sun when you hang this children's craft on the window.
If the edges of a cardboard frame in the shape of a hedgehog are pierced with holes (using a hole punch), then you can make a craft with lacing.
String beads or paper leaves through the cord as you weave. This hedgehog craft is suitable for older children - schoolchildren, because lacing is a long process.
DIY hedgehog
using the palm technique
Here are a few crafts that use prints or silhouettes of children's hands. For the youngest children, this craft is suitable, where you need to apply brown handprints several times on the already drawn outline of a hedgehog.
You can also divide the craft into 2 activities in kindergarten. At the first lesson, the child makes 3-4 multi-colored handprints on a white sheet of paper. In the second lesson, he cuts out these prints and sticks them on the back of a hedgehog cut out of cardboard.
You can do a collective community craft in kindergarten, where each child makes and then cuts out a handprint and then all the prints are glued around a hedgehog made of colored paper - I form its spines.
You can do without paints. Just trace the child's palms with a pencil on a sheet of colored paper. Then cut out and make a voluminous applique with a convex nose-cone of a paper hedgehog (as in the photo below). A simple group craft for kindergarten.
Hedgehog applications
From colored paper.
Here are some ideas for simple, beautiful hedgehog-themed paper appliques. In kindergarten, you can make such an applique with your own hands if you cut out at least half of the parts in advance. It will be difficult for a child to cut out mushrooms, leaves and a hedgehog in one lesson (20 minutes long). Let him receive some details already ready.
Here is a craft applique based on a disposable paper plate. It's okay that you don't have any plates. You can take a regular sheet of white cardboard, put a plate on it, and trace it. Cut out the rounds. And on one half of the round piece, draw teeth-needles.
The child’s task will be simple – cut out the teeth along the contour. Decorate the circle in two colors - make the jagged half of the circle brown, paint the round half green. Then glue on the muzzle and paws, mushrooms and leaves.
But I found a very beautiful postcard with a hedgehog, made by myself. This is also a good idea for layering appliqué. Here, the hedgehog's spiny back is made from four jagged strips of cardboard. In which you need to bend the teeth and stick them in tiers one after another, starting from the back of the hedgehog. Decorate the craft with leaves and berries.
And here is another hedgehog applique for children. Here the hedgehog's coat is made up of discs folded in half with a jagged edge. The more flaps you use in the application, the more magnificent your hedgehog will be. Using the same principle, you can make a three-dimensional mushroom and cloud. But this is too much for a kindergarten. Therefore, one volumetric element using the blade technique is enough.
VOLUME hedgehog crafts
FROM CARDBOARD.
Corrugated packaging cardboard is a good and cheap material for children's crafts. If you make SLOTS on cardboard parts with SCISSORS, then you can put the parts on one by one. And we will get a voluminous craft.
Here I have drawn where to make cuts on the parts in order to correctly assemble them into a cute cardboard hedgehog. Beautiful children's craft. It is necessary to take into account that corrugated cardboard is thick, so the cuts need to be made wide - like a slit. Then the parts will easily fit on each other.
You can also expand the boundaries of your imagination and create a more complex hedgehog craft from packaging cardboard. Some of the cardboard material needs to be painted black.
And from two sheets of cardboard you can make a three-dimensional lamp craft
in the shape of a hedgehog. Triangular cuts are made on the cardboard silhouettes to form needles. We glue two silhouettes in the area of the nose and in the back of the hedgehog’s back. Let the glue dry and then move the middle of the silhouettes apart - inserting a glass jar with a candle-tablet inside. It is convenient to light the candle at the bottom of the jar with a long spaghetti pasta - it burns perfectly brightly and evenly, like a long match.
Cardboard can be used not only as sheet cardboard, but also as household cardboard.
the one we usually throw away - cardboard
toilet paper rolls
, cardboard
egg cartons.
A hedgehog craft for children - from a toilet paper roll.
If you have colored brown double-sided paper and a toilet paper roll, then you can make a simple and quick hedgehog craft with your children.
On a piece of paper, draw a hedgehog’s prickly fur coat. Use scissors to slightly shorten the toilet paper roll in height so that it is lower. We draw on it the eyes, nose, mouth and paws of the hedgehog. We flatten the upper part of the roll and secure it with a stapler. We coat the back of the roll with glue and glue a prickly coat of colored paper. We bend the top of the fur coat forward - we get overhanging hedgehog bangs.
DIY hedgehog from an egg carton - master class in photographs.
Using scissors, we separate the cells of the box from each other, and cut each cell into petals. These will be hedgehog spines. We leave one cell intact - this will be the face of a hedgehog.
Pour boiling water over the remaining trimmings and the packaging lid. Let it sit and swell. We squeeze it with our hands and form a triangular cone from this loose mass - the basis of the hedgehog’s body. Let this piece dry for a day in the sun. Or dry it in the oven.
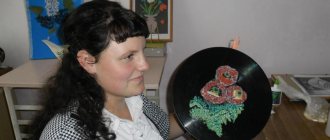
Tatiana Butova
Prickly impatiens
Lives in a dense forest
There are a lot of needles
And not a single thread.
Such a wonderful hedgehog
We made it with the children of the middle group from
autumn leaves
we collected during our walk.
Goal: learn from leaves
create a conceived image, develop children’s creative abilities, and expand their cognitive interest in nature.
For work we will need:
Dry autumn leaves
Landscape sheet
—felt-tip pen
How to make it yourself
The easiest way to create a hedgehog. In order to make it, you need to draw the face, body of the hedgehog and needles on paper. The stencil can be found on the Internet and transferred to colored paper.
Glue the head to the body. We cut out the nose and eyes from black and fasten them in place. Needles are more difficult to cut out, so if your baby can’t do it, help him.
We recommend reading:
Do not glue the needles next to each other, leave a distance between them. There should not be too many of them, 10 pieces are enough. We glue them onto the hedgehog's body. We wait until it dries.
Crafts hedgehog from plasticine
Children love to sculpt and making toys is their favorite pastime. Plasticine is great for this type of creativity. You can make a beautiful hedgehog out of it.
Option 1
To make a plasticine hedgehog you need to take brown and yellow plasticine. From yellow you sculpt the body. To do this, you need to knead the plasticine and make a small ball, then stretch it to the shape of a drop.
We make needles from brown plasticine. They should not be large, but as close to natural as possible. Tear small balls from the piece and pull them out a little.
The hedgehog also needs to have eyes made. You can simply draw them. We attach the needles to the body. The hedgehog is ready, you can start playing.
Option 2
This hedgehog can be made using plasticine and matches. We make the body as in the previous version. We sculpt the eyes, mouth and front paws.
We recommend reading:
We take matches and break them to the desired size. We stick it into the hedgehog's body.
Matches can be replaced with pasta, toothpicks or regular thin twigs.
1st grade craft from autumn leaves
Autumn gives us not only a harvest of vegetables, fruits and berries, but also a large number of dry leaves of a wide variety of colors and shades, which gives us the opportunity to show our imagination and use them for joint creativity with children or to create some kind of decoration for the interior of our home.
In addition, in order to engage in this type of activity, practically no financial investments are required (with the exception of glue and cardboard) - dry leaves lie under your feet, collect as much as you want. And how much joy and positive emotions your child will receive if you entrust him with this important task.
Maple leaves are especially popular for autumn crafts, since the shape of its leaves and beautiful colors allow them to be used in a wide variety of applications. In general, you can make a huge number of crafts from autumn leaves - it all depends on your imagination, but today we will focus on one of them, namely the “hedgehog from maple leaves” applique, or rather, its most interesting variations.
In order to make any crafts from dry leaves, you need to dry them - this can be done in two ways - place the leaves between the pages of a large and heavy book or iron them with a warm iron through newspaper pages. The second option is faster, and the first is simpler. The choice is yours - if you have a few days left, then you can dry the leaves in a book, and if you need the craft by tomorrow, then grab the iron and go ahead and dry the collected leaves.
In order for the application to be a success, and for nothing to distract you from the creative process, you need to carefully prepare your work area. By the way, it will also be useful to accustom the child to such preparation - and adults will not be distracted by trifles, and learn to plan the work process.
In addition to dried leaves for the applique, you will need PVA glue, scissors, thick cardboard, felt-tip pens or pencils (for drawing individual elements), plasticine (for making individual parts) and, of course, oilcloth to protect the working surface from glue, paints and other contaminants, yes and it is more convenient to remove small debris.
The hedgehog applique made from maple leaves can be made in a variety of ways. Let's take a closer look at one of them. For this craft, in addition to maple leaves, we will also need plum and acacia leaves or other leaves of suitable shape.
So, all the necessary materials and tools are prepared, we can begin our work.
Stage 1
We sort the leaves by color, shape and size. By the way, leaves can be collected not only in the fall, when they have turned yellow, but also in the summer - while they are green, this way you will get an even larger palette of colors for your crafts.
We choose the largest leaf - it will be the basis of our application, and we will glue smaller leaves to it. The glue should be applied only in the center of the sheet (a couple of drops is enough), so that in the future you can easily glue the remaining parts of our hedgehog.
Stage 2
We make the hedgehog’s belly from a plum leaf, carefully sliding it under the thorns, and from yellow acacia leaves we make legs, also pushing them under the pasted belly.
Stage 3
Using plasticine, we shape the face of the hedgehog - we sculpt an eye, a nose and a tongue, and stick it to the body of the animal. If you are afraid that the plasticine will fall off, secure it additionally with PVA glue.
To give our picture a complete look, we will sculpt ripe red apples, one of which we will attach to the back of the hedgehog, and the second next to it.
The hedgehog applique is ready, you can place it in a frame and hang it on the wall to constantly admire your creativity.
To make the task easier for the child, you can draw the silhouette of a hedgehog with a pencil, and entrust the “needles” to the baby - let him choose the appropriate leaves and place them as he wants - an additional exercise for the development of creative skills and imagination.
In addition to such a hedgehog, you can make many different prickly animals from the same materials. The photo shows the cutest and most interesting specimens that a child in 1st grade or older can make on their own. A younger child will still need the help of an adult.
Video on the topic
In conclusion, we present to you several videos about what crafts, including hedgehogs, can be made from autumn leaves with children, because nothing develops a child’s imagination better than joint creativity with parents. In addition, kindergartens and schools traditionally hold competitions in the autumn for the best autumn crafts - and what could be more pleasant than being proud of your child who has won such a competition.
sdelala-sama.ru
DIY hedgehog made from pine cones
The cones are very similar to a hedgehog's needle, so you can make a pretty cute hedgehog from this environmentally friendly material.
Option 3
To work you will need:
- Small bump;
- Plasticine. If you don’t have it on hand, you can use polymer clay.
Manufacturing process:
- We sculpt a muzzle from plasticine or clay. Let's make eyes. Let's put everything in its place. We take the cone and attach the muzzle to it;
- You can find a large maple leaf and place the hedgehog on it. Fast and beautiful.
Option 4
You can make a hedgehog from cones in another way. To do this you will need a plastic bottle, medium-sized fir cones, ready-made eyes and mustaches, glue, and a gray nylon sock.
We wrap a bottle with a sharp neck in a sock. We tie it at the base. It is desirable that the knot be small and inconspicuous.
Now you can start forming the needles. To do this, take glue and glue them to the bottle. Don’t place it too close, the fir cones are voluminous and will fill the entire space.
Glue mustache and eyes onto the muzzle. You can decorate the finished hedgehog with plasticine fruits and mushrooms.
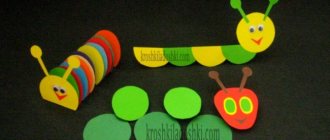
DIY leaf applications for schoolchildren
Hello, my dear readers! Today I will continue to expand the “creativity” section and we will talk about do-it-yourself leaf applique for schoolchildren. Autumn themed leaf appliques can be used for many crafts. Let's plunge into the world of animals and try to make a hedgehog applique from leaves, using the leaves of different types of trees: oak, birch, maple. This will not be difficult to do and such a task is quite suitable as a lesson on leaf applique for 1st grade. Today we will make a cool hedgehog from leaves and learn to see something new in the most ordinary objects. Don’t rush to tell your child what it will happen. Give him the leaves in his hands and ask him to fantasize about what can be made from them. And only then tell him with delight that it will be a hedgehog. My daughter and I ended up with a wonderful hedgehog. She really liked him. It was a great gift for mom. It all took about an hour or a little less and there was just something to keep the child occupied. In general, we do.
Hedgehog from leaves applique
Required material:
- PVA glue; - scissors; - marker; - green leaves of oak, birch, maple or any suitable ones; - four small brown juniper cones or dark acacia leaves; - sea buckthorn berries, raisins or any other suitable size; - sheet of paper.
As you understand, there is quite a lot of freedom of action with materials. The main thing is to catch the idea and implement it using what was at hand. In any case, it will turn out creative and cute, and the result will undoubtedly delight your little genius.
Sequence of work
Using scissors, cut out the body of the hedgehog from the first large sheet. You should get an oblong oval. We cut the lower part of the oval into a triangle. From another sheet we cut out a muzzle in the shape of a triangle. Using a marker, draw an eye and a mouth on the face.
Gently coat the body with glue and glue it onto a sheet of paper. Next, we spread the glue on the muzzle and apply it to the body, holding it to secure it. Instead of legs, we glue cones: two on top and two on the bottom. The stems can also be brown acacia leaves. It depends on how lucky you are with the materials.
For the first row of needles we use five birch leaves. We grease them one by one with glue and, starting from the head to the bottom, glue them so that they lay slightly on top of each other.
For the second row you will need seven leaves. Lubricate them with glue again and stick them on the previous row.
In order for our hedgehog made of leaves to look more like a real one, we need to glue five multi-colored small sea buckthorn berries, raisins, or just plasticine ovals onto its needles, if you are unlucky with the materials.
As a result, we got an excellent DIY leaf applique for schoolchildren. And this work will undoubtedly take its rightful place in the exhibition dedicated to the autumn holiday.
mirhobby.com
Craft hedgehog from seeds
Option 5
Another simple option on how to quickly make a beautiful hedgehog. For this you will need plasticine and seeds.
From plasticine, mold the body of a hedgehog along with the head. You need to make eyes and a nose from black plasticine. Place the seeds with the pointed end up on the body.
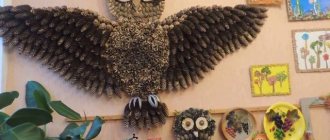
The time of year that gives us a varied selection of natural materials for DIY crafts is autumn. Children love to invent and then create original designs from leaves, stones, and sticks. Crafts made from pine cones are especially impressive. Even the smallest craftsmen can create interesting compositions for an exhibition in a kindergarten or school.
Master classes with step-by-step instructions for making an applique with the image of a hedgehog
This article will present videos in which needlewomen will tell you which leaves can be used to make appliqués with the image of a hedgehog, how to make the appliqués correctly, and will show options for finished works.
Autumn is a good time for creativity. There is nothing easier than making a beautiful applique from natural material “Hedgehog from leaves”. All you need is cardboard, glue, leaves and a good mood.
DIY crafts are a very exciting and interesting activity. It develops children's motor skills, ingenuity and imagination. The child has the opportunity to express himself creatively, and the parents have time to relax. In addition, things made with our own hands are much more valuable and enjoyable for us. Summer is coming to an end, which means that soon it will be possible to make autumn crafts, because a lot of natural materials will appear.
Finding the right things for work can be a real adventure. Golden autumn is an unusually beautiful time of year. Walking in nature - in the forest, in a park or square near your home - will bring a lot of aesthetic pleasure. Warm sun, variety of bright colors (yellow, red, crimson), blue sky. All this contributes to the flight of imagination, and we collect the necessary material without noticing it ourselves. Advice for parents: while collecting, you can tell your children what kind of leaves, needles or cones you are collecting, what trees they come from and what features they have. Then a walk through the forest should become not only pleasant, but also useful and instructive.
Of course, no autumn craft will be complete without beautiful autumn leaves. But before you start working with them, they need to be dried. The leaves may even have some defects - dots or holes from ants, this is normal, such specimens can be dried and then used for crafts. A special press is used for the drying process itself, but the simplest and most common way is to simply carefully place the leaves in books. Of course, these should not be copies that are dear to you or books that you are currently reading - it is better not to touch the leaves often during drying. Also, leaves can damage the pages a little, so if you feel sorry for your library, you can use regular paper, but you will need a lot of it. It will take about 2 weeks to dry the leaves, even if you did not take fresh, but slightly withered leaves.
There are a huge variety of options for what crafts you can make from autumn materials. Original panels, volumetric compositions or stained glass works. We suggest you make your next autumn craft from natural materials - a cute hedgehog made from leaves.
Simple crafts for children 4-5 years old
Children of kindergarten age cannot make crafts for a long time and with concentration, so choose ideas for them that can be implemented quickly and easily.
Bunny
A toy bunny can be made from cones of any size and shape: spruce, cedar. Use an acorn, chestnut or plasticine ball as the head. Make ears from leaves, fabric, and modeling dough.
The technology for making a spruce owlet is simple: you need to take one long, unopened cone and glue on it “Moment” eyes and a nose cut out of colored paper or twigs. If you don’t have glue at home, make eyes and a nose for the owl from plasticine, and wings from dry leaves.
Fish
Cute fish are made using several spruce fruits and colored plasticine for fins and eyes. Make a tail from leaves, New Year's tinsel or paper, as in the picture.
For fish, choose cones with open scales so that the craft is voluminous and looks like it’s alive. To add shine, the surface of the material can be coated with colorless nail polish.
Swans
Beautiful long-necked birds can be made in several colors: black, white, beige. Place the swans on a stand in the form of a lake or clearing, and place reeds made of branches and plasticine nearby.
Peacock
It is not easy for children to make a peacock; they will need adult help. For the craft, prepare fir cones, sharpened twigs for collecting the structure and legs, feathers or colored paper, and acorns for the head. If suitable branches cannot be found, fasten the parts with a glue gun.
On a note! To make the crafts beautiful and neat, the pine cones need to be washed, cleaned of dirt and dried leaves and dried in the oven at a temperature of 150-180 C° for 5-10 minutes.
Preparing the buds
The buds have an amazing aroma. With their help you can create unusual compositions. Cones look attractive in glass vases, baskets, and wreaths. But before you start work, the material should be prepared. Otherwise, the craft will soon lose its attractive appearance.
In addition, the buds release resin, which can ruin things.
Preparing the material for work is as follows:
- We collect cones. In this case, you should pay attention only to intact, beautiful specimens.
- We place the collected material in a sealed bag, tie it tightly, and put it in a dark place for several days.
- After 2-3 days, take the cones out of the bag and pour them into a container with hot water. Be sure to add dishwashing detergent to the water. Leave in the solution for half an hour. At the end of the allotted time, rinse them with water and place them on newspaper.
- As soon as the cones are dry, coat them with varnish.
You can get to work and create original compositions. Such natural material will retain its attractiveness for many years.
Unusual hedgehog
With the help of this master class you can make a hedgehog from pine cones and a plastic bottle. By combining natural and artificial materials in one work, you can get an interesting craft. This kind of work will not go unnoticed. The product can be safely taken to an exhibition of young craftsmen or used to decorate your home.
Materials:
- black wire;
- glue gun;
- brush;
- paints;
- plastic bottle;
- varnish;
- cones;
- scissors.
Execution sequence:
- Take a plastic bottle and cut off the top and bottom.
- Lubricate the edges of the bottle with glue and carefully insert them into each other.
- We paint the entire workpiece with black paint and put it aside until it dries completely.
- We draw the eyes with white paint, and the face of the hedgehog with gray color.
- Using black and blue paint, we finish the eyes and make the pupils.
- Shape the eyebrows with black.
Autumn composition
A hedgehog can be made from cones and a plastic bottle in several ways. The master class will help you understand the main nuances and allow you to create an amazing product. If you want to make an animal figure in a difficult way and get a piece of incredible beauty, you can use additional decorative elements.
Maple leaves, rowan berries, apples will become a real decoration of the composition.
Materials:
- colored cardboard;
- apples;
- scissors;
- cones;
- glue gun;
- brush;
- needles;
- acrylic paints;
- Rowan;
- Maple leaves;
- plastic bottle;
- iron bowl;
- primer;
- cardboard.
Execution sequence:
- Take a plastic bottle and cut off the top part of it. We make cuts on the edge and attach the nose to an iron bowl.
- Let's prepare a primer and apply it to the workpiece. We are waiting for everything to dry. Then apply a second layer of primer.
- Paint the workpiece brown. Once the paint has dried, you can begin decorating the composition.
- Apply glue to the bowl and attach the pine cone. In this way we cover the entire back of the hedgehog.
- Cut out a rectangle from cardboard. We paste it around the edge with maple leaves.
- We attach needles on top. We do this in a chaotic manner.
- We plant the hedgehog on the stand and glue it.
- To prevent the cardboard from being visible, fill the gaps with moss, pine needles, and cones.
- Place a maple leaf, apples, and rowan berries on top of the hedgehog.
- We make eyes from cardboard. We cut out small circles from gray paper, and even smaller circles from black paper.
- Place the circles on top of each other and glue the eyes to the hedgehog.
- We use dried pine needles to decorate the mustache, attaching them to the plastic cover on both sides.
- The hedgehog is ready. You can take your craft to a competition and even get a prize for it. The product will appeal to both children and adults.
The autumn composition will become a real decoration of the room, remind you of the passing time and bring a lot of positive emotions.
Where to begin
Regardless of which appliqué technique you choose, there is a certain procedure that must be followed. First, natural material must be collected. You need to choose whole, undamaged leaves of a wide variety of colors. Then the leaves should be dried. There are two main technologies for drying leaves:
- Place each sheet separately between the pages of an old book;
- Carefully iron each sheet placed between two sheets of paper with a warm iron.
Choose the method you like best. Next, let's prepare our workplace: cover the table with oilcloth, take sheets of paper or cardboard, PVA glue and scissors and felt-tip pens.
It is important to remember that teaching a child to keep the workplace in order is an important element of raising a little person.
If you are creating an application together with a small child, it is better to use fresh leaves and then dry the entire finished composition. In other cases, after preparing (harvesting and drying) the natural material, you can come to the most interesting thing - creating the image of your future application. After choosing the main idea of the painting, you should prepare the necessary leaves and arrange them on the sheet in accordance with your creative idea. First, we need to glue the base of the future figure onto our background - for the hedgehog, the base will be its torso. Other leaves will be attached to it. Do not apply glue to the entire sheet , otherwise after drying the craft will become uneven. After all the dried leaves are glued, the application is placed under a press, for example, in an old thick book for two to three days.
Original craft
You can easily make a hedgehog from pine cones and a plastic bottle at home. The master class will turn the creative process into a fun activity in which the whole family will take part. Children will be happy to get to work and even offer original ideas for designing the composition.
Materials:
- nylon sock;
- eyes;
- plasticine;
- rowan berries;
- mushrooms;
- apples;
- plastic bottle;
- cones;
- Super glue.
Progress:
Using a felt-tip pen, draw the outline of a hedgehog , an eye, and a nose.
Using scissors, we cut off the sticks from the leaves .
Glue the leaves along the outline of the hedgehog .
and glue small leaves at the bottom of the leaf .
The children did the work with great pleasure and were happy with the results.
This is the “thorny touch-me-not” we got, all that remains is to place it in a frame and decorate the interior of our group.
Applique of autumn leaves. Master class Application of autumn leaves is always a fascinating and creative process. And the collective application is especially important. In the senior preschool. Master class “Bouquet of autumn leaves” I bring to your attention a master class on applique from natural materials - autumn leaves. Before you begin to compile and design. Master class “Autumn landscape” (from autumn leaves) Description: the work can be done with children of older preschool age. The material may be useful for teachers of preschool institutions. Master class on application of autumn leaves “Aquarium” Objectives: Teach children to create plot compositions from natural material - dried leaves; develop a sense of color and composition. Educate.Master class on applique from autumn leaves “Outfit for Masha” Today I want to present to your attention a master class from autumn leaves “Outfit for Masha” Early autumn is a beautiful time - the time when.Master class on making applique from autumn leaves leaves Autumn is such a time of year. when you want to be creative. Some people write poetry, some people write music, artists paint pictures. And I collect in the fall. Master class on making autumn leaves The golden time has come! Everything on the street turned golden-purple. The kids and I also decided to decorate our reception room with beautiful leaves. Now. Master class on crafts made from autumn leaves “Merry Caterpillar” Master class on crafts from autumn leaves “Merry Caterpillar” Dear colleagues! I present to your attention a master class on making a new dress for Barbie made from autumn leaves. Master class Autumn is in full swing. Kindergartens hold autumn exhibitions of creative works by children and adults. At the beginning of autumn, crafts from.Crafts from autumn leaves are exhibited. Master class Autumn is the golden time, the time of harvest and the time of crafts made from natural materials. There are a lot of different ideas, so the children and I decided to implement them.