Corrugated cardboard has gained great popularity as a material for crafts relatively recently. But in a short time it fell in love with many craftsmen who use it to work in various techniques. Crafting from corrugated cardboard is not at all difficult, and the result is beautiful three-dimensional figures of animals, birds, people, and plants. Even young children can easily make simple applications and crafts from corrugated cardboard.
Corrugated cardboard is used to make packaging boxes that can be used for crafts. But it is better to buy special sheets of corrugated cardboard in different colors or material already cut into strips.
What crafts are made from corrugated cardboard:
- Christmas decorations;
- Wall panels;
- Applications;
- Caskets;
- Stands for stationery;
- Lamps;
- Airplanes, tanks and other military equipment;
- Houses, castles and other buildings;
- Scenery;
- Toy furniture;
- Photo frames;
- Volumetric figures;
- Gift packaging;
- Greeting Cards.
The list can be continued indefinitely, it all depends on the imagination of the master who wants to bring all his interesting ideas to life. Even a huge spaceship or rocket made from corrugated cardboard will look amazing.
Corrugated cardboard is often used to make crafts using quilling or scrapbooking techniques. Thanks to its multi-layered texture, the patterns are more interesting.
What will you need?
The main material for crafts is corrugated cardboard. It is best to cut it into strips of various (required) widths and lengths if the craft is planned to be voluminous. When you create an applique, first you need to make markings with a simple pencil. Accordingly, you need scissors and a stationery knife.
If the material is not painted, ordinary, then use paints (acrylic, gouache) and brushes. For complex crafts, corrugated cardboard and individual elements from it will need to be joined, so PVA glue or a glue gun is needed. In addition, stock up on ribbons, beads, colored paper, and a needle and thread. The main technique for working with corrugated cardboard is quilling, i.e. twisting strips into a spiral of varying density and then connecting individual elements into a composition, figures, etc.
Decorative panel
Corrugated cardboard is an amazing material for making three-dimensional paintings and panels. Cut out the background - a circle, oval, diamond or fantasy shape. Draw a sketch. For example, it could be a flower arrangement. It is important that every detail has a clear shape. The painting may consist of 2-3 layers. To do this, you need to make the appropriate number of blanks. The first represents the general outline of the composition. The next layer consists of individual fragments that should be closer to the viewer. It can be either continuous or consisting of separate parts. Finally, the third layer consists of small fragments: a design on a vase, a protruding wing of a bird, bows on a New Year’s wreath, etc. Masters of this genre make very sophisticated crafts, even using elements of quilling, that is, twisted parts. Fragments can be pasted over with colored paper, and then a multilayer composition can be made from them. Another option is to cover the craft with primer, and then with paint and varnish. You will get a one-color bas-relief.
You need to roll such cardboard very carefully so that there are no kinks.
It might be useful to read:
- How to make a beautiful hairstyle for medium hair quickly;
- Instructions for braiding double braids;
- Types and technologies of artificial eyelash extensions Volumetric eyelash extension technique;
- Types of hair perm;
- The color graphite is in fashion: who would suit this shade? ;
- Who suits red hair? ;
- Hair dye perfect mousse color palette;
- How to choose hair color for brown eyes: useful tips and recommendations for choosing suitable shades;
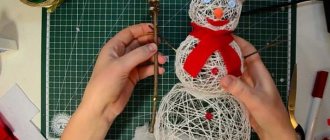
New Year's toys
New Year's fireworks have gone off, the toys have been collected in a box, and in the yard the snow is about to begin to melt. And even though making Christmas tree decorations is not as relevant now as it was a couple of months ago, we still suggest adopting several interesting ideas. Save them, and next year you won’t have to worry about what to take to kindergarten or school. The main advantage of such toys is their lightness, but the disadvantage is that they cannot be used outdoors.
In just 10-15 minutes a Christmas tree can be made from corrugated cardboard, such as the one in the photo above. The amount of starting material depends on what size you will make the toy. Don't make the strip too wide. So, for a length of 50 cm, 3-4 cm will be enough. Carefully roll the strip of cardboard into a roll. Next, fasten it so that it does not unfold, and then stretch it into a cone. Make a smaller barrel from a roll. You can make Christmas tree decorations from leftover cardboard or use beads.
Or, for example, make a wreath like the one in the picture using a combined technique - applique and quilling. The main highlight of it is minimalism and simplicity of form: the fewer small details, the more stylish the result.
How to make a tank from corrugated cardboard
Making a tank from corrugated cardboard is as easy as making one from regular cardboard. However, painting with gouache is a little more difficult - smudges and unsightly white spots are possible. Therefore, we recommend purchasing colored cardboard,
if for the craft you choose the option of making it from corrugated thick paper.
Let's start with a short master class
, as a result of which you will see a stunningly simple, and at the same time beautiful toy for a child.
Buy flats
from corrugated cardboard.
Stripes with a width of 1 or more centimeters are available for sale. Take the smallest width - 1 centimeter. It is better if the cardboards are in contrasting colors: this will make the tank brighter. If there are no ready-made strips, cut
them.
Roll up the large wheels for the track. You need four of
: two on each side.
To make the wheel really big, glue two strips together. Using the same principle, make four small wheels: the length of one strip will be enough for them.
Wrap the wheels
tank with a strip of corrugated cardboard. It would be better if the cardboard was a different color.
For the tank platform, take a sheet of cardboard
and make folds along the edges.
The sheet of cardboard should be twice the length of the tracks. Glue the tracks in the initial part of the platform,
then wrap them with the remaining length and glue the platform at the bottom.
Cut two rectangles along the length of the platform and glue them onto it, arranging the rectangles
over the tracks.
Roll up the tank barrel
from corrugated cardboard.
all the parts
to the top of the platform using glue.
a wonderful toy
awaits you
, which, if used carefully, will serve your child faithfully for a long time, and maybe more than one.
Making toys with your own hands is great. It’s good when the whole family is involved in the creative process: mom, dad, children. Such educational gatherings have a beneficial effect on the child’s psyche and provide the right social guidance. Now that you know how to make a cardboard tank with your own hands, your little one will have a new toy in the car park, and you will have a great time enjoying the company of your family.
Cartoon characters
Corrugated paper and cardboard are very pliable and easy to use, but at the same time textured materials. Working with him will be interesting not only for small children, but also for schoolchildren in the lower grades. To do this, you need to complicate the task. Try, for example, to make cartoon characters.
The picture above shows that the craft, among other things, can be adapted for storing small items, like a box. The system is the same. From one wide strip about 15 cm wide and 10 cm long, roll it up, fasten it, and glue the bottom. Then make the arms and legs in a similar way. To complete the head, roll a strip of cardboard 1-1.5 wide and 20 cm long (focus on the diameter of the cylinder) into a roll and pull it out slightly. Glue the eye beads.
Or you can create a whole composition of figurines, like these charming and very popular minions in the photo.
How to make a photo frame from corrugated cardboard?
Cardboard, which has a high density and strength, can be easily used to make a photo frame with your own hands. You need to decide on the size, then cut out the base, and carefully attach the decor to it.
In this case, the photo frame is made in a marine style. Corrugated blue waves of cardboard are decorated with a palm tree, clouds and a boat. The craft is simple and original. You can easily change the photo in it, make a new frame with a different theme, or create an entire series. In the version for girls, sweets and fruits are used.
Master class “Postcard with a “wicker fence””
Today was the day of another experiment for me. Well, I really wanted to recreate on paper the kind of “wicker fence” that is usually used to decorate country and garden verandas. And this is what I got