5. The stem itself will look alien if it retains a metallic appearance. It can either be painted green or wrapped in green plastic cut into ribbons. The last step is more difficult, but the appearance is more organic.
6. If desired, the bell-shaped design is complemented by leaves, various plexuses of stems, multi-level inflorescences, etc. Just remember that the frame must have a margin of safety, otherwise your bells will fall like flowers in the wind - and without any wind, but due to gravity.
7. Coloring. Since natural bells come in blue and white, the color of the source material should be chosen accordingly. If you want to make plastic flora with your own hands, but bottles don’t suit the color scheme, quick-drying spray paint will give you the desired color almost instantly.
Variety of shapes
The size of bells made from plastic bottles should be selected depending on the location of the flowers. If they will be located over a large area and will occupy a central place on it, then large bottles will be great. Such a large structure will look very attractive.
If the flowers are located in a small area, among plants, then it needs to be made more compact. Such flowers are located along the paths. In this case, bells from small bottles on thin, not too spreading stems will look beautiful.
Plastic flower bushes will not only decorate your garden, but will also bring benefits. Attach cores to the center of each flower, for example, from yellow-painted disposable cups or plastic yellow cases from children's chocolate eggs. Or attach leaves along the entire stem in addition to flowers. Such flowers will make noise. Place these bells near fruit trees. Their benefit is that they will scare away birds, which often spoil the harvest.
A flower bed can be made from old car tires. A small, neat decorative fence around flowers looks great. You can lay out large cobblestones, wild stones, or decorate the flowerbed with plastic bottles painted in bright colors.
DIY sunflowers from plastic bottles
- Cut out large sunflower petals from yellow plastic bottles. You can cut it from a colorless bottle and paint the petals with paint.
- Fasten the flower petals. To do this, make small holes at the base of the petals. And fasten them with wire.
- For the middle, use the bottom of a bottle, which can be painted black. You can use the bottom of a dark brown bottle. The shape of the bottom will imitate ripened seeds.
- Attach the finished sunflower flower to the stem. Make leaves.
- The production of stems and leaves has already been discussed above when talking about bells.
Materials for stems
The stems are made from durable rods or thin plastic pipes. The pipes can be left equal or bent in an arc. To give the pipes a green color, you will need to paint them or wrap them with green insulating tape.
An excellent replacement for pipes would be a rigid garden hose. Watering hoses that match the color are available for sale, as in the photo below. They are ideal for making stems for bells. To make the structure stronger, before digging the hoses into the ground, it is worth placing thin reinforcement or a metal rod inside.
On a note! It does not have to be the same as the stem; half its length will be enough.
Also suitable for the stem is a wooden strip, to which bottle caps are screwed using screws. It is better to make such a structure tall and place it in the garden, among lush bushes.
Another material for creating stems is metal rods or very stiff wire.
Thin strips are cut from a green plastic bottle. Then, heating the plastic over a fire, the strips are twisted in a spiral around the rod.
Bells attached to a spreading branch that has been pre-painted look interesting and original.
For stability, the bells need to be dug deeper into the ground. If the stems are made from reinforcement or rods, then their bases can be welded to a heavy metal platform.
Shapes and colors
To give the flower a natural look, it is better to reduce the size of the bells closer to the tip of the stem. This can be done by reducing the length of the flower itself or using smaller bottles.
You can make the shape of the flowers the way you like. The edges are cut rounded or sharp. Bend it outward and twist it a little, or leave it in its original form. Depending on the shape of the bottle, the bells will have a different appearance.
Bells made from transparent bottles will be inconspicuous and will not show all their beauty. Therefore they need to be painted. It is better to paint flowers from the inside, as then the paint will last longer. This is quite easy to do. You need to pour a small amount of paint into the cut-out workpiece and rotate the workpiece so that the paint covers the entire inner surface. The edges can be painted with a brush or sponge. If the bell is white, then white plastic bottles will do; you won’t have to paint them.
The color of bells in nature can be white and all shades from blue to blue. You can get creative and paint them in unusual colors or make shade transitions. Using your imagination, you can create magnificent and unique bells with your own hands.
Garden decoration
A master class will help you make a bell from a plastic bottle. Let's look at a simple method.
To create flowers you will need clean plastic bottles, scissors, a pen or marker. For the stem, a branch or twigs. Flexible wire and an awl are used to make the attachment of the flower to the stem.
Cut the bottle. Select the length of the workpiece according to the location of the flower on the stem. The larger ones are located closer to the base, and the smaller ones are located closer to the end of the stem.
On the top of the bottle you need to outline the future petals. Their shape can be whatever you like best. Then cut out the petals along the outlined outline.
Next we attach the flowers. Using an awl, we make two holes in the lid and thread the wire through them. At the same stage, the core is attached, if it is intended. Screw on the lid. Now we attach the finished flower to the stem. If you make the stems from pipes or hoses, then it is better to attach the flowers with self-tapping screws.
Bell leaves can be made from green plastic bottles, a piece of old linoleum painted green, or other suitable materials at hand.
DIY bells from plastic bottles
- The blue bell head is made from a plastic bottle of the corresponding color.
- To do this, use the top of a bottle with a cork. Cut out the bell petals from this part. And with the help of scissors we bend them outward to create the appearance of a blossoming bud.
- To attach the “flower” to the cork, we make holes. A wire is pushed through it.
- Using wire, the bell flower is attached to the base. This could be an ordinary stick, painted green or anything else that imitates the stem of a flower. Attach green leaves to the stem, cut from a green bottle or made from paper, for example.
- The bell is ready. For more grace and resemblance to a real flower, take small plastic bottles for buds. Colorless - can be easily painted.
- And yet, it is best to place not one “bell flower” on the stem, but several.
How to make New Year's beauty bells?
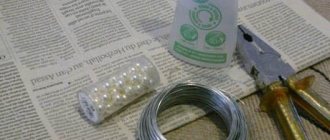
For the base of the miracle bells, the top parts of small bottles were taken, onto which the decor was attached - a mosaic made of salt dough. If there is no dough, you can use multi-colored beads.
The first step is to prepare the decor, that is, knead the dough exactly according to the simplest recipe - take one part water, one part flour and one point fine salt, after which it is all thoroughly mixed. You may need less water, the main thing is that the dough is plastic and dense enough.
The dough mosaic itself is quite simple to make - small balls are rolled out of the dough and flattened a little, and after a while they are placed on a radiator to dry. Considering that the size of the balls is very tiny, they will dry very quickly.
After about 3-4 hours you can start painting the mosaic. To please anyone, you can use gouache, acrylic paints, or mix both to obtain a reliable and inexpensive option. In addition, this will make the mosaic bright.
There you need to cut off the top parts of the bottles along with the necks, and then, after heating the knitting needles, use them to pierce the bottles right through near the neck itself. The resulting holes will be useful later in avoiding having to stretch wire, fishing line or strong threads through them, through which you can attach beautiful ribbons to crafts and hang them on the Christmas tree.
To ensure that bare plastic does not show between the mosaic elements, it is easier to paint the cut-off parts of the bottles.
Now you can start gluing the colored mosaic. It’s better to first draw a pattern on the plastic with a pencil and don’t choose complex patterns; it’s better to stick to simple patterns such as zigzags, lines and others.
The neck needs to be tightly wrapped with a beautiful narrow ribbon, from which you can make elegant loops.
With the help of these loops, Christmas tree decorations can hang on the tree.
In addition to bells, festive New Year's balls can also be made using this principle.
Every family always has a huge number of plastic bottles for juices, yoghurts or milk. Some people simply throw them away, while others collect them in the hope that someday they will be useful. If you belong to the second option of people, then this article is for you. We suggest you not to store empty containers, but to make simple bell crafts from plastic bottles that you can use to decorate your yard and area.
How to make bells from a bottle?
Of course, there can be many ways, but we will focus on the two simplest options.
Option #1
Materials:
- blue, green and white plastic bottles, although if not, you can deviate from generally accepted standards, why not make, for example, a red bell?;
- metal rods;
- wire;
- latex paint - useful if you don’t have bottles of matching colors, but have a great desire to do everything to make the crafts look exactly like bells.
Let's get started:
Option No. 2
This craft differs from the previous one only in the basis. In this case, we will look at how you can attach the bells differently.
Materials:
- pieces of old pipes;
- wire or wires;
- liter green plastic bottles;
- self-tapping screws according to the number of planned bells;
- blue and white bottles of different sizes; if there is no suitable color, then paint.
Let's get started:
- We are preparing the pipes; the optimal length for them is a little more than a meter. The tops of the pipes need to be bent a little, let the men help you with this.
- Just like in the previous version, we prepare the bells.
- We make small holes in the lids, equal in diameter to the screws.
- We drill small holes in the pipes for flowers, think about the distance yourself. If necessary, paint them with green paint.
- We drive the pipes into the ground and tie them together with wire so that they stand more firmly; you can place something heavy between them.
- We screw the bells into the drilled holes with self-tapping screws.
- We make leaves from liter green bottles and attach them to the bottom. That's it, the yard bush of bells made from plastic bottles is ready.
Using our tips, and, of course, your imagination, you can make many beautiful bell flowers, and not only them, from plastic bottles. To give you something to start with, we have prepared some interesting photographs that you can use when decorating your site. You can also try other ideas for decorations.
New Year is the most joyful and magical holiday. Preparing for it brings a lot of pleasant troubles. To create a fabulous atmosphere in your home and give yourself a festive mood, you can start making New Year's crafts. Making them with your own hands is simple and interesting. Involve your children in this entertaining hobby so that they don’t get bored and also prepare for the main winter celebration. Try making your own New Year's bells together
Video: how to make bells from plastic bottles with your own hands
With the right level of imagination and craftsmanship, used plastic can become a decorative model of a bell. Such a product is equipped with a tongue and appliqué, decorated with ribbons and painted. A well-made plastic bell will do honor to the New Year tree; it will look original as a souvenir on your desktop or bookshelf. The main thing is that at first glance, the material from which it is made and how it was made are not clear.
It's not just about careful work and surface treatment. But also in the selection of patterns and boldness of color solutions. Try to create - in the case of bells made from plastic bottles, this process is not burdensome and allows you to realize your personal creativity in a minimum of time. And remaking a failed masterpiece is as easy as shelling pears – just reach out to the next bottle and smile in a good mood.
Statues, fountains and mesmerizing waterfalls in the landscape design of the site are the lot of the elite. What should the majority of ordinary summer residents do, how to decorate their plot? Plastic bottles have been and remain a popular option for decorating an area without major financial investments.
Every household has an abundance of this material, so there is room for imagination. All kinds of flowers are of interest to most craftsmen. Bells from plastic bottles form very quickly. We will tell you in detail how to do this correctly.
Beautiful symbol of the New Year
The custom of decorating a home with bells came to us from Europe. There was a superstition that their ringing could scare away
evil spirits.
To prevent dark forces from interfering with New Year's celebrations, bells were hung on the Christmas tree along with other toys. This tradition has taken root well all over the world. And today even people who are far from superstitions decorate their houses with bells for the New Year and Christmas. Because this is a very beautiful
holiday souvenir.
In those distant times, people made huge bells from bronze. They were used not only as a talisman
, but also as a signaling tool.
The bell notified the population about various events or called for a meeting. Nowadays this signal is used in educational institutions. Every September 1st the first bell rings, and before the summer holidays we hear the last school bell. So you can safely consider the bell as a symbol
of the beginning of another year.
What can you make a bell from?
New Year's crafts can be made from various available materials. For example, from paper or cardboard, from a plastic bottle or disposable cup, from fabric or rope. The bell shape can be knitted, woven from beads or using the papier-mâché method. Excellent crafts are made from spruce and pine cones,
twig pots, foam, egg trays and shells.
In a word, a souvenir can be made from any available materials
materials similar in shape to a bell. Therefore, look for items in your home that have not yet found use. Thanks to simple master classes, they will turn into bright, original Christmas tree decorations.
First, let's figure out what any bell should consist of:
- dome;
- tongue;
- suspension.
Since we have a New Year's souvenir, we will need all kinds of themed
decorations.
For additional decor you need to take: pine branches, tinsel, sparkles, rhinestones, beads, sequins, lace, ribbons and bows. You can use a special figured hole punch
with the shape of a snowflake or star.
Flowers from plastic bottles: how to make? Step-by-step master classes with photos
Flowers from plastic bottles
- this is not only a way to give a second life to already unnecessary things, but also an opportunity to show your creative thinking and decorate your home or summer cottage. It’s also a gift idea, a way to relieve stress, because it’s no secret that the passion for manual labor calms the nerves. You can involve children in the process; they will not only be happy to help you, but perhaps they will come up with something new. Summer crafts, moreover, will be able to take part in competitions and exhibitions at school or kindergarten, and you won’t have to rack your brains urgently. Therefore, do not throw away old bottles, give them another chance to be useful, and not add to the mountains of difficult-to-decompose garbage in landfills.
Bells made of paper and cardboard
The simplest crafts are made from paper or cardboard. You can take white landscape sheets and then color them
souvenir. It is more convenient to use colored paper and cardboard. The following tools are useful for working with them:
- pencil;
- compass;
- scissors;
- PVA glue;
- needle and thick thread.
Yellow paper bell
Let's make a three-dimensional Christmas tree toy out of paper step by step. For this you need colored paper (yellow, green, red), woolen thread and large beads.
Instructions:
- Using a compass, draw a circle with a diameter of about 8 cm on yellow paper and cut it out.
- Draw 2-3 small leaves on green paper. We cut them along the contour.
- We make small circles from red paper. These will be rowan berries.
- We take a piece of thread about 15 cm. We string 2-3 beads on it on both sides, and then tie knots at the ends. This will create the tongue of the bell.
- We place the thread on the yellow circle so that the loop looks out from above. Lightly fold the paper and glue the base. Glue leaves and berries on top.
Now the cute bell is ready. They can decorate a Christmas tree or hang on the wall.
Christmas bell made of cardboard
A cardboard craft will become an original decoration for every Christmas tree. Prepare a cardboard sheet, scissors, needle, yarn and decorations.
A step-by-step diagram will tell you how to make a bell from cardboard:
- Prepare the cone shape. To do this, cut a circle out of cardboard and cut it in half. Fold the semicircle and glue the cut sides together. Wait for the glue to dry.
- Lubricate the finished cone with a layer of glue and wrap its entire surface with thread. Choose the color of the yarn at your design discretion.
- Let's take two large beads. We will hang one on a thread and leave it as a tongue. Now you need to thread the thread through the top of the cone and string the second bead, and then make a knot and loop. This way the structure will be securely fastened.
- Add decor to the Christmas tree decoration: sequins, lace or other decorations.
New Year's crafts from plastic cups and bottles
Plastic cups are an excellent inexpensive consumable for all kinds of crafts. You can also use unnecessary plastic soda or milk bottles. Small glasses make wonderful Christmas tree bells. The shape of the bottle is larger, so it is better to use it to make a decorative decoration for the interior or a toy for a very large Christmas tree.
Holiday bell from a bottle
What materials are needed:
- plastic bottle;
- festive paper napkin;
- tinsel;
- bow.
Let's start the master class:
- Cut off the top of the bottle.
- Apply glue to the outside and wrap with a napkin. Tie the top of the neck with thread. Fold the bottom edges inward.
- Glue a bow to the dome. We attach tinsel along the bottom edge using a stapler.
A bright New Year's bell is ready to decorate your home. It can also be made functional. Take a small real bell and use universal glue to attach it inside the craft. Now the New Year's souvenir will be able to make a beautiful ringing sound.
The cut half of a plastic bottle is decorated in different ways. You can leave it transparent and cover it with miniature stickers, wrap the bottom and lid with tinsel. If you make a hole in the lid with an awl, you will be able to hang the bead on a ribbon and also make a loop.
The surface of the bottle can be coated with paint, and then lacy lace can be glued on. We decorate the lid with sequins and add a pendant made of a thin ribbon.
Gold and silver bells from glasses
Try making Christmas decorations from cups.
Collect the following set of items:
- two disposable glasses;
- artificial spruce branch;
- spray can with golden paint;
- glue;
- wide ribbon;
- white lace;
- beads.
Let's start doing the craft:
- We paint the glasses with paint. Apply some gold spray to the branches.
- The cups will dry for now. Therefore, you can cut beautiful elements from lace. For example, flowers. Glue beads into their centers. After the paint has dried, glue the flowers onto the dome.
- The edges of the cups can be wrapped with fleecy yarn.
- We make a lush bow from a ribbon, tying it in the middle with a thread.
- We fasten the bells, bow and spruce branch together.
Instead of ordinary plastic cups, you can use yogurt containers. Now let's make a silver bell to decorate the Christmas tree. You will need: a glass, foil, tinsel, lace, scissors, an awl and a hook.
- At the end of the lace we tie a piece of colored tinsel to make the tongue of the craft.
- Wrap the glass tightly with foil.
- Use an awl to make a hole in the bottom of the glass. Let's pull the lace through it; a hook will be useful for this. Let's make a loop and a knot.
- Wrap fluffy silver tinsel around the loop.
Not only Christmas decorations are made from cups. You can even make a whole New Year's tree from this simple material. You can make a Christmas tree out of cups if you fasten them together with a stapler. To do this you will need many identical green glasses. The finished design is decorated with beads, seed beads and rhinestones.
Flowers from plastic bottles: photo
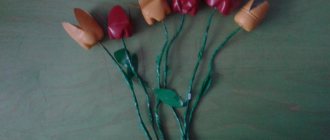
Similarly, you can make flowers from plastic bottles for the garden
in the form of a bouquet of lilies of the valley or bells, just slightly modifying the shape of the teeth in the lower part of the corolla, to decorate a garden, cottage or playground in a kindergarten. It will probably be easier to do this without cutting off the neck, then the cork can also be used to attach to the wire. Each flower has its own stem, and then they are twisted into a rope - a common stem. Lilies can be made in an absolutely similar way, only in this case the corolla is not solid with teeth, but is cut almost to the base into six pointed petals, which are bent outward. In this case, it is better to make the stamens from flexible wire and beads. Don't forget the sepals. The most suitable material for them is green containers, and the manufacturing principle is the same as for the corolla of a flower, only the edges of the petals need to be made jagged. The sepals will give the flowers greater plausibility and completeness.
Flowers from plastic bottles: step by step for beginners
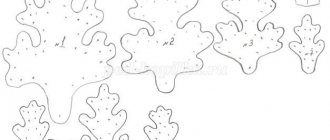
We don’t throw away the remaining bottom of the bottle. It will also make excellent flowers from plastic bottles, photo
which you see below.. You just need to shape the edges of the petals with scissors and paint the craft with bright acrylic paint. If you have bottles of different sizes, you can make the whisk two-row: just insert the smaller bottom into the larger one, and then even an old telegraph pole can bloom miraculously. We attach the flowers to the surface using a drill and self-tapping screws. You can decorate a wooden fence or barn wall in the same way. How to make a core: just a circle of the same plastic, but of a different color, will do, or you can use cork, also painting it if necessary. By the way, if after making your crafts there are still unused corks, collect them, they will be useful to you when making crafts from caps. Also, using fishing line, nylon thread or wire from flower bottoms, you can assemble a very romantic curtain.
Above I told you how to make the simplest flowers from plastic bottles step by step for beginners
. Now let's complicate the task a little. Let's learn how to make a beautiful whisk using a candle flame. Stock up on bottles of different sizes, for example, one and a half liter and half liter. We will need bottoms. But don't throw away the remaining parts, you will need them for other colors. In addition to plastic containers, we will use a contour that can be matched to colored plastic or simply silver or gold. In addition, you will need scissors, a glue gun, a candle, beads or seed beads. We cut the bottoms along the edges of the finished bulges towards the center, a little short of reaching it. We unfold the resulting petals more flatly and use scissors to give them the desired shape: rounded or pointed as you wish. After this, we warm the edge of the petals over the candle, allowing it to bend beautifully. We will process both bottoms, then glue the smaller one inside the larger one, and use glue to decorate the middle of the flower with beads or seed beads. If desired, the edge of the petals can be further contoured. These flowers may come in handy when making crafts on the theme of ecology.
DIY flowers from plastic bottles
And now we will learn how to make terry flowers from plastic bottles step by step
. Once you learn how to make a multi-row corolla and understand the principle, many more complex varieties of flowers will become available to you. There is nothing complicated here. First, we make several gradually decreasing petal stencils. For example, for a rose, let it be stencils with four petals. To make them, it is convenient to take paper squares with gradually decreasing sides. To make the rose densely terry, you will have to take six or seven gradually decreasing squares. Fold each square in half, then in half again, and then the resulting small square diagonally and cut out half of the petal, slightly short of the center. When we unfold it, we get a symmetrical four-petal corolla. The principle is the same as when cutting out snowflakes from paper. We do this with all the squares.
Souvenirs made from eggshells and trays
To prevent egg shells and trays from going to waste, make colorful New Year's toys out of them. Shortly before the New Year, start collecting the necessary materials at hand. Try to break raw eggs not in the middle, but from the edge. We should have complete molds for the bells.
For the craft, take eggshells, gauze (bandage), thick thread, PVA, paints and a brush. For decoration, you can add semolina, beads or putty.
There are two ways to make a Christmas tree toy from a shell.
Manufacturing method No. 1:
- Cut the gauze fabric into pieces. We glue them on the outside of the shell. This procedure is needed to strengthen the fragile material.
- After the glue has dried, cut out sharp petals on the shell. Cover the surface with white paint.
- Use an awl to poke a hole for the lace.
- We glue a mosaic of husks onto the shell and paint it.
Manufacturing method No. 2:
- We glue the shell with gauze from the inside. To quickly dry the glue, you can place the workpiece on the battery.
- Paint the outside with white.
- Use scissors to cut the shell evenly.
- Let's do the decor. Apply putty to the shell to create relief patterns, then paint the dried surface. You can smear the craft with glue and sprinkle it with beads or semolina. Use your imagination to create a bright design for the toy.
- Make a hole at the top and insert a loop.
For a MK with a cardboard tray for eggs, you need to take colored paper, glue, scissors, and string.
- Cut out cells from a cardboard tray.
- We cover the cells with paper of different colors.
- We pierce the top to attach the lace. You can also hang a large bead on it.
If you start collecting colorful candy wrappers from foil in advance, you can replace colored paper with them. You will get very beautiful shiny bells.
Bells made from other unusual materials
Make your Christmas tree truly festive and different from others. The green beauty, dressed up with her own crafts, will look cool and original. Let's try to make a few more New Year's toys from different materials.
From flower pots
Let's take clean flower pots and start decorating them:
- At the bottom we immediately drill a hole for hanging the future toy.
- Now we decorate the surface. You can simply wrap it in foil and glue on tinsel.
- Another decorative option is using pine cones. Using pliers, carefully separate the “leaves” of the pine cone. Then we cover the pot with them. It is better to use a hot glue gun. Additionally, we will decorate the craft with artificial spruce, beads and sparkles.
From twine
A DIY bell craft can be successfully made from linen thread. We take twine, a plastic bottle, a bag, PVA, tape, a glue gun, scissors and decor (beads, ribbons).
- The bottle will act as a mold. Therefore, you need to wrap the transition from the cap to the bottle with tape. This way we will level it so that we can easily remove the craft from the mold.
- We put the bag on the bottle and secure it by tying it at the bottom.
- Lubricate the surface of the bag with glue and wind a linen thread onto the bottle. This way we reach the middle of the bottle. Waiting for it to dry.
- Remove the blank from the bottle and remove the bag.
- We decorate as you wish.
We make a plastic composition with our own hands: decorative bells
In order to make an unusual and interesting flower arrangement from plastic bells, it is enough to perform several simple sequential manipulations:
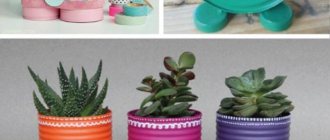
- Empty, clean, white and blue plastic bottles should be carefully cut in half. The basis of the flowers will be the cone-shaped narrow part of the bottles with lids.
- On the part used in the work, use a colored marker to mark the markings according to which you will cut out the petals. All petals must be bent outward using scissors, which will give the flowers a more natural and attractive appearance.
- For attachment to stems, a pair of holes are made in the cork for a wire connection.
- Using strong wire, all manufactured plastic flowers must be secured to stems, which are used as metal rods.
- Cut out the petals and bend them using sharp scissors
- To imitate the center of your bell flower, you can use any simple materials you have on hand, including sawed foam circles, which you can then paint with latex yellow paint.
- Metal stems should be wrapped in spiral tape, which must be cut from a green plastic bottle.
- At the final stage, cut out several leaves from green plastic that will alternate with a green spiral on the stems
Even children can be trusted to make basic flower arrangements from plastic material, but the use of dangerous tools is only possible under the supervision and assistance of adults.