Master class with step-by-step photos: “Bees in the hive”
Author: Smolnikova Natalya Nikolaevna, teacher at MBDOU “Kindergarten No. 118” Cherepovets, Vologda region
Description of the work
: The master class is intended for children of senior preschool age with the help of adults; teachers; creative people.
Purpose:
The craft is intended to decorate the kindergarten area
Target:
Creating a bee to decorate a kindergarten area
Tasks:
Develop creative imagination, fine motor skills; cultivate perseverance when making crafts.
Material:
ruler, pencil Glue gun Scissors, awl “doll eyes” Capsules from Kinder surprises Golden outline Self-adhesive black paper Bugle beads
1. On a beautiful sunny day, a buzzing sound is heard in the meadow. Who is this? And these are the hard working bees who collect nectar all day long. And I came up with the idea to decorate the kindergarten area by making bees and planting them in a hive house.
In summer, bees spend the whole day collecting nectar. They'll take it back later. The hive has its own wonderful home.
A bee is buzzing over a flower and is in a hurry to collect nectar. All the nectar that the bee collects turns into honey.
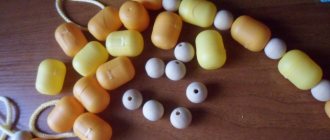
2. To make a bee, you need to take capsules from Kinder surprises, first piercing them with an awl (for wire) either from below or from above. It depends on how you will attach the bee. 3. Then we draw out the “self-adhesive” into thin strips of about 0.5 cm, then cut them.
After that we stick it on the body. If you are making a bee with small children, you can replace the “self-adhesive” with plasticine. In this case, roll out the plasticine into thin flagella and “smear” it on the body. 4. Then we prepare glass beads for the nose and antennae, “eyes” - and glue it all on using a hot glue gun. Or we sculpt from plasticine. 5. Next, we prepare the wings, for this we take thin plastic, or a thick transparent cover from a file folder, or from gift wrapping. We cut out the wings in a shape resembling “droplets”. Then, using a contour, we draw the membranes on the wings. When the outline is dry (it’s better to let it sit for a day), you can glue the wings to the bee. You can glue it in different places, depending on whether your bee is sitting or flying. Insert wire. 6. You can make a whole “family” of bees this way and populate them in the hive.
“Kinder Surprise” is a chocolate egg with a surprise, containing inside a plastic container with a small toy or souvenir. He has been known all over the world since 1972. Kinder Surprise is loved by all children and many adults. The most popular gift for a child, bringing joy and a little surprise. High-quality chocolate in small quantities and collectible toys will not leave anyone with children indifferent. Not all parents can resist children's tears, near shelves with chocolate eggs, with pleas for the purchase of another gift. Thus, a huge number of toys accumulate in the house. And plastic containers, of course, are thrown away. And in vain.
You don't have to throw away plastic containers; they can be useful for a variety of purposes. Including creating your own unique souvenirs and things that can please the eye.
As one of the options for using plastic containers, we suggest that you familiarize yourself with the training video. It shows how to make cool bees from seemingly completely unnecessary plastic containers from Kinder Surprise. These bees, for example, can be used to decorate a child’s room by hanging them from a chandelier or ceiling. It turns out original, creative and fun. And most importantly, a minimum of financial investments and a maximum of good mood. Involve children in the manufacturing process. The time spent doing this activity will not be in vain.
The process of making bees
First, you need to use an awl to make holes in the container on one side and the other. We pass toothpicks through these holes. A small part of the toothpick should stick out on one side, and a large part on the other. This creates a preparation for the future bee. Cut out several strips from self-adhesive black paper. Glue the cut strips in a circle to the workpiece. Cut out wings from white paper. Then, using a glue gun, glue the wings to the bee. Make a mouth out of the remaining black paper. Use acrylic paints to add additional elements: eyes and teeth. Secure the bee with a thin elastic band or thread. The bee is ready to fly!
In this simple way you can make not just one bee, but a whole swarm. Or instead of bees, you can make beautiful butterflies in the same way. Replacing white and black paper with colored ones.
Strive to create beautiful things out of nothing with your own hands for yourself and your children. Delight others with your creativity. And the whole world around you will be filled with bright colors.
Elena Vladimova
Master class “Funny bees” for children of senior preschool age
Vladimova Elena Stanislavovna
Description of work:
The master class is designed for children of senior preschool age together with a teacher, as well as for parents and creative people.
Purpose:
From capsules from Kinder surprises you can make original crafts, for example, beautiful bees. They will help decorate the natural corner in the group and the kindergarten area.
Target:
Make a funny bee together with your child
Tasks:
arouse interest in this type of activity, develop fine motor skills, creative imagination, cultivate perseverance, and develop aesthetic taste.
Material:
plastic milk bottle, red and black electrical tape, scissors, kinder capsules, plasticine, matches.
Preliminary work:
The teacher makes holes in the capsule for wings and horns, and makes a beehive.
1. Introduction to the material
2. Using black electrical tape scissors, cut thin strips
3. Take the capsule and cover it with black stripes
4. Cut out eyes and a nose from black electrical tape, and a mouth from red tape, then glue it to the capsule.
5. Cut out wings for the bee from a plastic bottle
6. Insert the cut wings into the holes
7. Decorate the wings using strips of black electrical tape
8. Take matches and insert them into the holes one at a time
9. Take black plasticine, make balls, then attach them to the tip of a match
10. Our work is ready.
Thank you for your attention!
Publications on the topic:
This development will be of interest to teachers of senior and preparatory groups; giraffes can be used as decoration for the reception area.
Master class “How we prepared for Easter” with children of middle preschool age. In the life of Orthodox citizens there is a significant day - Pure.
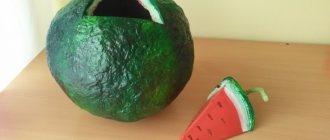
You will need: 1. Large box. 2. Small box 3. Scissors 4. Scotch tape 5. Green self-adhesive paper. 6. Stationery knife. 7. Glue.
The Standard states that one of the basic principles of preschool education is “the formation of cognitive interests and cognitive actions.
Everyone loves surprises, so most kids are simply crazy about chocolate eggs, inside of which there is a mini-container with a bright toy. Many craftsmen even know how to make a Kinder Surprise surprise. If you are also interested in this topic, then below are several ways to make crafts from the chocolate eggs themselves and their containers, as well as a recipe for a delicious and beautiful cake with the same name.
Master class “Hive for bees”
Tatiana Morgunova
Master class “Hive for bees”
Good afternoon Master class “evidence for bees ”
I really want to show how you can do amazing work with your children. Here you can show your imagination, teamwork, and accuracy. Based on this example, you can do a lot of different things. Show off your creativity. Good luck!
To work you will need:
Inflate the balloon to the desired size and begin gluing the balloon with threads,
dipping in PVA glue. We make a mark on the ball with a pen where the entrance to the evidence will be. When the thread has been wound to the mark, we cut off the mark on each turn so that there is emptiness there.
When all the work is ready and the threads are completely dry, burst the ball and remove the remains.
Beautifully wrap thread around the entrance of the evidence.
Let's start decorating the evidence. Glue bees , butterfly, flowers. (I glued it with hot glue)
Well, our evidence is ready!
Master class: accordion paper panel “Butterflies” Panel “Butterflies”.
For work you will need: a set of colored paper, scissors, glue, pencil. Cut out many strips of width from colored paper. “Chick, chick, chick, my chickens.” Master class Let me introduce you to a fun Easter craft for children. With a little help from adults, even little ones can handle this kind of work.. Master class “Lilies of the Valley” Master class “Lilies of the Valley” Objectives: - teach children to compose an image from details; - cultivate the desire to make a beautiful thing; - develop. Master class “Clocks made of cardboard” Master class “Clocks”. You can make this clock with children in the preparatory group and use it to learn time. 1. Cut out the base for the template. Master class for teachers “I am a master of arts and crafts myself” “If you can teach a child in childhood to feel beauty, to be amazed at the marvelous creations of human hands, the beauty of nature, then grow up.
Master class: craft from threads “Dandelions” Using the method of tying threads into a bundle, tassels, bows, berries, and figures of men are made. Flowers are made using the same method. I made it. Master class on making attributes for role-playing games “Cakes” ] Children love to treat each other to all sorts of goodies, and this is especially great during the game. The kids and I made some cute cakes. Master class “Portraits of Dads” To make the head we will need salt dough. I use the following recipe: 2 cups flour, 1 cup salt, half a glass of water.
Craft “Bird”
There can be many answers to the question of how to make a Kinder Surprise surprise. For example, if you have a few white feathers, watercolor paints, craft eyes, or two black beads on hand, you can make a funny chicken in a few minutes. You will also need a piece of red velvet paper or cardboard from which to cut out the beak. Using watercolor paints, feathers or bird fluff should be painted yellow and glued to the container as wings. Then you need to add the eyes and beak. That's it, the chicken is ready. It can be given as a gift, used for decoration, or hung on the wall in your baby's room or above his crib.
Craft “Giraffe”
You can make an elegant giraffe from Kinder Surprise containers and ordinary cocktail straws. To do this, use a permanent marker to draw a pattern on the container, characteristic of the skin of a giraffe. Cut 5 pieces 8-9 cm long from the cocktail tubes. Make holes in the container and insert the “legs” and “neck”. A muzzle is made from the tip, which is found on the hood laces. Attach it to the “neck”. Using glue, beads are attached to the face instead of eyes and ears. Thick yellow threads are braided into a pigtail using a piece of wire. When finished, insert this “tail” into the hole on the giraffe’s “croup”.
"Minion"
In recent years, cartoons have been created in Hollywood about all sorts of monsters and fantastic creatures, many of which are very popular with children. For example, many children will probably be delighted if you tell them how to make a Kinder Surprise surprise in the form of minions. It's quite simple! You will need a container hidden in the eyes, a permanent black marker, and a blue onesie on the egg, like the minions. Glue on the eyes and draw glasses and a mouth with a marker. That's it - the toy is ready!
How to make a Kinder Surprise cake
Almost all children, as well as most adults, love it. If your kids love chocolate eggs with a toy inside, then you can please them with a colorful cake.
Before making a big “Kinder surprise”, you must first bake 5-6 round cakes with sour cream, as usual. Then prepare the cream from 1 cup of cream, 250 g of cottage cheese, 3-4 tbsp. l. powdered sugar, 1 tbsp. l. maple syrup. To do this, beat the cream with powdered sugar until the mass thickens, grind the cottage cheese through a sieve, add the curd mass and add it to the cream.
Circles of different diameters are cut out from pre-baked cakes. After coating with cream, the “parts” are laid out on top of each other, and the top layers are formed from some of the scraps, rolled in the shape of a spiral (the result should be a structure resembling a pyramid on a tapering base). The remaining pieces of cake are ground, mixed with cream and this “cement” is smeared on top of the cake, giving the shape of an egg.
Mastic is prepared from powdered sugar with the addition of gelatin, water and lemon juice, as well as a small amount of butter (to prevent rapid drying), rolled out and pulled onto the “egg”, cutting off the excess at the base. Letters are cut out from the same material in the desired colors, as well as decor for the base. If desired, add a mastic “label” with the name of the child for whom the cake was prepared.
How to make a bee from Kinder Surprise
The plastic case for the toy, which is located inside the chocolate eggs, can become the basis for various crafts. For example, it makes funny bees that can be hung over a newborn’s crib instead of mobiles. The simplest option will require a minimum of effort, and to make it you will only need fishing line, several containers, black adhesive tape approximately 0.5 cm wide (it can be replaced with electrical tape of the desired color, cut into strips), glue, beads for eyes, tracing paper, black felt-tip pen and wire for antennae.
A laughing face is drawn on the case and eyes are glued on. Wrap containers with duct tape to create striped bees. Wings are cut out from tracing paper, decorated with a felt-tip pen and secured to the cases. Antennae are made from wire. Using a needle heated over a fire, I pierce the containers and insert the antennae, tying the ends of the antennae from the inside into knots. Make a hole for the fishing line and hang the bee. If you want the craft to be more expressive, you can make the insect’s legs from a thin black ribbon. To do this, the container is pierced in the right places, pieces of tape 5 cm long are threaded through them and tied into tight knots at both ends.
DIY crafts from plastic bottles: bee
The authors of this charming bee - a children's craft made from plastic bottles and a description of its production - are Ekaterina Naumova and her son. The “Bee” craft was made in kindergarten.
If instead of a permanent marker you use black paint for exterior work, such a bee will not be afraid of rain, and it will be able to decorate the yard, garden or cottage.
A bee that is planned to be stored indoors can be painted with acrylic paints. If there are no acrylic paints, they can be replaced with gouache with PVA glue or Fairy dishwashing liquid added to it.
Bouquet
In recent years, sweet gifts with unusual designs have become very popular. For example, you can make a bouquet of “Kinder surprises”. Those who have already done this will cope with this task without any problems. And even if you don’t have such experience, learning how to collect such bouquets is not at all difficult. To do this you will need corrugated paper, glue, wooden skewers, green adhesive tape, wrapping paper, ribbons and some element for decoration, such as a butterfly.
To make one flower, you need to cut out 5 petals from corrugated paper, slightly larger than the length of the Kinder Surprise. Each of them needs to be bent and put on the egg, twisted at the base and secured on a skewer. Then the “stem” needs to be wrapped with adhesive tape, collected flowers into a bouquet, wrapped in floral paper, tied with ribbon and decorated with a butterfly.
Sweet gift with toys
If you are interested in how to make a Kinder Surprise surprise in the form of a bouquet, then we can also recommend the option of containing the contents of containers. To make it, the “egg” needs to be wrapped in transparent floral film and secured on a skewer. You should do the same with 5 miniature stuffed toys. Then you should collect all the “flowers” into a bouquet, with a “Kinder Surprise” in the center and surround it with large leaves cut from corrugated paper. At the end, you can decorate the bouquet with a ribbon tied in a bow at the base.
Now you know how to make “Kinder Surprise” the basis for an original craft and will be able to please your family with an extraordinary gift.
Doing handicrafts from scrap materials is a very simple and enjoyable activity. You can easily find materials and equipment for making such an element as bees. In our article you can find a description of the most interesting options for decorating this decorative element with your own hands.
LiveInternetLiveInternet
-Music
—Categories
- . WHIT MONDAY. (0)
- FAITH. TEMPLES ICONS. (456)
- . CULTURE. RELIGION. (27)
- . PRAYER. (195)
- . PSALMS.. (100)
- . EVIDENCE. (7)
- . DREAMS OF THE HOLY VIRGIN. (9)
- EVERYTHING FOR THE DIARY. (56)
- . THANKS.. (1)
- . POSTCARDS. (3)
- . BLOG DESIGN. (61)
- . CONGRATULATIONS. (12)
- . HELPFUL INFORMATION. (42)
- . FRAMES. (2)
- . SCHEMES FOR A DIARY. (1)
- . FLASH DRIVES, GAMES. (13)
- ALL ABOUT BEAUTY AND HEALTH (2053)
- . TREATMENT WITH SODA. (5)
- . TREATMENT WITH SALOM. (4)
- . HEALING PROPERTIES OF BAKING SODA. (2)
- . LET'S QUIT SMOKING. (26)
- . WATER IS ENERGY POTENTIAL. (36)
- . DIETS AND PROPER NUTRITION. (19)
- . BREATHING PRACTICES. (2)
- . HEALTHY JOINTS. (295)
- . EYE HEALTH. (202)
- . HEALTH AND MEDICINE. (120)
- . HEALTHY LIFE / RUSSIAN BATH. (eleven)
- . Healthy lifestyle.. (24)
- . BEAUTIFUL HAIR. (2)
- . PHYSIOTHERAPY. (77)
- . TREATMENT WITH ONION PEELS. (2)
- . TREATMENT WITH BLUE IODINE. (3)
- . TREATMENT WITH SALT.. (20)
- . ETHNOSCIENCE. (612)
- . ALTERNATIVE MEDICINE. (274)
- . CLEANSING THE BODY. (165)
- . HELP YOURSELF. (544)
- . BEE PRODUCTS. (25)
- . SELF-HEALING.. (111)
- . WEATHERMAN'S ADVICE. (19)
- . SU-JOK THERAPY. (13)
- . TIBETAN MEDICINE. (10)
- . HERBAL TREATMENT. (115)
- . HAND CARE. (7)
- . HEALING. (37)
- . TEA MUSHROOM. (2)
- . CLEANING FROM NEGATIVITY. (101)
- COUNTRY LIFE (358)
- . COUNTRY IDEAS. (209)
- . FOR THE GARDEN, VEGETABLE GARDEN. (304)
- . FORGED PRODUCTS AND ELEMENTS. (2)
- . BEAUTIFUL PHOTOS OF NATURE. (9)
- . LANDSCAPE DESIGN. (4)
- . WORLD OF FLOWERS. (1)
- . LANDSCAPES. WINTER. BEAUTIFUL. (2)
- . NATURAL FARMING. (28)
- . GARDEN MAGIC. (6)
- . FLOWER TRICKS. (49)
- FOR THE SOUL AND MIND. (503)
- . I'M CAPRICORN. (51)
- . PHARMACY FOR THE SOUL. (27)
- . FEATURE FILM. (2)
- . I LOVE READING. (2)
- . AUDIOBOOKS. (7)
- . SPIRITUAL PRACTICES. (123)
- . SPIRITUAL PATH. (109)
- . INTERESTING. (47)
- . INTERESTING SITE. (19)
- . ART. IMAGES. (5)
- . HEALING MUSIC. (3)
- . LOUISE HAY. (7)
- . MARGARITA MURAKHOVSKAYA. (13)
- . MEDITATION. (86)
- . MIRZAKARIM NORBEKOV. (3)
- . WISE THOUGHTS. (37)
- . MUSIC. (68)
- . CARTOONS. (6)
- . MONUMENTS. ATTRACTIONS. (2)
- . PASSWORDS. (2)
- . PETS. (37)
- . POSITIVE. (4)
- . KNOW YOURSELF. (51)
- . POETRY. (127)
- . TRUTH. (4)
- . PSYCHOLOGY. (111)
- . S.N. LAZAREV. (1)
- . SLAVIC SECRETS. (33)
- . TECHNIQUES FOR WORKING WITH FEARS. (6)
- . QUOTES. PARABLES. (2)
- . ENERGY. (97)
- For yourself beloved (230)
- THE HOUSE AND WE ARE IN IT. (540)
- . GRANDMOTHER'S SIGNS.. (7)
- . ALL USEFUL USE. (297)
- . FOR HOME. FOR CREATIVITY. (260)
- . HOUSEHOLDING.. (17)
- . KITCHEN IDEAS. (17)
- . INTERESTING. (6)
- . MY INTERESTS. (83)
- . WISE LIFE ADVICE. (24)
- . ABOUT THE HOUSEHOLDERS. (12)
- . USEFUL TIPS. (186)
- . ENERGY AT HOME. (60)
- . IT IS MINE. (194)
- COOKING (1422)
- . PANCAKES, PANCAKES, PANCAKES. (21)
- . HEALTHY EATING. (17)
- . BEAN DISHES. (4)
- . DISHES FROM MEAT AND CHICKEN. (112)
- . SANDWICHES. (6)
- . QUICK RECIPES. (24)
- . JAMS, JAMS, COMPOTES. (56)
- . ALL ABOUT TEA. (4)
- . BAKERY. (325)
- . WE COOK IN POTS. (13)
- . WE COOK DELICIOUS. (120)
- . MUSHROOMS. (29)
- . DESSERT. (118)
- . PREPARATIONS FOR WINTER. (188)
- . SNACK. (35)
- . CASSEROLE. (4)
- . GREENERY. (5)
- . FROM POTATOES. (77)
- . FROM LAVASH. (34)
- . KAPORI TEA. (8)
- . KVASS. (10)
- . KULICHI. (3)
- . MEAT/SALING AND SMOKING LAD AND MEAT. (33)
- . WE BAKE BREAD. (32)
- . DRINK RECIPES. (41)
- . FISH. (74)
- . SALADS. (104)
- . SWEET PASTRY. (179)
- . SAUCES. (21)
- . DRYING COLLECTOR. (1)
- . COTTAGE CHEESE. (3)
- . DOUGH. (66)
- . CAKE WITHOUT BAKE. (33)
- . DECORATION OF DISHES. (5)
- . BREAD MAKER.. (2)
- . Cabbage soup, borscht, solyanka. (4)
- HONEY PARADISE. (96)
- . ALL ABOUT HONEY. (15)
- . ZABRUS. (3)
- . TREATMENT WITH HONEY. (31)
- . OINTMENTS. (4)
- . ROYAL JELLY. (3)
- . HONEY BAKING. (6)
- . HONEY COSMETICS. (8)
- . HONEY COOKING. (1)
- . HONEY. (4)
- . HONEY DESSERTS. (3)
- . HONEY DRINKS. (2)
- . HONEY MASSAGE. (3)
- . ABOUT BEES. (4)
- . PROPOLIS. (eleven)
- . BEE POLLEN.. (4)
- . BEE DAMAGE.. (6)
- HOLIDAYS (113)
- . BAPTISM.. (12)
- . EVERYTHING FOR A WEDDING. (5)
- . ANNOUNCEMENT. (3)
- . WHIT MONDAY. (2)
- . IVANA KUPALA. (2)
- . NEW YEAR/DECOR. (70)
- . EASTER. (14)
- . CHRISTMAS. (10)
- . OLD NEW YEAR. (7)
- . CLEAR THURSDAY. (8)
- HANDMADE CREATIVITY. (406)
- . ALL FROM PAPER AND CARDBOARD / PAPIER-MACHE. (49)
- . WE MAKE SNOWMAN. (7)
- . FLORISTICS. (2)
- . CUTTING WITH A JIGSAW. (23)
- . EMBROIDERY WITH Ribbons. (eleven)
- . KNITTING. (86)
- . WE ENGRAVE. (1)
- . DECOUPAGE. (23)
- . WE MAKE BOUQUETS FROM CANDY. (7)
- . WE DO IT WITH OUR OWN HANDS. (296)
- . FROM BEADS. (6)
- . FROM SALT DOUGH. (28)
- . WE USE STENCILS. (6)
- . KANZASHI. (21)
- . MOLDING. (82)
- . MASTER CLASSES. (107)
- . FOLK ARTS.. (4)
- . WEAVING FROM NEWSPAPERS. (241)
- . CRAFTS FROM WASTE. (48)
- . CRAFTS AND SOUVENIRS MADE FROM NATURAL MATERIAL. (19)
- . CRAFTS FROM BIRCH BARK. (18)
- . CRAFTS FROM DISCS. (6)
- . CRAFTS FROM PLASTIC BOTTLES. (71)
- . CRAFTS FROM TWINE. (37)
- . DRAWING. (eleven)
- . CANDLES WITH YOUR OWN HANDS. (27)
- . FLOWERS FROM CAPRON. (2)
- . SEWING. (57)
- CELEBRATION OF LOVE (357)
- . GRATITUDE. (53)
- . ANGELS THERAPY. (100)
- . BLESSINGS AND PROSPERITY. (150)
- . MAGIC AND LIFE. (63)
- . THE PATH..TO THE DREAM. (eleven)
- . OWN WIZARD. (162)
- . POWER OF LOVE. (110)
- . HAPPINNES EXISTS. (67)
- ESOTERICA (898)
- . ASTROLOGY. (52)
- . PALMISTRY. (10)
- . VEDA. (2)
- . DIVINATION. (70)
- . GALDRASTAV. RUNES. (101)
- . GLYPHS OF HARMONY AND PEACE. (5)
- . HOROSCOPE. (66)
- . CONSPIRACIES. (216)
- . ZODIAC. (6)
- . FULFILLMENT OF DESIRES. (233)
- . KABBALA. (2)
- . KARMA. (72)
- . QUANTUM TRANSITION. (62)
- . SPACE ENERGY. (7)
- . MOON MAGIC. (12)
- . LUNAR DAYS. (66)
- . MOON CALENDAR. HAIRCUTS. (5)
- . THE MAGIC OF MONEY. (108)
- . THE MAGIC OF SALT. (eleven)
- . MAGIC. (245)
- . MANTRAS. AFFIRMATIONS. (38)
- . TAPING METHOD. (1)
- . MUDRA. (60)
- . NUMEROLOGY. (105)
- . PROTECTIVE MAGIC. (163)
- . RITES FOR CHILDREN. (12)
- . RITES. (207)
- . SEARCH FOR YOURSELF. WISDOM FOR AGES. (1)
- . SIGNS. HOUSE. (45)
- . PROPHECIES. (18)
- . RUNES. CLEANSING. (36)
- . SECRETS OF THE WHITE WITCH. (4)
- . SIMORON. (53)
- . SOLAR CALENDAR.. (2)
- . DREAM INTELLIGENCE. (2)
- . THE SECRET OF YOUR BIRTHDAY. (34)
- . TALISMANS. PENTACLES. (20)
- . TIBETAN SINGING BOWLS. (5)
- . REALITY TRANSURFING. (3)
- . FENG SHUI. (6)
- . HOOPONOPONO. (eleven)
How to make a funny bee with your own hands from a kinder surprise: master class
From such a simple material as kinder packaging you can make funny and unusual bees that can be used as decoration. So, prepare all the necessary materials to create bees:
- Empty container from a kinder surprise;
- Black insulating tape;
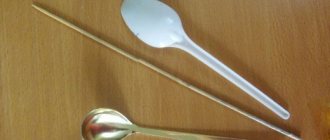
- Wooden toothpick with a sharp tip;
- Sheets of white paper;
- Reliable glue;
- Sharp scissors;
- Thin sharp knitting needle or awl;
- Thick thread or twine.
After preparing all the necessary tools and materials, start making bees. Take a thin knitting needle or an awl and use it to make two small holes in the egg container. They need to be made in the end sides of the kinder, and another hole should be made in the place where all the parts are fixed.
Thread a thick thread into the hole on the side, forming a small knot at the end. This thread will allow you to hang your bee in the air in the future. Insert a wooden toothpick into the holes located at the ends of the container so that the sharp end sticks out. This design will be your bee's sting.
Now take black insulating tape into strips two to three millimeters wide. For the body of the bee you will need three or four blanks. If you couldn't find tape, you can use white construction tape. Stick it on and paint it black. You need to cover the surface of the entire body of the bee with such black blanks, maintaining the same distance between them.
From white paper you need to cut out paired wings for your funny bee. They can be double or single - as your creative imagination tells you. Using glue, carefully and securely fix them on the back of the insect.
Now you need to start making the face of your bee. Cut out two circles with a diameter of four or five millimeters from white paper. Glue them to the end part of the structure on top of the sting. You need to cut out small circles from black insulating tape and stick them on white blanks. If you wish, you can simply draw the pupils of your bee using a black marker. If you wish, you can also make your bee's eyes from polymer clay or even mastic.
You need to cut out a triangular mouth from the same insulating tape and glue it underneath under the toothpick sting. Add a couple of white teeth and your DIY or crocheted bee is complete.
Polyurethane hive
The main advantages of this type of decorative hive are:
- variety of shapes and wide choice of colors;
- completely collapsible design;
- resistance to temperature changes;
- design features allow you to easily change the size of the decorative bee house if necessary;
- can be easily transported and moved to a new location;
- environmental friendliness of the source material;
- interchangeability of almost all parts;
- durability and resistance to damage and adverse external influences.
These ready-made bee hives are easy to assemble and disassemble. Self-respecting manufacturers include hive drawings and assembly diagrams with the finished product.
Maintenance of such decorative structures requires minimal maintenance and consists of periodically cleaning the internal surfaces. You can wash the hive with a warm soda solution. Subsequent disinfection is carried out only with drugs approved for use.
When choosing a polyurethane decorative hive, you need to ensure the quality of the source material and check for a certificate. This hive is a completely budget option and comes in a variety of shapes and sizes.
In addition to ready-made hive options, most gardeners have an excellent opportunity to make a hive with their own hands. Most often, improvised materials are used for homemade bee houses. For such a creative process, you can use completely different components or use special publications that contain a variety of drawings of hives.
Making an unusual and fluffy bee from pompoms
We offer you another option for making an original bee from balls in the form of pompoms with your own hands. For work you should prepare threads of two colors: black and yellow. Also, to make a bee, you should stock up on thick wire for weaving with beads, brown adhesive tape, PVA glue, thick cardboard, also scissors and two pieces of fabric measuring ten by five centimeters.
Make your insect's belly first. Form two rings from sheets of cardboard and wrap threads around them. When creating the bee's abdomen, use thread in both yellow and black shades. shape into an oval pompom. After finishing winding the threads, cut them with scissors and tie them with thread.
You need to form the head of your bee from black threads. On the head you can make antennae and eyes from felt or paper.
A bee has six legs. Cut two pieces of eleven centimeters, two pieces of ten centimeters and two pieces of twelve centimeters from thick copper wire. Wrap each piece of wire with black fluffy thread on one side only. Now stick all the legs in pairs into the chest of your bee.
Wings should be formed on the surface of your bee's chest. To do this, you can use pieces of fabric or make them using the kanzashi technique.
Also, use pieces of thick wire to make antennae and a stinger for your insect. Fix these structures on the surface of the head using PVA glue. That's it, now your unusual and funny bee is ready!
Hive options
Based on the main purposes, hives can be populated by bees or be an ordinary garden setting. It is possible to use both a ready-made decorative bee house and a home-made version.
Depending on the material used in construction and the history of beekeeping, two types of hives are known:
- based on natural materials (clay, straw, cork and others);
- based on synthetic materials (most often polyurethane hives).
Polyurethane hives appeared in Russia relatively recently, but a number of advantages have made them quite popular and well-known.