MAGAZINE Preschooler.RF
To work, we will need a glass jar with a tight-fitting lid, white sea salt, colored bath salts, a coffee grinder, a thin stick, a spoon, and a sheet of paper.Seascape
1. Salt of different colors must be ground in a coffee grinder and placed in boxes or bags. Coarse salt (as well as coarse sand) produces a worse picture in a glass container. The more shades of the source material you get, the more interesting your paintings will be.
2. Pour the base into the bottom of the jar - white salt or salt of the color you have the most. If part of the picture did not work out, you can carefully remove it from the jar with a spoon, and then restore the removed fragment by drawing it again. The removed salt will act as filler.
3. Next, pour a small pile of white salt (or “defective”) into the jar - the picture will be located near the glass, and in order not to waste colored salt, the middle of the jar is gradually filled with filler. This is done using a paper cone.
4. Picking up a small amount of colored salt, begin to “draw”: blue salt for the sea, shades of yellow for the sandy shore. Gradually add sand of different colors - this way you will have mountains, islands in the sea, and the sky. Don't forget to fill the middle of the jar with regular salt, pouring it in a heap.
5. Clouds in the sunset sky may not have clear outlines - this can be achieved using a thin wooden stick, carefully mixing layers of sand. Their boundaries will become blurred.
6. When the drawing is ready, it is necessary to “compact” the salt in the jar so that the drawing does not settle over time. To do this, use a thin skewer to pierce the salt in the middle of the jar many times - you will see that the pattern remains in place, but there is free space in the jar. Add base salts and repeat the operation several more times. The jar should be filled to the very brim, and the sand should lie tightly. Then screw the lid of the jar tightly - now you can safely turn it over.
Tip Colored sea salt, even very bright, becomes a pastel, muted color after grinding in a coffee grinder. To restore or change the color, it can be additionally painted. Add a very small amount of water to the dye and mix it with salt. Dry and mix well again. In this way you can get many shades of the same color - vary the amount of dye. Salt of different colors can also be mixed.
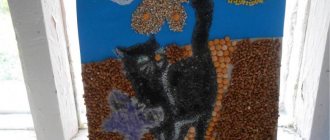
Camel in a jar
1. Pour a layer of salt into the jar, simulating sand - the base. Then, using a sheet of paper folded into a cone and secured with a piece of tape, pour the filler - white salt - into the jar. Fill the jar with layers of colored salt, creating a landscape for the future picture.
2. To draw the figure of a camel, you must first pour a stain of a suitable color. Then, using a thin sharp stick, draw the legs - push the salt along the glass wall. This is exactly how the aquiduct is drawn - green arches. The basic principle of drawing is that with the help of a stick you allow grains of salt to flow in the desired direction.
3. To form the neck and head of the camel, turn the stick over and use the blunt end to make way for a layer of yellow salt. Form humps with the sharp end of a stick. Complete the picture, compact the salt.
Source
| Next > |
DIY salt mounds
Each of the mounds is original and unique. These unusual crafts will surprise everyone with their amazing designs and ease of production.
For a mound of colored salt, you can choose any design - it can be abstract stripes that successfully combine colors if you are a beginner, or maybe a beautiful bouquet of flowers or an amazing landscape. In any case, such a craft will attract the attention of your guests.
How to make mounds of colored salt?
So, what do you need to make a pile of colored salt with your own hands? Let's prepare this:
- extra kitchen salt, its quantity depends on the size of the jar or bottle for filling;
- directly a jar with a lid or bottle;
- felt-tip pen or permanent marker for drawing a sketch on glass;
- gouache paints.
Here's what we'll take from the tools for making salt mounds with our own hands:
- wooden skewer, you can use a knitting needle;
- a small plastic spoon from a set of disposable tableware;
- small coffee spoon with a long handle.
Before moving on to the master class on making mounds, we’ll tell you how to properly paint salt for such crafts.
- So, let’s decide what colors of salt we need and in what quantities.
- Scatter the salt into separate plates - each plate will be painted a different color.
- Next, dilute the gouache with water, make it the same consistency as for painting, and pour a little paint into each plate.
- Mix the salt and paint thoroughly and evenly.
- Let the resulting mixture dry and get colored multi-colored salt.
Now we have everything we need ready, and we can finally get to work.
Dyed salt mounds - master class
- First of all, let's deal with the filling container. In our case, this is an ordinary cylindrical coffee jar with a screw-on lid. Wash it thoroughly, dry it, then use a felt-tip pen to draw a sketch. We will make a beautiful Russian landscape with a river, wooden houses and a church on a hill.
- Immediately pour green and white salt onto the bottom - this will form a hillock.
- Next, we take salt in shades of green and yellow and imitate forbs.
- On the left side we begin to make a river, combining blue salt with white.
- Pour regular white salt of a larger fraction into the center of the jar.
- We begin to make a brown raft on the water. For a board effect, combine two shades of brown.
- On the other side we create a beautiful grassy bank in yellow-green tones.
- We continue to make the river.
- Closer to the shore we begin to mix blue with green.
- Making a reflection of the future fence in the river.
- Next we will make a black line along the hill.
- And with the help of a stick or needle we turn it into a fence.
- We continue to add green coastlines.
- We got to the house.
- And finally, the most difficult and most interesting thing - we proceed to the domes of the church.
- At the same time we are making the roof of the second house.
- This is what our domes look like.
- We will make beautiful blue and soft pink clouds above the domes and trees.
- The landscape of a mound of colored salt is ready. All that remains is to finalize the craft itself.
- The following stages of work are necessary to ensure that the pattern of the salt mound with your own hands does not become distorted over time. Compact the salt with a pencil. Due to the fact that the salt in the center of the jar is large, you get a hole like this.
- Fill the hole with fine salt, and so on several times.
- Now screw on the lid and admire our work of art.
This mound can be an original handmade gift or a birthday present for grandma.