Retail sales today include both new and used vessels. The significant difference in price makes you seriously think about the advisability of purchasing a new cylinder. Regardless of the consumer’s choice, purchased cylinders must be accompanied by appropriate technical documentation confirming the serviceability of all components. Regardless of the life of the cylinder, before each new refueling it must undergo various checks and tests. For this reason, checking the accompanying documentation is an important step when purchasing a gas cylinder.
Features of a barbecue made on the basis of a gas cylinder: advantages and disadvantages
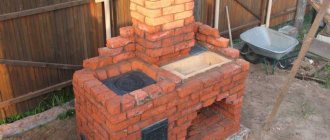
Today, barbecues made from gas cylinders are very popular and this is quite understandable. Such devices are quite large and spacious, so you can install a large number of skewers for a large company at once. Their legs are much higher than those of standard store products, and this allows a person to stand straight without bending while preparing kebabs. Also, if desired, you can create various interesting shapes from a cylinder using welding, fittings and metal to suit the exterior of your home.
Advantages of a barbecue from a cylinder:
- Ease of manufacture. Even a non-professional can easily make such a design in a few hours if you have detailed instructions and a visual image.
- Cheap design. If you have a used or unsuitable gas cylinder at your dacha, then the base of the barbecue will be free for you. The most you will have to spend money on is additional structural elements.
- Thanks to the thick walls of the cylinder, such a grill can withstand even the highest temperatures and high pressure, thereby significantly increasing its service life.
- If there is a hinged lid, the grill can be left outside without fear of precipitation. A lid is also necessary so that it can be used as a home smokehouse.
- Functionality. If necessary, the design can be improved using additional elements.
- Mobility. The grill can be moved from one place to another or transported by car.
- Ease of use. Since the bottom of such a grill does not burn out thanks to the thick walls, after preparing kebabs or other dishes, the coals do not need to be filled with water. You can just close the lid and that's it.
Disadvantages of the grill:
- The structure is too large and may not fit into the overall interior of the yard.
- This barbecue is quite heavy, so one person will not be able to move it without assistance.
- Only coal can be used as a raw material, since there is very little space for logs in it, or you will have to wait until the firewood is completely burned out, and then you can lay the skewers.
Types of feeders
All feeders can be divided into several types.
- Regular . They are used more often for young animals or a small number of animals. The design is a container, a trough. Often, improvised means such as an old plastic barrel, a used gas cylinder, or a car tire are used here.
- Bunkers. This type of feeder is suitable for dry concentrate feeding. Feed is poured into the vessel, which spills down into the feeder as the piglets eat the food.
- Automatic. This is a type of bunker feeder with automatic, electronic feed supply. Such technologies are expensive and are used for large numbers of animals.
Preparation for manufacturing: drawings and optimal dimensions
Before starting work on making a barbecue, it is necessary to completely release all the gas, which always remains in the cylinder even when it is completely “emptied”.
Since there may be condensation inside the cylinder, you must first open the valve and release the gas completely. This should only be done outdoors (on the street) away from potential sources of fire and other factors that could cause a spark and ignite residual gas. In order to make sure that the gas comes out, you can use a soap solution to saturate the outlet on the valve. If the soapy water bubbles strongly, it means gas is escaping.
After you see that the cylinder is empty, you need to turn it over and pour out all the condensate, and then fill it with water to the brim and leave it for two or three days to remove the smell of gas. To fill the water, a regular garden hose is connected to the cylinder, and water flows into it under high pressure. It will be safe to work with the workpiece from now on.
The first stage of the work is to create a drawing of the future barbecue, which will indicate all the dimensions, elements and design features.
Cylinder dimensions:
- Height - 98 cm.
- Diameter - 30 cm.
- Wall thickness - 0.3 cm.
- Weight - 22 kg.
- Since the diameter of the cylinder is 96 cm, it can be easily divided into 4 parts, starting the marking from the longitudinal seam to ensure uniformity.
Mark the balloon with chalk - You need to retreat 24 cm from the seam and mark two lines. Then place the container horizontally and make marks for placing the skewers.
- It is necessary to retreat approximately 3 cm from the transverse circular seams (lower and upper) and mark the cutting line.
Marking the gas cylinder for the lid - Then you need to mark 10 cm from the first and second lines so that you can then attach the legs exactly parallel to each other.
- Our first two marked lines from the longitudinal seam (24 cm each) will serve as the boundaries of the cover.
Cutting lines for the lid of the future barbecue - If metal rings are welded inside the cylinder, then it is necessary to make a cut so as not to damage them, since in the future they will serve as support for the lid.
Inner rings of the cylinder for fixing the cap
Markings and dimensions of the future barbecue in the drawing
Selecting a gas cylinder
In order for the grill to turn out good, you need to find a suitable cylinder. If at your dacha or in a country house there used to be a gas stove that was powered by such a cylinder, then you probably have a few left. You can look for a cylinder at scrap metal collection points, where they will sell it to you at the price of scrap, or rummage through the World Wide Web.
Usually a large cylinder with a volume of 50 liters is used. The main thing is that it is not rusty and does not have large holes in the body.
Tools required for work
Before starting work, you need to prepare all the necessary tools and additional elements so as not to be distracted at the most crucial moment by searching for, for example, a hammer, chisel or drill. To work we need a set of the following tools:
- Welding machine;
- Angle grinder (grinder);
- Protective glasses;
- Gloves;
- Metal door hinges (3 or 4 pieces);
- Rivets (one set) and rivet gun;
- Hammer;
- Screwdriver;
- Chisel;
- Adjustable wrench;
- Drill and metal drill bit with a diameter of 10–12 mm;
- Metal pipe for chimney;
- Pipes or long iron corners for the legs (you can use ready-made mechanisms from old foot sewing machines);
- Four squares for platforms under the legs - approximately 10x10 cm.
Recommended trough sizes for pigs
At birth, a piglet weighs about 1 kg, but with proper feeding, by six months it reaches a weight of 100-110 kg. An adult sow or boar can weigh up to 250-300 kg, having very large dimensions. For this reason, it is considered incorrect to use troughs or hopper feeders of the same size for feeding animals of different ages.
Due to the fact that the size of the head and snout of pigs of different ages differs significantly in size, it is best to make a trough with the length of the working part per individual:
- for suckling piglets - 15 cm;
- young animals weaned from the sow on supplementary feeding (1-3 months) - 15-20 cm;
- fattening piglets up to 6 months - 20-25 cm;
- piglets 7-10 months - 25-35 cm;
- pregnant sow - 35-40 cm;
- breeding boar - 40-50 cm.
The height of the front (working) side of the trough, which when feeding suckling piglets should not be higher than 10 cm, is also of great importance. Otherwise, small pigs simply will not be able to reach the food.
For adult pigs, it is also not recommended to make the working sides of the trough too high. The optimal height is considered to be 15-25 cm, thanks to which you can put the required amount of dry feed or liquid cereals into the container.
Step-by-step instructions for making it yourself
- Sawing. This is the most critical stage, since the appearance of the future barbecue and its performance characteristics depend on its quality. Using a grinder, you need to make cuts strictly along the intended lines. First, you should completely unscrew the valve with an adjustable wrench or cut it off with a grinder, pouring water on it to prevent accidental ignition of gas residues from a spark.
- Welding the lid and handles. The lid is best secured using hinges, which are first secured with rivets and then welded to the lid and base of the grill. If the hinges are not welded, then in the future, under the influence of high temperatures, they will simply bounce off and the lid will fall off. On the sides, to move the product, you can weld handles from reinforcement, pre-bent using a blowtorch or welding. If desired, ready-made metal handles can be purchased at the store and then simply bolted into specially drilled holes. It will be convenient for anyone.
- Welding the legs. We cut the pipes or corners into four pieces 50–70 cm long and weld them to the marked lines at the bottom of the cylinder at the same distance from each other so that they form a regular rectangle. We also recommend welding square metal plates to the ends of the legs, which will prevent the legs from sinking into soft ground under the own weight of the heavy grill. You can simply use two metal profiles, which are also welded at the bottom in parallel to two legs at once.
- Second version of legs. From a sheet of metal, you need to cut two strips 0.2 cm wide and 0.4 cm long. Then we bend these “ribbons” in the form of an arc along the diameter of the cylinder and weld the legs to their ends. At the bottom, we weld a transverse profile bar to each pair of legs to create rigidity and strength of the structure.
- We weld a corner between two posts (the length should not be longer than the cylinder).
- If you use a structure from a sewing machine as legs, then you can even install two wheels on it so that the barbecue can simply be rolled around the yard.
- In order to prevent the walls of the cylinder from deforming under the influence of high temperatures, it is necessary to weld two corners with walls 30x30 mm inside it along the entire length. This will also add additional rigidity and reliability to the structure.
- Since the combustion process requires a constant supply of oxygen, approximately ten or fifteen large holes with a diameter of up to 16 mm must be drilled in the rear of the product. They can be made in one row or arranged in a checkerboard pattern. At the same time, we use a grinder to make cuts for installing skewers.
- At the end of the cylinder, where the valve used to be, there remains a round hole into which we install the chimney pipe. You can use a regular drainpipe for this.
- At the bottom of the grill we place several cast iron grates of suitable size, which are usually used in stoves - potbelly stoves or boilers for air supply. This will help create an additional ventilation system during the burning of coals, and red-hot grates will help the process of cooking food even without adding coals.
How to make with a smokehouse
If you try hard and put in some effort, your barbecue can turn into a home smokehouse. The main condition for any smokehouse is complete tightness.
It is made in the same way as a barbecue, but only a firebox is added to it, which is made from an iron sheet or a small gas cylinder. To do this, part of the bottom of the grill is cut off and the firebox is welded to it.
The chimney is the main element of the smokehouse. You can make it yourself or buy a special pipe in the store.
You can begin the smoking process after you have completely heated the grill and firebox with wood, so that the smell of methane gas is completely eliminated and does not permeate the meat or fish during smoking.
How to make a grill-smokehouse from two gas cylinders: video
Coloring the resulting structure
Choosing the type of paint
To paint a barbecue from a cylinder, it is best to use heat-resistant paints, since the maximum temperature in it can reach more than 700 degrees. To do this, you must carefully read the instructions.
Paints should protect the metal from rust, as well as from temperature changes when water gets on its hot surface.
When heated, the paint should not release substances harmful to the human body and not enter into a chemical reaction with other substances.
Painting stages
- Before painting, the surface of the container should be cleaned of old paint using a drill and a special metal attachment or sandpaper.
- Then degrease the entire surface with alcohol, acetone or solvent.
- Before application, the paint must be mixed well until a uniform consistency is obtained and possible sediments and clots are removed. If the paint is too thick, you can thin it with a small amount of solvent.
- You can apply the paint with a brush or roller in several layers until you get a beautiful and smooth surface. Each layer should dry from half an hour to two hours, depending on the type of paint.
When painting a barbecue outdoors, the air temperature should not be below 20 degrees and above 40, since at sub-zero temperatures the paint will begin to freeze, and at too high temperatures it will dry instantly.
Acrylic heat-resistant paints are the most popular today and are produced in aerosol cans. Thanks to their unique composition, they are considered the safest, quick-drying, effective and durable. They also have anti-corrosion properties.
Black gas cylinder grill with stand
Brazier - a steam locomotive made from a gas cylinder on wheels
Brazier - a submarine made from a gas cylinder with decoration
Brazier - a bull made from a black gas cylinder
Brazier made from a cylinder with a chimney, painted with black heat-resistant paint
Three-in-one gas cylinder grill with legs on wheels
Separation of feed supply for animals of different ages
In a large farm, young animals and adults should be fed separately. Eating food together between pigs of all ages can have the following consequences:
- adults can trample piglets;
- bacteria and harmful insects from older pigs can cause diseases in young animals;
- the piglets will not receive the required amount of feed and will be stunted.
To ensure that the young animals eat well, a separate structure is made for them. Separation between animals occurs by adjusting the thresholds and sides: in this way, adults will not be able to reach the piglets’ feed, and young animals will not eat from a common high trough.
The best option would be a do-it-yourself pig feeder, the sides of which are at the chest level of small piglets. This will allow animals to eat without tilting their heads, which will have a good effect on the development of bone and muscle tissue.
The food tray should be angled so that food collects in one place. To achieve this effect, you need to make the rear pillars a few centimeters higher than the front ones. This design not only simplifies eating, but also facilitates the process of cleaning the container.
To make the feeder last longer, you can adjust the height of the threshold using hinges. To do this, grooves are made in the side walls of the feeder, and the front sheet of plywood should go down to the floor in front of the racks. To secure the adjustable side at the desired height, you can use self-tapping screws.
To prevent young animals from getting into the trough of older pigs, you need to install a ceiling made of boards. This will not be an obstacle for adults, and piglets will not be able to scatter food. To properly cover a pig feeder with boards, you should watch a video or photo from master classes.
The nuances of using the resulting product
- Even if the surface of the grill is covered with anti-corrosion paints, we do not recommend subjecting it to additional tests and leaving it outside in the open air. It is best to place it under a canopy in summer and spring, and put it away in a garage or in an outbuilding in autumn and winter.
- If, after you have done all the necessary measures to eliminate the smell from the cylinder, it still remains, then you just need to burn the inside of the grill several times and the smell will disappear forever.
- To avoid sparks flying out of the frypot and causing a fire, operate the product at a safe distance from flammable objects. Also, after finishing the cooking process, you should not pour out the ash, as it can smolder for about two more days and cause a fire.
- If necessary, the grill can be used as a barbecue if you install a regular metal grill from the refrigerator.
- The grill cover not only protects the inner surface of the product from precipitation, but is also the main part when turning the grill into a smokehouse.
The grill, which is made from a gas cylinder, can also serve as a smokehouse and barbecue. If meat is simply fried on an ordinary standard roaster, in this case it is also baked thanks to the special design of the product. Even when using a small amount of coals, the walls of the grill will warm up well and the meat will be completely cooked.
A cylinder grill will serve you for many years, provided it is used correctly and with proper care. This is an excellent multifunctional design that allows you not only to fry kebabs, but also to make excellent homemade smoked meats. And if you approach the production of such a product seriously and thoroughly, then in the future the grill will delight you and your family with “its own” kebabs and smoked delicacies.
Typically, spray paint cans are associated with graffiti. But in fact, you can use them, turning everyday items into a real exclusive that will delight the eye and surprise guests. This review provides examples of how you can transform your home using spray paint.
What containers are best to use in homemade foam generators?
When assembling a foam generator with your own hands, you can use almost any tanks that are available on your farm and are capable of operating at a pressure of 3-5 atmospheres. The choice of a specific option depends on what is your priority: the cheapness of a homemade device or its reliability.
If savings are more important, you can use iron and plastic cans, garden sprayers and similar containers. But it should be borne in mind that when working with such containers, you need to monitor the pressure in the foam generator. Exceeding this value slightly could cause the tank to explode, damaging your vehicle, or causing injury to you.
From a safety point of view, metal propane cylinders are the best option. Such structures are designed for dozens of atmospheres, so it is quite difficult to destroy them with conventional compressors used at home. Obviously, a foam generator with such a cylinder will be more expensive to produce, but this is fully compensated by its durability, safety and resistance to increased internal pressure.
Short-lived container made from a plastic barrel
Many pig farmers who don't want to spend the time and effort to build traditional wooden pig feeders use other materials, each of which has its own pros and cons.
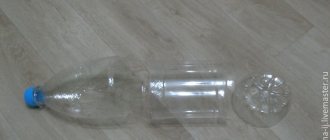
The easiest way is to make a trough from a plastic barrel of any size. To do this, a container that has not previously been used for storing poisons and chemically active substances is cut vertically into two parts by a grinder. The sharp edges of the cut are processed with sandpaper, and the farmer receives two feeders, perfect for fattening piglets.
If you cut the barrel into asymmetrical parts, then you may have at your disposal a shallow feeder for piglets and a voluminous trough, excellent for feeding adult sows or breeding boars.
The main disadvantage of such structures is their fragility, since playful and strong pigs will certainly begin to scratch their backs on the trough or chew plastic, rendering the feeder unusable.
Photo gallery
Design drawing for barrel feeding
Drawing of a bunker feeder
Bunker structure for feeding pigs in a store