It seems that no matter the number of lamps and fixtures in the room, the corners on the ceiling always remain dark. This fact never gave me peace of mind during renovations in one of the rooms. After a quick look at pictures online, I realized that my favorite was the designer corner lamp by Peter Bristol. It was made for Established & Sons and cost a whopping $900!
After searching a little more, I found attempts to make a similar lamp myself, but the information was incomplete, without any instructions. I decided to take matters into my own hands and make my own corner lamp.
This lamp consists of 3 main components: a triangular plywood frame, an inexpensive lamp with a cord, and a piece of clear acrylic (plexiglass). This lamp is easy to make, although it will require some skill. You will need a hand power tool, but if you have a table saw, this will make everything much easier.
Ready? Let's do it!
Stained glass lamp made of plexiglass
Amazingly beautiful things are created from acrylic glass.
One of our orders was a clear confirmation of this. Specialists made a hemispherical stained-glass plexiglass lamp with internal lighting. The design has the form of a flat hemispherical lens. Installation diameter – 1300 mm, height – 180 mm. The structure is made of matte black acrylic glass PLEXIGLAS 4 mm. To create the effect of a bright stained glass window, Oracal self-adhesive film of bright colors was used. Round and oval “drops” of various sizes and various colors are “scattered” across the surface of the acrylic lens. This technology made it possible to obtain an installation that has a visual resemblance to stained glass. The lens is placed on the wall, and LED lighting is mounted under the acrylic. Combined with soft interior lighting, the installation has a truly magical appearance. A stained glass window chandelier made of plexiglass looks expensive, stylish and presentable.
We used acrylic blowing technology to make the black hemispherical lens. The acrylic blank is placed and securely fixed on the table of a special device.
Under a powerful air flow directed upward from below, the heated acrylic sheet takes on a hemispherical shape. Gradually cooling, the hemisphere with a high-quality matte surface acquires its original strength. The result is a smooth, high-quality lens at the correct height.
The use of black acrylic is a very interesting, original design technique. Transparent acrylic glass is a timeless classic, but do not forget that this material is available in a wide variety of colors. The widest range of colors allows you to solve extraordinary problems, select options for any interior and combine acrylic products with any stylistic direction. Not only the colors vary, but also the surface texture - it can be matte, glossy, textured, satin. It is worth mentioning rainbow acrylic, the surface of which glows with a delightful fluorescent glow. Any type of self-adhesive film can be glued to the acrylic surface, thus forming complex patterns and designs, as well as creating a realistic imitation of stained glass.
Little tricks in making
- Favorite photos need to be printed on a printer using special paper. The paper should not be very thick, as it must transmit enough light.
- Cut out the resulting photographs and record them on transparent film.
- Attach a cut-out sheet of organic glass to the frame of the lamp, fix the film with the photo on it, then put more plexiglass on top.
- Fasten all the elements with screws, cut off the protruding edges of the film.
In addition to floor and table lamps, you can also make a ceiling chandelier with your own hands.
Additionally, you just need to provide special fastenings. Decorative thread is suitable for decoration, preferably linen. Choose the appropriate color to match the lamp or interior. It will look original in weaving.
Plexiglas for making lamps can be purchased at building materials stores. It is convenient to process at home. The material is easily cut with a circular saw. It is better to cut at medium speed to avoid melting due to overheating. You can drill it with ordinary drills. It is recommended to place plywood under the glass when drilling to prevent cracking.
If you don’t have the necessary tools at home, you can cut them in the store into the desired shape and size.
The light source is ready with your own hands. All that remains is to admire the results of the work. An original decorative product will not leave anyone indifferent.
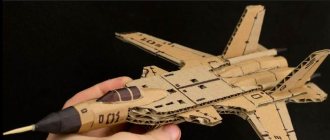
Crafts made from plexiglass are becoming more and more popular. This beautiful and pliable material is suitable for making figurines, photo frames and other interesting and beautiful things. In this material we will tell you how to make a price tag holder and a phone stand from plexiglass.
Glass ceiling mounting options
To veneer the planes with your own hands, you first need to cut the parts to the size that is most convenient to work with. Cutting is required when the owner prefers to take formatted pieces and determine the parameters of the fragments himself. Manufacturers offer already cut elements complete with hardware and other consumables.
Advice! If you need to make a layout in the form of a mosaic or stained glass window, then you will need to cut the glass parts around the perimeter. This work is done in workshops. There are ready-made forms on sale, but they are quite expensive.
Glass forms are attached to a frame or glue. Let's look at the options in more detail.
Technique for installing glass tiles with glue
Laying ceramic tiles on the ceiling with your own hands
The main requirement is careful leveling of the base surface. Since the adhesive base is not thick, the elements do not adhere to the surface even if there are small defects.
Advice! The glue does not adhere to the plaster, so the base needs to be washed away to concrete or the ceilings must be covered with sheets of gypsum plasterboard or plywood. Then glue the decor onto the finish or concrete. The step of additional fastening with self-tapping screws is 200-300 mm, so that heavy parts do not collapse.
What glue should I use? A composition with water-resistant properties is best suited, and to strengthen the fasteners, experts recommend additional fixation with dowels, the caps of which are then covered with caps.
Stages of finishing with glue - the algorithm of work is as follows:
- First you need to clean the base by removing all the plaster and eroding the finish down to the concrete.
- Dry the base, then saturate the concrete with primer, antiseptic and dry again. Impregnation can be applied in several layers, but you must first let the previous layer dry before applying the next one.
- Use putty to eliminate differences in height, chips, and seal cracks.
On a note! If the ceilings are thoroughly damaged, then it is easier to fill several bars with a cross-section of up to 40 mm and cover the surface with plywood.
- The adhesive composition is chosen to be epoxy based, silicone rubber, but you can use liquid nails.
Important! It is unacceptable to use glue for glass aquariums and other products; these are compounds with low adhesion and cannot withstand the weight of glass ceiling fragments.
- Using a notched trowel, apply glue to the surface, attach a piece of mirror or glass, press and release. The adhesive layer should not be more than 5 mm, if mirror panels are installed on the ceiling in a bathroom or other room with high levels of humidity or temperature changes, seal the seams with silicone sealant after the glue has dried. It is better not to use acrylic sealant; it turns yellow over time.
Technique for installing mirror panels on a frame
The option with lathing is much simpler and faster, and also makes it possible to hide lighting wires and utility lines along with insulating materials under the frame. The Armstrong frame, fitting kits, facet methods and ordinary wooden sheathing are used. All types of installation are easy to do with your own hands, so it’s worth considering them in more detail.
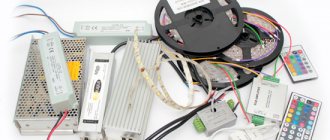
On a note! If you are installing a luminous ceiling in a plexiglass bathroom, then instead of spotlights you can use LED strip - this is a safer, cheaper and simpler option.