At home, in fact, you can create anything you want using only available materials that are available in every apartment. These include matchbox houses, simple panels using fabric and herbarium, crafts made from plasticine or clay, appliqués that can be made from absolutely anything. If a child is seriously and for a long time immersed in creativity, make sure that he always has everything he needs. The choice of sets for children's creativity is so wide and varied that you will not have any problems purchasing them.
You should not immediately start complex long-term work.
To start, use simple materials for quick crafts. For example: in any house there are multi-colored gloves, hide the ring finger on all the gloves by sewing up the hole. Fill all the free space with rice or any other bulk cereal and tie it with thread. The head of an imaginary man can be a ping pong ball or a table tennis ball. To attach it, place the ball in the cuff and sew it up. Hair can be threads of different thicknesses and different colors. Eyes can be colored beads, buttons, and beads. And the lips are rag rags of red or pink color. This craft is extremely easy to make, so by creating several people of different colors and sizes, you will have a whole family.
Master class on creating a bunny
Once upon a time there were gloves, knitted, gray with stripes. They lived for a long time, and for more than a year they were bored in a box with nothing to do. And they had a friend - a pink glove. Her sister got lost while out for a walk and since then the glove has been left without work.
And then Inspiration came and the old gloves got a new life - they turned into toy bunnies!
And here are the instructions for homemade glove toys:
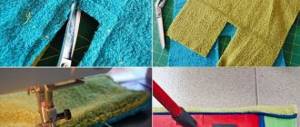
1. We prepare the gloves as in the photo - already at this stage you can see how two bunnies are made from one glove, and the paws for them from the other.
2. Here is our “sketch” of the future bunny.
3. We sew up the sides and make the “filling”. You can fill the bunnies with padding polyester, or with dry aromatic herbs, but I made mine from finely chopped shreds left over from previous handicrafts.
4. The nose and eyes can be made from beads or buttons; in my hares they are simply embroidered with regular threads. The pink bunny has an embroidered flower - this is a native decoration of the glove.
5. If you sew the bottom above the cuff and add volume to the bunny’s butt, he will sit. If the cuff is rolled up, the bunny will be standing up - then the bottom should be carefully hemmed with a round patchwork or twisted into a tight roll from the leftovers and simply tucked in.
Handmade toys have a special warmth. And homemade toys from gloves, socks or other household items give them a second life, and for a child it looks like a real miracle when one thing turns into another!
If you create such hares in the spring, when the family accumulates a dozen worn or unpaired gloves, you can stage a real performance or game of Grandfather Mazai and the hares!
A few more examples of crafts made from gloves
Despite the diversity of companies producing children's products, the doll industry has recently become noticeably impoverished - for some reason the toys in all stores are the same. Their quality also leaves much to be desired.
Here the thought involuntarily appears that the best toy for a child will be the one that you make for him yourself from scrap materials. For example, old gloves.
Do-it-yourself toys made from gloves is a completely new type of needlework, which stands alongside crafts made from socks, nylon tights and other things. Their beauty is that now you don’t need to throw away your old favorite thing - you can turn it into something useful for you and your child.
To make, for example, a funny little hare from a glove, you will need the following materials:
- A pair of bright children's gloves;
- Threads;
- Filler;
- Comfortable needle;
- Scissors;
- Doll eyes and other toy decoration items.
For the product, it is better to choose fluffy gloves made of mohair or other fleecy material. Then the toy will be soft, and uneven seams will be hidden by pile.
- Place the gloves in front of you, fingers down, pinkies facing out.
- Cut out the middle and ring fingers on both gloves, along with a piece of adjacent fabric to form a protruding wedge - you won't need these parts.
- Cut the remaining parts of the glove in half so that you are left with one piece with the thumb, index finger and part of the fabric up to the wrist, and the other with the little finger and part of the fabric up to the wrist.
- Cut off the excess fabric and sew the bases of the little fingers to each other - this is the head with the ears.
- Now sew together the parts with the thumb and forefinger - these are parts of the hare’s body with the neck, arms and legs.
- Stuff the body tightly with filler, also stuff the ears and sew the parts to each other.
Now your bunny is ready! Add doll eyes or button eyes to it, decorate its ears or neck with an elegant bow made of ribbon, attach antennae made of wire - give free rein to your imagination to make your glove toy look better than any store-bought one!
Using a creative approach to the method outlined above, you can make not only a hare, but also other funny animals from gloves.
What are we doing
First of all, we need to create the basis for our DIY kids craft. Take a thick rubber glove
- you can buy these at any hardware store - and squeeze it tightly at the very bottom.
Without weakening the compression, we raise our fist higher on the glove - this way we drive air into its upper part. We intercept
the area under the palm with an elastic band.
We tuck
cuff so that it forms a small container, which we will fill with toilet paper.
We've got a stand! Decorate
the top of the stand with thinly cut green paper strips. Our chicken went out for a walk on the grassy lawn.
The main task is completed
, now it's a matter of finishing. We cut out the crest and beak (you will need red material) and glue a pair of voluminous eyes to the hen (if you don’t have them on hand, use a win-win combination of white and black circles).
Chickens
A do-it-yourself glove toy, created step by step according to the described instructions, will evoke many positive emotions in kids. With a little work, you can make a small nest containing five tender, soft chicks.
Tools and materials
- yellow knitted glove - 1 pc.
- filler - optional
- thin green ribbon - 1 pc.
- yellow thread - 1 pc.
- needle - 1 pc.
- scissors - 1 pc.
- yellow felt (for the nest) - 1 pc.
- black beads or beads - 10 pcs.
- red or bright orange felt (for the beak) - 1 pc.
- PVA glue - 1 pc.
Step-by-step making of chickens from a glove
- First, fill each finger of a yellow knitted glove with filler.
- Using a thin green ribbon, we tie each finger, forming the head of the chickens.
- We wrap the elastic band of the glove up and sew it to the base of the product. The result is that the chicks are in the nest. We fill the free space of the glove with filler.
- From yellow felt, cut out a circle whose diameter corresponds to the diameter at the base of the glove, and then sew it to the glove.
- We sew two beads or seed beads to each finger, which will serve as the chickens' eyes.
- Draw 10 small triangles on red or bright orange felt, then cut them out.
- We glue 2 triangles at the wide base, the result should be 5 beaks, which we glue to the place intended for them.
Some ideas for finishing touches
When making crafts for Easter
to kindergarten with your own hands (see photo below), you can use the following recommendations:
- You can paint colorful dots on the corydalis or stick a collection of buttons on it.
- feather
-shaped paper pieces or decorate your craft with real feathers in radical shades. - Paper rings
never go out of style. We just put them on all four fingers. - napkins
folded in half will be a wonderful accessory in their simplicity.
Did you work hard? Don't forget to look again at the handicraft section of our website - we always have
Despite the diversity of companies producing children's products, the doll industry has recently become noticeably impoverished - for some reason the toys in all stores are the same. Their quality also leaves much to be desired.
Here the thought involuntarily appears that the best toy for a child will be the one that you make for him yourself from scrap materials. For example, old gloves.
(simple options).
Here in the photo below we see an excellent New Year's decoration of the most ordinary gift packages made of gray wrapping paper.
For the first idea you will need:
- a round shape made of white cardboard, a piece of red cardboard,
- red pompom (or regular cotton wool + PVA glue + red gouache)
- a piece of white foam packaging interlayer (which is often placed in boots in the store, or in boxes with equipment). Or (if you don’t have such material) you can take white cardboard and cover it with cotton pads.)
On a white round cardboard with eye shadow or blush
Draw spots on the cheeks and black beady eyes with a marker. In a bowl, stir red gouache and PVA glue (a couple of drops of paint per teaspoon of glue); dip a piece of cotton wool into this mixture. We form a ball from this sticky red cotton wool with our hands and dry it on a radiator (it will dry overnight).
Cut out a triangle-cap from red cardboard. We glue it to the edge of the white round piece (Santa Claus's forehead) - it is better to glue it dry, that is, use a glue stick or double-sided tape, since wet PVA glue will wet the cardboard and make it bend.
On top of the connecting line (between the hat and the head) we lay a “fur edging”, as I already said, it is better to cut it out of foam packaging material. Or cover the cardboard with cotton pads and cut out the edging of Santa Claus’s hat from such “cotton-shaggy paper”
Here are two more ideas
craft pendants in the form of Santa Claus - already from just cardboard... and cardboard with paper cupcake tins.
Here are the large bags with large size Santa Claus.
You can even make a package yourself from a sheet of gift paper. The template here is very simple. You can make such a drawing yourself with a pencil, cut it out, bend it along the fold lines and you’re done. A beautiful box - glue the face and beard of Santa Claus to it and you're done.
With your own hands, you can make PACKAGING POCKETS for gifts decorated with Santa Claus applique on top from cardboard (or from soft felt, or formiam as in the photo below).
Here is a diagram of such a pocket made of colored paper or cardboard. We bend along the lines, glue the sides and the container for sweets and chocolates is ready.
All that remains is to glue on top the head of Santa Claus with a beard and a hat. Simple and fast, no complexity. You will love making these quick pocket crafts with your own hands with Santa Claus, a snowman, angels and other New Year's characters.
Here is a pocket package made of soft felt or fleece, which is suitable for gifting a smartphone or jewelry. It will be a pleasure to receive such a gift, decorated with manual labor and the imagination of the giver.
Santa Claus WITH CANDY (easy to do with your own hands).
Here's another new craft for this year. Santa Claus hides a candy in a bright wrapper in his tummy. A simple children's craft that you will quickly understand and can do with your own hands in one sitting.
As you can see (in the photo below) there is nothing complicated or tricky here. It’s just that the tummy and back of Santa Claus are a FULL DETAIL - in shape it looks like a FIG.
which has a hole only in the upper turn of the number.
This “figure eight” is bent in half - and we get a tummy with a hole in the center in the front and a closed back at the back. At the top we fix our halves with a drop of glue, or a stapler or tape. And all that remains is for our Santa Claus to glue on the head with a beard and the legs-stand.
Santa Claus do it yourself
Craft using the spider web technique.
There is an article on our website where I show in great detail how to make these balls with your own hands from glue threads and a small balloon. In this article “Balls of thread and a sea of crafts using the spider web technique,” I posted a master class. Therefore, I will not explain in detail here, so as not to waste unnecessary words. Follow the link, everything is explained there.
Just look at the photo below and fall in love with these cute New Year characters made from yarn balls. Simple and fast. In one evening we make balls, in the second evening we cover them with pieces of colored paper - and the craft is ready and worthy of going to a New Year's exhibition at school or kindergarten.
You don’t have to cover the balls with paper parts, but just put a cap like this on the top ball - where a face with a mustache and beard is already glued to the cone-hat.
In general, such cardboard caps (from the photo above) can be put on ordinary white inflatable balloons. And you’ll get a quick craft for the New Year in the form of Santa Claus. Such quick crafts are convenient. (By the way, the link contains a lot of quick ideas for crafts for decorating a New Year’s office).
DIY Santa Claus.
Balloon craft
using papier-mâché technique.
You can make such a pot-bellied, big-nosed, sweet and charming Santa Claus from the cheapest materials. PVA glue + white paper napkins + balloon + gouache for coloring.
What is the secret of the SIMPLICITY of this Santa Claus craft.
The papier-mâché technique is very simple. If you mix a paper napkin with PVA glue and mold something out of this mixture and dry it, we will get a dense, almost wooden, hard craft.
This principle of creating a durable material from fragile paper and liquid glue became the basis of the Papier-mâché technique.
Instead of white paper napkins, you can use regular NEWSPAPER. But then you will need to paint it on top with white paint (acrylic or gouache) before drawing Santa Claus on it.
What do we do.
Step 1
Let's buy a balloon with an elongated tail (that is, pear-shaped). Let's inflate it so that it retains its slightly elongated pear-shaped shape. Turn the ball upside down and insert it inside the vase (to make it easier to work with). You can even tape it a little to this vase so that it doesn’t jump out of it.
Step 2
Tear the white napkins into shreds (or leave them whole, whichever is more convenient for you). We coat part of the ball with PVA glue and place a white napkin on this puddle. On top of the napkin, again apply PVA glue with a wide brush and again place the napkin on this wet place. Thus, we glue the entire ball in several layers - generously pouring glue and generously laying down layers of napkin. Let it all dry (overnight).
Note
– you can cover the ball with newspaper, dry it and paint it white. Or start the first layers from newspaper. And the last upper layers should be made from a white napkin, then there will be no need to paint it white.
Step 3.
We crumple the napkins into large lumps - these will be tozhki. We also pour glue over it, and we also cover it with napkins, forming a wet crust of papier mache. We also leave it to dry.
Step 4.
We take the ball out of the vase-pot on which it stood. We turn it with its tail up (we will cover this empty space that was in the vase with Santa Claus’s hat, it will not be visible. Using a marker on the dry round paper surface of the ball, we draw the silhouette borders of all the elements of Santa Claus - a face with a nose, a beard, a fur coat. We decorate this with gouache round decoration. Don't forget to glue the legs
Note. For papier mache you need a lot of PVA glue. If you buy it in the stationery department (where the glue is in small tube jars), you will overpay 5 times the cost
.
It is better and cheaper to buy PVA glue in liter buckets
in the construction departments of the store. For one liter of glue you will pay about 2 dollars. And such a bucket will be enough for you for a whole bunch of crafts. Any PVA glue labeled “universal” or “construction” will suit you. In composition, it is no different from ordinary school stationery PVA glue. The manufacturer can be any company. With this bucket you will not only make Santa Claus from papier-mâché, but also a snowman and a penguin (also based on a balloon). Details in other articles on this site.
By the way, based on the BALLOON, you can make a variety of crafts with Santa Claus. You can decorate a ball covered with newspaper with strips of colored fringe. We buy rolls of crepe colored paper from the stationery store. cut it into strips, cut them into fringe, paste the BALL IN A CIRCLE with fringed stripes. It turns out another version of the Santa Claus craft with your own hands - mischievous and shaggy.
Or you can decorate a balloon covered with newspaper with a FLEECE WRAP - the soft material will make a very cozy and warm craft.
Making our own Santa Claus
from stones and natural materials.
Ordinary stones - small or large river cobblestones can become the basis on which a New Year's fairy tale will grow.
You can simply find oval stable stones (or make them stable using play dough). Cover the stones with white gouache (spray with hairspray to fix the color and prevent it from staining your hands). Then draw all the lines of the future Santa Claus on a white background. Decorate each drawn sector with gouache. And then once again draw clear black boundaries between the elements of the drawing - make outlines with a black marker. Markers work great on rocks. It is best to use a marker for signing CDs - it does not wash off and does not stain your hands.
You can depict any New Year's theme on suitable flat stones. An article-lesson on creating beautiful New Year's drawings is already on our website “Family Heap”.
And from several stones (also painted with gouache) you can put together a whole plot applique on a single background cut out of plywood.
We buy a small sheet of plywood at a hardware store (or find a suitable one in a pile of trash near the entrance). We cut a round piece out of it. We tint with ink the color of snow and the color of sky. And against this background we lay out Santa Claus, his sack, his reindeer, his sleigh... whatever.
Please note that the stones perform only one part of the element - the rest are painted, laid out from twigs, ropes and other natural materials.
It is not necessary to choose smooth round stones. The most uneven curved stones can work to your advantage. Lay them out, try them on next to each other and try to see the outlines of your future craft in this arrangement. Who knows what masterpiece your little “rock garden” will give birth to on a piece of paper.
You can also use shells as a natural material for crafts in the form of Santa Claus. It will turn out interesting and beautiful.
You can come up with your own New Year's pictures from magic pebbles. Do not forget to spray the craft with hairspray - this will make it brighter and will not stain your hands with gouache or smudge. You can also sculpt some details of such a panel craft from plasticine (it can also be coated with hairspray)... or sculpt it from papier mache (paper napkin mixed with PVA glue, see point above in this article).
Craft Santa Claus
Made from plasticine.
You can also make a beautiful Santa Claus from ordinary plasticine (or polymer clay). The main thing is to work slowly and remember to wash your hands when moving from one color of plasticine to another. There we will get pure colors of the parts and the whole craft will look neat.
After making the craft, you need to dry it in a cool place and spray it with hairspray. This is necessary so that it stops being sticky and does not collect room dust. You can cover the craft with acrylic matte varnish with a soft brush. Acrylic varnish for crafts is sold at office supply or craft stores.
Such varnished, non-sticky plasticine figures are also good because they can be used inside small Snow capsules.
Where the foam snowball will fall. You can make capsules for plasticine Santa Claus with your own hands - from transparent plastic bottles. Cutting off the top and bottom of them and joining them together. Sprinkle nail glitter, sequins or foam balls inside, or cut the fluff from pillows with scissors - the fluff will slowly settle, creating the illusion of snowfall.
You can make flat crafts from plasticine
. Roll out colored plasticine with a rolling pin on the table. A wooden rolling pin is not suitable - it leaves rough marks on the plasticine. A round glass bottle or a can of any deodorant can be used as a smooth rolling pin.
Place a stencil image (details of Santa Claus, or his clothes) on the rolled out layer of plasticine. We trace with a sharp object. Remove the stencil and cut with scissors along the scratched lines. We get planar parts from which you can put together a plasticine graphic applique. Or make something like this to decorate your kitchen in New Year’s style (as in the photo below).
You can get ideas for plasticine crafts in the form of Santa Claus from New Year's cakes decorated with mastic characters. Santa Claus is often sculpted from sweet confectionery mastic from different angles. Look through New Year's cakes on Google and you will find many ideas for plasticine New Year's heroes.
You can find even more New Year's plasticine ideas for children's crafts in the classroom and at home in a special article on our website
DIY Santa Claus
FROM CONES.
Pine and fir cones can also be painted with gouache (like the stones from the paragraph above). And when painted, the pine cone immediately becomes an interesting basis for a New Year’s craft in the form of Santa Claus
. We insert beads and buttons, a fluffy dusting brush painted with white gouache becomes a fluffy beard. Cut out a hat from a piece of felt.
Also in the company of Santa Claus
With your own hands (also from pine cones) you can make a deer (with antlers made of fluffy wire), a snowman, a penguin in a felt scarf, and a green Christmas tree pine cone, decorated with beads and flowers cut from lace.
Other bright crafts and toys made from pine and fir cones are collected in a large article with photographs
Volumetric Santa Claus
From modular origami.
If you know how to fold an Origami module. It doesn’t cost you anything to create such a pot-bellied Santa Claus. YouTube is full of videos that will teach you how to fold a triangular paper origami module in 2 minutes. For 2 pm
you will make yourself a bunch of modules (the family will help),
and on the third evening
you will create Santa Claus. Assembly takes place without glue. Each module fits into each other - like a groove into a groove.
Green Christmas tree
also made from modular origami. And you can make a snowman and a deer, if you think with your head...
DIY Santa Claus
FROM PAPER CONES.
We all know how to make paper cones - like bags for seeds. We need a semicircle - which we roll into a bag and glue the side seam of the bag with glue (or not with glue, but with a stapler).
Or you can provide paper latches on the bag - slits and ears that fit into each other. On the template below we see that on the left we have an incision (short dotted line), and on the right there is a protruding eye (along the edge of the hem of the fur coat). We cut out such a template (diagram below), paint it and connect it into a bag - inserting the eyelet into the cut (or you can simply fix everything with glue without any ears).
Santa Claus is easy and quick to make based on a regular cone. Below I give large diagrams for large figures. The actual size of the diagram corresponds to A3 format - it’s like two landscape pages. You won't be able to print it on a printer - you need to go to the printing center. But the craft will be large and nice in size.
Here is another large template for making Santa Claus out of paper - it is also in A3 format - print in the center of the printout.
But this template is smaller - if you want, you can also enlarge it to a large size. Each craft is beautiful - you must agree. You can just imagine how Grandfather Frost stands proudly on the windowsill and pleases the eye. Great craft - elegant and simple.
Children's craft Santa Claus
From toilet paper rolls.
Cardboard rolls are great for children's crafts. In the photo below we see how you can play up the image of Santa Claus based on this “toilet roll” form.
The elements can be made from paper, felt, cotton wool, formiam, fabric or knitted socks.
Santa Claus and dishes
(pots, cups, plates).
And in this section of the article I want to show how to make an original craft from non-standard materials with your own hands.
You can make Santa Claus from flower pots.
We will make a beard for this grandfather from gypsum plaster.
You can buy gypsum plaster
(it’s cheap in small packages of half a kilo).
We dilute the gypsum mixture with water to a thick porridge. And quickly, before it thickens and dries, we sculpt a beard for Santa Claus. Pots can also be coated with plaster porridge, in those places where we depict fluffy fur or snow. If you sprinkle glitter
(nail polish) on top, it will make the snowy areas sparkle in the sun.
Or here are New Year's crafts from disposable colored cups
. Here the cups are placed in a circle on the floor (glue the round dance together using hot glue from a gun). Then, on a round dance, we make a second tier-floor, then a third - they themselves will be rounded into a spherical shape (because the cups at the bottom are narrower than at the edge). We make one ball for the belly and one ball for the head of Santa Claus. We make mittens, a belt, eyes, a mustache, and a hat from paper and fabric.
And we begin to make a green Christmas tree from cups according to the principle of a round dance. But we put a paper cone inside it. And we also attach the cups along the upper floors to the walls of this paper cone.
From the remaining red cups and toilet paper rolls you can make cute Frosties with a cotton wool beard.
And disposable flat plates can become a source of such children's crafts. Place beige paper on the bottom of the plate (this will be the background of the face). Without a beige or pink background (just on a pale plate) it will not be beautiful.
Craft Santa Claus
Made from felt and formiam.
Now a new ornamental material has appeared on sale - formiam. This brainchild of modern technology is very suitable for making voluminous, plump crafts that are well attached to each other using hot glue. In the photo below you see a Santa Claus craft made from formim (a porous thick material).
But crafts made from felt will still be more durable. And warmer to the touch. More dear, closer.
You can make Santa Claus appliques from felt on a round piece of paper - you will get a toy pendant for the Christmas tree.
Please note how in the photo below the fastening of the applique parts is done - with sparse stitches, parts are tacked here and there (the beard and mustache are held on by 4-5 stitches).
If you make a HOOP from cardboard, wrap it in fabric and decorate the front with a figure of Santa Claus, then we will get a headdress for the New Year. It can be worn for children's holiday dinners, or worn directly over a hat on the street - delighting passers-by with its New Year's look.
In addition to hard felt, you can use SOFT FLEECE. This is the material from which sweatshirts and bikers are made. It is suitable for sewing soft toys in the form of Santa Claus or plump pillows (as in the photo below).
But Santa Claus, where FELT (wool for felting) is present, is in the left photo below. And also a figurine of Santa Claus made from a ball of red thread and a piece of white centipon and a felt cap. The face can be made from a tennis ball, tinted beige.
It's in your hands
Do-it-yourself toys made from gloves is a completely new type of needlework, which stands alongside crafts made from socks, nylon tights and other things. Their beauty is that now you don’t need to throw away your old favorite thing - you can turn it into something useful for you and your child.
To make, for example, a funny little hare from a glove, you will need the following materials:
- A pair of bright children's gloves;
- Threads;
- Filler;
- Comfortable needle;
- Scissors;
- Doll eyes and other toy decoration items.
- Place the gloves in front of you, fingers down, pinkies facing out.
- Cut out the middle and ring fingers on both gloves, along with a piece of adjacent fabric to form a protruding wedge - you won't need these parts.
- Cut the remaining parts of the glove in half so that you are left with one piece with the thumb, index finger and part of the fabric up to the wrist, and the other with the little finger and part of the fabric up to the wrist.
- Cut off the excess fabric and sew the bases of the little fingers to each other - this is the head with the ears.
- Now sew together the parts with the thumb and forefinger - these are parts of the hare’s body with the neck, arms and legs.
- Stuff the body tightly with filler, also stuff the ears and sew the parts to each other.
For the product, it is better to choose fluffy gloves made of mohair or other fleecy material. Then the toy will be soft, and uneven seams will be hidden by pile.
Now your bunny is ready! Add doll eyes or button eyes to it, decorate its ears or neck with an elegant bow made of ribbon, attach antennae made of wire - give free rein to your imagination to make your glove toy look better than any store-bought one!
Kitty
A glove toy made according to these recommendations will be an excellent gift for family and friends for the New Year holidays. The kitten turns out to be very warm, soft and affectionate, so it will certainly cheer up the lucky person who will become the owner of such a unique creation. It is interesting and useful to make such toys together with children - they will be happy to participate in the process of creating such an affectionate and kind gift.
Tools and materials
- knitted glove with a pattern - 1 pc.
- stationery eraser - 1 pc.
- eye blank - 2 pcs.
- antennae preparation - 1 pc.
- double-sided tape - 1 pc.