In our lesson we will talk about what methods exist to make panels, compositions, bonsai and bead paintings. The thing is that to make such crafts with your own hands, there are a large number of different techniques in which the bead material remains unchanged. Crafts can be small or large, bright or in muted colors, and each one can be happily hung on the wall or given to relatives. First, let's talk about bead paintings. The appearance of a painting with beads depends on the technique in which it is made, as well as on its color and the pattern that you took as a basis. There are several of the most common methods by which panels, paintings and bead compositions are made. We will conduct this lesson for beginners to describe each of these techniques. Let's start with the simplest and most accessible one, which makes it possible to make paintings with glue.
Bead paintings: how to embroider correctly
Working with beads has a number of features.
In order for the result of your work to please you, you need not only to do everything in accordance with the instructions, but also to adhere to a number of additional recommendations:
- It is better for beginning craftsmen to use small circuits. The first work should not exceed 15x15 cm in size.
- It is easier to work with schemes whose color scheme is as contrasting as possible.
- Embroidering a landscape or still life is ideal for beginners, since minor mistakes are allowed when performing such work.
- The fabric should not only be dense, but also comfortable to work with.
- It is necessary to use not ordinary, but special threads and needles designed for working with beads.
- Beads play an important role in the quality of work. You need to approach his choice as seriously as possible.
- The thread must be treated with beeswax. Thanks to this, it will become stronger and glide better.
To prevent the finished product from being skewed, the thread must be tensioned equally at all stages of work.
Technique for laying icons with beads on an adhesive base, or inlaying with beads and other materials
Lord Bless!
Don’t be upset that you didn’t take the icon right away, but I thought that it would be better to start with this, the principle is the same, and you can already get your hands on something, and then make salaries. For work we will need: -a wooden egg blank with a stand; - primer for acrylic paint; — the paint itself; - varnish; — an icon (if you are making an icon), a drawing (in your head); - beads (No. 10-No. 16), the smaller the better; - glue; - gimp; - rhinestones (I use Swarovski crystals); — manicure scissors with thin blades (for cuticles); - wire cutters; - stationery knife; - thin wooden kebab sticks; - syringe; - awl; - thick fabric, like beads; It seems that I have listed everything, and now I will clearly show you the material and tools: this glue, as you can see for yourself, was purchased at Sokol metro station
and this glue, like the next one. I purchased the photo at the “Everything for Dance” store at Proletarskaya metro station, st. Melnikova 7, tel. (495)675 0829; (495)674 1670, there you can buy Swarovski rhinestones at a reasonable price, both adhesive and sew-on and thermal, I used to buy from them, and now from a wholesaler (but they don’t sell retail), and in Est Art you can buy by the piece .
Hood paint salon, st. Fadeeva 6, I don’t know the metro
And here is the gimp, it comes in different types, both soft and hard (truncal), so far I have only used the soft one. The choice is very large in the store at the Church of St. Nicholas.
Having prayed and called upon the Holy Spirit (Heavenly King, Comforter...), and trying to say the Jesus Prayer (Lord, Jesus Christ, Son of God, have mercy on me, a sinner), let us begin. .. Take an egg, preferably it should be smooth, if not quite smooth, sand it with micro-sandpaper, take an awl and stick the egg on it from the blunt end
then take a brush and primer and cover it with a thin layer, dry again, the second layer can be applied thicker, and then immediately “smooth” it with a brush moistened with plain clean water, but so that there are no smudges. Then, after drying, take the desired color (in this case, I recommend taking blue or white gold), I had one egg ready, albeit green.
It is small, 10 cm in height and 15 cm in diameter. You also cover it with several layers of varnish, but for now you can use glossy aerosol varnish, and in the future I will tell you how to cover it with furniture varnish, I will try it myself first, using a new technology. Everything has already dried, and you can start laying out, but... First, prepare a syringe, you need to remove the tip of the needle with pliers, but only to the beginning of the hole, otherwise the whole hole will get wrinkled, but it doesn’t matter, with the same pliers this hole can be expanded a little , if you press lightly on the flattened ends.
Then slightly bend the end of the needle, this will make it easier to work.
Then slightly bend the end of the needle, this will make it easier to work.
Well, that’s right, and then we take the piston out of the syringe and pour glue into it if the glue is in the tube, if not, then we take it from the jar as usual, I suggest you use two types of glue in this work, both from the tube (gel) and white, similar to PVA from bottles. To lay out the back wall, take white glue. On the egg, mark the middle with a simple pencil,
Next, use a syringe to apply glue in the form of a track directly along the line from the awl, make the tracks small so that the glue does not dry before you lay out the beads
Before you take the beads, wet the stick with saliva (sorry, but this is a necessity, it is better not to use water), and the bead itself will stick to it
I forgot to say that first we will lay out exactly this rim around the egg (the marked middle, and with a color transition, I used three tones, maybe three dark beads, three lighter, three very light, and in reverse order, perhaps this is the only time when In my work I resort to a pattern: in this case, we place the bead hole to hole.
When planting a bead, we align the row at the same time, pressing the beads against each other
We place the syringe on a cloth, before applying again we wipe the tip on it, before this do not touch the tip of the needle, let there be a drop of glue on it, and at the end of the work, you generally need to leave a drop, so the needle can be used again, the glue will not dry in it ( but again, not in a month if you use glue in a syringe), then you just remove the drop and continue working.
working...
Yes, one more nuance, the wand is always (almost always) located to the right of the work, look carefully at the photo
switched to the other side, and I’m holding the egg like this
Well, the row is completed, and this is what happened.
Now we cover this row with gold beads, but we place the beads edge-to-edge to each other (and this is the basic law in all my products, although there are exceptions)
We press the beads against each other and against the already laid out row with a spatula.
And then we begin to lay out the back wall. I used 4 tones, but you can use more for a smooth transition (somehow I managed to use up to 8-9 tones). I would like to draw your attention to the fact that when you divide an egg in half with a line, decide initially on the front side and the view from the back, because there may be some defects that can be covered with beads, and also, it is better to apply light paint under such walls , and use transparent beads. We continue to work, starting from the darkest color to the lightest, about three rows of each shade, leaving more space for the latter, also edgewise to each other, pressing and leveling, selecting beads of the same size, if not quite evenly, don’t worry. Make sure that the beads do not protrude upward, as if being squeezed out; the surface should also be smooth.
When filling the circle, try to keep the window uniform; you can even it out with beads if one side of the window is not entirely symmetrical. This is necessary in order to eventually complete the work in the middle. It happens that there is not enough space left at the junction of the beads and the bead does not fit in; “substandard” beads, with a beveled edge, are very helpful, with this edge (narrow), and we plug the “gap”. There shouldn't be any holes, it's a monolith.
We are approaching the end of the wall. We practically squeeze the last beads in tightly.
That's it, the wall is “finished”. Next we work with the gimp. To do this, I take transparent gel glue, it dries faster. I also apply it end-to-end with the beaded row and, pressing it with a stick, lay it along the row. In small segments.
at the end we cut it off with scissors (with a short movement so that the gimmick does not get wrinkled), and lay the joint into the joint.
And when it dries, we take a pencil in our hands and draw whatever our heart desires, maybe an Easter cake with Easter eggs and eggs, and a bell, and much more. We just make a sketch and turn on our imagination, because... I can't help you with diagrams here. And in icons, according to the design, we place the folds and tones of the clothes, it is simpler in this sense. And then we lay out the design with beads, in this case I did not adhere to the principle of laying out hole to hole, and edge to edge.
and at the end I settled the birds with a special felt-tip pen that writes on leather, glass, and does not wash off, or you can use paints, but then you need to fix it with varnish lightly. That’s the end and Glory to God!, Write to anyone who is unclear, I’ll try to help. Be brave, with God's help.
PS For those who are especially impatient, I’ll tell you about icons. In order to stick an icon, you need to cut it out and cut it in several places (with prayer) in a circle, without touching the face and handles.. The glue is applied white, on the image. the surface of the icon, and smoothes out from the middle to the ends.
then glue the gimp
on the trail. photo the gimp on the omophorion in the sleeve area has come off because... It has been standing for a long time, not secured with beads, and it was touched.
To make such a wall, you must first decide on the middle, in this case there is an overlap at the top, then lay a rim of three rows along the edges with silver, then on the back wall draw such islands as you wish, and then lay them all with a gimp, attach the gimp end-to-end And after drying, fill with beads in a circle, from the edges to the middle, side by side, and not hole by hole. You can alternate colors as you wish.
Next, my dears, if you have laid the gimp around the icon, fill the pattern with beads, laying it out in the direction of the folds and according to the shades. Do not overdo it with glue, the work should be neat, the glue should not protrude in any places.
God help you.
If your work turns out well, I would like you to link to the author of this master class, because... it is completely original.
If you have any questions, write or call. With regards, Natasha.
Simple Bead Painting for Beginners
Using a simple diagram, even a child can create his first painting. Handicraft will be fun and completely uncomplicated. It is enough just to carry out the work strictly in accordance with the plan.
Using a simple diagram, even a child can create his first painting.
Embroider step by step:
- Start working from the upper left corner.
- Secure the thread to the fabric by making several small stitches.
- Lay a horizontal row to the right side, securing each bead with diagonal stitches.
- Work the next row in the opposite direction.
- To make rounded elements, use an arched seam.
Frame the finished painting. The beautiful beaded mosaic is ready.
If you wish, you can start with the simplest thing: practice embroidering flowers
Partial beadwork
The advantage and simplicity of partial embroidery is that to complete it you need to do only part of the work yourself . The canvas already has certain details, and the needlewoman only needs to complement them with the help of small beads.
What is necessary:
- beads of all shades indicated in the diagram;
- canvas with a diagram and drawing;
- needle;
- threads;
- scissors.
The advantage and simplicity of partial embroidery is that to complete it you need to do only part of the work yourself
Progress:
- Thread the thread into a special needle designed for working with beads.
- Start working from a corner, and it doesn’t matter at all which one.
- Sew each detail clearly at the same angle, making stitches from the lower left corner of the cell to the upper right.
- After finishing the embroidery, secure the thread by making a knot.
- Cut the remaining end of the thread immediately.
Choose a frame that fits best and place the finished work in it.
LiveInternetLiveInternet
It is impossible to be indifferent to beads. When you see products made from these tiny beads, you either take your breath away with admiration, or you think about wasted time. Indeed, working with beads requires enormous patience and attention; wicker jewelry and bead-embroidered paintings are not created in an hour, and people with an explosive temperament are better off not getting close to beads. But in the skillful hands of a master who puts not only painstaking work into his creation, but also a piece of his soul, beadwork turns into masterpieces.
For example, in our time of heyday of “handmade”, the attention of fashionistas is very often attracted by jewelry made of beads - massive necklaces, openwork bracelets, earrings sparkling with glass beads look very stylish and expensive, and most importantly, original. Beaded paintings are also very popular. The embroidery itself is very beautiful, but if the picture is also made of iridescent beads, then it takes on a completely different look. All these works attract many with their beauty, but at the same time, few people take up working with beads because of the aforementioned high labor intensity. Although there are ways to work with beads that allow you to create, for example, an unusual gift in a relatively short time. We will talk about paintings made of beads, but not embroidered, but glued. I bring to your attention a technique for creating these simple-to-make, but such unusual paintings.
1. First you need to decide on the design. You should choose simple motifs with smooth, preferably closed, contours. Drawings for stained glass and mosaics or images of silhouettes are great for these purposes. For example, like this:
2. It is advisable to print the selected picture at a scale of 1:1 on a color printer and glue it to the base of the future picture. Usually, I use ready-made frames of various formats with thick plastic or cardboard bases. We disassemble the finished frame, put the glass aside (we won’t need it), mark the contours of the slats on the base and put the frame itself aside. Let me explain why glass is not useful and why outline the contours - even the smallest beads, when glued, form a rather thick layer, so the glass simply will not fit into the frame, as well as the edges glued with beads.
3. Now we need to outline the contours of our drawing by gluing threads or wires along the design; this technique will give us the necessary graphics and clarity of the picture, and will also simplify the task of gluing beads. At first I used wire 0.5-1 mm thick for these purposes, but it is not easy to work with, and finding flexible wire that matches the color is even more difficult. Therefore, it is better to lay out the contours with threads of suitable thickness or thin laces; they follow the contours of the picture well and are easy to stick.
4. Now we come to the main issue - the choice of glue. Both the outline and the beads themselves are glued to the base with transparent thick glue. PVA is not suitable for these purposes - beads do not stick well to it; superglue hardens instantly and will not give you any room for error; moreover, the beads become dull upon contact with it; but the polyurethane “Moment Crystal” is quite suitable. It is absolutely transparent and will not add any tint to the painting; it hardens long enough to have time to correct something, and at the same time, drying does not take days. Its only drawback is the strong smell, so it is better to work in a well-ventilated area, taking breaks during work, so as not to get a headache.
5. After the outline is laid out and has already dried, you can start gluing the beads. Cover a small area inside the outline with a layer of glue and begin laying beads of the desired shade. The layer of glue should not be thin, otherwise it will dry out quickly, but a thick layer is not suitable either - its excess will be visible on top of the beads. So, gradually filling small areas and placing beads tightly, we create a picture. I adjust the beads with my fingers; if delicate work is required, I use toothpicks. If during the work there are gaps between the beads, do not worry - a colored pattern under the beads, glued to the base, will hide the imperfections.
After finishing the work, wait for the glue to dry completely and install the painting vertically. This may cause some beads to fall off, but the gaps can be refilled with glue and the missing beads can be reattached. Then we fix our picture in the frame and admire the work done.
Link to website: https://podelki-shop.ru/biseropletenie/kartiny_iz_bisera
Series of messages "Paintings. Panels.":
Part 1 - Master class on making the "Iris" panel Part 2 - Flying away butterfly. Decorating the walls... Part 31 - Patchwork panel with flowers. Patterns and assembly diagram Part 32 - Pictures made of wood Part 33 - Pictures made of beads. Master class Part 34 - Small patchwork summer panel. Patterns Part 35 - Fabric paintings Part 36 - PANEL. CUP OF COFFEE + MK ON A HOLLOW CUP. Part 37 - Sunflowers - knitted panel Part 38 - Ancient book in a frame. Master Class. COOL!!!
How to make a picture from glass beads with your own hands
Using glass beads, you can create amazing paintings . For example, using a simple template you will be able to independently depict a bouquet of lilies on glass. The technique is unusual, but not complicated either.
What is necessary:
- Photo frame;
- glue;
- black yarn;
- scissors;
- black, green and red glass beads;
- toothpick.
Using glass beads you can create amazing paintings
Progress:
- Place the template under the glass and carefully trace its outline with glue.
- Place pieces of yarn on top of the glue.
- Using yarn, draw the outline of the entire pattern, correcting any unevenness with a toothpick.
- Wait until the workpiece dries a little.
- Fill the leaves with green glass beads.
- After this, decorate the flowers themselves with red and black details.
Bead painting on glue
The ease of doing this kind of work is amazing . After all, needlework that uses beads seems incredibly difficult for many. Due to the fact that all elements are fixed not with thread, but with glue, all actions are reduced to the bare minimum.
What is necessary:
- frame;
- wire;
- toothpick;
- glue;
- beads.
Progress:
- Select a suitable design and print it exactly in the size in which the work will be done.
- Remove the glass from the frame and attach the printed drawing to the cardboard base of the frame.
- Wait a little until the base dries.
- Mark the boundaries of the painting by gluing wire to the prepared base.
- Wait until the contours dry and only then start working with beads.
- Apply glue to each part in thin layers.
- Glue and adjust each element if necessary using a toothpick.
After completing the work, put the drawing under the press and wait until it dries completely.
Use of beads and benefits
The painstaking nature of such work can be compared to putting together a diamond mosaic. The process is great for children and adults. The design world widely uses beads in its products. Nowadays, beads are used to decorate the landscape, customize the interior design of the car, and beads are often used in clothing.
The creative process will be useful for schoolchildren and can instill artistic taste. After getting acquainted with the paintings made of beads on glue by experienced craftsmen, you can be inflamed with the desire to create your own unique work. To create a high-quality picture from beads, it is recommended to buy a Czech set.
Creating an image helps:
- Improves fantasy in children and adults;
- Raises the general condition and mood of the creator;
- Teaches children patience.
To create an image from glue, you do not need a needle or other sharp objects, which means it is safe for kids of any age.
How to embroider a beret with beads
Embroidery on clothes is a separate type of needlework. Not only threads are used, but also beads. It is thanks to these small elements that you can transform and make any headdress perfect.
A rose embroidered with beads will look amazing on a beret. The main lines on it should be carefully embroidered with black beads, and the center of the petals and leaves should be made of gold details. Thus, the composition will turn out not only beautiful, but also voluminous, and accordingly will acquire a special charm.
A rose embroidered with beads will look amazing on a beret
To draw an original twig with beads, ideal as a decoration for headdresses, you will need parts of different shapes and sizes, as well as bugles. Due to the fact that the drawing diagram is presented in black and white, the color scheme of this composition can be absolutely any. Here everything depends only on the imagination of the needlewoman; you can also download a ready-made picture. Depending on the color of the beret on which the embroidery will appear, either gold and black beads, or red, pink, and green beads can be used.
It all depends only on the imagination of the needlewoman
Butterfly embroidery is perfect for a child's beret. With the help of beads, beads and sequins, it can be painted in the most unexpected colors. A headdress in this design will look elegant and festive, and, accordingly, will give its owner exclusively positive emotions. Not a single young fashionista will refuse such a delicacy.
Butterfly embroidery is perfect for a child's beret
Separately, it is worth noting that even just placing small beads on the beret in a chaotic order, it will look much more impressive and expensive. Despite the fact that this embroidery option is the simplest, its use helps to make any thing perfect. Moreover, this technique can be used not only on berets, but also on any clothing.
Large paintings are made on a special machine. Smaller works are performed by needlewomen without all kinds of additional devices. In any case, each work deserves special attention, as it turns out incredibly beautiful. There is no shame in presenting such a craft as a gift, since a hand-made painting, portraits or children's pictures has a noble and expensive appearance. For some craftswomen, making such masterpieces becomes not only a hobby, but also an opportunity to make good money. Beading is a great hobby for craftswomen.
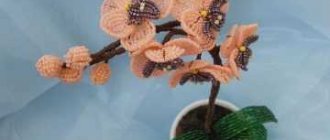
We weave a flower panel from beads on the wall with our own hands
We bring to your attention a detailed master class on making a decorative flower panel for the kitchen or another room with your own hands. Before starting the process of weaving panels for beginning needlewomen, prepare all the necessary materials and tools. You will need:
- cut beads of green and white colors - five grams of each;
- five grams of pink beads;
- thin wire for weaving;
- thick wire for attaching to the frame;
- green floral tape;
- wire cutters;
- strong thread for fastening;
- boxes for storing small beads;
- the frame of the composition itself (it is best to use a dark wooden frame).
First, you need to make all the individual components of your entire composition: pink flower buds and leaves. All these components take quite a long time to produce and require painstaking work, patience and perseverance.
In order for the pink bud to look natural, each flower petal must be woven separately. You need to collect nine pink beads on a thin wire sixty centimeters long and twist it into a drop. To secure, wrap the wire twice around the axle.
Then you need to collect eighteen more beads and repeat everything. You may need a little more or less beads, as the beads may be uneven. Therefore, before each fastening of the wire, it is worth looking through the row of beads. There will be five such rows in each petal, and sixty of them will be needed.
Once all the flower petals are formed, you can begin assembling the roses and buds. Their number in each flower can be completely different. The result should be three fairly large roses and two flower buds. Each petal should be slightly bent outward. The elements must be fastened together using a thin strong thread.
You can start weaving leaves for a beaded floral panel on the wall. They are made from green cut beads using the French technique. Take a piece of wire sixty centimeters long and string seven green beads onto it. Wrap the tip around its axis and secure. Make four turns of beads around this base.
In total, you need to make twenty-four such sheets, and then connect them into branches of three. It is also necessary to make sepals for the buds. They include four leaves held together to form a clover.
It remains to form two branches of gypsophila from white beads. Take a random piece of thin wire. Pick up four beads, fold them in half and twist them around their axis. After such manipulations you should have a loop. Next, also collecting four beads, make a twig.
Now proceed to the final assembly of the composition onto the frame. Attach a thick wire in a diagonal direction to the wooden frame. The entire beaded structure will be attached to this wire.
Using a thick, strong thread, connect the sepals and flower buds together. Then, in a chaotic order, begin to wrap branches of leaves, gypsophila and flowers.
In those places where the wire is visible, decorate it with tape or simply paint it with paints. You can also add additional decorative elements with butterflies. This feature will add naturalness and liveliness to your beaded composition.
As a result of such painstaking work, you will get an interesting bead panel. The roses can be made in other colors, and the gypsophila can be replaced with mimosa branches, made from yellow and green beads. And the number of sheets, buds and other elements of the panel can be varied.